
Are you tired of staring at that unsightly dealership sticker on your car’s window? Maybe you’ve just purchased a new vehicle and can’t wait to take it for a spin, but feel embarrassed by the branding plastered on every surface. Whatever the case may be, there’s no denying that dealership stickers can be a major annoyance. But fear not, removing them can be a breeze with the right tools and approach.
In this comprehensive guide, we’ll walk you through the steps required to remove dealership stickers from your car like a pro. We’ll cover everything from the tools you’ll need to the correct techniques to ensure you don’t damage your car’s paint or glass. But first, why do dealerships even put stickers on cars? Well, it’s a way for them to advertise their services and let the world know where you purchased your vehicle.
However, as the owner of the car, you have the right to remove these stickers if you so choose. After all, it’s your car, and you should be free to customize it to your liking. So whether you’re looking to remove a single sticker or an entire collection, this guide has got you covered.
By the time you’re finished reading, you’ll be equipped with all the knowledge and tools necessary to remove those pesky dealership stickers and make your car truly your own. Ready to get started? Let’s dive in!
Table of Contents
Introduction
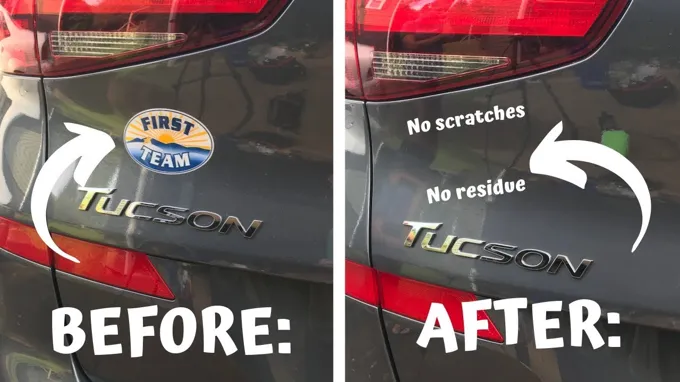
We all have been in the situation where we purchase a new car and notice the unsightly dealership sticker on the back. Fortunately, removing the sticker is a straightforward process that requires minimal tools. Firstly, you will need a hairdryer or heat gun to apply heat to the sticker.
This process will cause the adhesive to soften, making it easier to remove. Once the sticker has been heated, use a plastic scraper to gently lift the corner of the sticker. Using slow, steady pressure, work your way across the sticker, peeling it off bit by bit.
If any residue remains, use a mixture of warm, soapy water and a microfiber cloth to gently rub the area until it disappears. Be sure to not use any harsh chemicals as it may damage the car’s paint. With these simple steps, you can have your car looking pristine in no time, without a dealership sticker in sight.
Why Remove Dealership Stickers?
Removing dealership stickers from a newly purchased vehicle is a decision that many car owners make. These stickers, often featuring the dealership’s logo and contact information, can be seen as an eyesore and detract from the vehicle’s aesthetics. However, there are other reasons why removing dealership stickers might be a good idea.
For one, they can be a security risk, as they give away information about the car’s make and model, which could be useful to thieves. Additionally, they can be seen as a form of free advertising for the dealership, which could potentially drive down the car’s resale value. Ultimately, it’s up to each individual car owner to decide whether or not they want to keep the dealership stickers on their vehicle.
Types of Dealership Stickers
Dealership stickers can come in a variety of shapes, sizes, and designs. These stickers serve as not only a marketing tool for the dealership, but also as a way for customers to express their loyalty to a particular brand or model. One of the most common types of dealership stickers is the brand logo sticker.
These stickers prominently feature the logo of the brand being sold at the dealership, and they can be placed on cars, windows, or any other visible surface. Another popular option is a model-specific sticker. These stickers display the name or image of a particular model that the dealership specializes in or is trying to promote.
Additionally, some dealerships offer commemorative stickers for special events or limited-edition vehicles. These stickers can serve as a way to mark a significant moment in the dealership’s history or to celebrate a new release. Overall, dealership stickers are a versatile and effective way to promote a brand or model, build customer loyalty, and commemorate special occasions.
Tools and Materials
If you’re looking to get a dealership sticker off your car, you’ll need a few tools and materials. First, you’ll need a heat gun or a hairdryer to help loosen the adhesive on the sticker. Use the heat gun or hairdryer to warm up the sticker, and then peel it off with a plastic scraper or an old credit card.
Be careful not to scratch the paint or leave any residue behind. Once the sticker is off, you can use a solution of warm water and dish soap or rubbing alcohol to remove any leftover adhesive. A microfiber towel and some elbow grease should do the trick! If you don’t have a heat gun or hairdryer, you can also try using a plastic bag and ice cubes to cool down the sticker and make it easier to peel off.
With a little patience and the right tools, you can get that dealership sticker off your car in no time!
Heat Gun/Hair Dryer
When it comes to DIY projects and home repairs, having the right tools and materials is essential. One tool that can come in handy for both is a heat gun or hair dryer. These tools can be used for a variety of tasks, from removing old paint or wallpaper to thawing frozen pipes or shrink-wrapping items.
While they may look similar, there are some differences between the two. A heat gun is more powerful and can reach higher temperatures, making it better suited for tougher tasks. A hair dryer, on the other hand, is less powerful and better for more delicate jobs.
Both can be used for drying and styling hair, but a hair dryer is specifically designed for this purpose and usually comes with attachments for different hair types and styles. Overall, having a heat gun or hair dryer in your toolkit can be helpful for a range of DIY and home repair projects.
Plastic Razor Blade/Scraper
When it comes to removing stubborn adhesive residue or cleaning delicate surfaces, a plastic razor blade/scraper can be a game-changer. Unlike traditional metal scrapers, plastic scrapers are gentle on surfaces and won’t cause harm or scratches. They are also much safer to handle, reducing the risk of accidents or injuries.
What’s great about plastic scrapers is that they are versatile and can be used for a variety of tasks, from removing decals on cars to scraping ice off windshields. To achieve the best results, it’s crucial to choose the right tool for the job and be mindful of the pressure and angle used during scraping. Using a plastic scraper is an easy and affordable way to tackle tough cleaning and scraping tasks without causing damage or leaving residue behind.
So, why not add this handy tool to your toolkit and make your cleaning tasks a breeze?
Rubbing Alcohol
Rubbing alcohol is a versatile household item that can be incredibly useful in a variety of ways. Whether you need to disinfect a wound, clean a surface, or even remove stubborn residue, rubbing alcohol can be a go-to for many. To effectively utilize rubbing alcohol, it’s important to have the right tools and materials on hand.
Some common items you may need include cotton balls or swabs, a spray bottle, or even a small funnel for transferring the rubbing alcohol into smaller containers. Additionally, it’s essential to choose the right strength of rubbing alcohol, as some solutions may be too strong for certain uses. When used properly, rubbing alcohol can be an asset to any home or workspace.
Goo Gone/Goof Off
When it comes to removing sticky or stubborn substances, Goo Gone and Goof Off are popular choices for many DIYers and professionals alike. These solvents can effectively remove adhesives, grease, tar, and other gunk from various surfaces, including metal, wood, plastic, and fabric. Goo Gone is a citrus-based cleaner that uses natural oils to break down and dissolve sticky residues without harming the surface underneath.
It’s ideal for cleaning up kitchen messes, removing labels, and getting rid of gum, wax, and crayon marks. Goof Off, on the other hand, contains stronger chemicals that can tackle tougher stains and buildups, such as paint, varnish, rust, and graffiti. However, it’s also more harsh and flammable, so you need to follow proper safety precautions when using it.
Both Goo Gone and Goof Off come in different formulations, such as sprays, gels, wipes, and aerosols, so you can choose the one that suits your needs the best. Remember to test a small, inconspicuous area first before applying the solvent to the entire surface, and always read the label instructions carefully. With the right tools and materials, you can make your cleaning and repair jobs easier and quicker.
Microfiber Cloth
When it comes to cleaning, a microfiber cloth is an essential tool to have. This versatile cloth is made of tiny fibers that are woven together, creating a soft and durable fabric that can tackle a variety of surfaces. It’s perfect for wiping down and dusting surfaces around the home, as it’s gentle enough not to scratch delicate materials but effective enough to pick up dirt and grime.
One of the great things about microfiber cloths is that they don’t require any additional cleaning products, just a bit of water in most cases. So not only are they effective at cleaning, but they’re also eco-friendly and budget-friendly. Investing in a few high-quality microfiber cloths can make cleaning a breeze and leave your surfaces spotless!
Removal Process
Are you tired of looking at that old dealership sticker on your car? Removal can be a tricky process, but don’t worry – it’s not impossible. One easy solution is to use a simple household item – a razor blade. Carefully scrape the edges of the sticker using the razor blade until you can get a good grip on it.
Then, use a combination of your fingernails and a plastic scraper to peel off the sticker. If the sticker leaves any residue behind, you can use rubbing alcohol or adhesive remover to clean it off. Another option is a heat gun or hair dryer.
Heat up the sticker for a few minutes until the adhesive loosens, then use the same method as before. Just be careful not to overheat the area or damage the paint. With a little bit of patience and elbow grease, you can get that unwanted dealership sticker off your car in no time.
Step One: Heat the Sticker
When it comes to removing pesky stickers, it can be a challenge to get them off without damaging the surface underneath. But with the right technique, it’s possible to remove them without leaving any residue or marks. The first step in the process is to heat up the sticker.
This can be done using a hairdryer or heat gun on low setting, gently warming the sticker until it starts to loosen from the surface. Once it’s warm, use a plastic scraper or credit card to carefully lift the sticker from one corner, pulling it away with slow, steady pressure. Be sure to keep the heat on the sticker as you work, reheating as needed to keep it pliable and prevent tearing.
With some patience and a bit of heat, you’ll be able to remove that stubborn sticker in no time!
Step Two: Peel the Sticker Off
Now that you’ve heated up the sticker on your laptop, phone, or other device, it’s time to peel it off. But hold on, don’t just yank it off like a band-aid. It’s important to approach this process with care so that you don’t damage your device or leave any residue behind.
When peeling off the sticker, start from one corner and carefully lift it up, taking your time. If you feel any resistance, apply a little more heat to the area to loosen the adhesive. Once the sticker is fully lifted, take a clean cloth and wipe away any residue that may be left on the surface.
If there is still some sticky residue left over, you can use a gentle adhesive remover to get rid of it. And voila, you’ve successfully removed your sticker! Remember to dispose of it properly and protect your device from any potential harm in the future.
Step Three: Remove Residue with Alcohol or Goo Gone
The next step in the removal process is to get rid of any residue that might be left behind after removing the bulk of the sticker or label. Residual glue or adhesive can be a real pain to remove, but there are a few tricks that can help make the process a lot easier. One option is to use rubbing alcohol, which is an effective solvent that can dissolve the adhesive and allow it to be wiped away with a cloth or paper towel.
For more stubborn residue or particularly strong adhesives, a product like Goo Gone can work wonders. This adhesive remover is specially designed to break down sticky substances, making them easier to clean up. Simply apply the Goo Gone to a cloth or sponge and rub it onto the residue until it starts to dissolve.
Then, wipe it away with a clean cloth or paper towel. With these techniques, you’ll be able to remove everything from stubborn labels to old bumper stickers without leaving a trace behind.
Precautions and Tips
If you’re looking to remove a dealership sticker from your car, there are a few precautions and tips to keep in mind that can make the process easier and less damaging to your car’s paint. Firstly, be cautious when using any type of adhesive remover, as some solvents can cause damage to your car’s paint if left on for too long. Additionally, always test any adhesive remover on a small, inconspicuous area of your car first to ensure that it doesn’t cause any damage.
To remove the sticker, use a razor blade or plastic scraper to gently peel up the edge of the sticker, being careful not to scratch the paint. Once you have a small section of the sticker lifted, use a hairdryer on high heat to soften the adhesive, and continue to slowly peel the sticker off, using the razor or scraper to help lift any stubborn spots. Finally, use a mild soap and water solution to clean off any leftover adhesive residue.
By following these tips, you can successfully remove a dealership sticker without damaging your car’s paint.
Avoid Scratches and Damage to Paint
Whether you’re a car enthusiast or just a regular driver, keeping your vehicle’s exterior in pristine condition is always a priority. However, scratches and paint damage can happen at any time, leaving unsightly blemishes on the surface. Thankfully, there are several precautions and tips you can follow to avoid such mishaps.
One simple trick is to always park your car in a safe and secure location, away from potential hazards like overhanging trees, bushes, or uneven terrain. You can also use a car cover or a paint protection film to shield your vehicle from any elements like dust, dirt, or road debris. Another essential aspect is to handle your car’s exterior with care and avoid using abrasive materials when washing or drying it.
Always use soft brushes, microfiber cloths, or specialized car-washing sponges to prevent scratches or swirl marks. By following these simple precautions and tips, you can ensure that your car’s paint stays vibrant and unblemished for years to come.
Test Products on a Small Spot First
When trying out new products, it’s always recommended to test them on a small, inconspicuous spot first, especially if you have sensitive skin or are prone to allergies. This precautionary measure can save you from potential skin irritations or allergic reactions. Take some of the product and apply it to a small area, like behind your ear or on the inside of your wrist, and wait for 24 to 48 hours to see if there’s any adverse reaction.
Even if the product promises great results, you don’t want to risk damaging your skin or putting your health in jeopardy. It’s always better to be safe than sorry. By taking this simple step, you can ensure that the product is safe for you to use on your face or body without any issues.
Remember, just because a product works for someone else doesn’t mean it will work for you, so it’s best to try it out before applying it to larger areas.
Be Patient and Take Your Time
Being patient and taking your time is important in almost every aspect of life. This is especially true when it comes to important decisions or tasks, such as picking a college major, choosing a career path, or making a major purchase. Rushing into something without proper consideration can lead to regret later on, so it’s essential to slow down and carefully weigh your options.
But being patient can be difficult in a world where everything moves so quickly. We’re constantly bombarded with information and stimuli, making it easy to feel overwhelmed or under pressure. To help stay calm and focused, try taking breaks when needed, and asking for support from friends or family.
Remember, life is a journey, not a race, and taking the time to make informed decisions will ultimately lead to a more satisfying outcome.
Conclusion
Getting rid of a dealership sticker may seem like a daunting task, but with a little patience, some elbow grease, and a trusty spatula, you can easily peel away any unwanted advertising. So go ahead, scrape and peel until your heart’s content, and bask in the glory of a sticker-free car that’s all your own. And who knows – perhaps you’ll even discover a newfound passion for removing stubborn adhesives.
Hey, everyone needs a hobby!”
FAQs
What tools do I need to remove a dealership sticker from my car?
You will need a heat gun or hairdryer, plastic scraper, rubbing alcohol, and a microfiber towel.
Will a dealership sticker on my car affect its resale value?
It depends on the buyer. Some buyers may view it as an advertisement for the dealership, while others may see it as a negative.
Is it safe to use a razor blade to remove a dealership sticker from my car?
No, using a razor blade can damage the paint on your car. It is best to use a plastic scraper or something similar.
Can I remove a dealership sticker without leaving residue?
Yes, using rubbing alcohol or a product specifically made for sticker removal can help remove residue.
How long does it take to remove a dealership sticker from a car?
The time it takes depends on the size of the sticker and how long it has been on the car. It can take anywhere from a few minutes to an hour.
Can I remove a dealership sticker on a leased car?
Yes, but check with your lease agreement to make sure there are no restrictions on removing stickers from the car.
Will removing a dealership sticker affect my warranty?
No, removing a dealership sticker will not affect your car’s warranty.