Do you love to ride your bike but find that the bearings are not as smooth as they used to be? Well, fear not, because in this blog post, we will show you how to grease your bike bearings and have them spinning like new again. Just like a car needs oil to keep its engine running smoothly, your bike bearings need grease to reduce friction and ensure smooth rotations. So let’s dive in and learn how to give your bike the TLC it deserves.
Introduction
Hey there bike enthusiasts! If you’re new to maintaining your bike or just curious about bike bearings, you’ve come to the right place. In this blog post, we’ll be diving into the ins and outs of greasing bike bearings. Bike bearings are an essential component of your bicycle’s wheels, pedals, and even the headset.
They allow for smooth rotation and reduce friction, helping you have a more enjoyable and efficient ride. To keep your bike bearings in top condition, it’s important to know how to properly grease them. So, grab your bike and let’s get greasing!
What are bike bearings and why should you grease them
bike bearings, grease, maintenance
Benefits of greasing bike bearings
greasing bike bearings, benefits
Step by Step Guide
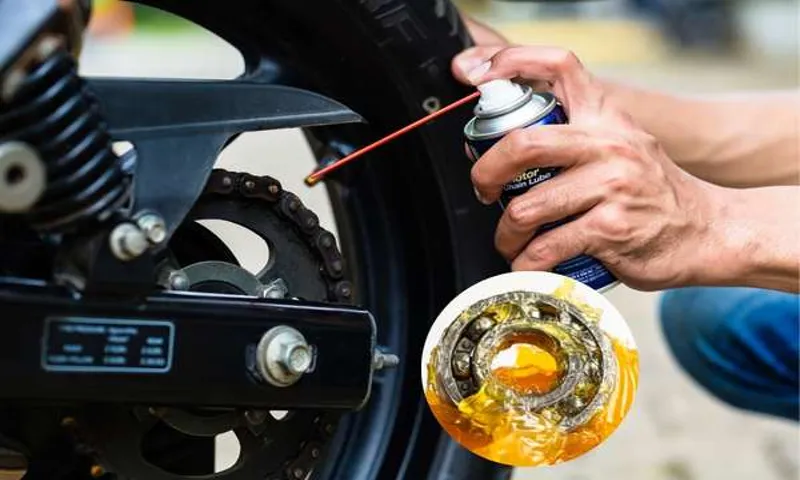
So you’ve noticed that your bike doesn’t feel as smooth as it used to, and you’re wondering if it’s time to grease the bearings. Well, you’re in the right place! Greasing your bike bearings is an essential maintenance task that can help prolong the life of your bike and improve its overall performance. To grease your bike bearings, you’ll need a few tools: a set of metric allen wrenches, a thin grease such as marine grease or lithium grease, and some paper towels or rags to clean up any excess grease.
First, start by removing the wheels from your bike. This can usually be done by loosening the quick release skewer or unscrewing the nuts holding the wheels in place. Once the wheels are off, inspect the bearings for any dirt or debris.
If you notice any, use a rag or paper towel to clean them off. Next, take your allen wrench and remove the dust cap on the hub. This will expose the bearings.
Carefully remove the bearings and set them aside. If there are any spacers or seals, carefully remove those as well. Now it’s time to apply the grease.
Take a small amount of grease and apply it to the bearings. Make sure you coat them evenly, but don’t over-grease them as this can cause excess friction. Once the bearings are greased, carefully reassemble everything, making sure to put the spacers and seals back in their proper place.
Finally, give the wheels a spin to make sure everything feels smooth and properly aligned. If you notice any issues, make any necessary adjustments. And there you have it! A step-by-step guide on how to grease your bike bearings.
Step 1: Prepare the bike
“bike preparation” Preparing your bike before you hit the open road is an essential step in ensuring a safe and enjoyable ride. So, let’s dive into step one: preparing the bike. First, start by giving your bike a thorough cleaning.
Get rid of any dirt, dust, or debris that may be stuck in the chain, gears, or brakes. Use a mild detergent and water to clean the frame, and a degreaser to remove any built-up grime on the chain and gears. Next, inspect the tires for any signs of wear or damage.
Check the tire pressure and adjust it accordingly, making sure it meets the manufacturer’s specifications. If you notice any cracks or bulges on the tires, it’s time to replace them. Remember, the tires are the only point of contact between your bike and the road, so ensuring they are in good condition is crucial for a safe ride.
Moving on to the brakes, check the brake pads for wear. If they are worn down or damaged, replace them immediately. You should also check the brake cables for any signs of fraying or rust.
If you notice any issues, it’s best to replace the cables as well. Now let’s focus on the gears. Shift through all the gears to ensure they are working smoothly.
If you notice any hesitation or grinding, it’s possible that the gears need to be adjusted or replaced. This is something you can do yourself if you have the necessary tools and knowledge, but it’s always a good idea to take your bike to a professional if you’re unsure. Lastly, don’t forget about the accessories.
Step 2: Remove the wheel with the bearing
Removing the wheel with the bearing is the next step in the process of fixing your vehicle. This step is essential because it allows you to access the bearing and replace it if necessary. To start, you’ll need to jack up the car and securely place it on jack stands.
Once the car is safely raised, you can use a lug wrench to loosen the lug nuts on the wheel. Next, you’ll need to remove the lug nuts completely and carefully slide the wheel off the hub. Be sure to keep a good grip on the wheel as you remove it to prevent any accidents.
Once the wheel is off, you’ll be able to see the bearing and assess its condition. If you notice any signs of damage or wear, it’s best to replace it to avoid further problems down the road. Removing the wheel with the bearing is just the second step in the process, but it is an important one to ensure that you can properly inspect and fix the bearing.
Step 3: Clean the bearing and hub
clean the bearing and hub
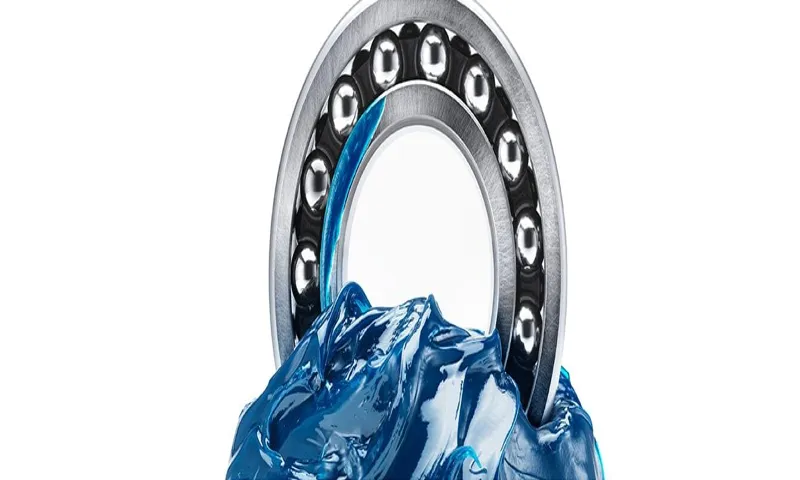
Step 4: Apply the grease
greasing bicycles, applying grease to bike parts, lubricating bike components. In order to keep your bicycle running smoothly and efficiently, it is important to apply grease to the necessary parts. This step is crucial as it helps prevent friction and wear on the moving components of your bike.
Applying grease not only prolongs the life of your bike but also ensures a smoother and quieter ride. So, let’s dive into the step-by-step process of applying grease to your bike. First, gather the necessary tools and materials.
You will need a high-quality bicycle grease, which is specifically designed for the purpose of lubricating bike components. Additionally, you will need a clean rag or paper towel to wipe off any excess grease. Next, identify the parts of your bike that require grease.
These include the bottom bracket, headset bearings, hub bearings, and pedal threads. Greasing these parts will help reduce friction and ensure a smoother ride. Before applying the grease, make sure to clean the areas thoroughly.
Use a degreaser or a mild detergent to remove any dirt or grime. This step is important as it helps the grease adhere better to the surfaces and prevents contamination. Once the parts are clean, apply a thin layer of grease to the surfaces.
It is important not to apply too much grease as it can attract dirt and debris, causing potential damage to your bike. A small amount is enough to provide sufficient lubrication. Using your fingers or a small brush, evenly spread the grease on the surfaces.
Step 5: Reassemble the wheel
reassemble the wheel Once you have successfully cleaned all the parts of the wheel and inspected for any damage or wear, it’s time to reassemble everything. But before you start, make sure to refer to your bike’s user manual or online resources for specific instructions. Begin by sliding the axle back into the hub and threading on the locknuts.
Tighten them securely but not overly tight. Next, place the hub back into the rim, ensuring that the valve hole lines up with the valve on the inner tube. Attach the spokes to the hub, using the correct pattern as specified by the wheel manufacturer or your bike’s manual.
This is where patience and attention to detail are crucial. Make sure each spoke is properly tensioned and aligned as you go. Once all the spokes are attached and tensioned, use a spoke wrench to bring the tension in each spoke to the same level.
This is essential to ensure a true and straight wheel. Finally, check that the wheel is centered and true before adding the tire, tube, and other accessories. Double-check all the nuts and bolts to ensure everything is properly tightened.
With this step completed, your wheel is now ready to be mounted back on your bike.
Tips and Tricks
Have you ever wondered how to grease a bike bearing? Well, you’re in luck because I’m going to share some tips and tricks with you. Greasing your bike bearing is essential for smooth and efficient performance. To start, you will need a few tools, including a grease gun, grease, and a wrench.
First, remove the wheel from your bike and then use the wrench to loosen the axle nuts or quick-release levers. Once the axle is free, you can access the bearings. Use a rag to clean any old grease or dirt from the bearings and then apply a small amount of fresh grease to each bearing.
Make sure to evenly distribute the grease and spin the bearings to ensure they are properly lubricated. Finally, reassemble your bike and tighten the axle nuts or quick-release levers. Congratulations, you have successfully greased your bike bearings! Remember to regularly grease your bearings to extend their lifespan and keep your bike running smoothly.
Use the right type of grease
grease, lubrication, maintenance, machinery, friction, performance, viscosity, temperature, application, effectiveness When it comes to keeping your machinery running smoothly, using the right type of grease is crucial. Grease is a lubricating agent that reduces friction between moving parts, preventing wear and tear and ensuring optimal performance. But not all greases are created equal, and using the wrong type can lead to reduced effectiveness and potential damage.
One key factor to consider when choosing grease is viscosity. Viscosity is a measure of a fluid’s resistance to flow, and it determines how well the grease will spread and adhere to surfaces. If the grease is too thin, it may not provide sufficient lubrication, while if it is too thick, it may not be able to flow into smaller gaps and crevices.
Another important consideration is temperature. Grease can be formulated for high or low-temperature applications, and using the wrong type can result in poor lubrication and even damage to the machinery. High-temperature greases are designed to withstand heat and maintain their properties, while low-temperature greases remain fluid in colder environments.
The application method is also crucial. Some greases come in the form of a spray or aerosol, while others are applied using a brush or grease gun. It’s important to choose the right method for your specific machinery to ensure proper coverage and distribution of the grease.
In summary, using the right type of grease is essential for optimal lubrication and maintenance of your machinery. Consider factors such as viscosity, temperature, and application method when choosing the appropriate grease for your needs. By doing so, you can ensure that your machinery operates smoothly and efficiently, reducing the risk of damage and improving overall performance.
Don’t over-tighten the bearing
When it comes to maintaining your skateboard, one important thing to remember is to not over-tighten the bearing. Your skateboard’s bearing is what allows the wheels to spin smoothly, and if you tighten it too much, it can actually hinder your performance. Over-tightening the bearing can cause the wheels to not spin as freely, which can make it harder to push and maneuver your board.
It can also put unnecessary strain on the bearing, potentially leading to damage or the need for replacement. So, how do you know if you’ve tightened it too much? One way is to simply give the wheels a spin with your hand. If they don’t rotate freely for at least a few seconds, then you may have tightened the bearing too much.
So, next time you’re adjusting your skateboard’s bearing, remember not to overdo it and keep it at just the right tightness for optimal performance.
Regular maintenance is key
Regular maintenance is key when it comes to keeping your belongings in tip-top shape, and this applies to a wide range of things – from your car to your home appliances. So why should your website be any different? Just like a car needs its oil changed and a house needs its pipes checked, a website needs regular maintenance to ensure it stays running smoothly. It’s easy to overlook the importance of maintenance when everything seems to be working fine, but small issues can quickly turn into big problems if left unresolved.
By performing regular maintenance on your website, you can catch any potential issues early on and prevent them from becoming major headaches down the line. Regular maintenance can also help improve the performance and speed of your website, ensuring that your visitors have a seamless browsing experience. So, remember to carve out some time for regular website maintenance – your website will thank you for it!
Conclusion
In conclusion, greasing a bike bearing is like giving it a luxurious massage. Just like we humans need some pampering to keep functioning at our best, bike bearings require a little bit of grease to keep spinning smoothly and effortlessly. It’s a simple process that involves some good ol’ grease, a touch of precision, and a hint of finesse.
Think of your bike bearing as a tired athlete after a long marathon. It’s worn out, in need of some TLC. So, grab your grease and let’s give that bearing the care it deserves.
First, clean the bearing like you would clean an athlete before a massage. Remove any dirt and grime, so it’s ready for the grease to work its magic. Then, squeeze a generous dollop of grease onto your hands, ready to provide nourishment to the weary bearing.
Now comes the fun part – the massage! Apply gentle pressure and spread the grease evenly across the surface of the bearing, ensuring every nook and cranny is covered. Just like a skilled masseuse, your goal is to make the bearing feel relaxed and rejuvenated. Don’t be shy with the grease; remember, we’re not going for a light tickle, but rather a deep, satisfying experience.
So, slather it on and let the bearing bask in its newfound lubrication. Once you’re satisfied with your greasing skills, carefully put the bearing back in its rightful place and spin the wheel. Ah, can you hear that? The sweet symphony of a well-greased bearing, purring contently as it effortlessly glides along.
So, my fellow bike enthusiasts, next time you want to pamper your bike and ensure its bearings are as happy as can be, reach for that trusty grease and give them the treatment they deserve. After all, a well-greased bearing is the secret to a smooth, enjoyable ride – and who doesn’t want that?”
Keeping your bike bearings properly greased is essential for smooth and efficient riding. By following these steps and taking proper care of your bike, you can ensure that your bearings last longer and provide optimal performance.
Greasing your bike bearings may not be the most exciting task, but it is essential for maintaining a smooth and efficient ride. By taking the time to properly grease your bearings, you can ensure that they last longer and provide optimal performance. First, start by removing the wheels from your bike and inspecting the bearings for any signs of wear or damage.
If everything looks good, use a degreaser to clean the bearings and remove any old grease. Once they are clean, apply a high-quality bearing grease using a grease gun or a small brush. Be sure to apply the grease evenly and avoid over-greasing, as this can cause excess friction.
Finally, reassemble your wheels and check for any play or wobbling. If everything feels smooth and secure, you’re good to go! Regularly greasing your bike bearings will not only improve your riding experience but also extend the life of your bike. So, next time you’re performing maintenance on your bike, don’t forget to show your bearings some love.
FAQs
How often should I grease my bike bearings?
It is recommended to grease your bike bearings every 6-12 months, or whenever you notice any signs of dryness or grinding.
What type of grease should I use for bike bearings?
You should use a high-quality, waterproof grease that is specifically designed for bike bearings. Popular options include lithium-based or synthetic greases.
Can I use WD-40 to grease my bike bearings?
No, WD-40 is not suitable for greasing bike bearings. It is a degreaser and not a lubricant. Use a proper bike grease for optimal performance.
How do I clean bike bearings before greasing them?
To clean bike bearings, remove them from the bike and soak them in a degreaser. Use a brush to scrub away any dirt or grime. Rinse with water and let them dry completely before re-greasing.
Should I use bearing press tools to grease my bike bearings?
It is recommended to use bearing press tools for proper installation and removal of bike bearings. This ensures proper alignment and reduces the risk of damage.
Can I over-grease my bike bearings?
Yes, over-greasing can cause excess friction and may lead to premature wear. Apply a thin and even layer of grease to the bearings without overdoing it.
How can I tell if my bike bearings need to be greased?
Signs that your bike bearings need greasing include rough or grinding noises, decreased smoothness, and excessive play or wobble in the wheels or pedals.