

Are you looking to keep your wheels spinning smoothly and extend their lifespan? One easy maintenance task you can do yourself is greasing the wheel bearings. While many mechanics and car enthusiasts recommend doing this every 12 months or 12,000 miles, it’s a good idea to check your vehicle’s manual to see what the manufacturer recommends for your specific make and model. Greasing wheel bearings helps reduce friction and heat, which can prevent wear and tear as well as costly repairs down the line.
But where to start? In this step-by-step guide, we’ll walk you through the process of greasing your wheel bearings, from removing the wheel to packing the bearings with grease and reassembling everything. Whether you’re a seasoned mechanic or a curious car owner, you can save money and keep your ride smooth with this simple maintenance task. So grab your tools and let’s get started!
Table of Contents
Introduction
If you’ve ever experienced a screeching sound when driving or noticed that your vehicle is not driving as smoothly as it used to, it may be time to grease your wheel bearings. Greasing your wheel bearings is a crucial aspect of vehicle maintenance, as it helps prevent friction and wear-and-tear on the wheels. To grease your wheel bearings, first, you should jack up your vehicle and remove the wheel, then remove the dust cap, cotter pin, and castle nut.
Once that’s done, you can carefully remove the inner bearing and slide the entire hub off the spindle. Your wheel bearings should be inspected for any visible wear or damage before adding fresh grease. With the old grease removed and new grease applied using a grease gun, the wheel can be reassembled, ensuring the spindle nut is tightened correctly.
Failure to grease your wheel bearings can ultimately result in wheel bearing failure and cause a potential danger to you and other road users. Regular maintenance can help extend the lifespan of your wheel bearings, saving you time and money in the long run.
Tools and Materials
If you’re a car owner, one crucial thing you need to understand is how to grease wheel bearings. Once the bearings are greased, they keep the wheels turning smoothly with minimal friction. To perform this task, you’ll need to gather some tools and materials like a high temperature wheel bearing grease, jack stands, a wrench, and a fresh cotter pin.
Start by jacking up the car and resting it on jack stands safely. Next, loosen the wheel lug nuts and remove the wheel. Remove the dust cap, cotter pin, and castle nut, then pull the hub off the spindle.
Clean out the old grease and then repack the bearings with fresh grease. Use your fingers to apply the grease evenly around the bearing until all gaps are filled. Don’t forget to replace the cotter pin and dust cap and ensure the castle nut is tightened to the manufacturer’s specifications.
Finally, replace the wheel and test before hitting the road. Remember that greasing your wheel bearings not only guarantees your safety but also prolongs your car’s lifespan.
Removing the Wheel Bearings
“Removing the wheel bearings may seem like a daunting task, especially if you’ve never done it before. But fear not, with the right tools and some patience, it can be done easily. The first step is to raise the car and remove the wheel.
Once the wheel is off, you’ll need to remove the caliper and the rotor to gain access to the wheel bearings. The bearings are held in place by a retainer ring, which needs to be removed using a pair of pliers. Once the retainer ring is off, the bearings can be carefully removed.
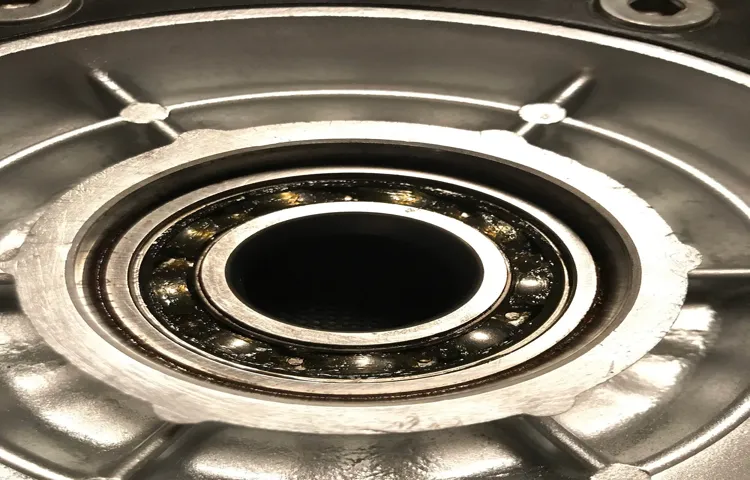
It is important to inspect the bearings for any signs of wear or damage. If everything looks good, they can be cleaned and re-greased. However, if any damage is found, the bearings will need to be replaced.
Greasing the wheel bearings is crucial to preventing them from seizing and causing more significant damage to your car in the long run. Regular maintenance and greasing of your wheel bearings will help keep your car running smoothly and safely on the road.”
Step 1: Elevate and secure the car.
Before you start removing the wheel bearings, it’s crucial to elevate and secure the car properly to prevent accidents. The first step involves finding a level ground, using a jack to lift the car, and placing jack stands or chocks to keep it in place. Once the car is securely in place, you can move on to removing the wheel bearings.
These small yet essential components allow the wheel to smoothly rotate around the axle, and replacing them promptly will ensure the longevity and safety of your vehicle’s wheels. To remove the bearings, you will need to remove the wheel hub, and then use a bearing puller to take out the old bearings carefully. Make sure to clean and inspect the bearings and hub for any damage or wear before installing new ones.
Remember to follow the manufacturer’s instructions and torque specifications when installing the new wheel bearings. With a little patience and attention to detail, you should be able to remove and replace your vehicle’s wheel bearings safely and effectively.
Step 2: Remove the wheel.
To remove the wheel bearings, the first step is to remove the wheel. This can be done by loosening the lug nuts while the vehicle is still on the ground to make it easier to remove the wheel once you have lifted the vehicle. It is important to use a sturdy, reliable jack and jack stands on a level surface before lifting the vehicle.
Once the vehicle is lifted, remove the lug nuts and the wheel. Then, locate the wheel bearings, which are usually found behind the brake rotors. These can be removed by unscrewing the retaining bolts and gently pulling the bearings out of the hub.
It is important to inspect the bearings for any signs of damage or wear, such as pits, cracks, or excessive play. If the bearings are worn or damaged, they will need to be replaced before reassembling the wheel. By following these simple steps, you can ensure that your wheel bearings are in good condition and your vehicle is running smoothly on the road.
Step 3: Release the brake caliper and rotor.
Removing wheel bearings can be a challenging task, but it’s essential to maintain your vehicle’s efficiency. To begin, the brake caliper and rotor need to be released. This step requires you to remove the caliper bolts and carefully separate the caliper from the rotor, making sure not to damage the brake line.
Once freed, tie the caliper to the suspension component with a bungee cord to prevent damage to the brake line. With the caliper out of the way, the rotor can be removed, giving access to the wheel bearings. It’s essential to inspect the bearings for any wear or damage before proceeding with their removal.
To do this, turn each bearing while feeling for any roughness or vibration. If there is any sign of damage, replacing the bearings is the safest option. With this sorted, the wheel bearings can be removed using a bearing puller or hammer and chisel.
This part of the process requires precision and patience, so take your time. Once the bearings are out, the hub can be cleaned, and new bearings can be installed. Overall, this process can be complicated, but it’s necessary for the longevity of your vehicle.
Step 4: Remove the cotter pin and castle nut.
To remove the wheel bearings, you need to start by removing the cotter pin and castle nut. The cotter pin is a small metal pin that prevents the castle nut from loosening. To remove it, you just need to straighten out the pins and pull it out.
Next, use a wrench or pliers to loosen and remove the castle nut. This nut is what holds the wheel bearings in place, so it may require some effort to loosen it. Once you’ve removed the castle nut, you can slide the hub assembly off the spindle.
You may need to use a pry bar to encourage the hub assembly to come off. With the hub assembly off, you can access the wheel bearings and replace them if necessary. This is an important step in maintaining your vehicle’s wheels and ensuring smooth and safe operation on the road.
Step 5: Pull the hub assembly off the spindle.
Removing the Wheel Bearings Now that you’ve successfully detached the brake caliper and rotor from the spindle, the next step in replacing your wheel bearings is to pull the hub assembly off the spindle. This might require some effort, especially if the bearing and/or seal have been in place for a long time. If the hub assembly doesn’t come off easily, you can use a gear puller or a bearing puller to get the job done.
It’s important to be careful not to damage any of the components in the process, as this could result in additional repairs or replacements. Once you’ve removed the hub assembly, you can begin to inspect the wheel bearings for any signs of damage or wear. Check for any excessive play, roughness when turning, or unusual noises.
If any of these symptoms are present, it’s likely time to replace the bearings. It’s important to note that even if your bearings seem to be in good condition, it’s always a good idea to replace them when you have the hub assembly removed, as they are a wear item and can wear out over time. Overall, removing the wheel bearings requires a bit of effort and care, but it’s an essential step in the process of replacing them.
With the hub assembly removed, you’ll have a clear view of the bearings and can inspect them thoroughly to ensure they’re in good condition. Remember to take your time and be gentle to avoid causing any damage, and if you’re unsure at any point, don’t hesitate to consult a professional.
Step 6: Take out the old wheel bearing.
When it comes to removing the wheel bearings, there are a few steps you need to follow. First, make sure that you have all the necessary tools and equipment. You will need a socket wrench, pliers, a pry bar, and a hammer.
Once you have everything you need, you can begin the process of removing the old wheel bearing. Start by removing the cotter pin and nut from the spindle. Once you have done this, you can use a pry bar to gently remove the old bearing from the spindle.
Take your time and be careful not to damage any of the surrounding parts. If the old bearing is stuck, you may need to use a hammer to gently tap it loose. Once the old bearing is removed, you can clean the spindle and prepare it for the installation of the new bearing.
Remember to take your time and be careful throughout this process to ensure that everything is done correctly and safely.
Cleaning and Inspecting the Bearings
If you’re looking for a smooth ride on your bike, then it’s important to make sure your wheel bearings are well-maintained. To grease wheel bearings properly, you’ll need to start by cleaning and inspecting them. This involves removing the wheels from your bike and removing the bearings from the hub.
Then, use a degreaser and a brush to clean the bearings thoroughly, making sure to get rid of any dirt or grime that might be causing friction. Once the bearings are clean and dry, it’s time to apply a fresh layer of grease. Use a high-quality bearing grease that’s specifically designed for bike wheels, and make sure to apply it evenly to all the parts of the bearing.
Finally, reassemble your bike wheel, making sure the bearings are seated properly and the axle is tightened to the correct torque. Repeat this process periodically to ensure your wheel bearings stay in great shape and give you a smooth ride every time.
Greasing the Bearings
Have you ever wondered how to grease wheel bearings? Well, look no further! Greasing the bearings is a crucial aspect of maintaining your vehicle. The wheel bearings assist in the smooth rotation of the wheels, and if they are not lubricated regularly, they can become damaged and cause serious issues with your vehicle’s overall performance. To get started, you will need a few basic tools, such as a jack, a jack stand, a grease gun, and some high-quality grease.
Begin by lifting the vehicle with a jack, placing a jack stand underneath for support, and removing the wheel. Next, remove the dust cap and clean the area around the bearing. Fill the bearing with grease using a grease gun until it oozes out of the sides.
Finally, replace the dust cap, reattach the wheel, and lower the vehicle. Voila! Your bearings are now greased and ready to help keep your vehicle running smoothly for miles to come.
Step 1: Clean the bearings.
Greasing the bearings is an important maintenance task that should be performed regularly. Before greasing the bearings, the first step is to clean them thoroughly. This helps to remove any dirt, debris or old grease that may be present, ensuring that the new grease can be applied effectively.
To clean the bearings, you can use a degreaser or a solvent that is safe for the material of the bearing. Use a clean rag or a brush to apply the solvent, making sure to clean all surfaces of the bearing. You can repeat the cleaning process until the bearings are completely clean.
Once they are clean, you can move on to the next step of greasing the bearings. Keyword: Greasing the Bearings.
Step 2: Add grease to the bearing.
When it comes to maintaining your bearings, regular grease application is the key to keeping them running smoothly. Grease serves as a lubricant, reducing friction and wear between the internal components of the bearing. To grease the bearings, you’ll first need to remove the old grease.
Then, using a clean cloth or brush, apply a thin layer of fresh grease to the inside of the bearing. Make sure not to overfill the bearing with grease, as this can cause it to overheat or even fail completely. Instead, use just enough grease to coat the internal components without blocking the movement of the bearing.
Remember, greasing your bearings regularly will not only extend their lifespan but also improve the overall performance of your equipment. So, add it to your maintenance checklist and enjoy the benefits of smooth, efficient operation.
Step 3: Fit the bearings back into the hub assembly.
When fitting the bearings back into the hub assembly, it’s important to make sure they are properly greased. This will help ensure the bearings operate smoothly and reduce the likelihood of wear and tear over time. To do this, apply a small amount of grease to the inside of the bearing and then evenly distribute it by rotating the bearing by hand.
Make sure to also apply a small amount of grease to the hub assembly before reinserting the bearing. Once the bearing is in position, use a bearing installation tool to firmly press it into place. You should feel some resistance as the tool compresses the bearing, but it should slide smoothly into place.
Repeat these steps for the remaining bearings. Remember, a well-greased bearing is key to keeping your vehicle running smoothly and safely on the road.
Reassembling the Wheel
Greasing your wheel bearing is an important part of maintaining your vehicle or bike. It’s not as complicated as it sounds, and doing it regularly can save you from expensive repairs later on. First, remove the wheel from the axle and take off the cap covering the bearings.
Clean the bearings and the races with a solvent, making sure to get all the old grease out. Next, repack the bearings with fresh grease, making sure to apply enough so that it covers every surface. You can use a bearing packer tool to make this step easier and mess-free.
Finally, reassemble the wheel, making sure to tighten everything to the correct torque specifications. By doing this regularly, you can ensure a smooth and safe ride while also extending the lifespan of your wheel bearing.
Conclusion
In conclusion, greasing your wheel bearings is a crucial step in maintaining your vehicle’s performance and ensuring a safe ride. While the process may seem daunting at first, it’s actually quite simple with the right tools and a bit of know-how. By taking the time to grease your bearings on a regular basis, you’ll prolong the life of your wheels, reduce wear and tear on your vehicle, and ultimately enjoy a smoother, more enjoyable driving experience.
So don’t let your wheels grind to a halt – get greasing today!”
FAQs
What are wheel bearings?
Wheel bearings are components in a vehicle that enable wheels to spin smoothly and reduce friction.
How often should wheel bearings be greased?
It is recommended to grease wheel bearings every 10,000 to 12,000 miles or every year, whichever comes first, to prevent wear and tear.
What are the signs of worn wheel bearings?
Signs of worn wheel bearings include odd noises, a shaky steering wheel, uneven tire wear, and poor handling.
Is it necessary to pack wheel bearings with grease by hand?
Yes, it is necessary to pack wheel bearings with grease by hand to ensure that the entire bearing is coated evenly and sufficiently.
Can wheel bearings be greased without removing the wheel hub?
No, the wheel hub must be removed to access the wheel bearings and properly grease them.
How much grease should be applied to wheel bearings?
A sufficient amount of grease should be applied to fully coat the bearing rollers and cover the races inside the hub.
What type of grease should be used for wheel bearings?
High-temperature wheel bearing grease, specifically designed for use in cars, should be used to protect against heat and friction.