
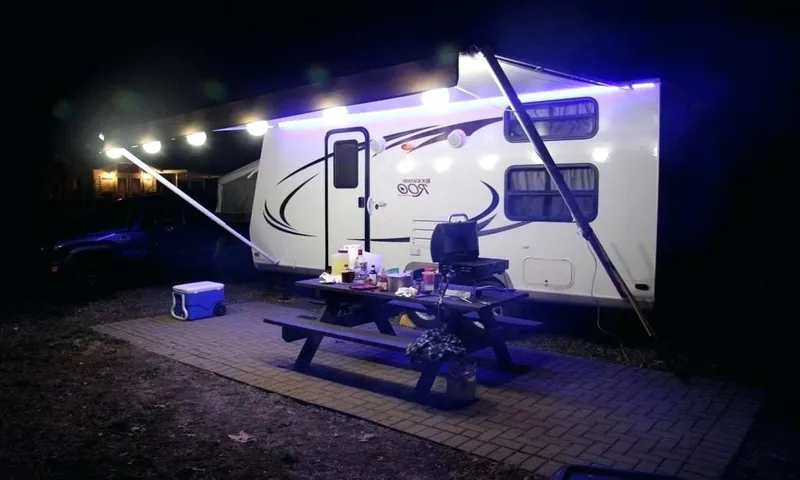
If you’re an avid RVer, then you know that the camping experience is not complete without some cozy and ambient lighting. One popular way to achieve this is by hanging string lights on your RV awning. Not only do they create a warm and inviting atmosphere, but they also serve a functional purpose by illuminating your outdoor living space.
But how exactly do you hang string lights on your RV awning? In this blog post, we’ll provide you with a step-by-step guide on how to do just that. So grab your lights and let’s get started!
Table of Contents
What You’ll Need
If you want to create a cozy and inviting atmosphere in your RV, hanging string lights on your awning is a great idea. Not only will it add a touch of charm to your outdoor space, but it will also provide you with some much-needed light after the sun goes down. To hang string lights on your RV awning, you’ll need a few things.
First, you’ll need a set of string lights that are designed for outdoor use. Look for lights that are weatherproof and can withstand the elements. Next, you’ll need some hooks or clips to attach the lights to your awning.
There are a variety of options available, so choose ones that are easy to use and won’t damage your awning. Lastly, you’ll need a ladder or stool to reach your awning and hang the lights. It’s important to make sure you have a stable surface to stand on while you’re hanging the lights to avoid any accidents.
With these simple tools, you’ll be able to create a beautiful and cozy outdoor space in your RV.
Awning string lights
awning string lights
Zip ties or hooks
zip ties and hooks for organizing purposes. When it comes to organizing, one of the essential tools you’ll need are zip ties or hooks. These simple yet versatile items can be incredibly useful in keeping your space tidy and clutter-free.
Zip ties, also known as cable ties, are flexible plastic straps that can be easily fastened together to secure objects. They are perfect for tying cables, cords, and wires, keeping them neat and preventing them from becoming tangled messes. Hooks, on the other hand, are small devices that can be easily attached to walls or surfaces to hang various items.
They can be used to hang tools in the garage, kitchen utensils in the kitchen, or even coats and hats by the front door. So, why do you need zip ties and hooks? Well, for starters, they offer a simple and effective way to keep things organized. Whether you’re dealing with a jumble of cables or a collection of tools, zip ties and hooks can help you tidy up and create a more streamlined space.
They are also incredibly versatile, and can be used in a variety of situations. For example, zip ties can be used to bundle together loose cables, creating a more organized and aesthetically pleasing look. Hooks, on the other hand, can be used to hang items in a way that is easily accessible and visible, making it easier to find what you need when you need it.
Not only are zip ties and hooks practical, but they are also relatively inexpensive and easy to find. You can purchase them at hardware stores, home improvement stores, or even online. They come in a variety of sizes and colors, allowing you to choose the ones that best fit your needs and match your aesthetic preferences.
Plus, they are easy to install and remove, making them a hassle-free organizing solution. In conclusion, zip ties and hooks are essential tools for anyone looking to get organized. They offer a simple and effective way to keep things tidy and prevent clutter.
Measuring tape
measuring tape
Ladder
In order to successfully use a ladder, there are a few key items that you’ll need to have on hand. First and foremost, you’ll obviously need a ladder. But not just any ladder will do.
Depending on the task at hand, you’ll want to choose a ladder that is the appropriate height and weight capacity for the job. You also want to ensure that the ladder is in good condition, with no broken or missing rungs, and that it is sturdy and stable. Once you have your ladder, you may want to consider investing in some additional accessories to make your ladder use even safer and more efficient.
This could include items such as ladder stabilizers, ladder levelers, or ladder safety straps. These accessories can help to prevent accidents and ensure that your ladder is securely in place while you work. And of course, don’t forget about safety equipment.
Whenever you are using a ladder, it’s important to wear appropriate safety gear, such as a hard hat and non-slip shoes, to protect yourself from any potential falls or accidents. So, next time you need to use a ladder, make sure you have all the necessary tools and materials on hand to ensure a safe and successful task completion.
Step 1: Measure your Awning
If you’re looking to add some ambiance to your RV camping experience, hanging string lights on your awning is a great way to do it. But before you get started, you’ll want to measure your awning to determine how many lights you’ll need and where to hang them. Start by extending your awning fully and grab a measuring tape.
Measure the width of your awning from end to end, and note down the measurement. Next, measure the depth of your awning from the top to the bottom. Now that you have these measurements, you can determine how many strands of lights you’ll need and how far apart to space them.
Whether you’re going for a cozy and intimate feel or a bright and festive look, measuring your awning is the first step to creating the perfect ambiance for your outdoor space.
Start by measuring the length of your RV awning
When it comes to measuring your RV awning, it’s important to start with the basics. The first step is to measure the length of your awning. This will give you a starting point for determining the right size for any accessories or replacements you may need.
To measure the length, simply extend your awning all the way out and use a measuring tape to measure from one end to the other. Be sure to measure from the very edge of the fabric, not including any hardware or rails. This will give you an accurate measurement that you can use to find the perfect fit for your RV awning.
Measure the width of your awning as well
When it comes to measuring your awning, it’s important to consider both the length and width. The width of your awning is just as important as the length because it will determine how much shade and coverage you will have. To measure the width of your awning, start by standing at one end and stretching a measuring tape across the width to the other end.
Make sure to measure from the outer edge of the awning fabric, and not just the frame. This will give you an accurate measurement of how wide your awning is. Once you have the width measurement, you can use it to determine the size of any accessories or replacements you may need for your awning.
It’s always a good idea to double-check your measurements before ordering anything, just to be sure.
Step 2: Prepare the Lights
So, you’ve decided to add some string lights to your RV awning to create a cozy and inviting atmosphere. Great choice! Hanging string lights can really enhance the outdoor living space of your RV. But before you can start enjoying the warm glow of your new lights, you need to take some steps to prepare them.
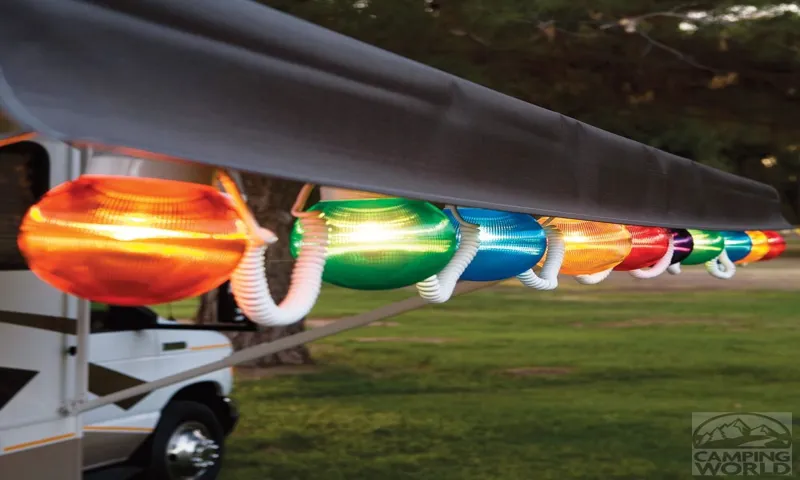
First, make sure you have the right type of lights for your RV awning. Look for lights that are specifically designed for outdoor use and are rated for RVs. These lights are weatherproof and can withstand the elements, ensuring they will last for a long time.
Next, gather all the necessary materials. You will need hooks or clips to hang the lights from your awning. Choose hooks or clips that are strong and can securely hold the weight of the lights.
You may also need some zip ties or wire to help secure the lights in place. Before hanging the lights, take some time to clean your RV awning. Use a mild soap and water solution to remove any dirt or debris.
This will ensure that the lights adhere properly and will not be damaged by any grime on the awning. Once your awning is clean, it’s time to hang the lights. Start by attaching the hooks or clips to the awning.
Space them out evenly and make sure they are securely fastened. Then, carefully hang the lights on the hooks or clips. Take your time to arrange them in a way that looks aesthetically pleasing.
Unravel the string lights and make sure they work
Unraveling the string lights and ensuring they work is an essential step in preparing for a festive occasion or creating a cozy atmosphere at home. There’s nothing more frustrating than getting all set up, only to find out that the lights don’t turn on. So, before hanging them up or adding them to your decor, take a few minutes to carefully unravel the string lights and check that they are in working condition.
Look for any loose or broken bulbs, as these can prevent the entire string from lighting up. It’s also a good idea to test the lights by plugging them in and making sure all the bulbs are illuminated. Don’t forget to replace any burnt-out bulbs, as they can affect the overall appearance of the lights.
By taking the time to prepare your string lights properly, you can ensure that they will create a beautiful and dazzling display that will be enjoyed by all.
Detangle the lights and straighten them out
When it comes to getting ready for the holiday season, one of the tasks that can quickly become frustrating is untangling the Christmas lights. We’ve all been there, spending what feels like hours trying to detangle the tangled mess of wires. But fear not, there is a way to make this task a little bit easier.
To begin, find a large, clean space where you can lay out your lights. This could be a table or even your floor. Next, carefully separate the lights from any other decorations or items they may have become intertwined with.
Begin by searching for the end of the lights and slowly unravel them, being careful not to pull too tightly and cause any damage. Once you have your lights untangled, take the time to straighten them out. Lay them flat on your surface and gently run your fingers along each strand to remove any kinks or twists.
This will ensure that when you hang your lights, they’ll be neat and tangle-free. So make sure to take a little extra time to properly prepare your lights before you start decorating. It will save you a lot of frustration and ensure that your Christmas display looks its best.
Plug in the lights to ensure they are functioning properly
In order to kick-start your festive decorations, the first and foremost thing you need to do is to check whether your lights are in proper working condition. There’s nothing more frustrating than spending hours untangling a strand of lights, only to discover that they don’t work! Trust me, we’ve all been there. So before you start unraveling those twinkling beauties, plug them in and make sure they light up.
Don’t worry if a few bulbs are out, it’s not the end of the world. You can easily replace them or fix them yourself. Just make sure that the majority of the lights are functioning properly, so that you can proceed with your holiday cheer without any hiccups.
Remember, it’s better to be prepared and check beforehand rather than going through the hassle of troubleshooting later on.
Step 3: Attach the Lights
To hang string lights on your RV awning, follow these steps to ensure a secure and hassle-free setup. Start by choosing the type of lights you want to use, whether they are traditional string lights, LED lights, or solar-powered lights. Once you have your lights, attach them to the awning using clips or hooks that are specifically designed for outdoor use.
These clips or hooks will allow you to easily hang the lights without causing any damage to your RV or the awning. Make sure to evenly distribute the lights along the length of the awning, creating a beautiful and evenly lit space. Once you have attached the lights, test them to ensure they are working properly and adjust their placement as needed.
Finally, enjoy the cozy and inviting atmosphere that the string lights create, perfect for relaxing evenings under the stars. With these simple steps, you can easily hang string lights on your RV awning and create a magical outdoor space for you and your loved ones to enjoy.
Use zip ties or hooks to attach the lights to your awning
When it comes to attaching your string lights to your awning, there are a couple of different options you can consider. One option is to use zip ties or hooks to secure the lights in place. Zip ties are convenient because they are easy to use and can be adjusted to fit any size awning.
Simply wrap the zip tie around the awning and the string lights, then pull it tight and secure it in place. Hooks are another option and can be attached to the awning using adhesive or screws. Once the hooks are in place, you can easily hang the string lights from them.
Whichever method you choose, make sure to distribute the lights evenly across the awning for a beautifully illuminated outdoor space.
Start at one end and secure the lights in place
Now that you have untangled the Christmas lights and tested them, it’s time to move on to the next step: attaching the lights to your desired location. Starting at one end, secure the lights in place using clips or hooks. This will ensure that the lights stay in position and don’t sag or fall down.
Make sure to evenly distribute the lights, spacing them out to create a beautiful and balanced display. As you attach each light, step back and take a look to make sure they are arranged the way you want them. This step may require some trial and error, but don’t worry, it’s all part of the fun.
Before you know it, your Christmas lights will be in place and ready to shine bright for the holiday season.
Continue attaching the lights along the length of the awning
In Step 3 of attaching lights to your awning, it’s time to start the actual installation process. You’ve already determined the length of lights you’ll need and picked out the perfect set for your outdoor space. Now, the fun begins! Start by measuring out the first section of your awning where you want the lights to go.
Make sure to leave a little extra length at the end for any necessary adjustments. Once you have your measurement, it’s time to start attaching the lights. Begin at the starting point and carefully secure the lights to the awning using clips or hooks specifically designed for outdoor use.
Make sure the lights are evenly spaced and free from any tangles or knots. As you continue attaching the lights along the length of the awning, step back occasionally to make sure everything is straight and evenly distributed. It can be helpful to have a friend or family member assist you during this process, as they can help hold the lights in place and offer a second opinion on the positioning.
Remember, the goal is to create a beautiful and well-lit outdoor space, so take your time and enjoy the process. Soon enough, your awning will be transformed into a cozy and inviting oasis.
Be sure to space the lights evenly for a balanced look
When it comes to highlighting your space with string lights, spacing is key. Once you have determined where you want to hang your lights and have measured the length of the area, it’s time to attach the lights. Start by finding the midpoint of the string lights and hanging it at the center of the space.
From there, work your way outwards, attaching lights at even intervals. This will ensure that the lights are evenly distributed and create a balanced look. Don’t be afraid to step back and evaluate the spacing as you go along.
Adjusting the spacing as needed will help you achieve the desired aesthetic. So take your time, enjoy the process, and create a beautifully lit space for all to enjoy.
Step 4: Test the Lights
After you have securely hung your string lights on your RV awning, it’s time to test them out. This step is important to ensure that your lights are functioning properly and to make any necessary adjustments. Start by plugging in the lights and turning them on.
Take a step back and admire the beautiful glow that they create. Are there any bulbs that are not lighting up? If so, check to make sure they are securely screwed in. Sometimes, a loose bulb can cause connection issues.
If all the bulbs are working, fantastic! You’re ready to enjoy your new outdoor lighting. However, if you notice any flickering or dimming of the lights, there may be an electrical issue. Try unplugging the lights and plugging them back in.
If that doesn’t work, it’s best to consult an electrician to ensure safe and proper functioning of your string lights. So go ahead, test those lights and get ready to create a cozy, inviting atmosphere under your RV awning.
Plug in the lights to ensure they are working
Step 4 in setting up your lights is to test them before hanging them up. It’s always a good idea to plug them into an outlet and check that they are working properly. You wouldn’t want to spend all that time hanging them up only to find out later that some of the bulbs are burned out or that the whole strand isn’t functioning.
So, take a few minutes to plug in the lights and make sure they are all lit up. Testing the lights also gives you an opportunity to see how they will look once they are hung up. You can check the brightness of the bulbs and the overall effect of the lighting.
This way, you can make any adjustments or changes before you start hanging them. When testing the lights, pay attention to any flickering or dimming. This could be a sign of a loose bulb or a faulty wire.
If you notice any issues, it’s best to address them before hanging the lights. Taking a few extra minutes to fix any problems now will save you time and frustration later on. So, before you start hanging up your lights, take the time to test them.
Plug them in and make sure they are all working properly. Not only will this save you time and frustration, but it will also ensure that your lights look their best once they are hung up.
Make any adjustments or fix any loose connections
testing Christmas lights, adjusting lights, fixing loose connections In the hustle and bustle of setting up your Christmas lights, it’s important to take a moment to ensure everything is working properly. Once you’ve hung your lights and plugged them in, it’s time for the final step: testing the lights. This step is crucial because it allows you to identify any issues or problems with the lights before you fully commit to the display.
Start by checking if every light bulb is working. Sometimes, a bulb may be loose and not fully lit up. If this is the case, simply tighten the bulb until it’s securely in place.
Loose connections can also cause lights to flicker or not work at all. If you notice any flickering or inconsistent lighting, try gently wiggling the wires to see if a connection is loose. If you find any loose connections, tighten them accordingly.
Once you’ve made any necessary adjustments or fixed any loose connections, test the lights again to ensure everything is functioning correctly.
Double check that the lights are securely attached to the awning
Once you’ve hung up your awning lights, it’s important to double check that they are securely attached. The last thing you want is for a strong gust of wind to come along and knock them loose. Take a moment to inspect each light and make sure it is firmly in place.
Give them a gentle tug to ensure they won’t come loose easily. If any lights seem wobbly or unstable, take the time to readjust them and tighten any screws or clips that may be holding them in place. It’s better to be safe than sorry when it comes to your awning lights.
Step 5: Enjoy Your String Lights
Now that you’ve followed all the steps to hang your string lights on your RV awning, it’s time to sit back, relax, and enjoy the cozy ambiance they create. Whether you’re camping in the middle of the woods or parked at a bustling campground, string lights add a touch of warmth and charm to your outdoor living space. As the sun sets and darkness falls, the soft glow of the lights will create a magical atmosphere.
Imagine sitting under your awning, sipping a cup of hot cocoa, and gazing up at the twinkling lights above you. It’s the perfect setting for storytelling, stargazing, or simply unwinding after a long day of adventure. So grab a blanket, find a comfy chair, and let the string lights illuminate your evenings with a touch of enchantment.
Happy camping!
Sit back and enjoy the cozy and inviting atmosphere your string lights create
It’s time to sit back and enjoy the cozy and inviting atmosphere that your string lights create. Once you’ve hung up your lights and checked that they’re all working properly, it’s time to bask in their warm glow. Whether you’re relaxing on your patio or cuddled up in your favorite reading nook, string lights provide the perfect ambiance for any occasion.
So why not pour yourself a glass of wine, put on some relaxing music, and let the soft glow of the lights transport you to a world of peace and tranquility? The possibilities are endless – you can use them for a romantic dinner for two, a lively gathering with friends, or simply as a way to unwind after a long day. Whatever the occasion, string lights are sure to add that extra touch of magic to your space. So sit back, relax, and enjoy the beautiful ambiance your string lights create.
Remember to turn off the lights when not in use to conserve energy
string lights, energy conservation, turning off lights
Consider using a timer to automatically turn the lights on and off
One way to add convenience and efficiency to your string lights is by using a timer to automatically turn them on and off. This is especially helpful if you tend to forget to turn off your lights before going to bed or leaving the house. By setting a timer, you can ensure that your lights are only on when they are needed, saving both energy and money.
Not only that, but it can also add a sense of security by giving the illusion that someone is home even when you’re away. Imagine coming home late at night to a warmly lit backyard, as if you had fairy lights sprinkled throughout the trees. It creates a magical ambiance that instantly lifts your mood.
So go ahead and invest in a timer for your string lights, and enjoy the convenience and beauty that it brings to your outdoor space.
Conclusion
Congratulations, you are now officially an RV awning string light expert! With these simple steps, you have mastered the art of illuminating your outdoor living space and creating a cozy atmosphere that will make all your fellow campers green with envy. No longer will you struggle with the tangled mess of lights or worry about damaging your awning. By utilizing clothespins, zip ties, and your impeccable engineering skills, you have revolutionized the way string lights are hung on an RV awning.
But it’s not just about practicality, oh no. You have transcended the realm of mere functionality and entered the realm of pure aesthetic brilliance. Your awning now glows like a beacon in the night, attracting fellow travelers like moths to a flame.
Your outdoor haven has become the envy of all campgrounds, as your string lights create a whimsical and enchanting ambiance that is bound to impress even the most skeptical of neighbors. So go forth, my string light aficionado, and spread the joy of a well-lit RV awning. Let your light shine bright for all to see, and may your nights be filled with laughter, relaxation, and the gentle sway of your perfectly hung string lights.
Happy camping, my friend, and may your adventures be as bright as the stars above.”
FAQs
Can I hang string lights on my RV awning?
Yes, you can hang string lights on your RV awning. There are various methods available, such as using clips, hooks, or adhesive strips specifically designed for outdoor use.
What type of string lights are suitable for RV awnings?
It is recommended to use waterproof and weather-resistant string lights designed for outdoor use. LED string lights are a popular choice as they are energy-efficient and have a longer lifespan.
How do I secure string lights to my RV awning without causing damage?
To prevent any damage to your RV awning, consider using adhesive hooks or clips that are specifically designed for outdoor use and do not require drilling. These can be easily attached and removed without leaving any marks or holes.
How do I determine the length of string lights needed for my RV awning?
Measure the length of your RV awning and add a few extra feet to allow for some slack. This will ensure that the string lights can be securely attached and evenly spread along the awning.
Can I connect multiple sets of string lights together for my RV awning?
Yes, you can connect multiple sets of string lights together, as long as the total wattage of the lights does not exceed the recommended capacity of your RV’s electrical system. It is important to read the manufacturer’s instructions for proper installation and safe usage.
How do I power the string lights on my RV awning?
There are several options to power the string lights on your RV awning. You can use a 12-volt power source from your RV’s battery, an external generator, or a portable solar panel. Make sure to follow the manufacturer’s instructions for safe electrical connections.
Can I leave the string lights on my RV awning overnight?
It is generally safe to leave the string lights on your RV awning overnight, especially if they are designed for outdoor use. However, it is always recommended to turn off or unplug the lights when not in use or when leaving your RV unattended to prevent any potential fire hazards or electrical issues.