
Have you ever found yourself on a long road trip in your semi-truck, needing to power your electronics or appliances while on the go? The solution lies in connecting a power inverter to your semi battery. A power inverter is a device that converts the 12-volt DC (direct current) from your truck’s battery into 110-volt AC (alternating current), allowing you to power various household devices or tools. Imagine having the freedom to charge your laptop, use a small refrigerator, or even enjoy a movie on your TV while parked for the night.
All of this is possible with a power inverter. It’s like having a mini power station right in your truck! Now, you might be wondering how to connect a power inverter to your semi battery. Don’t worry; it’s not as complicated as it sounds.
It only requires a few simple steps and some basic tools. Think of it as connecting your truck’s battery to a magical conduit that brings your electronics to life. In this blog post, we will guide you through the process of hooking up a power inverter to a semi battery.
We’ll provide easy-to-follow instructions, useful tips, and troubleshooting advice. By the end of this article, you’ll have all the knowledge you need to transform your truck into a fully equipped mobile power hub. Get ready to embark on a journey where convenience meets functionality.
With a power inverter connected to your semi battery, you’ll have the freedom to power your devices wherever the road takes you. So, let’s get started and unlock the full potential of your truck’s electrical system!
Table of Contents
Introduction
If you’re a long-haul truck driver or have a semi-truck, you may have thought about installing a power inverter to provide electricity while on the road. A power inverter is a device that converts DC (direct current) power from your semi truck’s battery into AC (alternating current) power that you can use to run appliances and charge electronic devices. Installing a power inverter to a semi battery is a relatively simple process that can make your life on the road a lot more convenient.
In this blog post, I’ll walk you through the steps of how to hook up a power inverter to your semi truck battery, so you can power your devices and appliances anytime you need them.
What is a power inverter and why would you want to use one in a semi truck?
power inverter, semi truck, use
Step 1: Gather the necessary materials
If you’re looking to power your electronics on the road, hooking up a power inverter to your semi battery can be a convenient solution. But before you begin, you’ll need to gather a few essential materials. First, you’ll need a power inverter that matches the voltage of your semi battery.
It’s important to choose an inverter that can handle the power requirements of your devices. Next, you’ll need a set of cables to connect the inverter to your battery. Make sure to choose cables with the appropriate gauge to handle the current that will be flowing through them.
Additionally, you’ll need some basic tools such as a wrench or socket set to loosen and tighten the battery terminal connectors. Lastly, it’s a good idea to have a fuse or circuit breaker to protect your inverter and electronics from any power surges or short circuits. Once you have all these materials, you’ll be ready to move on to the next step in the process.
What you will need to complete the installation
In order to successfully complete the installation of your new system, there are a few materials that you will need to have on hand. These materials will ensure that you have everything necessary to properly install and set up your system. The first step is to gather the necessary materials.
This may include tools such as a screwdriver, pliers, and wire cutters. You may also need electrical tape, wire nuts, and zip ties. Additionally, you will need to have the system itself, including any cameras, sensors, and control panels.
It is important to gather all of these materials before beginning the installation process to avoid any delays or hiccups along the way. By having everything you need ready to go, you can ensure that the installation process goes smoothly and efficiently.
Step 2: Determine the power requirements
So, you’re looking to hook up a power inverter to your semi battery? Well, the first step is to determine the power requirements of the devices you want to run off the inverter. This is important because it will help you choose the right size inverter for your needs. To determine the power requirements, you need to look at the wattage of each device you want to power.
Most electronic devices will have a label or sticker that provides this information. Simply add up the wattage of all the devices to get the total power requirements. Next, you’ll want to choose an inverter that can handle at least the total power requirements.
It’s a good idea to get an inverter with a little extra capacity to account for any power surges or fluctuations. Once you have the right size inverter, you can connect it to your semi battery. Make sure to follow the manufacturer’s instructions for proper installation.
Typically, you’ll need to connect the positive and negative terminals of the inverter to the corresponding terminals on the battery. You may also need to use a fuse or circuit breaker to protect the inverter and your devices. Overall, it’s important to make sure you choose the right size inverter and properly connect it to your semi battery to ensure safe and reliable power.
Calculating the power needed and choosing the right inverter
calculating power requirements, choosing the right inverter, power needs, determining power requirements, inverter selection. In order to choose the right inverter for your needs, it’s important to determine the power requirements of the devices you plan to connect to it. This step is crucial because using an inverter that doesn’t provide enough power can lead to a variety of issues, including damage to your devices or even the inverter itself.
To calculate your power needs, you’ll want to consider the wattage of each device you plan to connect. This information can typically be found on a device’s label or in the owner’s manual. Add up the wattage of all the devices you plan to use simultaneously, and make sure the inverter you choose has a wattage rating that exceeds this total.
It’s also important to consider any additional power needs you may have in the future. If you anticipate adding more devices or appliances to your setup down the line, it’s wise to choose an inverter with a higher wattage rating than you currently require.
Step 3: Locate a suitable location for the inverter
Now that you have your power inverter and the necessary tools, it’s time to find a suitable location for the inverter in your semi. This step is crucial as it will determine how easily you can access and use the inverter. Ideally, you want to choose a location that is close to the battery but also easily accessible.
A common spot to install the inverter is under the driver or passenger seat, as this allows for easy wiring and also keeps the inverter protected. Make sure to secure the inverter properly with screws or mounting brackets to ensure it doesn’t move around while you’re driving. Additionally, it’s important to choose a location that is well-ventilated, as inverters can generate heat when in use.
Avoid placing it near any flammable materials or in areas with no airflow. By carefully selecting the location for your inverter, you can ensure that it is both easily accessible and safe to use.
Factors to consider when selecting a location
When selecting a location for your inverter, there are several factors to consider. One important factor to keep in mind is the accessibility of the location. You want to choose a spot that is easily accessible for maintenance and repairs.
It should also be easily visible, so that you can easily monitor the performance of your inverter. Another important factor to consider is the proximity to the power source. Ideally, you want to choose a location that is close to the power source, as this will reduce power losses and improve the efficiency of your system.
Additionally, you should consider the environmental conditions of the location. Is it prone to extreme weather conditions, such as strong winds or heavy rainfall? These factors can impact the durability and performance of your inverter, so it’s important to choose a location that can withstand the elements. Lastly, consider the noise level of the location.
Inverters can produce some noise during operation, so you may want to choose a location that is away from areas where the noise may be a disturbance. By taking these factors into consideration, you can ensure that you select a suitable location for your inverter that will maximize its performance and longevity.
Step 4: Prepare the battery
So, you’ve got your power inverter and you’re ready to hook it up to your semi battery. The first step is to prepare the battery. Start by locating the battery in your semi-truck.
It is usually located in the engine compartment or under the driver’s seat. Before connecting the power inverter, it’s important to ensure that the battery is in good working condition. Check for any signs of corrosion or damage to the battery terminals.
If you spot any corrosion, clean it off using a mixture of baking soda and water. Once the terminals are clean, check the battery voltage using a voltmeter. A fully charged battery should read around 1
6 volts. If the voltage is lower than this, you may need to charge the battery before proceeding. Make sure to follow the manufacturer’s instructions for charging the battery.
Once the battery is cleaned and fully charged, you’re ready to move on to the next step of connecting the power inverter.
Ensuring the battery is ready for the inverter
battery, inverter, prepare
Step 5: Connect the inverter to the battery
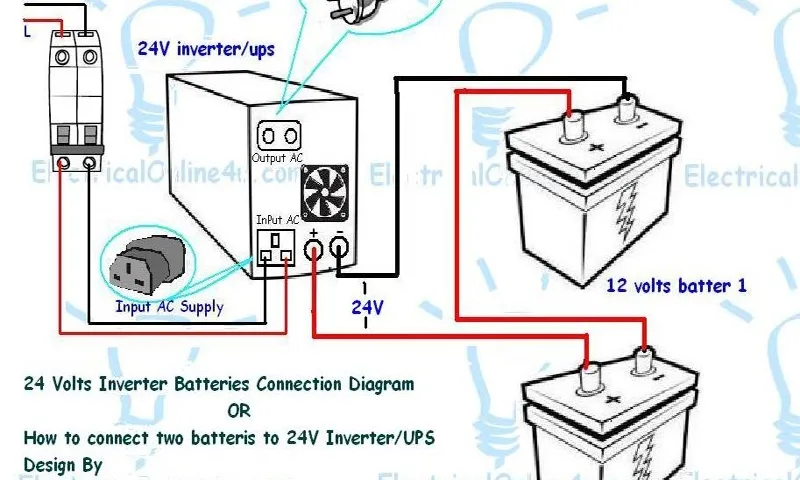
Now that you have gathered all the necessary tools and equipment, it’s time to connect the inverter to your semi battery. This step is crucial in ensuring that the power inverter functions properly and safely. Start by identifying the positive and negative terminals on your battery.
The positive terminal is usually marked with a “+” symbol, while the negative terminal is marked with a “-” symbol. Using the appropriate cables, connect the positive terminal of the battery to the positive terminal of the inverter. Make sure to tighten the connection securely to avoid any loose connections that could potentially cause a safety hazard.
Next, connect the negative terminal of the battery to the negative terminal of the inverter in the same manner. Once the connections are secure, double-check all the connections to ensure they are tight and secure. It’s important to be extra cautious during this step to prevent any accidents or damage to your equipment.
Once you have successfully connected the inverter to the battery, you can move on to the next step of setting up your power system. Remember to always follow the manufacturer’s instructions and guidelines when working with electrical equipment to ensure safe and efficient operation.
The proper way to make the connections
solar power inverter, battery connection, invertor-to-battery connection When it comes to setting up a solar power system, connecting the inverter to the battery is a crucial step. This connection allows the inverter to convert the direct current (DC) energy produced by the solar panels into alternating current (AC) energy that can be used to power your appliances. To make the proper connections, there are a few key steps to follow.
First, ensure that the inverter is turned off and that the battery is disconnected from any power source. Then, locate the positive and negative terminals on both the inverter and the battery. Connect the positive terminal of the battery to the positive terminal of the inverter using a battery cable, and do the same for the negative terminals.
Make sure the connections are tight and secure, as loose connections can lead to power loss or even damage to the equipment. Once the connections are made, double-check everything and turn on the inverter to test if it is working properly. By following these steps, you can ensure that your solar power system is properly connected and ready to provide electricity to your home or business.
Step 6: Test the setup
So, you’ve successfully set up your power inverter in your semi truck and connected it to the battery. Now it’s time to test the setup and ensure everything is working properly. The first thing you’ll want to do is turn on your inverter and make sure it’s receiving power.
You can do this by checking the display or indicator lights on the inverter itself. If everything looks good, the next step is to plug in a small electronic device, such as a phone charger, and see if it powers on. This will verify that the inverter is converting the battery’s DC power into AC power that can be used by your devices.
If your device powers on and charges, then congratulations – you’ve successfully hooked up a power inverter to your semi battery! However, if your device doesn’t power on or charge, there may be an issue with the connection or the inverter itself. Try double-checking all the connections and testing with a different device to see if the problem persists. If you’re still having trouble, it may be best to consult a professional or reach out to the manufacturer for assistance.
How to verify that the inverter is working correctly
To test the setup and verify that the inverter is working correctly, follow these steps. First, turn on all the appliances connected to the inverter. Check if they are receiving power from the inverter and functioning as expected.
You can do this by monitoring the power indicator lights or using a voltage meter to measure the output voltage. Secondly, test the backup power function of the inverter by disconnecting the main power supply and relying solely on the inverter for power. Make sure that all the appliances continue to run without any interruption.
Lastly, observe the behavior of the inverter during power fluctuations or surges. The inverter should be able to handle these fluctuations smoothly without causing any damage to the appliances. By performing these tests, you can ensure that the inverter is working correctly and providing uninterrupted and stable power supply to your appliances.
Step 7: Secure all connections
Now that you have successfully connected your power inverter to the semi battery, it’s important to take the necessary steps to ensure all connections are secure. This will help prevent any potential accidents or damage. To begin, double-check that all the connections are tight and secure.
Give each connection a gentle tug to make sure it doesn’t come loose. If any connections feel loose, tighten them accordingly. Next, you’ll want to insulate all the connections to protect against any potential short circuits.
You can use electrical tape or heat-shrink tubing to cover each connection. Make sure to wrap the tape or tubing tightly around the connection, leaving no exposed wires. Additionally, it’s a good idea to secure the power inverter to a stable surface to prevent it from moving or falling during the vehicle’s movement.
You can use mounting brackets or straps to securely attach the inverter to a fixed location. Lastly, remember to double-check that all the connections and the power inverter itself are properly grounded. Grounding is important for safety reasons and helps to prevent electric shock.
Follow the manufacturer’s instructions on how to properly ground the inverter and confirm that the ground is secure. By taking these steps to secure all connections, you can ensure that your power inverter operates safely and efficiently while providing the power you need for your semi battery.
Ensuring that the connections won’t come loose during travel
travel, connections, secure, loose When it comes to traveling, one of the biggest concerns is ensuring that all of our belongings stay safe and secure. And that includes our electronic devices and their connections. You definitely don’t want to unpack your laptop only to find that the charger or other cables have come loose during transit.
To avoid this frustrating situation, it’s important to take the time to properly secure all of the connections. Whether it’s using twist ties, Velcro straps, or even just some rubber bands, find a way to keep everything in place so that it doesn’t come loose during travel. Think of it like securing a package for shipping – you want to make sure everything is tightly wrapped and secure so that it arrives at its destination intact.
By taking a few extra minutes to secure your connections, you can have peace of mind knowing that everything will be in working order when you reach your destination. So don’t forget this crucial step before you head out on your next travel adventure.
Conclusion
And there you have it, my friends! A semi truck, a power inverter, and a gleeful union between man and machine. With a few simple steps and a little bit of ingenuity, you can unleash the power of electricity right there in your truck. Whether you’re a road warrior looking to charge your gadgets or a culinary adventurer hoping to cook up a storm on the open road, this handy guide has got you covered.
So go forth, my fellow truckers, and let the current flow! Just remember, with great power inverting comes great responsibility. Happy trucking, and may your battery always juice up and power on!”
Enjoying the benefits of a power inverter in your semi truck
One crucial step in installing a power inverter in your semi-truck is ensuring that all connections are secure. This is important to prevent any accidents or damage to the inverter or other components of your truck’s electrical system. Start by tightly securing the cables and wires, making sure they are properly connected to the inverter’s input and output terminals.
Double-check that the connections are firmly in place and that there are no loose or exposed wires. You can use zip ties or cable clamps to organize and secure the cables, keeping them neat and out of the way. Additionally, it is essential to check all other connections related to the inverter, such as the battery connections.
These should be clean and free of any corrosion, and the terminals should be tightened appropriately. By taking the time to secure all connections, you can ensure that your power inverter functions efficiently and safely while you enjoy the benefits it provides while on the road.
FAQs
How do I hook up a power inverter to a semi truck battery?
To hook up a power inverter to a semi truck battery, first, locate the battery in the truck. Then, connect the positive terminal of the inverter to the positive terminal of the battery using a suitable cable. Next, connect the negative terminal of the inverter to the negative terminal of the battery. Finally, double-check all connections and ensure that the inverter is properly grounded.
What size power inverter do I need for a semi truck battery?
The size of the power inverter you need for a semi truck battery depends on your power requirements. Generally, it is recommended to choose an inverter with a capacity of at least 1000 watts to handle common appliances and devices. However, if you plan to power larger equipment or multiple devices simultaneously, you may need a higher wattage inverter.
Can I run a refrigerator off a power inverter connected to a semi truck battery?
Yes, it is possible to run a refrigerator off a power inverter connected to a semi truck battery. However, it is important to consider the power requirements of the refrigerator and choose an inverter with sufficient capacity. Additionally, running a refrigerator on a power inverter may drain the battery quickly, so it is important to monitor and recharge the battery as needed.
Is it safe to hook up a power inverter to a semi truck battery?
Yes, it is generally safe to hook up a power inverter to a semi truck battery. However, it is important to follow safety precautions and ensure that the connections are secure and properly insulated. It is also advisable to use an inverter with built-in safety features, such as overload protection and short-circuit protection, to prevent any potential hazards.
Can I charge my laptop using a power inverter connected to a semi truck battery?
Yes, you can charge your laptop using a power inverter connected to a semi truck battery. Most laptops have a relatively low power consumption, so a standard power inverter with a capacity of 100-200 watts should be sufficient. Just make sure to use the appropriate charging cable and adapter for your laptop.
How long can I run a power inverter off a semi truck battery?
The duration for which you can run a power inverter off a semi truck battery depends on various factors, including the battery capacity, the power consumption of the devices connected to the inverter, and the efficiency of the inverter itself. In general, a fully charged semi truck battery can provide power for several hours to a power inverter, but it is always advisable to have a backup power source or recharge the battery periodically.
What precautions should I take when hooking up a power inverter to a semi truck battery?
When hooking up a power inverter to a semi truck battery, it is important to take the following precautions:
– Ensure that the battery is disconnected before making any connections.
– Use appropriate cables and connectors that are designed for the voltage and current levels involved.
– Make sure all connections are secure and properly insulated to prevent short circuits or accidental disconnections.
– Position the inverter and its cables in a safe and well-ventilated location to prevent overheating.
– Regularly monitor the battery voltage and recharge as needed to avoid excessive discharge or damage to the battery.