So you’ve just purchased a Thor Power Inverter TH3000 and you’re excited to start using it. But now you’re wondering, how exactly do you hook it up? Well, you’ve come to the right place. In this blog post, I’m going to walk you through the process of connecting your Thor Power Inverter TH3000 to your power source so you can start enjoying its benefits.
Before we dive into the nitty-gritty details, let me give you a brief overview of what a power inverter does. Essentially, a power inverter takes the DC (direct current) power from your battery and converts it into AC (alternating current) power, which is what most household appliances and electronics run on. This means that you can use your inverter to power devices like laptops, TVs, and even small appliances when you’re away from a traditional power source.
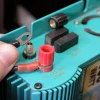
Now, let’s get back to hooking up your Thor Power Inverter TH3000. The first thing you’ll need to do is locate the positive and negative terminals on your inverter. These are usually labeled with a “+” and “-” symbol.
You’ll also need to locate the positive and negative terminals on your battery. Next, you’ll want to connect the positive terminal of your battery to the positive terminal of your inverter using a good quality cable. It’s important to make sure the connection is secure, as a loose connection can cause power issues or even damage your inverter.
Once you’ve connected the positive terminal, it’s time to move on to the negative terminal. Connect the negative terminal of your battery to the negative terminal of your inverter using another cable. Again, make sure the connection is secure.
Finally, it’s time to test your setup. Turn on your inverter and check to see if it’s working properly. You can do this by plugging in a device or appliance and seeing if it powers on.
Table of Contents
Introduction
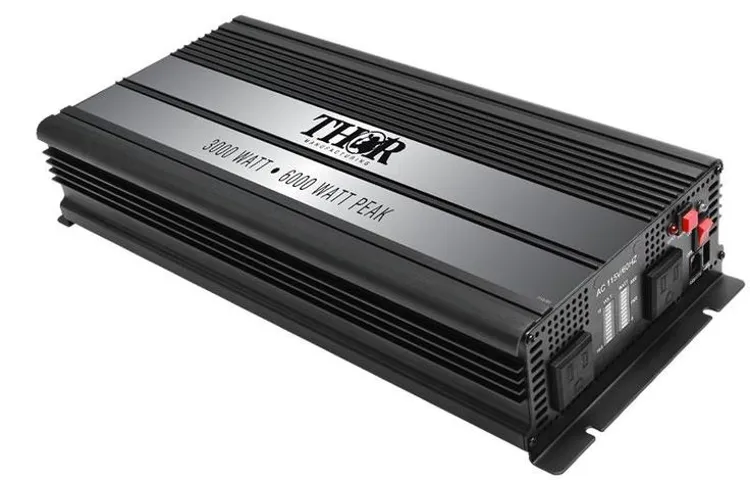
Looking to power up your electronics on the go? A thor power inverter th3000 might be just what you need. This powerful inverter can convert your vehicle’s battery power into AC power, allowing you to run appliances and electronics while you’re on the road. But how exactly do you hook up a thor power inverter th3000? It’s actually quite simple.
First, locate a suitable location for the inverter in your vehicle. It should be close to the battery and away from any sources of heat. Next, connect the positive and negative cables from the inverter to the positive and negative terminals of your vehicle’s battery.
Make sure to tighten the connections securely. Once the connections are secure, you can start using your inverter to power up your devices. Just plug them into the AC outlets on the inverter, and you’re good to go! So whether you’re on a road trip or going off-grid, a thor power inverter th3000 can make a world of difference in keeping your electronics powered up.
What is a Thor Power Inverter TH3000?
Thor Power Inverter TH3000 Introduction: Are you tired of being limited by the available power sources when you are out on the road or camping? If so, then you need to consider investing in a Thor Power Inverter TH3000. This powerful inverter is designed to convert DC power from your vehicle’s battery into AC power, allowing you to run a variety of devices and appliances while on the go. Whether you need to charge your laptop, power a small refrigerator, or run a power tool, the Thor Power Inverter TH3000 has got you covered.
In this blog post, we will explore the features and benefits of this impressive power inverter and why it is a must-have for any outdoor enthusiast or frequent traveler. So, let’s dive in and see what makes the Thor Power Inverter TH3000 so special!
Why do you need a power inverter?
power inverter, need a power inverter, purpose of a power inverter
Step 1: Gather the necessary materials
Are you ready to hook up a Thor Power Inverter TH3000? Well, the first step is to gather all the necessary materials. You will need the TH3000 power inverter itself, a power source such as a car battery or deep cycle battery, a set of batteries to power the inverter, a set of battery cables with the proper connectors, and a power inverter installation kit. It’s important to have all these items on hand before you begin the installation process to ensure a smooth and successful setup.
Once you have all the materials, you can move on to the next step of the process.
Thor Power Inverter TH3000
power inverter, Thor Power Inverter TH3000
12V battery
12V battery
Cables and connectors
When it comes to setting up a network or connecting different devices, having the right cables and connectors is essential. Without them, you won’t be able to establish a solid and reliable connection. So, to get started, you need to gather the necessary materials.
First, determine the types of cables and connectors you will need based on your specific needs. This can include Ethernet cables, USB cables, HDMI cables, and more. Next, make a list of the required lengths and quantities of each cable.
It’s always a good idea to have a few extra cables on hand, just in case. Additionally, consider the connectors you will need for your devices. For example, if you are connecting a laptop to an external monitor, you may need an HDMI to VGA adapter.
Lastly, make sure you have the appropriate tools for cable management and organization, such as cable ties or clips. By gathering all these materials beforehand, you will be well-prepared to set up your network or connect your devices seamlessly.
Tools (wrench, screwdriver, etc.)
In order to properly complete any DIY project, it is important to gather all the necessary tools beforehand. When it comes to working with tools, it’s always best to be prepared. For a typical home improvement project, some common tools you might need include a wrench, screwdriver, hammer, and pliers.
These tools come in various sizes and types, so it’s important to have a variety on hand to tackle different tasks. It can be frustrating to start a project only to realize that you don’t have the right tools to complete it. By taking the time to gather all the necessary materials at the beginning, you can save yourself a lot of time and frustration down the line.
Step 2: Prepare the power inverter
When it comes to hooking up a Thor Power Inverter TH3000, the second step is to prepare the power inverter for installation. This is an important step to ensure that the inverter functions properly and efficiently. To prepare the power inverter, there are a few key things to consider.
First, make sure to read the instruction manual that comes with the inverter. This will provide you with important information on how to properly set up and configure the inverter. It’s also important to determine the correct voltage and power requirements for your specific setup.
This will help ensure that the inverter is compatible and capable of handling your power needs. Additionally, you’ll want to gather all the necessary tools and materials, such as wiring, connectors, and mounting brackets, to properly install the inverter. Taking the time to prepare the power inverter before installation will help ensure a smooth and successful setup process.
Check the specifications of the power inverter
power inverter, specifications, prepare
Connect the battery cables to the power inverter
power inverter, DIY installation, battery cables, connect Step 2 in the DIY installation process of a power inverter is preparing the device for connection. Once you’ve chosen the perfect power inverter for your needs, it’s time to get it ready for use. Start by locating the positive and negative battery terminals on your vehicle.
These will likely be labeled with a “+” and “-” sign. Next, grab the battery cables that came with your inverter. One end of these cables should have connectors that fit snugly onto the battery terminals.
Grab the red cable, which is positive, and connect it to the positive terminal. Then, take the black cable, which is negative, and connect it to the negative terminal. Make sure the connections are secure, as a loose connection can lead to poor performance or even damage to your inverter.
Once the cables are connected, you’re ready to move on to the next step in the installation process. With the battery cables securely attached to the power inverter, you can be confident that you’ll have a reliable and efficient source of power wherever you go. So go ahead and connect those cables, and start enjoying the convenience and versatility of your new power inverter.
Ensure a secure connection
power inverter, secure connection, prepare. In order to ensure a secure connection when using a power inverter, it is important to properly prepare the device before use. This is crucial to avoid any potential electrical hazards or damage to the equipment.
First, make sure that the power inverter is placed on a stable surface and is securely mounted or fastened to prevent any movement or vibration while in use. Next, check and tighten all the connections, including the input cables and output cables. It is important to ensure that the cables are clean and free from any corrosion or damage.
Additionally, it is recommended to use a secure electrical box or enclosure to house the power inverter, providing an extra layer of protection. Finally, double-check that the power source and any connected devices are compatible with the power inverter’s specifications to prevent any issues or malfunctions. By taking these steps to prepare the power inverter, you can ensure a secure and safe connection for all your electrical needs.
Step 3: Connect the power inverter to the battery
So, you’ve got yourself a Thor Power Inverter TH3000 and you’re ready to start using it. The first step to hooking up this power inverter is to connect it to a battery. This is an essential step in making sure that your power inverter is receiving the power it needs to function properly.
To do this, locate the positive (+) and negative (-) terminals on your battery. Next, you’ll want to connect the positive cable from the power inverter to the positive terminal of the battery. Make sure the connection is secure and tight.
Then, take the negative cable from the power inverter and connect it to the negative terminal of the battery. Again, ensure a secure connection. Once both cables are connected, you can turn on your power inverter and start enjoying its benefits.
Just remember to always follow the manufacturer’s instructions and guidelines when hooking up any power equipment to ensure your safety and the longevity of your devices.
Locate the positive and negative terminals of the battery
When connecting a power inverter to a battery, it is crucial to locate the positive and negative terminals of the battery. These terminals are usually labeled with a plus sign (+) and a minus sign (-) respectively. The positive terminal will typically be colored red, while the negative terminal is colored black.
It is important to connect the power inverter correctly to avoid any electrical mishaps. Once you have identified the terminals, you can proceed with the next steps of connecting the power inverter to the battery. Remember, it’s like connecting the right puzzle pieces together to ensure a smooth and seamless operation of the power inverter.
Connect the positive cable to the positive terminal
“power inverter” Have you ever found yourself in a situation where you need to power your electronic devices but you’re nowhere near an electrical outlet? Whether you’re camping in the great outdoors or dealing with a power outage at home, a power inverter can come to the rescue. But how exactly do you connect a power inverter to your battery? Well, step three is simple: connect the positive cable to the positive terminal. This might seem like a no-brainer, but it’s an important step that should not be overlooked.
By connecting the positive cable to the positive terminal, you’re ensuring that the power from the battery flows correctly to the power inverter. It’s just like connecting the positive end of a battery to the positive end of a flashlight – if you get the connections mixed up, you won’t be able to power your flashlight. So make sure you pay attention to the positive cable and positive terminal on your battery and connect them securely.
And don’t forget to tighten the connection with a wrench to ensure a solid connection that won’t come loose while you’re using the power inverter. Once you’ve got the positive cable connected, you’re ready to move on to the next step in setting up your power inverter.
Connect the negative cable to the negative terminal
power inverter, battery, connect, negative cable, negative terminal, electricity, vehicle, car battery, electrical device, power supply, parallel, direct connection, safety precautions. Alright, now that you’ve got your power inverter and you’re ready to connect it to your vehicle’s battery, it’s time for step three: connecting the power inverter to the battery. This step is crucial because it’s what allows the power inverter to draw electricity from the battery and supply it to your electrical devices.
To start, you’ll need to locate the negative terminal on your vehicle’s battery. It’s usually marked with a “-” symbol and is often black in color. Once you’ve found it, take the negative cable from your power inverter and connect it to the negative terminal on the battery.
This is a simple parallel connection that creates a direct pathway for the electricity to flow. When connecting the negative cable, make sure it’s securely fastened to the terminal. You don’t want any loose connections that could potentially lead to electrical issues down the line.
Also, be careful to avoid any accidental contact between the negative cable and any metal parts of the vehicle. It’s important to note that connecting the power inverter directly to the battery bypasses the vehicle’s electrical system. This means that the power inverter will draw power from the battery even when the engine is turned off.
So, make sure to turn off any electrical devices connected to the power inverter when the vehicle is not running, as leaving them on could drain the battery. Lastly, always follow safety precautions when working with electricity. Make sure to wear gloves and protective eyewear, and avoid working in wet or damp conditions.
Also, double-check all connections before turning on the power inverter to ensure everything is connected properly and securely. So, that’s it for step three: connecting the power inverter to the battery. With this step complete, you’re one step closer to enjoying a reliable power supply for all your electrical needs, whether you’re on the road or off-grid.
Tighten the connections
power inverter, battery, connections, tighten, step 3
Step 4: Test the power inverter
So, you’ve got yourself a THOR TH3000 power inverter and you’re ready to hook it up. Great choice! Now it’s time to test that bad boy out and see what it can do. To start, make sure you have everything you need for testing the power inverter.
You’ll need a battery, some electrical devices to connect to the inverter (like a phone charger or a small appliance), and of course, the power inverter itself. First, connect the positive (+) terminal of the battery to the positive (+) terminal on the power inverter. Then, connect the negative (-) terminal of the battery to the negative (-) terminal on the inverter.
This will complete the circuit and allow the power inverter to draw power from the battery. Now, it’s time to connect your electrical devices. Plug in your phone charger or appliance into one of the AC outlets on the power inverter.
Make sure the device is turned on and functioning properly. Next, turn on the power inverter. There should be a power switch or button that you can press to activate it.
You should see some lights or indicators on the inverter, indicating that it is powered on. If everything is connected correctly, you should now be able to use your electrical devices as you normally would. For example, if you plugged in a phone charger, you should be able to charge your phone.
It’s important to monitor the power draw of your devices while using the power inverter. The THOR TH3000 has a maximum power output of 3000 watts, so be mindful of the power requirements of the devices you’re using. If you try to power too many devices that require a lot of power, you may overload the inverter and cause it to shut off.
Turn on the power inverter
power inverter, test power inverter, turn on power inverter. In the previous steps, we have discussed how to choose a power inverter, connect it to your battery, and ground it properly. Now, it’s time to put your power inverter to the test and see if it’s working correctly.
Before you start testing the power inverter, make sure that all the connections are secure and there are no loose wires. To turn on the power inverter, locate the power switch or button on the device. It is usually a simple on/off toggle switch or a button that you need to press.
Now, you may be wondering, why is it necessary to test the power inverter? Well, testing the power inverter is crucial to ensure that it is functioning properly and providing the required amount of power. One way to test the power inverter is by connecting a small electrical device, such as a lamp or a fan, to the inverter’s AC outlet. Once you have connected the device, turn on the power inverter and see if the device starts working.
If the device doesn’t turn on or operates at a lower power level than expected, it could indicate a problem with the power inverter. Another way to test the power inverter is by using a multimeter. Set the multimeter to measure AC voltage and connect it to the AC output of the inverter.
The multimeter will then display the voltage produced by the inverter. Make sure that the voltage reading matches the specifications of your power inverter. If the reading is significantly lower or higher than expected, there may be an issue with the inverter’s output.
Testing your power inverter is essential to ensure that it is working correctly and providing the power you need. By following the steps mentioned above, you can easily test your power inverter and identify any potential problems. Remember to always prioritize safety when working with electrical devices and consult the manufacturer’s manual for specific instructions on testing your power inverter.
Check if the power inverter is working
“power inverter” Are you experiencing issues with your power inverter? Don’t worry, we’re here to help! Step 4 in troubleshooting your power inverter is to test it and check if it’s working properly. A power inverter is responsible for converting DC (direct current) power from a battery into AC (alternating current) power so that you can use it to operate household appliances or electronics. To test the power inverter, start by checking the connections.
Ensure that the inverter is securely connected to both the battery and the appliance you’re trying to power. If the connections are loose or corroded, it can affect the inverter’s performance. Next, check the inverter’s display or indicators.
If it’s turned on but not producing any power, there may be an issue with the internal components. In this case, it’s best to consult a professional for further troubleshooting or repair. Additionally, you can test the inverter by connecting a small appliance, like a radio or a light bulb, and see if it functions properly.
If it doesn’t, there could be a problem with the inverter itself, and it may need to be replaced. Testing the power inverter is an essential step to ensure that it’s working correctly and providing power to your appliances and electronics.
Test the power output
solar power output, power inverter, test power output, solar panels In Step 4 of setting up your solar power system, you will need to test the power output using a power inverter. The power inverter is responsible for converting the direct current (DC) energy produced by the solar panels into usable alternating current (AC) energy that can be used to power your home or business. Testing the power output is an essential step to ensure that your solar panels are generating the expected amount of energy.
To test the power output, you will first need to connect the power inverter to the solar panels. This can typically be done by connecting the DC input on the inverter to the output of the solar panels. Once the inverter is connected, you can turn it on and monitor the power output.
There are a few different ways to test the power output of your solar panels. One method is to use a power meter, which can measure the voltage and current output of the panels. By multiplying the voltage and current, you can calculate the power output in watts.
Another method is to use a data logging device, which can record and analyze the power output over time. It’s important to test the power output of your solar panels regularly to ensure that they are functioning properly and generating the expected amount of energy. If you notice a decrease in power output, it could indicate a problem with the panels or the inverter.
By catching issues early, you can avoid a decrease in energy production and potentially costly repairs. In conclusion, testing the power output of your solar panels using a power inverter is a crucial step in setting up and maintaining your solar power system. Regularly monitoring the power output will help ensure that your panels are generating the expected amount of energy and allow you to quickly identify and address any issues that may arise.
With proper testing and maintenance, you can maximize the efficiency and lifespan of your solar power system.
Step 5: Use the power inverter
So, you’ve got your Thor Power Inverter TH3000 and you’re ready to hook it up. Well, let me tell you, it’s easier than you might think. The first thing you’ll need to do is make sure your DC power source is turned off.
This could be a battery or a generator. Once that’s done, locate the positive and negative terminals on the back of the power inverter. The positive terminal will usually be marked with a plus sign (+) and the negative terminal will be marked with a minus sign (-).
Now, take the positive (+) wire from your DC power source and connect it to the positive terminal on the power inverter. Make sure the connection is secure. Next, take the negative (-) wire from your DC power source and connect it to the negative terminal on the power inverter.
Again, make sure the connection is secure. Once everything is connected, you can turn on your DC power source and your Thor Power Inverter TH3000 should be ready to use. Remember, safety is key, so always double-check your connections before turning on any power source.
With the power inverter hooked up properly, you’ll be able to convert DC power to AC power and use it to run all sorts of devices, from small appliances to power tools. So go ahead, power up and enjoy the convenience of portable AC power wherever you go.
Connect your devices to the power inverter
power inverter, devices, connect, use Once you have successfully installed your power inverter, the next step is to connect your devices to it so that you can start using it. Begin by identifying the types of devices you want to power using the inverter. This could be anything from laptops and smartphones to small appliances like fans or televisions.
Take into consideration the power rating of each device and ensure that the power inverter can handle the load. Most power inverters come with multiple AC outlets, so you can connect multiple devices at the same time. Simply plug the power cords of your devices into the AC outlets on the power inverter.
Be mindful of how much power each device is drawing to avoid exceeding the power inverter’s capacity. Now that your devices are connected, you can start using them as you would with a regular power source. Whether you’re on a road trip or experiencing a power outage at home, the power inverter gives you the freedom to stay connected and powered up.
Ensure proper usage and safety precautions
power inverter, proper usage, safety precautions
Conclusion
In conclusion, hooking up a Thor Power Inverter TH3000 is as exhilarating as riding a lightning bolt and as effortless as a flick of Thor’s mighty hammer. Just like the God of Thunder himself, this power inverter harnesses the raw energy from the heavens and transforms it into a force to be reckoned with. But fear not, mortal beings, for I shall guide you through this daring endeavor with the precision and finesse of a well-aimed Mjolnir throw.
By following these steps, you’ll be able to conquer any electronic power challenge that comes your way: Like a true Norse warrior, gather your tools and prepare for battle. A wrench, a screwdriver, and some electrical tape shall be your trusty allies during this quest.
Locate the battery, the life force of your power inverter. Connect the red cable to the positive terminal of the battery, just as Thor wields his weapon with unwavering strength and determination.
With the elegance of a frost giant dance, attach the black cable to the negative terminal of the battery. This grounding connection ensures a stable and reliable power flow, just like Thor’s unshakable grip on his beloved hammer.
Now, feast your eyes upon the wondrous TH3000. Mount it in a secure location, ensuring that it is easily accessible for future adjustments.
Like Thor’s enchanted belt, it must always be within reach for optimal performance. The time has come to embrace the electrifying moment.
Summary of the steps
power inverter
Final thoughts on using the Thor Power Inverter TH3000
power inverter, inverters, electrical appliances, inverter, power source, electrical outlet, Tesla, car battery, 120V AC, DC power, battery terminals, power generation, power supply, electrical systems, portable power, renewable energy, power backup, emergency power, power outage. Step 5: Use the power inverter Now that we have covered the installation process of the Thor Power Inverter TH3000, it’s time to put it to use! Using a power inverter opens up a range of possibilities for powering your electrical appliances when you don’t have access to a traditional power source. Whether you’re on a road trip, camping in the great outdoors, or experiencing a power outage at home, a power inverter can come to the rescue.
To begin using the inverter, ensure that it is connected to a power source, such as a car battery, using the appropriate cables. It’s important to note that the TH3000 is a 12V DC to 120V AC power inverter, meaning it converts the DC power from the battery into AC power that is suitable for most household appliances. Once the inverter is connected, you can start plugging in your devices.
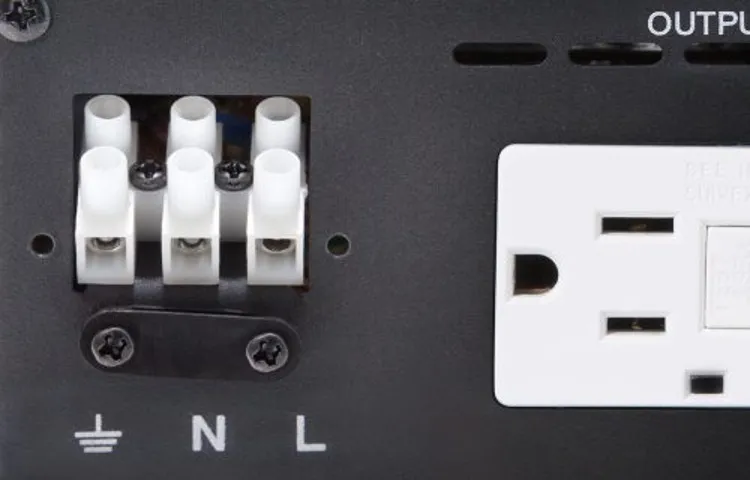
Keep in mind that the TH3000 has various outlets to accommodate different types of appliances. It features two 120V AC outlets, a USB port, and a digital display that shows important information such as the input voltage and output wattage. Before plugging in your devices, make sure you understand their power requirements to avoid overloading the inverter.
One of the great advantages of using a power inverter is its portability. You can easily take it with you wherever you go, providing a reliable power backup for emergencies or remote locations. For example, if you’re camping and want to charge your phone or power a small fan, the TH3000 can be a lifesaver.
Similarly, if you’re on a road trip and want to use your laptop or other electronic devices, the inverter can tap into the car battery to provide a convenient power source. In conclusion, using a power inverter like the Thor Power Inverter TH3000 opens up a whole new world of options for powering your electrical appliances. Whether you’re using it as a backup power source during a power outage or taking it with you on outdoor adventures, this versatile device can make a big difference.
Just make sure to follow the manufacturer’s instructions, understand your appliances’ power requirements, and take advantage of the various outlets and features provided by the inverter. With the TH3000, you can enjoy the convenience of electricity wherever you go.
FAQs
Can the TH3000 power inverter be connected to a car battery?
Yes, the TH3000 power inverter is designed to be connected to a car battery for portable power on the go.
What is the maximum power output of the TH3000 power inverter?
The TH3000 power inverter has a maximum power output of 3000 watts, allowing it to power various household devices.
How do I connect the TH3000 power inverter to my car battery?
To connect the TH3000 power inverter to your car battery, simply attach the positive terminal to the red cable and the negative terminal to the black cable.
Can the TH3000 power inverter be used in an RV or camper?
Yes, the TH3000 power inverter can be used in RVs and campers, providing convenient power for appliances and electronics while on the road.
Is the TH3000 power inverter compatible with solar panels?
Yes, the TH3000 power inverter is compatible with solar panels, allowing you to harness solar energy and convert it into usable power.
Can I use the TH3000 power inverter to power sensitive electronic devices?
Yes, the TH3000 power inverter is equipped with advanced safety features to protect sensitive electronic devices from power surges or fluctuations.
What type of outlets does the TH3000 power inverter have?
The TH3000 power inverter features multiple AC outlets and USB ports, providing versatile connectivity options for a wide range of devices.