Welcome to our complete guide on how to hook up a power inverter! Have you ever found yourself in a situation where you needed to access AC power while on the go? Whether you’re on a road trip, camping, or working remotely, having a power inverter can be a game-changer. It allows you to convert DC power from your vehicle’s battery into usable AC power, enabling you to charge your electronic devices or use small appliances. Now, you may be wondering, how exactly do I hook up a power inverter? Don’t worry – we’ve got you covered.
In this guide, we’ll walk you through the step-by-step process of connecting a power inverter to your vehicle’s battery. We’ll cover everything from choosing the right inverter for your needs to safely connecting the cables and powering up your devices. So, let’s dive in and get started! Imagine this: you’re on a long road trip and your phone’s battery is about to die.
You desperately need to charge it to stay connected or use GPS navigation. A power inverter can come to the rescue. It acts as a bridge between your vehicle’s battery and your electronic devices, providing them with the necessary power to keep you connected and entertained.
Choosing the right power inverter is crucial to ensure compatibility and efficiency. There are various types and sizes available on the market, ranging from small inverters that can power just a few devices to larger ones capable of running appliances like mini-fridges or power tools. Consider the power requirements of the devices you plan to use and select an inverter that can handle the load.
Once you have your power inverter, it’s time to connect it to your vehicle’s battery. First, identify a suitable location near the battery to mount the inverter. This should be a well-ventilated area away from any moving parts or areas prone to excessive heat.
Mounting the inverter securely will prevent it from vibrating or getting damaged while on the road. Next, it’s time to connect the cables. Begin by disconnecting the negative (-) terminal of your vehicle’s battery to avoid any accidental short circuits.
Table of Contents
Introduction
So you’ve decided to upgrade your power supply, huh? Well, I’ve got just the thing for you – a power inverter! This nifty device allows you to convert direct current (DC) power from your car’s battery into alternating current (AC) power, giving you the ability to plug in and charge your devices on the go. But how exactly do you hook one up? Don’t worry, it’s a lot simpler than it sounds. All you need to do is locate your car’s battery, connect the positive cable from the inverter to the positive terminal, and the negative cable to the negative terminal.
Once you’ve made sure everything is secure and tightened up, you’re good to go! Just be sure to follow all safety precautions and consult the user manual for your specific power inverter model. Before you know it, you’ll be enjoying the convenience of powering your devices wherever you go!
What is a Power Inverter?
power inverter
Why Would You Need a Power Inverter?
power inverter
Types of Power Inverters
power inverters, types of power inverters
Choosing the Right Power Inverter
So you’re looking to hook up a power inverter, huh? Well, you’ve come to the right place! Choosing the right power inverter can make all the difference in powering your devices efficiently and safely. First off, let’s talk about what a power inverter actually does. Basically, it converts DC (direct current) power from your car or battery into AC (alternating current) power, which is what most household appliances and electronics use.
This means that you can power things like laptops, smartphones, and even small appliances while you’re on the go. When selecting a power inverter, there are a few key things to consider. First, you’ll want to determine how much power you’ll need.
Look at the wattage of the devices you plan to power and make sure the inverter can handle that amount. It’s always a good idea to get an inverter with a little extra power capacity, just to be safe. Next, think about the type of power inverter you need.
There are two main types: modified sine wave and pure sine wave. Modified sine wave inverters are more affordable and can handle most electronics, but they may not be compatible with sensitive devices like medical equipment or certain appliances. Pure sine wave inverters, on the other hand, provide a clean and consistent power output, making them a better choice for these types of devices.
Another important consideration is the input voltage of the inverter. Make sure that the input voltage matches the power source you plan to use, whether it’s a 12V car battery or a 24V boat battery. Lastly, don’t forget about safety features.
Look for an inverter that has built-in protection against things like overvoltage, overload, and overheating. These features will help protect both your devices and the inverter itself. So, there you have it! Choosing the right power inverter doesn’t have to be complicated.
Determining Your Power Requirements
power requirements, power inverter
Understanding Voltage and Wattage
power inverter, understanding voltage, wattage, choosing the right power inverter. Power inverters are essential devices that convert DC (direct current) power into AC (alternating current) power, allowing you to use your electronic devices and appliances on the go. When it comes to choosing the right power inverter, understanding voltage and wattage is crucial.
Voltage refers to the force or pressure at which electricity flows, while wattage is the amount of power that an appliance or device requires to operate. To select the correct power inverter, you need to consider the voltage and wattage requirements of the devices you plan to use. By matching the voltage and wattage specifications with the power inverter’s capabilities, you can ensure that your electronic devices and appliances work efficiently and safely.
So, next time you’re looking to power up your devices on the road or in remote areas, make sure you choose a power inverter that meets your voltage and wattage needs.
Considering the Waveform Type
power inverter, waveform type, Choosing the Right Power Inverter
Deciding on the Inverter Size
power inverters, choosing the right size, inverter size, determining the inverter size, power requirements, efficient power supply. Choosing the right power inverter can be a daunting task, especially when it comes to deciding on the inverter size. The size of the inverter is crucial as it directly affects its performance and efficiency in providing power to your appliances or devices.
To determine the right inverter size, you need to consider your power requirements. Start by calculating the total power consumption of the appliances or devices that you intend to run using the inverter. This includes not only the continuous power requirements but also the peak power requirements.
Peak power requirements refer to the sudden surge of power needed to start certain appliances. Once you have determined the total power requirements, it’s important to choose an inverter size that can handle the load comfortably. It’s recommended to opt for an inverter that has a capacity that is slightly higher than your calculated power requirements.
This will ensure that the inverter can handle the peak power demands without any issues. In addition, choosing a larger inverter size allows for future expansion or addition of more appliances. However, it’s essential to strike the right balance as choosing an inverter that is too large for your needs can lead to inefficiencies and unnecessary costs.
Furthermore, larger inverters tend to consume more power even when there’s no load, resulting in higher electricity bills. Therefore, it’s crucial to choose an inverter size that provides efficient power supply without wasting energy. To summarize, choosing the right inverter size involves calculating your power requirements accurately and selecting an inverter that can handle the load comfortably.
Consider both continuous and peak power requirements to ensure optimal performance. Remember, it’s better to choose a slightly larger inverter size rather than one that is too small or too large. By doing so, you can have a reliable and efficient power supply for your appliances and devices.
Preparing for Installation
So you’ve decided to install a power inverter in your vehicle to make life on the road a little easier. But how exactly do you go about hooking up a power inverter? Don’t worry, it’s not as complicated as it might seem. The first thing you’ll want to do is find a suitable location for the inverter.
You’ll want to make sure it’s secure and easily accessible. Once you’ve found a good spot, you can start connecting the inverter to your vehicle’s battery. This is where things can get a little tricky, so it’s important to follow the manufacturer’s instructions carefully.
Typically, you’ll need to connect the positive terminal of the inverter to the positive terminal of the battery, and the negative terminal of the inverter to the vehicle’s chassis. It’s also a good idea to install a fuse between the battery and the inverter to protect against any potential electrical issues. Once everything is connected, it’s a good idea to test the inverter to make sure it’s working properly.
Simply plug in a small electronic device, like a phone charger, and see if it powers on. If everything is working as it should, you’re good to go! You now have a reliable power source for all your on-the-go devices.
Tools and Materials Needed
“tools and materials for installation” When it comes to preparing for a DIY installation project, having the right tools and materials can make all the difference. Not only will it save you time and frustration, but it will also ensure that the job is done properly. Before you start, it’s essential to have a few basic tools on hand, such as a measuring tape, hammer, screwdriver, level, and utility knife.
These tools will come in handy for a wide range of tasks, from measuring and cutting materials to assembling and securing them in place. In addition to these essential tools, you’ll also need to gather the necessary materials for your specific project. This could include things like nails, screws, wall anchors, adhesive, caulk, and paint or stain depending on the nature of the installation.
By taking the time to gather all the necessary tools and materials before you begin, you’ll be well-prepared for a successful installation experience.
Safety Precautions
When it comes to installing any new equipment or appliances in your home, safety should be your top priority. This is especially true when it comes to electrical installations, as improper wiring or installation can lead to serious accidents or even fire hazards. To ensure the safety of your home and your family, it is important to take some precautions before attempting any installations.
First, make sure you turn off the power source to the area where you will be working. This can help prevent any accidental electrocutions. It is also important to wear appropriate safety gear, such as goggles and gloves, to protect yourself from any potential hazards.
Additionally, make sure to follow the manufacturer’s instructions carefully and consult a professional if you are unsure about any part of the installation process. By taking these precautions, you can ensure a safe and successful installation.
Locating a Suitable Installation Spot
“Finding the Perfect Spot for Your Installation: Preparing for the Big Day” So, you’ve finally decided to take the plunge and install that new thingamajig you’ve been eyeing for weeks. But before you jump headfirst into the installation process, there are a few things you need to consider. One of the most important factors is finding the perfect spot for your installation.
After all, you wouldn’t want to go through all the trouble of setting everything up, only to realize it’s not in the right place, right? First things first, take a moment to assess the area where you plan to install your new gadget. Is it cluttered with other equipment or furniture? Is there enough space for the installation to fit comfortably? The last thing you want is to try to squeeze your new toy into a tight corner or risk damaging it by placing it too close to other objects. Next, think about the surrounding environment.
Is the area prone to excessive heat, moisture, or dust? These factors can greatly affect the performance and longevity of your installation. If you’re considering installing something in your bathroom or kitchen, for example, you’ll want to make sure it’s resistant to water and steam. Another important consideration is accessibility.
Will you be able to easily access your installation once it’s in place? It’s always a good idea to leave some extra space around the installation so you can maneuver around it if need be. And if you’re installing something that requires regular maintenance or adjustments, make sure you can easily reach it without having to move other items out of the way. Lastly, think about aesthetics.
Will your installation complement the overall look of the room? You don’t want something that sticks out like a sore thumb or clashes with the existing decor. Consider the color, design, and style of your new addition, and how it will blend in with its surroundings. By taking the time to carefully consider these factors, you’ll ensure that your installation goes off without a hitch.
So, before you crack open that toolbox, take a step back and give some thought to the perfect spot for your new gadget. Trust me, it’ll be worth it in the long run!
Installation Steps
If you’re wondering how to hook up a power inverter, don’t fret – it’s actually quite simple! First, you’ll want to locate the battery in your vehicle or the designated power source. Next, you’ll need to connect the positive terminal of the power inverter to the positive terminal of the battery and the negative terminal of the power inverter to the negative terminal of the battery. Make sure to tighten the connections securely to prevent any loose contact.
Once the connections are in place, you can turn on the power inverter by flipping the switch or pressing the power button. Voila! You’re ready to start using your power inverter to charge your devices or power small appliances on the go.
Step 1: Disconnecting the Battery
“Step 1: Disconnecting the Battery” When it comes to installing a new car stereo, one of the first steps you need to take is disconnecting the battery. This is an important safety precaution that should not be skipped. You see, when you work with electrical components in your car, there is always a risk of short circuits or electrical shocks.
By disconnecting the battery, you eliminate that risk and ensure your safety throughout the installation process. Disconnecting the battery is quite simple. First, locate the battery under the hood of your car.
It is usually a rectangular box with two cables attached to it – a positive cable (usually red) and a negative cable (usually black). Start by disconnecting the negative cable. This is important because it ensures that no electricity is flowing through the system.
To do this, use a wrench or a socket set to loosen the nut on the negative cable clamp. Once it is loose, slide the clamp off the negative terminal of the battery. After disconnecting the negative cable, move on to the positive cable.
Using the same wrench or socket set, loosen the nut on the positive cable clamp and slide the clamp off the positive terminal of the battery. By disconnecting both cables, you have effectively disconnected the battery from the rest of the electrical system in your car. Now that the battery is disconnected, you can proceed with installing your new car stereo.
But remember, when you’re finished with the installation, make sure to re-connect the battery in the reverse order – positive cable first, followed by the negative cable. This ensures that everything is properly connected and prevents any electrical issues. So there you have it, step one of installing a new car stereo: disconnecting the battery.
Step 2: Mounting the Inverter
inverter, mounting So, you’ve got your solar panels set up on your roof and you’re ready to start harnessing the power of the sun. But before you can start enjoying all that free electricity, there’s one important step you need to complete: mounting the inverter. The inverter is a critical component of your solar power system, as it converts the DC energy generated by the solar panels into AC energy that can be used in your home or fed back into the grid.
In order to ensure optimal performance and longevity of your inverter, it needs to be installed correctly. Here are the steps you’ll need to follow to mount your inverter.
Choose the right location: The first step in mounting your inverter is finding the right location for it. Ideally, the inverter should be installed in a well-ventilated area that is protected from direct sunlight, extreme temperatures, and moisture. This could be a garage, basement, or utility room.
You’ll also want to make sure the location is easily accessible for any maintenance or repairs that may be needed in the future. Mount the inverter: Once you’ve chosen the location, it’s time to mount the inverter.
Most inverters come with mounting brackets or holes that allow for easy attachment to a wall or other secure surface. Make sure to use the appropriate screws or bolts to securely fasten the inverter in place. It’s important to ensure that the inverter is mounted in a stable and secure manner to prevent any accidental damage or movement.
Connect the wiring: After the inverter is securely mounted, you’ll need to connect the wiring. This will involve connecting the DC output cables from the solar panels to the DC input terminals on the inverter, as well as connecting the AC output cables from the inverter to your electrical panel or grid connection point.
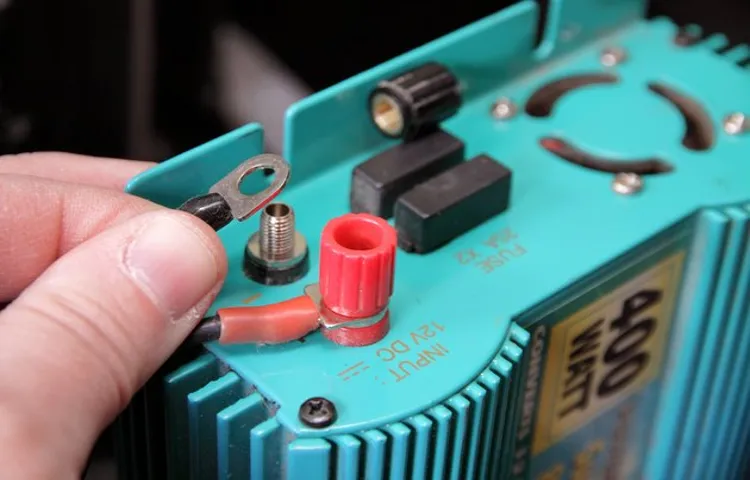
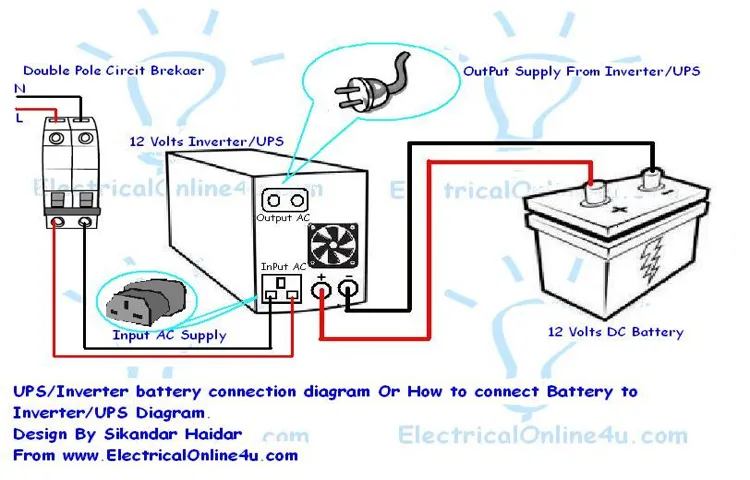
Step 3: Connecting the Inverter to the Battery
connecting inverter to battery, installation steps, battery to inverter connection, connecting power inverter to battery. Now that you have your power inverter and battery ready, it’s time to connect them together for a seamless power supply. The first step is to ensure that your inverter is turned off and that you have the necessary tools on hand.
Begin by locating the positive and negative terminals on both the battery and the inverter. These terminals are usually labeled as “+” and “-“. Connect the positive terminal of the battery to the positive terminal of the inverter using a properly sized wire.
Next, connect the negative terminal of the battery to the negative terminal of the inverter using another appropriately sized wire. It’s essential to ensure that the wires are secure and tightly connected to prevent any loose connections or unstable power flow. Once the connections are made, double-check to ensure that they are correctly attached and that there are no loose connections.
The battery to inverter connection is a crucial step in the installation process, as it determines the flow of power from the battery to the inverter. Remember to follow the manufacturer’s instructions and safety guidelines when making these connections. With the battery successfully connected to the inverter, you are one step closer to enjoying the benefits of a reliable power supply.
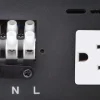
Step 4: Connecting the Inverter to the Electrical System
connecting the inverter to the electrical system, installation steps, inverter wiring, electrical connections, secure grounding, electrical codes and regulations, solar system installation. Now that you have your solar panels in place and the inverter ready to go, it’s time to connect the inverter to your electrical system. This is a crucial step in the installation process, as it ensures that the energy generated by your solar panels can be converted into usable electricity for your home.
The first step in connecting the inverter is to properly wire it to your electrical system. This involves making sure that all the necessary electrical connections are securely in place. You’ll want to follow the manufacturer’s instructions carefully, as each inverter may have slightly different wiring requirements.
It’s always a good idea to double-check your work to ensure that all connections are tight and secure. Next, you’ll need to establish a secure grounding connection for your inverter. This is important for safety reasons and to ensure the proper functioning of your electrical system.
You’ll want to consult your local electrical codes and regulations to determine the specific requirements for grounding in your area. It may be necessary to install additional grounding rods or connect to an existing grounding system. Once the wiring and grounding are complete, you can connect the inverter to your electrical system.
This typically involves connecting the inverter to your main electrical panel or distribution board. Again, it’s important to carefully follow the manufacturer’s instructions and consult electrical codes to ensure that the connection is done correctly. After connecting the inverter, it’s a good idea to test the system to make sure everything is working properly.
You can do this by turning on the inverter and monitoring the electricity usage in your home. If you notice any issues or abnormalities, it’s important to address them right away to ensure the safety and efficiency of your solar system. In conclusion, connecting the inverter to your electrical system is an essential step in the installation process.
Step 5: Testing the Power Inverter
power inverter, testing power inverter, installation steps
Troubleshooting and Tips
Have you ever found yourself needing to power a device or appliance while on the go? Maybe you’re planning a road trip and want to use your laptop or charge your phone in the car. In situations like these, a power inverter can be a life-saver. But how do you hook it up? Well, let me break it down for you.
First, you’ll need to locate your car’s battery. Most car batteries are located in the engine compartment, but some may be in the trunk or under the rear seat. Once you’ve found it, you’ll need to connect the positive (+) and negative (-) cables from the power inverter to the battery terminals.
It’s important to make sure you connect the cables properly, as reversing the polarity could damage the inverter or even your car’s electrical system. Once the cables are securely connected, you can plug your device or appliance into the inverter’s outlets and enjoy the power on the go. Just remember to turn off the inverter when you’re not using it, as leaving it connected can drain your car’s battery.
With these simple steps, you’ll be able to power your devices wherever your adventures take you. So, what are you waiting for? Get out there and explore!
Common Problems and Solutions
Common Problems and Solutions in Troubleshooting and Tips When it comes to troubleshooting technical issues, we have all been there. It can be frustrating and time-consuming, especially when you don’t know where to start. But don’t worry, we’ve got you covered with some common problems and their solutions to make troubleshooting a breeze.
One common problem that many people encounter is slow internet speed. If you find that your internet is sluggish, there are a few things you can try. First, check if there are any devices on your network that are using a lot of bandwidth, such as downloading large files or streaming videos.
If so, you may need to limit their usage or prioritize your own device for a faster connection. Another solution is to try resetting your router by either turning it off and on again or resetting it to its factory settings. This can often resolve any temporary issues that may be causing the slow speed.
Another common problem is when your computer starts to freeze or crash randomly. This can be incredibly frustrating, especially when you’re in the middle of an important task. One solution is to check for any updates or patches for your operating system and installed programs.
Outdated software can sometimes cause compatibility issues that lead to crashes. You should also make sure that your computer is not overheating, as excessive heat can cause hardware malfunctions. Cleaning the dust out of your computer’s fans and ensuring proper ventilation can help prevent overheating and improve its overall performance.
A third common problem is when your smartphone battery drains quickly. We all rely heavily on our phones, so it can be frustrating when the battery doesn’t last as long as we need it to. One solution is to disable any unnecessary features that may be draining battery life, such as location services, push notifications, or background app refresh.
Tips for Optimal Performance
Optimal performance is essential for ensuring a smooth and efficient experience when using any electronic device. Whether it’s a computer, smartphone, or tablet, there are a few troubleshooting tips that can help you enhance performance and fix any issues you may be experiencing. Firstly, it’s important to regularly update your device’s software.
These updates often contain bug fixes and performance improvements that can help eliminate any glitches or slow-downs. Secondly, clearing up storage space can significantly improve performance. Delete any unnecessary files or apps and consider moving larger files to external storage.
Additionally, managing your device’s background processes can contribute to improved performance. Close any unnecessary apps running in the background and consider disabling any unnecessary notifications. Lastly, it’s crucial to protect your device from malware and viruses.
Install reputable antivirus software and regularly scan your device for any potential threats. By following these troubleshooting tips, you can optimize your device’s performance and ensure a seamless user experience.
Conclusion
And that, my friends, is how you go from powerless to limitless power with a simple flick of a switch! With the knowledge of how to hook up a power inverter, you hold the key to a whole new world of possibilities. No longer will you be at the mercy of the whims of charging outlets and dead car batteries. Whether you’re embarking on an epic road trip, wanting to power up your favorite gadgets on a camping adventure, or just need a reliable backup power source, the power inverter is your trusty sidekick.
So go forth, fellow power enthusiasts, and let your devices charge with the fervor of a thousand lightning bolts! But remember, with great power comes great responsibility. So, be sure to follow all safety precautions and handle your power inverter with care. Happy powering!”
Safety Reminders
In our ongoing efforts to prioritize your safety, we’d like to provide some helpful troubleshooting and tips. We understand that accidents or malfunctions can happen, so it’s important to stay informed on how to handle these situations. When it comes to troubleshooting, one of the best things you can do is to familiarize yourself with the user manual that came with your device.
This manual will often contain solutions for common problems and can serve as a go-to resource when things go wrong. Additionally, reaching out to customer support can be extremely beneficial. They may be able to guide you through the troubleshooting process or offer assistance in resolving the issue.
In terms of tips, we want to emphasize the importance of regular maintenance. Many accidents can be prevented by simply taking the time to inspect your devices regularly. This can include checking for any loose or frayed wires, ensuring that all safety features are in working order, and replacing any worn-out parts.
It’s also crucial to follow the manufacturer’s guidelines for maintenance tasks such as cleaning, oiling, or adjusting certain components. Remember, even the most well-maintained devices can experience unexpected malfunctions. In these situations, it’s essential to prioritize your safety and the safety of those around you.
If you notice any unusual behavior or suspect that something is not working as it should, it’s always better to err on the side of caution and seek professional help. By familiarizing yourself with troubleshooting techniques and following proper maintenance procedures, you can minimize the risk of accidents and ensure that your devices are working properly. Your safety is our top priority, and we want to ensure that you feel confident and secure while using our products.
Enjoying the Benefits of a Power Inverter
power inverter, troubleshooting, tips, benefits The power inverter is truly a game-changer when it comes to powering our electronic devices on the go. Whether you’re camping, traveling in an RV, or just need a reliable source of electricity in your car, a power inverter can come in handy. However, like any other electronic device, power inverters can sometimes experience issues.
Here are some common troubleshooting tips to help you get the most out of your power inverter. One of the most common problems with power inverters is the inability to turn on or provide power to your devices. If you’re facing this issue, the first thing you should check is the connection.
Make sure that the inverter is properly connected to your battery or power source. Sometimes, loose connections can prevent the inverter from working correctly. Additionally, check the cables for any damage or fraying, as this can also affect the power flow.
Another common issue is when the inverter is turned on, but it doesn’t deliver the expected power output. This can be frustrating, especially if you’re relying on the inverter to power critical devices. One potential cause of this problem is an overload.
Power inverters are designed to handle a certain amount of power, so if you’re trying to run multiple high-powered devices simultaneously, the inverter may not be able to keep up. In this case, it’s important to prioritize your devices and only run those that are essential. We’ve all experienced a power outage at some point, and having a power inverter can be a lifesaver in those situations.
However, in some cases, the inverter may not be able to provide power even when the battery is fully charged. This can be due to a faulty inverter or a problem with the battery itself. If you’ve ruled out any connection issues or overload problems, it may be time to consult a professional or, in some cases, replace the inverter.
FAQs
Can I hook up a power inverter to my car battery?
Yes, you can hook up a power inverter to your car battery by connecting the positive and negative terminals of the inverter to the corresponding terminals on the battery.
What size power inverter do I need to run my household appliances?
The size of the power inverter you need depends on the wattage of your household appliances. To determine the size, add up the wattage of all the appliances you want to run simultaneously and choose an inverter that can handle that total wattage.
How should I connect a power inverter to a solar panel system?
To connect a power inverter to a solar panel system, you will need to first connect the DC output of the solar panels to a charge controller. Then, connect the charge controller to the DC input of the power inverter, and finally, connect the AC output of the inverter to your electrical system.
Can I use a power inverter in my RV?
Yes, you can use a power inverter in your RV to convert the DC power from your battery to AC power for running appliances. Make sure to choose an inverter that is suitable for the electrical system in your RV.
What precautions should I take when using a power inverter?
When using a power inverter, make sure to follow these precautions:
– Choose the appropriate size and type of inverter for your specific needs.
– Ensure that the inverter is properly grounded.
– Use proper wiring and connectors to connect the inverter to the power source and appliances.
– Do not exceed the maximum wattage capacity of the inverter.
– Regularly check the inverter for any signs of damage or malfunction.
Can I run sensitive electronic devices with a power inverter?
Yes, you can run sensitive electronic devices with a power inverter, but it is recommended to use a pure sine wave inverter, as it produces a clean and stable output similar to the power grid. This helps prevent any potential damage to the sensitive electronics.
How do I install a power inverter in my boat?
To install a power inverter in your boat, you will need to connect the inverter to the boat’s battery. Run appropriate gauge wiring from the battery to the inverter and ensure proper fusing and connection. It is also important to consider the marine environment and choose an inverter specifically designed for marine applications.