Hey there! Welcome to our blog on the topic of “Introduction.” Whether you’re a newbie in the blogging world or a seasoned pro, we’ve got you covered. In this post, we’ll dive into the importance of a captivating introduction and how it can make or break your content.
Imagine this – you stumble upon an intriguing article with a promising title. You click on it, excited to devour the juicy information it promises. But wait, what’s this? The first few lines are dull and uninspiring, leaving you wondering if it’s even worth continuing.
We’ve all been there, right? Well, that’s where a killer introduction comes into play. It’s the gateway that captures your readers’ attention and entices them to stay for the long haul. In a world full of distractions and short attention spans, a well-crafted opening paragraph is like a magnet, drawing people in and igniting their curiosity.
Think of it as the spark that ignites a fire. It sets the tone for the rest of your piece and establishes a connection with your audience. An introduction should be like a warm greeting, inviting readers in and making them feel at home.
It should make them feel like they’re in capable hands, ready to embark on a captivating journey together. But how exactly do you create such an introduction? What elements should you include to make it truly memorable? Well, fret not, because we’re here to walk you through it. From attention-grabbing hooks to clear and concise statements, we’ll explore the various techniques you can use to ensure your introduction stands out from the crowd.
So, whether you’re writing a blog post, an essay, or even a novel, understanding the power of an engaging introduction is crucial. It’s the first impression your readers will have, and we’ll show you how to make it count. So, are you ready to take your writing to the next level? Let’s dive in and learn the art of crafting an introduction that leaves a lasting impact!
Table of Contents
What is a power inverter?
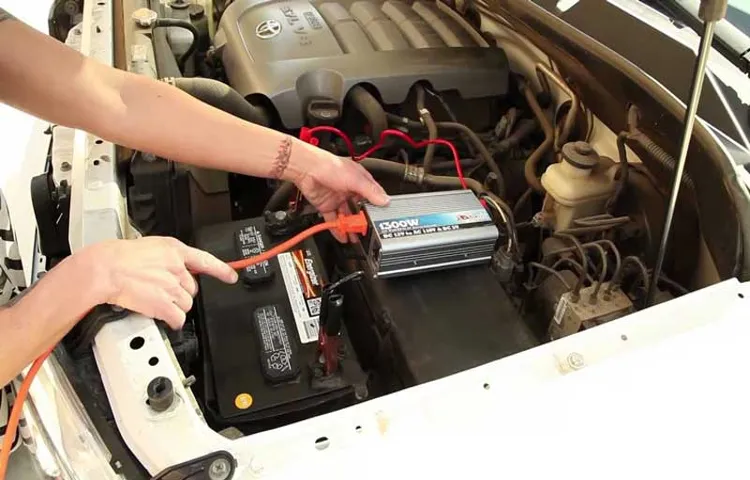
Are you tired of running out of battery power when you’re on the go? Well, a power inverter might be just what you need to keep your devices charged and ready to use. A power inverter is a device that converts DC (direct current) power from your car’s battery into AC (alternating current) power that can be used to power electronic devices such as laptops, phones, and small appliances. It’s like having a portable outlet in your car! But how do you hook up a power inverter to your car battery? It’s actually quite simple.
First, locate your car’s battery and make sure the engine is turned off. Then, connect the positive (+) and negative (-) terminals of the power inverter to the corresponding terminals on the battery, making sure to tighten the connections securely. Finally, turn on the power inverter and plug in your devices.
Voila! You’re now ready to power up on the go. Just make sure to always use the appropriate fuse and follow the manufacturer’s instructions to ensure safe and proper use of your power inverter. So next time you’re on a road trip or stuck in traffic, you’ll never have to worry about your devices running out of juice again!
Definition of a power inverter
power inverter, definition
Types of power inverters
power inverters A power inverter is a device that converts DC (direct current) power from a battery or another DC source into AC (alternating current) power. This allows you to use appliances and devices that require AC power when you don’t have access to a traditional AC power source. Power inverters are commonly used in cars and RVs, as well as in emergency and off-grid situations.
There are several different types of power inverters, each with its own characteristics and applications. The most common type of power inverter is the modified sine wave inverter. This type of inverter is more affordable and suitable for most basic applications.
It produces an AC output that closely approximates a sine wave, but with some distortion. Modified sine wave inverters are compatible with most electronic devices, but some sensitive equipment, such as certain medical devices and high-end audio equipment, may not function properly with this type of inverter. Another type of power inverter is the pure sine wave inverter.
This type of inverter produces a clean and pure sine wave, similar to the waveform of utility power. Pure sine wave inverters are more expensive than modified sine wave inverters but offer better performance and compatibility with a wider range of devices. They can power sensitive equipment without any issues, making them ideal for applications that require high-quality AC power, such as medical equipment and certain types of electronics.
There are also power inverters that are specifically designed for grid-tied applications. These grid-tied inverters are used in solar power systems and are capable of converting the DC power generated by solar panels into AC power that can be fed back into the electrical grid. Grid-tied inverters often include advanced features that monitor the performance of the solar system and ensure that it operates efficiently.
In conclusion, power inverters are essential devices that allow you to convert DC power into AC power, enabling the use of appliances and devices that require AC power in various settings. There are different types of power inverters available, ranging from modified sine wave inverters to pure sine wave inverters and grid-tied inverters. Choosing the right type of power inverter depends on your specific needs and the devices you plan to power.
Why would you want to hook up a power inverter to your car battery?
If you’ve ever been on a road trip or found yourself in need of electricity while on the go, you may have wondered how to hook up a power inverter to your car battery. Well, let me tell you, it’s not as complicated as it may seem. A power inverter is an incredibly useful device that allows you to convert the DC power from your car battery into AC power that can be used to charge or operate various electronic devices.
Whether you need to power your laptop, charge your phone, or even run a small appliance, a power inverter can come in handy. It’s like having a portable electrical outlet in your car! So why would you want to hook up a power inverter to your car battery? The answer is simple – convenience. Having the ability to generate electricity while on the go gives you the freedom to stay connected and powered up no matter where you are.
Whether you’re on a long road trip, camping in the great outdoors, or simply stuck in a power outage, a power inverter can save the day. So, if you’re ready to take control of your power supply and never be caught without electricity again, it’s time to learn how to hook up a power inverter to your car battery.
Benefits of using a power inverter in your car
power inverter, car battery, benefits
Common uses for a power inverter in a car
power inverter in a car, hook up a power inverter, car battery, common uses for a power inverter in a car
What do you need to hook up a power inverter to your car battery?
If you’re looking to power your devices on the go, a power inverter can be a life-saver. But how do you hook it up to your car battery? Don’t worry, it’s easier than you might think. First, you’ll need a power inverter that matches your power needs.
This is important because if you try to run devices that draw more power than the inverter can handle, it could cause damage. Once you have the right inverter, you’ll need some basic tools like wire strippers, electrical tape, and a wrench. Start by disconnecting the negative terminal of your car battery to prevent any electrical mishaps.
Then, use the wire strippers to remove a small section of insulation from the end of the positive cable from the inverter. Connect this cable to the positive terminal of the car battery and secure it with a wrench. Next, remove a small section of insulation from the end of the negative cable from the inverter and connect it to the negative terminal of the car battery.
Finally, wrap the exposed sections of cable with electrical tape to ensure they’re secure. And that’s it! You’ve successfully hooked up a power inverter to your car battery. Now you can power your devices wherever the road takes you.
List of required tools and materials
power inverter, car battery, tools and materials, hook up, require
Important safety precautions
hook up a power inverter to your car battery. If you want to power your electronic devices while on the go, hooking up a power inverter to your car battery can be a great solution. But before you dive into the project, there are a few important safety precautions you need to be aware of.
First of all, make sure to disconnect the negative terminal of your car battery before you start working on the electrical connections. This will prevent any accidental short circuits or electric shocks. Additionally, it is crucial to choose the right size of power inverter for your needs.
If you plan on powering large appliances, such as a refrigerator or power tools, you will need a high wattage inverter. On the other hand, if you only need to charge small electronic devices like laptops or phones, a lower wattage inverter will suffice. Remember to read the manufacturer’s instructions and specifications carefully before purchasing your power inverter.
Lastly, it is vital to follow all the installation instructions provided by the manufacturer and ensure that all connections are secure and well-insulated. This will prevent any loose wires or exposed electrical components that can cause a fire hazard. So, keep these safety precautions in mind and enjoy the convenience of having a power inverter in your car!
Step-by-step guide to hooking up a power inverter to your car battery
If you’re looking to power electronics or appliances from your car, a power inverter is a convenient and portable solution. Hooking up a power inverter to your car battery may seem complicated, but it’s actually quite simple once you know the steps. First, you’ll want to choose the right size power inverter for your needs.
Consider the wattage of the devices you plan to power and choose an inverter that can handle that load. Once you have your power inverter, start by locating your car’s battery and disconnecting the negative terminal. This will prevent any accidental power surges.
Next, connect the positive terminal on the inverter cable to the positive terminal on your car battery. Make sure the connection is secure and tight. Then, connect the negative terminal on the inverter cable to a grounded metal surface in your car, such as a bolt or the car’s frame.
Finally, reattach the negative terminal of your car battery. Now, you’re ready to start using your power inverter. Make sure to follow the manufacturer’s instructions for connecting your devices to the inverter, and never exceed the inverter’s wattage limit.
With these simple steps, you’ll be able to easily hook up a power inverter to your car battery and power your electronics on the go.
Step 1: Choose the right power inverter
In order to hook up a power inverter to your car battery, the first step is to choose the right power inverter for your needs. This is an important decision because it will determine the maximum wattage that your inverter can handle and therefore the types of appliances you can power. For example, if you want to run a small device like a laptop or phone charger, a smaller inverter with a lower wattage may be sufficient.
However, if you want to power larger appliances like a refrigerator or power tools, you’ll need a more powerful inverter with a higher wattage. It’s also important to consider the type of inverter, such as a modified sine wave or pure sine wave inverter, as this can affect the quality of power output. Taking the time to research and choose the right power inverter will ensure that you have the necessary power to run your desired appliances and prevent any potential damage to your car’s battery.
Step 2: Prepare your car battery
To start hooking up a power inverter to your car battery, the first thing you need to do is prepare your car battery. This involves ensuring that it is in good condition and fully charged. A weak or dead battery will not be able to provide the necessary power for the power inverter to function properly.
So, before you start the installation process, it’s a good idea to check the battery’s voltage using a multimeter. If it’s below 12 volts, you may need to charge or replace the battery. It’s also important to disconnect the negative terminal of the battery before working on any electrical connections to avoid any potential accidents or damage.
Additionally, make sure to clean the battery terminals and connectors to ensure a good connection. This can be done by using a wire brush or a battery terminal cleaner. By taking these steps to prepare your car battery, you can ensure a smooth and safe installation process for your power inverter.
Step 3: Connect the power inverter to the car battery
power inverter, car battery, connect, step-by-step guide, hooking up So, you’ve got your power inverter and now you’re ready to connect it to your car battery. Don’t worry, it’s easier than you might think. Just follow this simple step-by-step guide and you’ll have it up and running in no time! Step 1: First, make sure your car is turned off and the keys are removed from the ignition.
Safety first! Step 2: Locate your car’s battery. It’s usually under the hood, but in some cars, it may be located in the trunk or elsewhere. If you’re not sure, consult your owner’s manual or do a quick internet search for your specific make and model of car.
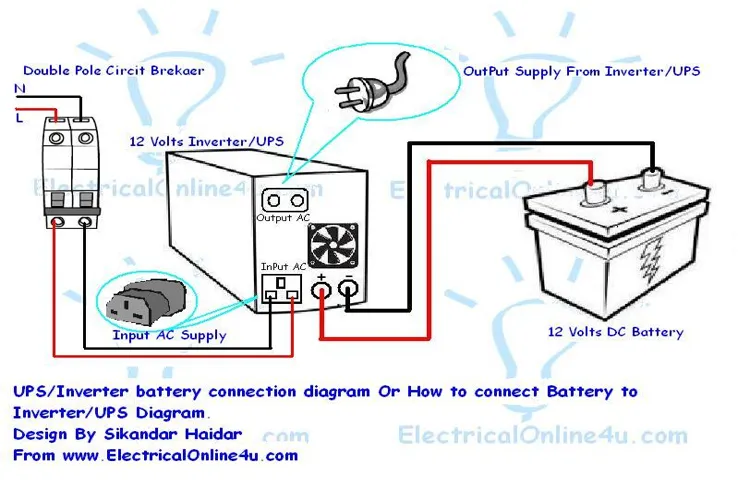
Step 3: Take a close look at your power inverter. You should see two sets of cables coming out of it – a set of red cables and a set of black cables. The red cables are positive (+) and the black cables are negative (-).
Step 4: Connect the red cable to the positive terminal on your car battery. This is typically marked with a “+” sign. Make sure the connection is tight and secure.
Step 5: Next, connect the black cable to the negative terminal on your car battery. This is typically marked with a “-” sign. Again, make sure the connection is tight and secure.
Step 6: Now, you’re ready to test it out! Start your car and turn on the power inverter. You should see a light or indicator on the inverter, showing that it’s receiving power from the battery. Step 7: With the power inverter connected, you can now plug in and use any devices that require AC power.
Step 4: Route the power inverter cables
One of the most important steps in hooking up a power inverter to your car battery is to route the power inverter cables correctly. This ensures that the power is being transferred safely and efficiently from the battery to the inverter. To do this, you will need to locate the positive and negative terminals on your car battery.
These are usually labeled with a plus (+) and minus (-) sign. Once you have located these terminals, you will need to connect the positive terminal of the battery to the positive terminal of the power inverter using a thick gauge wire. The negative terminal of the battery should be connected to the negative terminal of the power inverter using another thick gauge wire.
It is important to ensure that the connections are secure and tight to avoid any power loss or damage to the equipment. Additionally, it is advisable to use a fuse or a circuit breaker in line with the positive wire to protect the inverter from any power surges or short circuits. By following these steps, you will be able to route the power inverter cables correctly and safely power your devices while on the road.
Step 5: Connect your devices to the power inverter
Now that you have your power inverter ready, it’s time to connect your devices to it. This step is pretty straightforward, but it’s still important to follow the proper precautions to avoid any potential risks or damage. To start, make sure your car is turned off and the keys are removed from the ignition.
This will prevent any accidental power surges or electrical mishaps. Once you’ve done that, locate the power inverter in your car. It’s usually located in the trunk or under the hood, near the battery.
Next, you’ll want to take your DC cables from the power inverter and connect them to the positive and negative terminals of your car battery. The positive terminal is usually marked with a “+” symbol, and the negative terminal is marked with a “-” symbol. Simply attach the positive cable to the positive terminal and the negative cable to the negative terminal.
Make sure the connections are tight and secure to ensure proper power transfer. Once the cables are connected to the battery, you can then plug in your devices to the power inverter. This can be done using the AC outlets on the inverter.
Just like any regular power outlet, you can plug in your devices such as laptops, smartphones, or even small appliances. Make sure not to overload the inverter by plugging in too many devices or devices that require a large amount of power. Finally, you’re ready to turn on your car and test out your newly connected devices.
Start your car and check that your devices are receiving power from the inverter. You can do this by turning on your devices and checking if they are charging or functioning properly. If everything is working as expected, then congratulations! You’ve successfully connected your devices to the power inverter and can now enjoy using them on the go.
Tips and troubleshooting
So, you’ve decided to take your camping trip to the next level by installing a power inverter in your car to charge your electronic devices on the go. Great idea! But how do you go about hooking up a power inverter to your car battery? Well, it’s actually pretty simple. First, you’ll need to locate your car’s battery.
This is usually found under the hood or in the trunk. Once you’ve located the battery, you’ll need to disconnect the negative terminal. This will ensure that you don’t accidentally create a short circuit while working with the power inverter.
Next, you’ll need to find a suitable location for your power inverter. It’s best to choose a spot that is easily accessible but also out of the way, so it doesn’t interfere with your driving. Once you’ve found the perfect spot, you’ll need to mount the power inverter securely.
This can be done using zip ties or brackets, depending on the design of your inverter. Now, it’s time to connect the power inverter to the battery. First, attach the positive cable from the inverter to the positive terminal on the battery.
Then, attach the negative cable from the inverter to a metal grounding point on the car’s chassis. Once everything is securely connected, you can reattach the negative terminal to the battery. And that’s it! You’ve successfully hooked up your power inverter to your car battery.
Just make sure to follow all safety precautions and consult the manual for your specific inverter for any additional instructions or considerations. Happy travels!
Common issues and how to fix them
In the world of technology, it’s not uncommon to run into issues or glitches with our devices or software. Thankfully, many common problems have simple solutions that can be easily fixed. One common issue that people encounter is a slow or lagging computer.
This can be frustrating, especially when you’re in the middle of an important task. To fix this, you can start by closing any unnecessary programs or applications that are running in the background. This can help free up memory and improve the overall performance of your computer.
Another issue that many people come across is a frozen screen. If your screen becomes unresponsive, you can try pressing Ctrl+Alt+Delete to open the task manager and end any unresponsive programs. If that doesn’t work, you can try restarting your computer to resolve the issue.
Another common problem is a weak or unstable internet connection. This can be annoying, especially if you’re trying to stream a movie or play an online game. To fix this, you can try resetting your router or modem.
Simply unplugging it for a few seconds and then plugging it back in can often resolve the issue. If that doesn’t work, you can try moving closer to the router or using an Ethernet cable for a wired connection. In some cases, the problem may be with your internet service provider, so contacting them for assistance may be necessary.
Lastly, another common issue users encounter is a depleted battery on their devices. Whether it’s a smartphone, tablet, or laptop, dealing with a dead battery can be inconvenient. To avoid this problem, you can try adjusting your device’s settings to conserve battery life, such as dimming the screen or setting it to sleep after a certain period of inactivity.
Tips for maximizing the efficiency of your power inverter
power inverter, maximize efficiency, tips, troubleshooting
Conclusion
In conclusion, hooking up a power inverter to your car battery is like giving your vehicle an electrifying upgrade. It’s like putting a superhero cape on your car, giving it the power to transform from a regular road machine into a mobile powerhouse. Just imagine, with a power inverter, you can plug in all sorts of devices and gadgets, turning your car into a party on wheels or a mobile office.
Whether you want to charge your laptop on a long road trip or have a mini fridge to keep your drinks icy cold, the possibilities are endless. But remember, my fellow car enthusiasts, with great power comes great responsibility. Make sure to follow all safety precautions and properly install your power inverter.
Don’t let your car battery feel overwhelmed by the immense power it now possesses. Treat it with care and it will reward you with the convenience and joy of having an electrified car. So, get ready to embrace the future of car technology.
Hook up that power inverter and let your car battery feel the surge of power coursing through its veins. Just be prepared to answer when your car starts demanding its own personal theme song – it’s earned it. Happy powering, my electrified road warriors!
Summary of the benefits and steps of hooking up a power inverter to your car battery
power inverter, car battery, benefits, steps, tips, troubleshooting Using a power inverter to connect to your car battery can offer a range of benefits, allowing you to use electrical appliances and devices while on the road. Whether you want to power a laptop, charge your phone, or even run small appliances such as a mini fridge or coffee maker, a power inverter can make it possible. The first step is to choose the right power inverter for your needs, considering the wattage and voltage requirements.
Once you have the inverter, you can connect it to your car battery by attaching the positive and negative cables. It’s important to make sure the car engine is turned off before connecting the inverter. Once connected, you can start using your electrical devices.
There are a few tips to keep in mind when using a power inverter. Firstly, it’s important to know the power rating of your car battery and make sure it is suitable for the inverter you are using. You should also be mindful of the power draw of the devices you are connecting to the inverter, as using high-power appliances for an extended period of time can drain your car battery.
Additionally, it’s a good idea to periodically check the connections to ensure they are secure and not becoming loose. If you encounter any issues or troubleshooting problems with your power inverter, there are a few things you can try. Firstly, check the fuse of the inverter to ensure it hasn’t blown.
If the fuse is intact, you can try disconnecting and reconnecting the cables to reset the inverter. If the problem persists, it may be worth checking the battery voltage to ensure it is providing enough power. It’s also important to use the inverter within its recommended temperature range, as extreme heat or cold can affect its performance.
Overall, with the right equipment and proper precautions, hooking up a power inverter to your car battery can greatly enhance your on-the-go electrical capabilities.
Final thoughts and recommendations
“Tips and troubleshooting for a smooth gaming experience” Here are some tips and troubleshooting steps to help you have a smooth gaming experience. Firstly, make sure your computer meets the minimum requirements for the game you want to play. Check the system requirements and make sure your computer has enough RAM, a fast processor, and sufficient storage space.
Updating your graphics card driver can also improve gaming performance. Next, close any unnecessary background processes and applications before starting the game. These can use up valuable system resources and affect the game’s performance.
You can use the Task Manager to check for any unnecessary processes running in the background and close them. If you are experiencing lag or slow performance while playing online games, try connecting your computer directly to the router with an Ethernet cable instead of using a wireless connection. This can reduce latency and improve the stability of your connection.
Another troubleshooting step is to lower the graphics settings in the game. If your computer is struggling to run the game smoothly, reducing the graphics settings can help improve performance. Lowering the resolution, turning off anti-aliasing, and reducing the level of detail can all make a difference.
If you are still having issues, it may be worth checking for any available updates for the game. Developers often release updates to address performance issues and bugs. Make sure you have the latest version of the game installed.
Lastly, consider upgrading your hardware if you consistently experience performance issues with multiple games. Upgrading your graphics card or increasing the amount of RAM in your computer can help improve gaming performance. In conclusion, by ensuring your computer meets the game’s requirements, closing unnecessary background processes, optimizing your internet connection, adjusting graphics settings, updating the game, and upgrading your hardware if necessary, you can troubleshoot and improve your gaming experience.
FAQs
What is a power inverter and what does it do?
A power inverter is a device that converts DC (direct current) from a car battery into AC (alternating current) for powering electronic devices.
Can I hook up a power inverter directly to my car battery?
Yes, you can hook up a power inverter directly to your car battery by connecting the positive (+) and negative (-) terminals of the inverter to the corresponding terminals of the battery.
What size power inverter do I need for my car battery?
The size of the power inverter you need depends on the wattage of the electronic devices you plan to power. It is recommended to choose an inverter with a wattage rating higher than the total wattage of the devices you wish to use.
How do I connect the power inverter to my car battery safely?
To connect the power inverter safely, make sure the car engine is turned off and disconnect the negative terminal of the car battery before making any connections. Then, connect the positive terminal of the battery to the positive terminal of the inverter and the negative terminal of the battery to the negative terminal of the inverter.
Can I leave the power inverter connected to my car battery all the time?
It is not recommended to leave the power inverter connected to the car battery all the time, especially when the engine is not running. This can drain the battery and lead to starting issues.
Can I connect multiple electronic devices to a power inverter?
Yes, you can connect multiple electronic devices to a power inverter as long as the total wattage of the devices does not exceed the inverter’s wattage rating. It is important to check the power requirements of each device before connecting them.
Can I use a power inverter while driving?
Yes, you can use a power inverter while driving to power electronic devices such as laptops, mobile phones, or portable DVD players. However, it is important to ensure that the inverter is securely installed and that the cables are not obstructing any driving controls.