Picture this: You’re about to head out on a bike ride, but you notice your tires are looking a little deflated. You don’t have a fancy air compressor, so what do you do? Fear not, because inflating tubeless bike tires with a floor pump is easier than you think. Not only will this save you money, but it’s also a convenient solution if you’re out on a ride and need to top off your tire pressure.
In this blog post, we’ll explore how to inflate your tubeless bike tires using a floor pump, so you can spend less time worrying about your tires and more time enjoying your ride. So, grab your pump, and let’s get started!
Table of Contents
What You Will Need:
Are you struggling to inflate your tubeless bike tire with a floor pump? Don’t worry, it’s a common issue among cyclists. However, it’s important to note that not all floor pumps are created equal and some may not be suitable for tubeless tires. To inflate a tubeless bike tire with a floor pump, you’ll need a few things.
First, make sure you have a compatible floor pump with a pressure gauge that can handle at least 60 PSI or more. You’ll also need a tubeless valve stem, sealant, and a tire lever. Before inflating, make sure to remove the valve core using a valve core remover tool to allow air to flow into the tire.
Then, use the tire lever to gently push the tire bead onto the rim, being careful not to puncture the tire or damage the sealant. Once the bead is in place, attach the floor pump to the valve stem and begin pumping. It may take a bit of effort to get the tire fully inflated, but once it is, replace the valve core and tighten it down.
Easy peasy!
– Tubeless Bike Tires
If you’re considering the switch to tubeless bike tires, there are a few things you’ll need to make the transition easier and more successful. First and foremost, you’ll need tubeless-ready tires, which typically have a reinforced bead that locks onto your rim without the need for an inner tube. You’ll also need tubeless valves, which are longer than traditional valve stems and feature a rubber gasket on the inside to create a tight seal.
Sealant is also crucial for sealing any punctures or small leaks that may occur, and is typically added through the valve stem before inflating the tire. To help with installation, you may want to invest in a tubeless tire inflator, which allows you to easily inject air and sealant into the tire. With the right equipment and a bit of patience, tubeless tires can offer a smoother ride, improved traction, and increased durability, making them a worthwhile investment for any serious cyclist.

– Floor Pump
If you’re an avid cyclist, having a floor pump is essential to ensuring that your tires stay properly inflated before hitting the road. When it comes to buying a floor pump, there are a few things that you should consider to get the most out of your investment. Firstly, it’s important to check the compatibility of the pump with your bike’s valves.
There are two types of valves – Presta and Schrader, and you’ll need to ensure that your pump is compatible with the valve type of your tires. Secondly, consider the maximum pressure that the pump can achieve, as this will determine whether it’s suitable for your tires. Finally, look for additional features such as an air pressure gauge, a long hose, and a comfortable handle for ease of use.
With the right floor pump, you can keep your tires inflated to the optimal pressure and ride with confidence on any terrain.
– Valve Core Removal Tool
If you’re planning on changing a tire anytime soon, one small but essential tool you’ll definitely need is a valve core removal tool. This useful little gadget makes the process of removing and replacing tire valve cores a breeze, saving you time and effort in the long run. Typically, these tools are made of sturdy metal and feature a small head with a threaded tip that easily grips and twists the valve core out of place.
Without a valve core removal tool, you might find yourself struggling to remove the valve core with pliers or other makeshift tools. Don’t let an essential tool like this go unnoticed; grab one for your toolbox today and make tire changes a breeze!
– Air Compressor (Optional)
If you’re planning on doing some DIY car maintenance or repair at home, it’s important to have the right tools. One of the essential tools you’ll need is an air compressor. While it’s not strictly necessary for all tasks, an air compressor can be incredibly useful for many applications.
For example, it can be used to power pneumatic tools like drills, sanders, and wrenches, making your work quicker and more efficient. It can also be used to inflate tires, clean parts, and even paint your car. When looking for an air compressor, consider the CFM (cubic feet per minute), horsepower, and tank size.
These factors will determine how much power and capacity your compressor has. With the right air compressor, you’ll have a versatile tool to help you get your DIY car projects done with ease.
Steps for Inflating Tubeless Bike Tires with a Floor Pump:
If you’re wondering how to inflate tubeless bike tires with a floor pump, the process is actually quite simple. First, ensure that your tire is properly seated on the rim and the valve is tightly screwed on. Next, remove the valve core using a valve core remover or pliers.
This will allow for more air flow when inflating. Then, using the floor pump, pump up the tire to the desired pressure, usually around 30-40 psi. Check the pressure frequently using a pressure gauge.
Once the tire is fully inflated, replace the valve core and screw it on tightly. Give the tire a quick spin to check for any leaks. If there are leaks, apply sealant and re-inflate the tire.
And voila! You’re all set to hit the road with properly inflated tubeless bike tires. Remember to check the pressure regularly, especially before each ride.
1. Remove the valve core
If you’re planning to inflate your tubeless bike tires using a floor pump, there are a few steps you need to follow to ensure safe and proper inflation. First and foremost, you need to remove the valve core, which is the small metal piece located inside the valve stem. This allows for faster and easier inflation, and also prevents damage to the valve stem.
To remove the valve core, you can use a valve core remover tool or an adjustable wrench. Simply insert the tool into the valve stem and turn counterclockwise to loosen and remove the valve core. Once the valve core is removed, attach the pump securely to the valve stem and pump air into the tire until it reaches the desired pressure.
Be sure to reinsert the valve core and tighten it securely before riding your bike. With proper inflation, you can enjoy a smoother, more efficient ride on your tubeless bike tires.
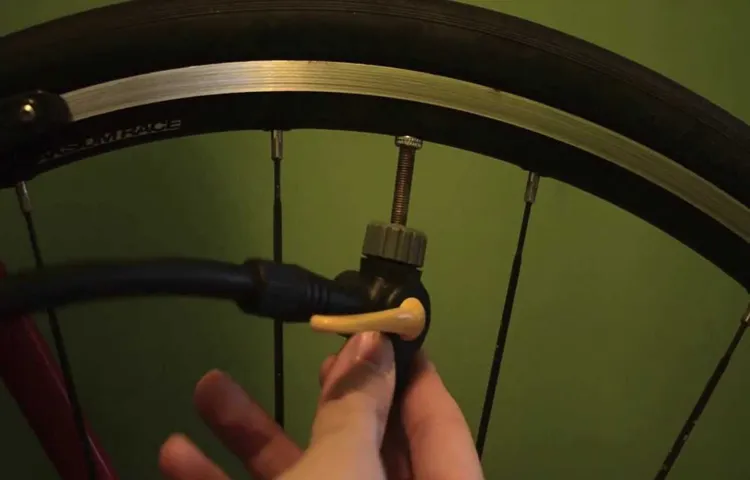
2. Attach the pump to the valve
Attaching the pump to the valve is the next step in inflating tubeless bike tires with a floor pump. Start by finding the valve on your tire. It’s usually located in the center of the rim and looks like a small, round, metal or plastic nozzle.
Once you’ve located the valve, remove the cap and make sure the valve is in the “open” position. Then, attach the pump head to the valve, making sure it’s securely fastened. You’ll know it’s attached correctly when you can’t wiggle it loose.
Now, it’s time to start pumping! Use long and steady strokes to fill the tire with air. Pay attention to the tire pressure gauge on the pump to ensure you don’t over-inflate the tire. Once you’ve reached the desired pressure, remove the pump head from the valve and replace the cap.
It’s essential to attach the pump correctly to the valve to ensure optimal tire pressure and prevent leaks during your ride. So, take your time and make sure it’s securely fastened before inflating your tire.
3. Pump air into the tire
In order to fully inflate a tubeless bike tire using a floor pump, there are a few steps you need to follow. First, make sure the pump’s nozzle is securely attached to the tire valve. Then, begin pumping air into the tire.
It’s important to monitor the tire pressure as you pump, using a gauge if possible, to make sure you don’t over-inflate the tire. Over-inflated tires can lead to decreased traction and can even burst. On the other hand, tires that are under-inflated can make it harder to pedal and decrease your bike’s overall performance.
So, it’s important to find the right balance. Once you’ve reached the desired tire pressure, carefully remove the pump nozzle and replace the valve cap. Now you’re ready to hit the road and enjoy a smooth ride on your fully-inflated tubeless bike tire!
4. Check the pressure
After inflating the tubeless bike tire with a floor pump, the final step is to check the pressure. It is essential to ensure that the tire pressure is adequate for a safe and comfortable ride. The ideal tire pressure for your bike’s wheels can typically be found on the tire sidewall or in the user manual.
Make sure to check this before inflating. While checking the pressure, use a high-quality tire pressure gauge to get accurate readings. If the pressure is too low, add more air using the floor pump until you reach the recommended pressure level.
On the other hand, if the pressure is too high, release some air by pressing the valve stem or using a release button on the pump. Remember, keeping your tires at optimum pressure is crucial for your bike’s performance and longevity. With proper pressure, you’ll experience better grip, handling, and greater ease when turning corners and rolling over obstacles on the road or trail.
Troubleshooting Tips:
If you are looking to inflate your tubeless bike tire with a floor pump, don’t worry, it’s a simple process. First, make sure you have all the necessary tools to do the job, including a floor pump with a pressure gauge, a valve core removal tool, and sealant. Next, remove the valve core using the valve core removal tool.
Once the valve core is removed, attach the pump to the valve, making sure it is securely in place. Then start pumping air into the tire, ensuring that the pressure doesn’t exceed the recommended limit. It’s important not to rush the process as it can take some time to inflate the tire fully.
Finally, once the tire is fully inflated, replace the valve core, and give the tire a spin to distribute the sealant. Voila, you now have a fully inflated tubeless bike tire, ready to hit the road or trail!
– If the tire won’t inflate, check for obstructions in the valve or try using an air compressor.
When you’re trying to inflate your tire, it can be frustrating if it won’t inflate. Before you give up, though, there are a few troubleshooting tips that you can try. One of the first things you should check for is obstructions in the valve.
Dirt or debris can get lodged in there, preventing air from flowing through. If you see anything blocking the valve, carefully remove it with a tool like a toothpick or a thin wire. Another thing to try is using an air compressor instead of a manual pump.
Air compressors can provide a stronger and more consistent flow of air, which can help to fully inflate the tire. These tips should help you get your tire inflated and ready for the road in no time.
– If the tire won’t hold pressure, try adding sealant or replacing the valve stem.
When it comes to maintaining your bike, flat tires can be a frustrating issue. One common problem is when the tire won’t hold pressure. Often, the issue is caused by a damaged valve stem.
The valve stem is responsible for maintaining air pressure and can get worn out over time. To fix this issue, you can replace the valve stem. If the valve stem looks fine, you can try adding sealant to the tire.
Sealant is a liquid that can seal small punctures in the tire and prevent further leaks. If these solutions don’t work, there may be a larger issue with the tire itself, and it may need to be replaced. Remember to regularly check your tire pressure and keep your bike tires properly inflated to prevent flats from happening in the first place.
By following these troubleshooting tips, you can keep your bike tires in top condition and avoid any frustrating mishaps on your rides.
Conclusion
In conclusion, inflating a tubeless bike tire with a floor pump is like blowing up a balloon with a straw – it requires patience, technique, and a bit of finesse. Remember to first check your tire pressure, remove the valve core, and use a pump with a long and flexible hose. With a little practice, you can become a pro at inflating your tubeless tires, and your rides will be smoother and more enjoyable than ever before.
So don’t be afraid to give it a try – and remember, always keep the rubber side down!”
FAQs
What is a tubeless bike tire?
A tubeless bike tire is a type of tire that does not require an inner tube to hold air.
How do I know if my bike tire is tubeless?
You can check if your bike tire is tubeless by looking for the words “tubeless” or “TL” on the tire sidewall.
Can a tubeless bike tire be inflated with a floor pump?
Yes, a tubeless bike tire can be inflated with a floor pump. However, you may need to use a special valve adapter.
How much air pressure should I put in my tubeless bike tire?
The recommended air pressure for tubeless bike tires varies depending on the tire and the rider’s weight. Check the tire sidewall for the recommended range and adjust based on your personal preference.
What is the easiest way to seat a tubeless bike tire?
The easiest way to seat a tubeless bike tire is to use a tubeless tire inflator or a high-volume air compressor. If those are not available, you can use a floor pump with a strong burst of air.
How can I prevent tubeless bike tires from leaking air?
To prevent tubeless bike tires from leaking air, make sure the tire bead is properly seated, use sealant to seal small punctures, and check the air pressure regularly.
Do I need to use sealant with a tubeless bike tire?
While you don’t necessarily need sealant with a tubeless bike tire, it is recommended to prevent small punctures from causing air leaks. Sealant can also help seal the tire bead and improve the tire’s overall performance.