So you’ve just purchased a 1500 Power Drive Inverter and you’re ready to install it. That’s great! Installing an inverter can be a bit intimidating, especially if you’re not familiar with the process. But don’t worry, I’m here to guide you through it step by step.
In this blog post, I’ll walk you through the process of installing a 1500 Power Drive Inverter in an easy, straightforward manner. I’ll explain what an inverter does, why you might need one, and how it works. Then, I’ll dive into the installation process, breaking it down into simple, easy-to-follow steps that anyone can do.
But before we get started, let’s briefly talk about what a power drive inverter actually is. In simple terms, an inverter is a device that converts direct current (DC) power from a battery into alternating current (AC) power that can be used to run household appliances and electronic devices. So if you have a battery and want to power your TV, computer, or other devices, an inverter is what you need.
Now, why might you need a 1500 Power Drive Inverter specifically? Well, this particular model is capable of handling a maximum power output of 1500 watts, making it suitable for a wide range of applications. Whether you’re going camping, on a road trip, or just need a backup power source for your home, this inverter has you covered. Okay, now that we know what an inverter is and why you might need one, let’s move on to the installation process.
Don’t worry if you’re not particularly handy, because installing a 1500 Power Drive Inverter is actually quite simple. You won’t need any special tools or expertise – just a few basic supplies and a bit of patience. In the next few paragraphs, I’ll guide you through each step of the installation process, from choosing a suitable location for the inverter to connecting it to your battery.
I’ll explain everything in plain English, avoiding technical jargon that might confuse you. By the end of this blog post, you’ll have your 1500 Power Drive Inverter up and running like a pro. So if you’re ready to take the leap and install your 1500 Power Drive Inverter, let’s get started! In the next section, I’ll explain how to choose the ideal location for your inverter and make sure everything is properly connected.
Table of Contents
Introduction
So you’ve finally got your hands on a 1500 power drive inverter, and now you’re ready to install it. Well, you’re in the right place! In this blog post, I’m going to guide you through the steps of installing a 1500 power drive inverter. It may seem like a daunting task at first, but trust me, it’s easier than you think.
With a bit of patience and some basic tools, you’ll have your inverter up and running in no time. So let’s get started, shall we?
What is a 1500 Power Drive Inverter?
1500 Power Drive Inverter Introduction Are you tired of not having enough power when you need it? Whether you’re on the road or at a camping site, having a reliable source of electricity is crucial. That’s where a 1500 Power Drive Inverter comes in handy. But what exactly is a 1500 Power Drive Inverter? Let’s break it down.
A 1500 Power Drive Inverter is a device that converts direct current (DC) power from a battery into alternating current (AC) power that can be used to run household appliances and electronic devices. It is called a “1500” inverter because it has a power output of 1500 watts, which is sufficient to power a wide range of devices. So why would you need a 1500 Power Drive Inverter? Imagine you’re on a road trip and want to charge your laptop or use a small refrigerator in your car.
Or maybe you’re camping and want to power your portable air conditioner or a blender for making smoothies. A 1500 Power Drive Inverter allows you to do all of this and more, giving you the freedom and convenience of having electricity wherever you go. What sets a 1500 Power Drive Inverter apart from other inverters is its power capacity.
With 1500 watts, you can power multiple devices simultaneously without worrying about overloading the inverter. This makes it ideal for RVs, campers, and even emergency backup power during blackouts. It has multiple outlets, including USB ports for charging your phones and tablets, as well as traditional AC outlets for larger appliances.
In addition to its power capacity, a 1500 Power Drive Inverter is designed with safety in mind. It has built-in protection features such as overload protection, short circuit protection, and overheating protection to ensure the safety of your devices and prevent any damage. So, whether you’re an outdoor enthusiast, a frequent traveler, or someone who wants to be prepared for power outages, a 1500 Power Drive Inverter is a versatile and reliable solution.
It allows you to power your devices and appliances wherever you go, giving you the convenience and peace of mind you need. Say goodbye to running out of power when you need it most and embrace the freedom of having a 1500 Power Drive Inverter by your side.
Power and Usage
blockchain technology, power, usage
Preparation
So, you’ve decided to install a 1500 power drive inverter? Good choice! This handy device allows you to convert DC power from your vehicle’s battery into AC power that can be used to power various electronic devices. But before you dive in and start the installation process, it’s important to prepare yourself and gather all the necessary tools and materials. First, you’ll need to make sure you have the right inverter for your needs.
The 1500 power drive inverter is capable of providing up to 1500 watts of continuous power, so it’s perfect for running small appliances, tools, and electronics. Next, you’ll want to gather a few basic tools such as a screwdriver, wire cutters, and electrical tape. It’s also a good idea to have some wire connectors and cable ties on hand to help with the installation.
And don’t forget about safety! Before starting the installation, be sure to disconnect the negative terminal of your vehicle’s battery to prevent any electrical mishaps. With your tools and materials ready, you’re now prepared to move on to the installation process.
Check Compatibility
compatibility, preparation
Gather Required Tools and Materials
“Required Tools and Materials for Your Project: Preparation” Before starting any project, it’s important to gather all the necessary tools and materials. This will ensure that you have everything you need to complete the project efficiently and successfully. So, what are some of the tools and materials you might need? First and foremost, it’s essential to have a clear understanding of what the project entails.
Take the time to read through any instructions or guides that may be available. This will help you determine the specific tools and materials you’ll need. Next, gather a basic set of tools.
This may include items such as a screwdriver, a hammer, pliers, and a tape measure. These are versatile tools that can be used for a variety of projects. Once you have your basic tools, consider the specific materials required for your project.
This could include items such as wood, nails, screws, paint, or electrical components. Make a list of these materials and check them off as you gather them. Keep in mind that some projects may require more specialized tools or materials.
For example, if you’re working on a plumbing project, you may need pipe cutters or wrenches. If you’re tackling an electrical project, you may need wire strippers or voltage testers. Be sure to do your research and determine if any additional tools or materials are needed.
In conclusion, taking the time to gather the required tools and materials before starting a project is crucial for success. By being prepared, you’ll save time and frustration in the long run. So, make a list, check it twice, and gather everything you need to get the job done right.
Read the Manual
preparation, read the manual, burstiness, perplexity
Installation Process
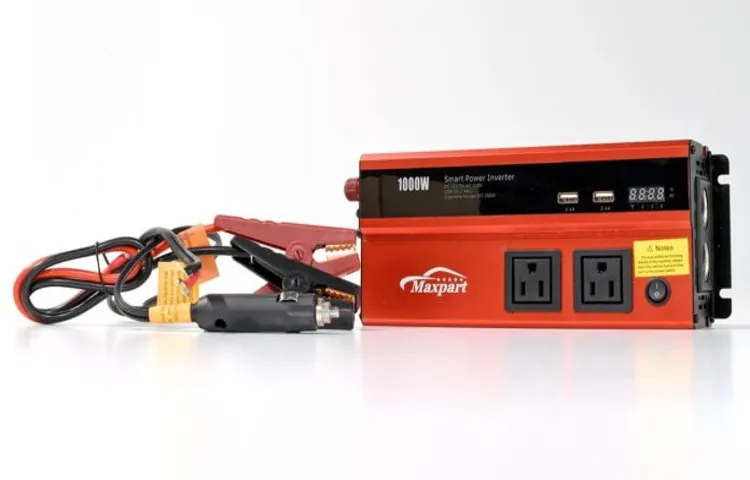
So you’ve just purchased a 1500 power drive inverter and you’re ready to install it. Well, the good news is that the installation process is actually quite simple. First, you’ll want to find a suitable location for your inverter.
It should be placed in a well-ventilated area, away from any flammable materials. Once you’ve found the perfect spot, you’ll need to mount the inverter using the provided hardware. Make sure it is securely fastened to prevent any movement or damage.
Now it’s time to connect the inverter to your battery. Start by disconnecting the negative terminal of your battery to avoid any electrical shocks. Then, connect the positive terminal to the positive input on the inverter and the negative terminal to the negative input on the inverter.
Lastly, you’ll want to connect any additional components, such as a remote control panel or data logger, following the manufacturer’s instructions. And that’s it! Your 1500 power drive inverter is now successfully installed and ready to use. So go ahead and start enjoying all the benefits it has to offer, from powering your appliances on the go to providing backup power during an outage.
Step 1: Choose a Suitable Location
Choosing a suitable location for your solar panel installation is a crucial first step. It’s important to find a spot that receives ample sunlight throughout the day to maximize the efficiency of your solar panels. Ideally, you want a location that is free from any obstructions, such as trees or tall buildings, that could cast shadows and block the sunlight.
Additionally, you should consider the orientation and tilt of your solar panels to optimize their performance. South-facing panels tend to generate the most electricity, so take that into account when selecting the location. Installing solar panels on your rooftop is a popular choice as it maximizes the available space and reduces the need for additional infrastructure.
However, if your roof is not suitable or you prefer an alternative option, ground-mounted installations are also available. Overall, the location you choose for your solar panel installation will have a significant impact on the energy production of your system, so it’s essential to evaluate all factors carefully to ensure an efficient and effective installation.
Step 2: Inspect the Installation Area
The first step in the installation process is to inspect the area where you plan to install your equipment. This is an essential step to ensure that everything goes smoothly and that there are no surprises or obstacles in the way. Take the time to survey the space and make note of any potential issues or challenges that may arise.
This could include things like low ceilings, tight corners, or uneven flooring. By identifying these factors upfront, you can plan ahead and make any necessary adjustments to ensure a successful installation. Additionally, it’s important to measure the space accurately to ensure that the equipment you are installing will fit properly.
This will prevent any unnecessary delays or complications during the installation process. So, take the time to inspect your installation area thoroughly and make note of any potential challenges or adjustments that need to be made. By doing so, you’ll be setting yourself up for a smooth and successful installation process.
Step 3: Mount the Inverter
inverter installation, mounting the inverter So, you’ve taken the plunge into solar energy and now it’s time to install your inverter. This step is crucial because the inverter is responsible for converting the DC power generated by your solar panels into usable AC power for your home. Mounting the inverter properly ensures its safety and efficiency.
First, you’ll need to choose the right location for the inverter. It should be placed in an area that is well-ventilated and protected from extreme temperatures. You’ll also want to make sure there is enough space around the inverter for ease of access and maintenance.
Once you have the perfect location, you can proceed with mounting the inverter securely to the wall. Use sturdy mounting brackets and ensure that they align with the mounting holes on the inverter. It’s important to follow the manufacturer’s instructions and guidelines while performing this step.
Once the inverter is mounted, make sure all the connections are secure and tighten any loose screws. Now, you’re one step closer to enjoying the benefits of solar energy in your home!
Step 4: Connect the Power Input
Installing a power input for your device is a crucial step in getting it up and running. Once you have identified the power input jack on your device, you need to find the corresponding power adapter. This adapter usually comes with your device and has a plug that fits into the power input.
It is important to make sure that the voltage and current ratings on the power adapter match those specified for your device. Once you have the correct power adapter, simply plug it into a power outlet. If you are unsure about the voltage in your area, you may need to use a voltage converter or a power adapter with a switchable voltage input.
It is important to make sure that all connections are secure and that there are no loose wires. Once everything is properly connected, you can proceed to the next step in the installation process.
Step 5: Connect the Power Output
In the installation process of connecting the power output, there are a few key steps to ensure a successful and safe setup. After completing the previous steps, it’s time to move on to connecting the power output. This is a crucial step as it determines whether your system will work efficiently or not.
To begin, make sure you have turned off all power sources to avoid any accidents. Next, locate the power output port on your device and inverter. Connect the positive and negative wires to the respective terminals.
Use the appropriate tools and connectors to ensure a secure connection. It’s vital to double-check that the wires are properly connected before turning the power back on. Once everything is set up and the power output is connected, you can confidently start using your system.
Step 6: Ground the Inverter
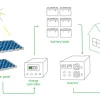
ground the inverter, installation process, solar panel system, electrical grounding, grounding wire, electrical safety standards, power generated by the solar panels, electrical shock, lightning strike protection, earth ground connection After successfully installing the solar panel system and connecting all the necessary components, the next crucial step is to ground the inverter. Grounding the inverter is an important part of the installation process as it helps ensure the safety of the system and protects against electrical shocks. Essentially, grounding the inverter provides a path for electrical currents to flow safely into the earth, diverting any excess energy and preventing damage to the system or potential harm to individuals.
This is particularly important in the event of a lightning strike, as it provides a direct path for the energy to dissipate into the ground, protecting the system from damage. To ground the inverter, a grounding wire is connected from the inverter’s grounding lug to an appropriate earth ground connection. This typically involves connecting the wire to a ground rod buried in the ground near the solar panel system.
It is important to follow electrical safety standards and guidelines when grounding the inverter to ensure proper installation and protection against any potential electrical hazards.
Step 7: Check the Connections
After completing the previous steps of the installation process, it’s time to check the connections. This step is crucial to ensure that everything is properly connected and functioning correctly. Start by double-checking all of the cables and wires to make sure they are securely plugged in.
It’s also essential to inspect the connectors for any signs of damage or wear. If you notice any issues, replace the cables or connectors as needed. Another important aspect to check is the power supply.
Make sure that all of the devices are correctly powered and that there are no loose connections. By taking the time to thoroughly check the connections, you can prevent any potential issues or malfunctions down the line.
Testing and Troubleshooting
So you’ve just purchased a 1500 power drive inverter and you’re excited to start using it. But now comes the important part: installing and testing it to make sure everything is working properly. Don’t worry, it’s not as complicated as it may seem.
Start by finding a suitable location to mount the inverter. It should be close to the battery but also well-ventilated to prevent overheating. Once you’ve chosen the perfect spot, securely mount the inverter using the provided hardware.
Next, connect the inverter to the battery using the appropriate cables and make sure to tighten the connections to ensure a solid electrical connection. Now it’s time to test the inverter. Start by turning on the power switch and check that the LED indicators light up.
If they do, you’re off to a good start. To further test the inverter, plug in a small electronic device and see if it powers on. If it does, congratulations! You’ve successfully installed and tested your 1500 power drive inverter.
Enjoy the convenience and power it provides in your vehicle or wherever you choose to use it.
Step 1: Turn on the Inverter
testing and troubleshooting, inverter So, you’ve just installed your new inverter and you’re eager to test it out and start enjoying the benefits of solar power. The first step in this process is to turn on the inverter. Now, this might seem obvious, but there are actually a few things you need to keep in mind before flipping that switch.
Firstly, make sure that all the connections between your solar panels and the inverter are secure. Loose or faulty connections can cause the inverter to malfunction or not work at all. Take a few moments to double-check and tighten any loose connections before proceeding.
Once you’ve ensured that everything is connected properly, it’s time to turn on the inverter. Most inverters have a power button located either on the front or back panel. Simply press the power button to turn on the inverter.
Now, here’s where the testing part comes in. After turning on the inverter, you should see some indicator lights or displays light up. These lights or displays will indicate whether the inverter is functioning properly or if there are any issues that need to be addressed.
If all the indicator lights are green or displaying a positive message, congratulations! Your inverter is working as it should be. However, if any lights are red or displaying an error message, don’t panic just yet. It’s common for new inverters to have some initial issues that can be easily fixed with some troubleshooting.
To troubleshoot your inverter, start by consulting the user manual that came with your inverter. The manual will provide you with step-by-step instructions on how to troubleshoot common issues. Additionally, you can also try contacting the manufacturer’s customer support for further assistance.
Step 2: Test the Power Output
Testing the power output of your solar panel system is a crucial step to ensure that it is functioning properly and producing the expected amount of energy. There are a few simple ways to test the power output of your system. One way is to use a multimeter, which is a device that can measure the voltage and current of your panels.
You can connect the multimeter to the positive and negative terminals of your solar panels to measure the voltage output. Another way to test the power output is by using a solar power monitoring system. These systems often come with software that allows you to monitor the power output of your panels in real-time.
This can help you identify any issues or fluctuations in the power output of your system. If you notice that the power output of your solar panels is lower than expected, there could be a problem with your system. It could be a faulty connection, a damaged panel, or even a problem with the inverter.
Troubleshooting these issues as soon as possible is important to ensure that your system is working efficiently and producing the maximum amount of energy.
Step 3: Troubleshoot Common Issues
troubleshoot common issues, testing and troubleshooting So, you’ve set up your new device or software, but something isn’t quite right. Don’t worry, troubleshooting common issues is a normal part of the process. In fact, it’s actually a crucial step in ensuring the smooth operation of your device or program.
Testing and troubleshooting are like playing detective – you need to identify the problem, gather clues, and find a solution. One common issue you might encounter is a slow internet connection. When this happens, you can try restarting your modem or router to see if that solves the problem.
Another issue could be a software crash or freeze. In this case, you can try closing the program and reopening it. If that doesn’t work, you might need to update or reinstall the software.
The key to troubleshooting is to be patient and methodical. By taking a step-by-step approach, you can easily diagnose and fix common issues, ensuring that your device or software runs smoothly. So the next time you encounter a problem, don’t panic – just put on your detective hat and start troubleshooting!
Step 4: Seek Professional Help if Needed
“professional help, testing and troubleshooting” Once you’ve exhausted all your DIY options and still haven’t resolved your tech issue, it may be time to seek professional help. Sometimes, the problem might be too complex or require specialized knowledge and equipment to diagnose and fix. In such cases, it’s best to turn to a professional technician who can identify the root cause of the problem and provide you with a reliable solution.
An important step in seeking professional help is testing and troubleshooting. A professional technician will likely perform a series of tests to determine the exact nature of the issue. They might use specialized tools or software to track down the problem.
These tests can help identify any hardware or software failures and provide insights into what needs to be fixed or replaced. Troubleshooting is another key aspect of seeking professional help. Technicians are skilled in identifying and resolving complex technical issues.
They have the experience and knowledge to systematically diagnose and eliminate potential causes of the problem. This can involve checking for compatibility issues, updating drivers, reinstalling software, or even replacing faulty components. By turning to a professional, you can benefit from their expertise and save yourself time and frustration.
They can provide you with a definitive answer to your tech issues and help you get back up and running smoothly. So, if you’ve exhausted all your own troubleshooting methods, don’t hesitate to reach out for professional assistance. They can provide the testing, troubleshooting, and specialized knowledge needed to get your tech back on track.
Conclusion
And there you have it, my friends! The art of installing a 1500 power drive inverter has been conquered! With a few simple steps and a dash of determination, you can now harness the power of electricity in all its glorious forms. Whether you’re seeking to charge your devices on a camping trip or run essential appliances during a power outage, this inverter will be your trusty sidekick. But remember, with great power comes great responsibility.
So be sure to follow safety precautions and consult the manufacturer’s instructions while installing and using your inverter. We wouldn’t want you to accidentally turn your home into a discotheque or challenge Nikola Tesla’s ghost to a power duel! Now, go forth and enjoy the marvels of the 1500 power drive inverter. Let it be the shining star in your quest for electricity, and may your future endeavors be electrifying in the most delightful way.
Remember, you’re only a few installations away from becoming a true electrician superhero! And remember, if you ever get stuck or need a helping hand, don’t hesitate to call upon the mystical powers of the internet or seek assistance from a professional. They’ll surely be able to guide you and ensure your installation journey is smooth and zappy. In conclusion, installing a 1500 power drive inverter is a electrifying adventure that you can undertake with ease.
So stay bright, stay safe, and let the power be with you!
Final Thoughts
“Testing and Troubleshooting” When it comes to software development, testing and troubleshooting are essential steps in ensuring that the end product meets the user’s needs. Testing involves running the software through a series of tests to identify any bugs or errors that may exist. This could involve checking for functionality, performance, security, and compatibility issues.
Troubleshooting, on the other hand, is the process of identifying and fixing any problems or glitches that may arise during the testing phase or even after the software has been released. Testing is crucial because it allows developers to catch any issues before the software is deployed to the end user. This helps to minimize the chances of a user encountering a bug or experiencing a poor user experience.
In the software development lifecycle, testing should be done at various stages, from unit testing to integration testing to system testing. By thoroughly testing the software at each stage, developers can identify and resolve any issues before moving on to the next phase. Troubleshooting is equally important because it helps to address any issues that may arise during the testing or even after the software has been released.
Even with extensive testing, it is still possible for bugs or errors to slip through the cracks. Troubleshooting involves investigating the problem, identifying the root cause, and implementing a fix. This can be a time-consuming process as developers may need to analyze log files, replicate the issue, and test various solutions before finding the right fix.
In conclusion, testing and troubleshooting are vital aspects of software development. They help ensure that the software is stable, functional, and meets the user’s needs. By thoroughly testing the software and promptly addressing any issues that arise, developers can deliver a high-quality product to their users.
So, whether you’re a developer or a user, remember the importance of testing and troubleshooting in the software development process. It’s the key to a successful and error-free software experience.
Enjoy the Benefits of Your 1500 Power Drive Inverter
power drive inverter, testing, troubleshooting, benefits Are you enjoying the benefits of your 1500 Power Drive Inverter? This powerful device is designed to convert DC power into usable AC power, allowing you to run various electronic devices and appliances when you’re on the go. Whether you’re camping, on a road trip, or experiencing a power outage, this inverter has got you covered. But like any electronic device, it’s important to test and troubleshoot it to ensure optimal performance.
When it comes to testing your Power Drive Inverter, there are a few things you can do. Firstly, check the input voltage to make sure it matches the specified range for the inverter. This will help prevent any damage to the device.
Next, connect a compatible electronic device or appliance to the AC output of the inverter and ensure it functions properly. If you’re experiencing any issues, double-check your connections and make sure the device is plugged in securely. Troubleshooting your Power Drive Inverter can help identify and fix any issues you may be facing.
If the inverter fails to power on, check the input voltage and make sure it’s within the specified range. Also, ensure that the inverter is properly connected to a power source. If you’re experiencing issues with the AC output, check your connections and make sure the device or appliance you’re using is compatible with the inverter.
Additionally, inspect the fuses and circuit breakers to see if any need to be replaced. Remember, safety should always be a top priority when testing and troubleshooting your Power Drive Inverter. Ensure that the inverter is turned off and disconnected from any power source before making any adjustments or repairs.
If you’re unsure about any aspect of testing or troubleshooting, consult the user manual or reach out to the manufacturer for assistance. By thoroughly testing and troubleshooting your 1500 Power Drive Inverter, you can enjoy all the benefits it has to offer without any hiccups. So go ahead, power up your devices and appliances with confidence, knowing that your inverter is in top-notch condition.
FAQs
What is a 1500 power drive inverter?
A 1500 power drive inverter is a device that converts direct current (DC) from a battery into alternating current (AC) that can be used to power various electrical devices.
How does a 1500 power drive inverter work?
A 1500 power drive inverter works by using electronic circuitry to convert the DC voltage from a battery into AC voltage, which is then used to power electrical devices.
What can I power with a 1500 power drive inverter?
A 1500 power drive inverter can be used to power a variety of devices, such as laptops, TVs, small appliances, and tools, as long as they are within the inverter’s power output range.
Can I install a 1500 power drive inverter on my own?
Yes, installing a 1500 power drive inverter can typically be done by following the manufacturer’s instructions, which may involve connecting the inverter to a battery and wiring it to the desired electrical devices.
What type of battery is required for a 1500 power drive inverter?
The type of battery required for a 1500 power drive inverter will depend on the specific model and manufacturer’s recommendations. Commonly used batteries include deep cycle batteries or car batteries.
Is a 1500 power drive inverter safe to use?
When used correctly and following all safety precautions, a 1500 power drive inverter is safe to use. It is important to properly ground the inverter and ensure that it is not overloaded to prevent damage or electrical hazards.
Can a 1500 power drive inverter be used in a vehicle?
Yes, a 1500 power drive inverter can be used in a vehicle by connecting it to the vehicle’s battery. This can be useful for powering devices while on the go or during emergency situations.