
Hey there! Are you ready to dive into the fascinating world of “Introduction”? Well, buckle up because we’re about to embark on a journey that will open up a whole new realm of possibilities for you. An introduction is like the opening chapter of a book – it sets the stage for what’s to come and hooks you in with its intriguing narrative. It’s that first impression that can make or break an experience.
Whether it’s meeting someone new, starting a new job, or even exploring a new hobby, the way you introduce yourself can have a lasting impact. In the world of writing, introductions serve the same purpose – to captivate the reader and draw them into the rest of the content. It’s like the enticing aroma of freshly baked cookies wafting through the air, tempting you to take a bite.
An effective introduction grabs your attention, piques your curiosity, and leaves you hungry for more. But what makes a great introduction? Think of it as a magician’s sleight of hand – it needs to be skillfully crafted, engaging, and leave the reader wanting more. It’s a delicate balance between providing enough information to spark interest and keeping a sense of mystery.
Imagine you’re at a party, and someone approaches you and says, “Hey, I have a secret that will change your life. Wanna know what it is?” How can you resist? You’ll be on the edge of your seat, dying to know what that secret is. That’s the kind of allure a well-crafted introduction can have.
In this blog, we’ll explore the art and science behind creating captivating introductions. We’ll delve into the psychology of first impressions, uncover the techniques used by master storytellers, and discover how to grab your readers’ attention from the very first sentence. So get ready to become a master of introductions.
Whether you want to write compelling blog posts, captivating essays, or engaging social media content, we’ve got you covered. It’s time to make your words leap off the page and leave a lasting impact. Let’s get started!
Table of Contents
- 1 What is an RV awning?
- 2 Benefits of installing an RV awning
- 3 Gather the necessary tools and materials
- 4 Measure the area for the awning
- 5 Choose the right type of awning for your RV
- 6 Positioning and marking the awning placement
- 7 Installing the awning brackets
- 8 Mounting the awning fabric or roller tube
- 9 Testing the functionality of the awning
- 10 Securing the awning to prevent damage while traveling
- 11 Enjoying the benefits of your RV awning
- 12 Conclusion
- 13 FAQs
What is an RV awning?
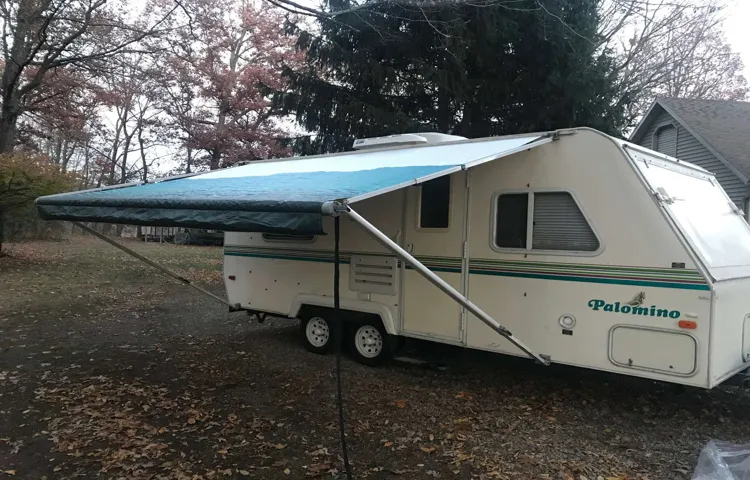
Are you a fan of the great outdoors? Do you enjoy the freedom and flexibility of traveling in an RV? If so, then you know how important it is to have a comfortable and cozy space to relax and unwind after a long day of adventuring. That’s where an RV awning comes in. An awning is a retractable shade that attaches to the side of your RV, providing you with much-needed shade and protection from the elements.
It’s like having your own little outdoor oasis wherever you go. But how do you install an RV awning? Well, it’s actually quite simple. First, you’ll need to purchase an awning that is the right size for your RV.
Then, follow the manufacturer’s instructions for installation. Typically, this involves attaching the awning brackets to the side of your RV and then extending the awning fabric. It may sound a bit daunting, but with a little bit of patience and some basic tools, you’ll have your awning up and ready to go in no time.
So go ahead, enjoy the great outdoors in style with your very own RV awning.
Benefits of installing an RV awning
One of the best investments you can make for your RV is installing an awning. Not only does it provide shade and protection from the elements, but it also extends the living space of your RV, giving you more room to relax and entertain. But how do you go about installing an RV awning? Don’t worry, it’s easier than you might think.
First, measure the length of your RV to determine the size of awning you need. Next, gather all the necessary materials, including the awning and installation hardware. Then, follow the manufacturer’s instructions to mount the awning to your RV.
Once it’s installed, you’ll immediately start reaping the benefits. Not only will you have a cool and comfortable space to relax outdoors, but you’ll also have added protection from rain and sun. You can even add accessories like lights and screens to make your awning even more versatile.
So why wait? Start enjoying the benefits of an RV awning today!
Hey there! Are you ready to dive into the world of preparation? Whether it’s for a job interview, a big event, or simply tackling your everyday tasks, preparation is key to success. It’s like the secret ingredient that takes you from average to extraordinary, giving you the confidence and edge you need to conquer any challenge that comes your way. Think of preparation as the foundation for the best version of yourself.
Just like a house needs a solid foundation to stand tall, you need preparation to build a strong and successful life. It’s like having a roadmap that guides you towards your goals and ensures that you’re always one step ahead. Preparation allows you to anticipate obstacles and tackle them head-on.
It equips you with the skills and knowledge needed to tackle any situation, giving you the upper hand. It’s like having a loaded toolbox, ready to tackle any repair or project that comes your way. With preparation, you become a problem solver, a go-getter, and a person who can handle anything that life throws at you.
But preparation isn’t just about getting ready for big moments. It’s also about the small, everyday tasks that make up our lives. Whether it’s meal prepping for the week, creating a to-do list for the day, or organizing your schedule, preparation helps you stay organized and efficient.
It’s like having a well-oiled machine that runs smoothly and effortlessly. So, are you ready to take your life to the next level with preparation? Join me on this journey as we explore the strategies, tips, and tricks that will help you become a master of preparation. Together, we’ll unlock the secrets to success and achieve greatness in every aspect of life.
Let’s get started!
Gather the necessary tools and materials
Before you can install an RV awning, you’ll need to gather some necessary tools and materials. Firstly, you’ll need a ladder or step stool to reach the top of your RV. You’ll also need a tape measure to accurately measure the dimensions of your awning and determine where it needs to be installed.
Additionally, you’ll need a drill, screws, and a screwdriver or drill bits to secure the awning brackets to your RV. It’s also important to have a level to ensure that your awning is installed straight and evenly. Lastly, don’t forget to have a helper on hand to assist you in lifting and positioning the awning during installation.
With all of these tools and materials ready to go, you’ll be well-prepared to install your RV awning properly and securely.
Measure the area for the awning
So, you’ve decided to install an awning on your RV, and you’re ready to dive into the process. The first step is to measure the area where you want to install the awning. This is a crucial step to ensure that you choose the right size and have enough space for the awning to fully extend.
You don’t want to end up with an awning that’s too small or too big for your RV. To measure the area, start by locating the mounting brackets. These are typically located on the side of your RV, near the roofline.
Measure the distance between these brackets, making note of the width. Next, measure the height from the top of the brackets to the area where you want the awning to stop. This will give you the height measurement.
Once you have these measurements, you can start shopping for an awning that fits your RV perfectly. Installing an RV awning is a great way to add shade and comfort to your outdoor adventures, and with the right measurements, you’ll be on your way to enjoying your new awning in no time.
Hey there! Have you ever wondered how things get set up or put together? Well, you’re in luck because today we’re going to dive into the world of installation. From assembling furniture to installing software, the process of installation is a crucial step in bringing things to life. Whether you’re a DIY enthusiast or just curious about how things work, understanding the ins and outs of installation can be both fascinating and rewarding.
So, sit back, relax, and let’s explore the world of installation together!
Choose the right type of awning for your RV
Installing an awning on your RV can greatly enhance your outdoor experience and provide much-needed shade on those hot summer days. However, it’s important to choose the right type of awning for your specific needs. There are a few different types to choose from, including retractable, freestanding, and window awnings.
Retractable awnings are popular because they can be easily adjusted to provide shade at various angles. Freestanding awnings, on the other hand, are designed to be set up and taken down quickly and are great for camping trips. Window awnings are smaller and can be attached directly to the windows of your RV.
Once you’ve chosen the right type of awning, the installation process is relatively straightforward. Most awnings come with detailed instructions, and all you’ll need is a few basic tools. Whether you’re a seasoned RV enthusiast or a newbie, installing an awning is a relatively simple way to improve your outdoor space and make your RV feel more like home.
So why wait? Start enjoying the benefits of an awning today!
Positioning and marking the awning placement
Installing an RV awning can greatly enhance your outdoor experience while traveling in your motorhome. Before you can enjoy the shade and protection it provides, you’ll need to properly position and mark the awning placement. Start by deciding where you want the awning to be placed on your RV.
Consider factors such as the size of your RV, the layout of your campsite, and any obstacles that may be in the way. Once you have chosen the ideal location, mark the mounting brackets that will hold the awning in place. Use a tape measure and level to ensure that the brackets are evenly spaced and level.
It’s important to take your time with this step as it will determine the stability and functionality of your awning. Once the brackets are marked, you can proceed with the installation process.
Installing the awning brackets
In this section, we will guide you through the process of installing the brackets for your RV awning. Installing the brackets is an important step to ensure that your awning is securely attached to your RV and can withstand strong winds or harsh weather conditions. First, you will need to gather all the necessary tools and materials, including the brackets, screws, a drill, and a measuring tape.
Once you have everything ready, start by determining the exact location where you want to install the brackets. It’s best to choose a spot that is sturdy and does not obstruct any existing features on your RV. Using a measuring tape, mark the desired position for each bracket.
Next, take your drill and carefully make pilot holes in the marked spots. This will make it easier to screw in the brackets later on. Once the pilot holes are made, align the brackets with the holes and screw them in place using the provided screws.
Make sure to tighten the screws securely, but be careful not to overtighten and strip the holes. Repeat this process for all the brackets until they are all securely attached. Congratulations, you have successfully installed the awning brackets! Now you can move on to the next step of installing the actual awning fabric.
Mounting the awning fabric or roller tube
Installing an RV awning can be a great way to add shade and comfort to your outdoor space. One important step in the installation process is mounting the awning fabric or roller tube. This can be a bit tricky, but with the right tools and instructions, it can be done easily.
First, make sure you have the fabric or roller tube and any necessary hardware. Start by attaching the fabric or roller tube to the awning arms. This can usually be done by sliding the fabric or tube into the designated slots and securing it with screws or other fasteners.
Make sure everything is aligned properly and tightened securely. Once the fabric or roller tube is attached, carefully extend the awning to its full length and check for any wrinkles or creases in the fabric. If necessary, adjust the tension or reposition the fabric to ensure a smooth and tight fit.
Finally, test the awning by retracting and extending it a few times to make sure it operates smoothly. With these steps, you should be able to successfully mount your RV awning fabric or roller tube and enjoy the benefits of a shaded outdoor space.
The finishing touches are what truly bring a project to life. Whether it’s applying the final coat of paint on a masterpiece or adding the perfect accessories to an outfit, these small details can make all the difference. In the world of interior design, the finishing touches are what transform a space from ordinary to extraordinary.
It’s the carefully chosen throw pillows, the strategically placed decorative accents, and the thoughtfully arranged wall art that give a room its personality. But the importance of finishing touches extends beyond aesthetics. They have the power to evoke emotions, create a sense of harmony, and tell a story.
So, if you want to take your home decor to the next level, it’s time to focus on those finishing touches. Whether you’re starting from scratch or looking to refresh your space, this blog will be your ultimate guide to adding the perfect finishing touches to any room.
Testing the functionality of the awning
Installing an awning on your RV can greatly enhance your outdoor living space and provide much-needed shade on hot summer days. But before you can start enjoying the benefits of your new awning, you need to ensure that it is properly installed and functioning correctly. One of the most important steps in this process is testing the functionality of the awning.
To begin, make sure that the awning is fully extended. This will ensure that you are able to properly test its operation. Once the awning is fully extended, take a close look at the fabric to ensure that it is evenly stretched and free from any tears or damage.
Next, test the manual operation of the awning by gently pulling on the pull strap or handle. The awning should extend and retract smoothly, without any binding or resistance. In addition to the manual operation, it is also important to test the automatic operation of the awning, if it is equipped with this feature.
This can usually be done by pressing a button or switch on the control panel. The awning should extend and retract smoothly and quietly, without any jerking or hesitation. Another important aspect to test is the stability of the awning.
Give it a gentle shake to ensure that it is securely fastened to the RV and does not wobble or sway excessively. This is particularly important if you plan on using the awning in windy conditions. Finally, check the awning’s ability to provide shade and protection from the sun.
Stand underneath the awning and see if it adequately blocks out the sun’s rays. You should be able to feel a noticeable difference in temperature when standing in the shade of the awning. By thoroughly testing the functionality of your RV awning, you can ensure that it is properly installed and ready to be enjoyed.
Securing the awning to prevent damage while traveling
So, you’ve got a shiny new RV awning and you’re excited to hit the road and enjoy some outdoor shade. But before you take off, it’s important to make sure your awning is properly secured to prevent any damage while traveling. Installing a RV awning is actually quite simple and can be done in just a few steps.
First, start by attaching the mounting brackets to the side of your RV. Make sure to line them up with the holes on the awning rail. Then, slide the awning roller into the rail and secure it with the provided bolts.
Once the roller is in place, extend the awning and lock it into position with the tension knobs. Finally, use the included straps or bungee cords to secure the awning arms to the brackets. This will keep them from swinging freely during travel and potentially causing damage.
With your awning properly installed and secured, you can hit the road with peace of mind knowing that your shade will stay in place, no matter how bumpy the journey.
Conclusion: How to Wrap Up your Blog Effectively After putting in the time and effort to craft a well-written and engaging blog post, it’s essential to wrap it up effectively with a strong conclusion. The conclusion serves as the final statement, leaving a lasting impression on your readers. But how can you ensure that your conclusion hits the mark and leaves your audience satisfied? In this blog post, we will explore some tips and strategies for creating a compelling conclusion that ties everything together smoothly.
So, let’s dive in and discover the art of concluding your blog post with finesse! When it comes to crafting a conclusion, there are a few key elements to keep in mind. First and foremost, it should summarize the main points discussed in your blog post. Think of it as a recap, reminding your readers of the valuable information they have just absorbed.
This summary should be concise, effectively condensing the main ideas into a few sentences or paragraphs. Furthermore, the conclusion should leave your readers with a sense of closure. You want them to feel satisfied that they have gained something from reading your post.
One effective way to achieve this is by restating the main message or takeaway of your blog post. By reiterating the core idea in a clear and impactful manner, you can reinforce its significance in the minds of your readers. In addition to summarizing and reinforcing the main points, a good conclusion also provides a sense of finality.
Just like the ending of a good novel or movie, your conclusion should give readers a satisfying sense of completion. One way to do this is by adding a final thought or reflection that offers a fresh perspective or insight. This could be a call to action, a thought-provoking question, or an inspiring quote that leaves readers thinking long after they have finished reading your blog post.
Finally, don’t be afraid to inject a bit of your personality into the conclusion. This is your opportunity to make a lasting impression and connect with your readers on a more personal level. By adding a touch of authenticity or sharing a personal anecdote related to the topic, you can create a deeper connection and enhance the overall impact of your conclusion.
Enjoying the benefits of your RV awning
Installing a RV awning can greatly enhance your outdoor experience while on the road. Not only does it provide much-needed shade and protection from the elements, but it also expands the living space of your RV, giving you a comfortable area to relax and entertain. So, how do you go about installing a RV awning? First, you’ll need to make sure that you have all the necessary tools and materials, including a drill, screws, and a ladder.
Next, determine the best location for your awning, making sure it is securely attached to the RV and will provide optimal coverage. Once you have chosen the location, mark the positions of the mounting brackets and drill holes accordingly. Attach the brackets securely to the RV using the screws provided, making sure they are level and evenly spaced.
Finally, carefully unroll the awning fabric and secure it to the brackets, ensuring that it is taut and properly aligned. Congratulations, you have successfully installed your RV awning and can now enjoy all the benefits it has to offer!
Conclusion
And there you have it, the ultimate guide to installing an RV awning. With these simple steps, you’ll be able to transform your humble RV into a stylish and functional oasis on wheels. So grab your tools, unleash your inner DIY enthusiast, and get ready to show off your impeccable craftsmanship at the next campground gathering.
Remember, installing an RV awning is not just a practical addition, but a statement of style and sophistication. So go forth, my fellow adventurers, and may your awnings be sturdy, your shade be plentiful, and your camping experience be filled with sunny days and starry nights. Happy awning installing!”
FAQs
How do I install a RV awning on my own?
Installing a RV awning on your own can be a bit challenging, but with the right tools and instructions, it can be done. Start by carefully reading the installation manual that came with your awning. Gather all the necessary tools and materials required for the installation. Find a suitable location on your RV where you want to mount the awning. Ensure that the area is clear and free of any obstructions. Follow the step-by-step instructions provided in the manual to properly mount and secure the awning to your RV. It is recommended to seek assistance from a professional if you are not confident in your DIY skills.
Can I install a RV awning on any type of RV?
RV awnings are designed to be versatile and can be installed on various types of RVs, including motorhomes, travel trailers, and campers. However, it is important to ensure that your specific RV model is compatible with the awning you intend to install. Check the manufacturer’s specifications and recommendations before purchasing and installing an awning to make sure it is suitable for your RV.
Are RV awnings difficult to maintain?
RV awnings require regular maintenance to keep them in good condition and prolong their lifespan. The level of difficulty in maintaining an RV awning depends on the type and material of the awning. Generally, awnings made from vinyl or acrylic fabric can be easily cleaned with mild soap, water, and a soft brush. Regularly inspect the awning for any signs of damage or wear, and promptly address any issues to prevent further damage. It is also important to retract the awning during severe weather conditions to avoid damage caused by strong winds or heavy rain.
Are there any safety considerations when installing a RV awning?
Safety should always be a priority when installing a RV awning. Make sure to follow the manufacturer’s instructions and recommended safety guidelines. It is advisable to have an extra set of hands to assist you during the installation process, especially when lifting and mounting the awning. Use caution when working at heights and use appropriate safety equipment, such as gloves and safety goggles. If you are unsure about any aspect of the installation process, it is best to consult a professional or seek assistance.
Can I customize the fabric of my RV awning?
Yes, you can customize the fabric of your RV awning to suit your personal style or match the exterior of your RV. Many manufacturers offer a variety of fabric colors and patterns to choose from. You can also opt for additional features such as UV protection or water resistance. Keep in mind that fabric customization may come at an additional cost, so it’s important to consider your budget and preferences before making a decision.
How do I know what size of RV awning to purchase?
Determining the correct size of RV awning can be done by measuring the length of your RV’s awning rail. Start by measuring the distance from one end of the rail to the other. This measurement will give you the overall length of the awning you need to purchase. It is recommended to add an extra 6-12 inches to this measurement to account for any necessary overhang. Additionally, consider the height and width of your RV to ensure that the awning will provide adequate coverage.
Are there any additional accessories or attachments that I should consider with my RV awning?
There are several accessories and attachments that can enhance the functionality and convenience of your RV awning. Some common options include awning lights, tie-down straps, awning mats, awning rooms, and wind deflectors. These accessories can provide added comfort, protection, and organization while using your RV awning. It is important to research and choose accessories that are compatible with your specific awning model, as not all attachments are universal.