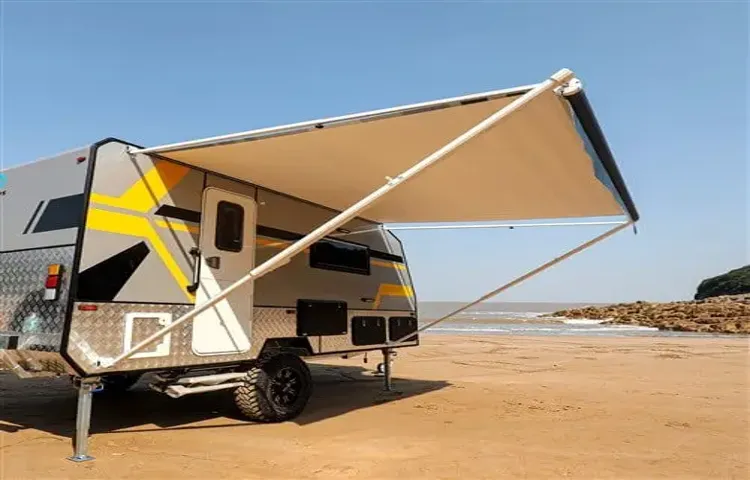
Looking for a way to add some shade and shelter to your RV? Look no further than an Aleko RV awning. These easy-to-install awnings are a perfect addition to any rig, providing a comfortable outdoor living space for you and your loved ones. But just how do you install one of these handy devices? In this blog post, we’ll walk you through the process step-by-step, from start to finish.
So whether you’re an experienced handy-person or just looking to up your DIY game, read on to learn how to install an Aleko RV awning and start enjoying your new outdoor space.
Table of Contents
Check for Compatibility
Before starting the installation process for your Aleko RV awning, it is important to ensure compatibility with your RV. One key factor to consider is the length of your RV’s awning rail. The Aleko RV awning comes in sizes ranging from 8 feet to 21 feet, so you will need to measure your awning rail to determine which size will fit your RV.
Another consideration is the mounting brackets. Make sure that the mounting brackets included with the awning are compatible with your RV. If they are not, you may need to purchase additional brackets separately.
It is also important to check for any obstructions like satellite dishes or vents that may interfere with the installation process. Taking the time to check for compatibility can save you time and frustration down the road, ensuring a smooth and successful installation process for your Aleko RV awning.
Make Sure the Awning Fits Your RV
When choosing an awning for your RV, it’s crucial to make sure that it’s compatible with your RV. Not all awnings are designed to fit on all types of RVs, so it’s important to check the compatibility before making a purchase. A good place to start is by checking the length and height measurements of your RV and compare them to the dimensions of the awning.
Additionally, be sure to consider the weight of the awning, as it needs to be able to be supported by your RV’s framing. Another important factor to consider is the mounting location of the awning, as there are different mounting options available depending on the RV’s design. By taking the time to check for compatibility, you’ll ensure that you’ll be able to install and use your awning safely and effectively on your RV.
Gather Necessary Tools and Materials
When it comes to beginning any project, the first thing on the to-do list should always be gathering the necessary tools and materials. But it’s not just about checking off a list and making sure you have everything you need – it’s about ensuring compatibility. The last thing you want is to have everything together and then realize that certain items aren’t compatible with one another.
For example, if you’re working on a DIY project that involves using specific paints or adhesives, make sure they’re compatible with the materials you’re using. By doing your due diligence ahead of time, you can avoid frustrating setbacks along the way. So, before you start any project, take the time to research compatibility and ensure that the tools and materials you gather are going to work seamlessly together.
Trust me, it’ll save you time, money, and a whole lot of headaches in the long run.
Prepare Your RV
If you’re planning to go on an RV adventure, one of the essential things you need to prepare is your RV awning. Installing an Aleko RV awning doesn’t have to be a daunting task. The first step is to choose the awning size that fits your RV best.
Then, you need to make sure that the installation kit includes all the necessary hardware, such as screws, brackets, and end caps. Once you have everything you need, you can start by determining the location of the awning rail and attaching it to the RV’s sidewall. Next, you can slide the awning fabric into the awning rail and secure it with the end caps.
Finally, you need to install the support brackets and tighten all the screws for a sturdy and safe installation. By following these simple steps, you can enjoy the shade and comfort of your Aleko RV awning during your trip.
Find the Correct Position for the Awning
When it comes to preparing your RV for a relaxing outdoor getaway, one essential step is finding the correct position for the awning. This is a crucial step in ensuring the comfort and safety of you and your fellow travelers. Positioning your awning correctly means avoiding hazards such as low hanging trees, electrical wires and other obstacles in the area.
It’s important to ensure that the ground underneath it is also level to prevent any damage or wobbling. Once you’ve found the perfect location, make sure to secure it properly with stakes and tie-downs to prevent any unexpected gusts of wind from wreaking havoc on your setup. Remember, finding the right spot for your awning is paramount to enjoying a memorable and stress-free outdoor experience.
Clean the Installation Area
When it comes to preparing your RV for installation of a new component, it’s crucial to clean the area thoroughly. This will not only provide a clean slate for the new installation but also help prevent any potential rust or corrosion from occurring down the road. Plus, it’s much easier to work in a clean and organized space! Start by removing any debris or dirt from the area with a brush or vacuum.
Then, use a cleaner or solvent to wipe down the surface and remove any grease or grime. Finally, ensure that the area is completely dry before proceeding with the installation. By taking the time to properly prepare the installation area, you can help ensure a successful and long-lasting installation process.
So don’t skimp on this important step!
Mark the Spot for the Bracket Installation
When it comes to installing a bracket for your RV, the first step is to mark the spot where you will be installing it. But before we get to that, it’s important to prepare your RV by thoroughly cleaning the area where you plan to install the bracket. This will ensure that the bracket adheres well, providing a secure hold.
Once you’ve cleaned the area, it’s time to mark the spot where the bracket will go. You’ll need to make sure you choose a solid, flat surface that can support the weight of the bracket and any accessories you plan to attach to it. Use a measuring tape to mark the spot and ensure the bracket is level when installed.
By taking the time to properly prepare your RV and mark the spot for installation, you’ll ensure a successful and long-lasting installation.
Install the Brackets
If you’re looking to install an Aleko RV awning, it’s important to know that the process varies depending on the specific awning model. Typically, you’ll need to clean and prepare the area where you plan to install the awning, then measure and mark the mounting points before attaching the brackets and awning itself. One common method is to use L-brackets to mount the awning to the side of your RV, but make sure to double-check the instructions and recommended installation methods for your particular model.
Overall, following a step-by-step guide and taking your time to ensure everything is properly secured is key to a successful installation. With these tips and a bit of DIY know-how, you’ll be enjoying your new Aleko RV awning in no time!
Attach the Brackets to the RV
The first step in attaching brackets to an RV is to measure the distance between the RV’s frame and the brackets themselves. This ensures that the brackets are placed in the correct location and will be secure once they’re attached. Once you’ve determined the correct position, drill holes for the bolts that will hold the brackets in place.
It’s important to make sure the bolts are tightened securely, as these brackets will be responsible for holding your RV’s weight. If you’re unsure of how to properly attach the brackets, it’s always best to consult with an RV expert who can provide guidance and ensure the brackets are installed correctly. By taking the necessary precautions and following the proper procedures, you can rest assured that your RV will be secure and stable for your next adventure.
Secure the Brackets with Screws and Bolts
When it comes to installing brackets, securing them with screws and bolts is crucial for ensuring stability and durability. You don’t want your brackets to come loose after all your hard work, do you? When installing the brackets, make sure they are level by using a spirit level and marking the positions for the screw holes. Once you have marked the positions, pre-drill the holes to prevent splitting the wood or damaging the wall.
Then, attach the brackets to the wall or support using screws and bolts, making sure they are securely fastened with no movement. You can use a socket wrench or screwdriver to tighten the bolts properly. It’s important to remember that the right type of screw or bolt for the job should be used, as different materials require different fasteners.
Don’t skimp on the hardware – investing in high-quality screws and bolts will pay off in the long run, ensuring your brackets stay secure for years to come.
Attach the Awning
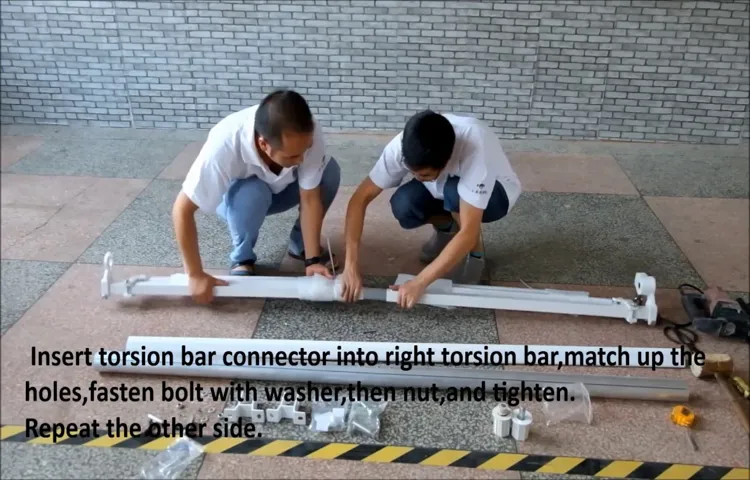
Installing an Aleko RV awning can be an easy and straightforward process as long as you follow the instructions carefully. To attach the awning, you should first locate the awning brackets and secure them to the side of your RV using screws and bolts, making sure they are positioned securely and evenly. Next, connect the awning rail to the brackets and make sure it’s level.
Once the rail is attached properly, you can unroll the awning fabric and attach it to the rail using the provided hardware. Ensure that the fabric is taut and centered, then adjust the tension arms to secure the fabric in place and prevent it from sagging or flapping in the wind. Finally, test the awning to make sure it’s functioning properly and securely, and be sure to follow any additional maintenance or care instructions to keep your RV awning in great shape for years to come.
With these steps, you can enjoy the shade and comfort of your Aleko RV awning on your next outdoor adventure!
Insert the Awning into the Brackets
When it comes to attaching an awning, inserting it into the brackets is a crucial step in the process. First, make sure the brackets are securely mounted to the wall or surface you are attaching them to. Next, lift the awning up and carefully slide each end into the corresponding bracket.
It’s important to ensure the awning is level and properly aligned with the brackets to prevent any damage or complications when retracting it. Remember, this step is just one part of attaching the awning – be sure to read the manufacturer’s instructions thoroughly and follow each step carefully. Taking the time to properly install your awning will not only increase its lifespan, but also ensure your safety and delight when enjoying the shade it provides on a sunny day.
Install the Tension Arms and Secure Them
When it comes to awnings, installing the tension arms correctly is crucial. These arms help to hold up the awning and provide the necessary tension to keep it taut and secure. Before attaching the awning, make sure that the tension arms are properly aligned with the brackets.
Once you have positioned the arms, begin to secure them using the screws and bolts provided. Be careful not to overtighten the bolts as this may cause damage to the awning fabric. Once you have secured both tension arms, you can begin to attach the awning itself.
Start by sliding the awning into the groove on the roller and pulling it out enough to attach it to the tension arms. Take care to make sure that the awning is centered and that the fabric is taut to avoid any sagging or drooping. Once attached, use the winding handle to extend and retract the awning to ensure that it is working correctly.
With the tension arms securely in place, you can enjoy your awning with confidence and peace of mind.
Test the Awning
Installing an Aleko RV awning is a great way to add shade and comfort to your camping experience. Once you’ve followed the instructions and installed your awning, it’s important to test it out before hitting the road. Start by extending the awning fully and ensure that it’s securely locked in place.
Then, slowly retract the awning to make sure it rolls up without any issues or kinks. Another crucial step is to test the tilt function of the awning to make sure it can be adjusted to provide adequate shade from different angles. It’s always better to identify any potential issues with your awning before you’re out on the road and in need of some shade.
So take the time to test it out and make sure it’s fully functional before setting out on your next adventure.
Extend and Retract the Awning Several Times
If you’ve just installed a new awning, testing it out should be your top priority to ensure it works the way it should. To test it out, you’ll need to extend and retract it several times. This will not only allow you to see if everything is running smoothly, but it will also help you get a feel for how the awning operates.
Additionally, extending and retracting the awning several times will help you get an idea of how long it takes to fully extend or retract. There are a few things to keep an eye out for during this process, such as whether the awning moves fluidly or if there are any obstructions that might be in the way. Remember that taking the time to test out your awning will save you time and frustration down the line.
So, grab a cold drink and give it a go!
Make Adjustments if Necessary
If you’ve just installed a new awning, it’s a good idea to test it out to ensure that it’s working correctly. One of the most important things to check is whether the awning opens and closes smoothly. If you notice any jerky movements or resistance when opening or closing the awning, you may need to make some adjustments.
This could involve tightening loose screws, lubricating moving parts, or adjusting tension settings. It’s also important to check that the awning is level and that it sits flush against the wall. If there are any gaps or uneven areas, this could be a sign of improper installation.
Making these adjustments may take a bit of time and effort, but it will ensure that your awning is working properly and will last for years to come.
Conclusion
Installing an Aleko RV awning may seem like a daunting task, but with the right tools and a little bit of know-how, it can be a breeze. Just remember to measure twice, drill once, and have a cold beverage waiting for you at the end of it all. With your new awning up, you’ll have the perfect spot to enjoy your outdoor adventures and bask in the shade like a true RV pro.
So go forth and install, and let the good times roll!”
FAQs
What materials are required to install an Aleko RV awning?
The materials required to install an Aleko RV awning include the awning, mounting brackets, screws, anchors, a drill, and a measuring tape.
Can I install an Aleko RV awning by myself, or do I need professional help?
It is possible to install an Aleko RV awning by yourself, but it is recommended that you have some experience with DIY projects and are comfortable using tools.
How do I measure my RV to ensure I purchase the correct size Aleko awning?
To measure your RV for an Aleko awning, measure the distance between the center lines of the mounting brackets. This measurement should be the same as the width of the awning you purchase.
What is the process for installing the mounting brackets for an Aleko RV awning?
To install the mounting brackets for an Aleko RV awning, hold the bracket to the RV and mark the location of the screw holes. Drill pilot holes, then use screws and anchors to attach the brackets securely to the RV.
Do I need to use silicone sealant when installing an Aleko RV awning?
While not strictly necessary, using silicone sealant around the edges of the mounting brackets can help prevent leaks and ensure a secure installation.
Can I install an Aleko RV awning on any type of RV?
Aleko RV awnings are compatible with most types of RVs, including travel trailers, fifth wheels, and motorhomes.
How do I care for and maintain my Aleko RV awning once it is installed?
To care for your Aleko RV awning, keep it clean by periodically washing it with mild soap and water. If it becomes ripped or damaged, repair it promptly to prevent further damage.