So you’ve just purchased a new camper or trailer, and you’re excited to hit the road and start exploring the great outdoors. But before you can embark on your journey, there’s one important step you need to take: installing an equalizer hitch. An equalizer hitch, also known as a weight distribution hitch, is a crucial piece of equipment that helps distribute the weight of your camper or trailer evenly across all axles.
This not only improves the stability and control of your vehicle while towing, but it also ensures a smooth and safe ride. But how exactly do you go about installing an equalizer hitch? Don’t worry, I’ve got you covered. In this blog post, I’ll walk you through the step-by-step process of installing an equalizer hitch, from start to finish.
So grab your tools, put on your DIY hat, and let’s get started!
Table of Contents
Introduction
Are you ready to take your towing game to the next level? Installing an equalizer hitch is a great way to ensure a smoother and safer towing experience. Whether you’re towing a camper, boat, or trailer, an equalizer hitch can help distribute the weight properly and reduce sway. But how exactly do you install one? Don’t worry, we’ve got you covered.
In this blog post, we’ll walk you through the step-by-step process of installing an equalizer hitch so that you can hit the road with confidence. Let’s get started!
What is an Equalizer Hitch?
equalizer hitch An equalizer hitch, also known as a weight distribution hitch, is a type of towing device that helps evenly distribute the weight of a trailer or caravan across the towing vehicle and its wheels. This can be especially useful for larger trailers, which often place a significant amount of weight on the back of the towing vehicle, causing it to sag or become unbalanced. An equalizer hitch consists of a specialized hitch bar that connects the towing vehicle to the trailer, as well as tension bars and weight distributing arms that help redistribute the weight.
By doing so, an equalizer hitch can improve stability, handling, and control while towing, making it safer and more comfortable for the driver.
Why Use an Equalizer Hitch?
equalizer hitch, towing, trailer, weight distribution, stability, safety, control, sway, towing capacity Introduction: If you’ve ever towed a trailer, you know just how important it is to have complete control and stability while on the road. As your trailer adds extra weight to the back of your vehicle, it can create a shift in balance and increase the chance of sway. This not only compromises your safety but also makes for a more stressful and uncomfortable towing experience.
That’s where an equalizer hitch comes in. This ingenious device is designed to evenly distribute the weight of your trailer, providing you with the stability and control you need for a smooth and safe journey. Whether you’re towing a small camper or a large boat, using an equalizer hitch can make all the difference in your towing experience.
Equipment You Will Need
If you’re looking to enhance the towing capabilities of your vehicle, installing an equalizer hitch is a smart choice. But before you get started, there are a few pieces of equipment you’ll need to gather. Firstly, you’ll need the equalizer hitch itself, which consists of a hitch head, weight distribution bars, and a shank.
Make sure to choose a hitch that is compatible with your towing capacity and trailer weight. Additionally, you’ll need a torque wrench to properly tighten the bolts and ensure a secure connection. It’s also a good idea to have a trailer jack on hand to support the weight of the trailer while you’re installing the hitch.
Lastly, don’t forget to have a tape measure or ruler to measure the height of your trailer and adjust the equalizer hitch accordingly. With these tools in hand, you’ll be well-prepared to successfully install your new equalizer hitch and enjoy a smoother and safer towing experience.
Required Tools
“In order to successfully complete any DIY project, it is essential to have the right tools at hand. When it comes to equipping yourself for a painting project, there are a few key items that you will need. Firstly, you will need a drop cloth or tarp to protect your floors and furniture from drips and spills.
A sturdy ladder or step stool is also essential for reaching high or hard-to-reach areas. Additionally, you will need a variety of brushes and rollers in different sizes to ensure smooth and even coverage. A paint tray or bucket is necessary for holding and mixing your paint, as well as a stir stick to ensure an even consistency.
Other tools that may come in handy include painter’s tape for clean lines and edges, sandpaper for smoothing rough surfaces, and a putty knife for filling in any holes or cracks. By having these tools on hand, you will be well-prepared to tackle any painting project with ease and confidence.”
Required Parts
To successfully build your own computer, there are a few essential parts and equipment that you will need. First and foremost, you will need a computer case to hold all of the components together. This is like the shell of the computer, providing protection and organization for everything inside.
In addition to the case, you will also need a power supply unit (PSU) to provide the necessary power to all of the components. Think of the PSU as the heart of your computer, ensuring that it can run smoothly and efficiently. Another crucial part is a motherboard, which acts as the central hub connecting all of the components together.
It’s like the nervous system of your computer, allowing all parts to communicate with each other. Additionally, you will need a processor (CPU) which acts as the brain of the computer, handling all of the calculations and instructions. Imagine it as the conductor of an orchestra, guiding each instrument to create beautiful music.
Lastly, you will need RAM (random access memory) which acts as the computer’s short-term memory. It allows for quick and efficient processing of data, like a juggler who can keep multiple balls in the air at once. Overall, these are the essential parts and equipment you’ll need to build your own computer, each one playing a vital role in creating a functional and efficient system.
Step-by-Step Installation Guide
So, you’ve decided to take the plunge and install an equalizer hitch on your trailer. Congratulations! This important piece of equipment will help to evenly distribute the weight of your trailer, making for a smoother and safer towing experience. But where do you start? Don’t worry, I’ve got you covered with this step-by-step installation guide.
First things first, gather all the necessary tools and equipment. You’ll need an equalizer hitch kit, a wrench or socket set, a torque wrench, and a trailer hitch receiver that is compatible with the equalizer hitch. Once you have everything ready, it’s time to install the equalizer hitch.
Begin by positioning the hitch head onto the trailer hitch ball mount and secure it with the provided lock washer and nut. Make sure to tighten the nut securely, using a wrench or socket set. Next, attach the spring arms to the hitch head.
These arms are the key component of the equalizer hitch as they distribute the weight of the trailer. Slide the spring arms onto the hitch head, making sure they are facing the correct direction and secure them with the provided pins or clips. After that, it’s time to install the weight distribution bars.
These bars help to distribute the weight evenly across the trailer and tow vehicle. Slide the weight distribution bars onto the spring arms, making sure they are fully seated and secure them with the provided pins or clips. Now that the hitch is fully assembled and attached to the trailer hitch receiver, it’s time to adjust the tension.
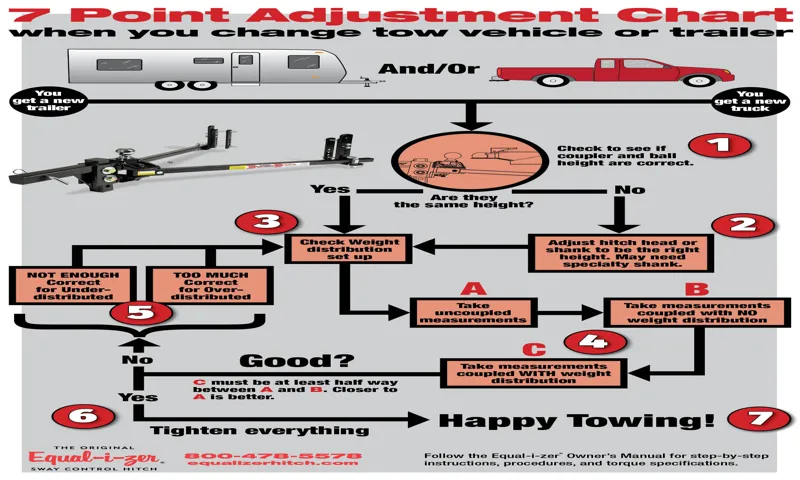
This can be done by adjusting the chains on the weight distribution bars. Start by measuring the distance from the ground to the front and back of your tow vehicle. The goal is to have the front of the tow vehicle slightly lower than the back, creating a level towing experience.
Step 1: Measure and Prepare the Tow Vehicle
installing a tow hitch. Installing a tow hitch on your vehicle can greatly expand its versatility and allow you to tow trailers, boats, or other equipment with ease. However, before you can begin the installation process, there are a few things you need to do to prepare your tow vehicle.
The first step is to measure your vehicle and determine the appropriate hitch size. This is important because the hitch needs to be properly sized to ensure a secure and safe connection. To do this, you will need to measure the distance from the ground to the top of your vehicle’s receiver tube opening.
This measurement will help you determine the correct drop or rise for your hitch. Once you have determined the correct hitch size, you will need to gather the necessary tools and equipment for the installation process. This may include a socket set, torque wrench, jack stands, and a wire brush for cleaning the receiver tube opening.
It’s important to have all of these items on hand before you begin, as it will make the installation process much smoother and more efficient. Before you can install the tow hitch, you will need to remove any existing hardware or attachments from your vehicle’s receiver tube opening. This may include a ball mount or hitch ball that was previously installed.
Use a socket set to remove any necessary bolts or screws, and carefully set aside any removed hardware for later use. Once you have cleared the receiver tube opening, you will need to clean the area thoroughly. Use a wire brush to remove any dirt, rust, or debris that may have accumulated in the opening.
This will ensure a clean and secure connection for the tow hitch. With the receiver tube opening clean and prepared, you are now ready to begin the installation process. Follow the manufacturer’s instructions carefully, using the provided hardware to secure the tow hitch to your vehicle.
Step 2: Prepare the Trailer
trailer installation guide, preparing the trailer, step-by-step installation
Step 3: Attach the Hitch Head to the Receiver
When it comes to attaching the hitch head to the receiver, you’ll want to follow a few simple steps to ensure a secure and proper installation. Start by positioning the hitch head so that the mounting holes align with the holes on the receiver. Once aligned, insert the necessary bolts and tighten them with a wrench.
Make sure the bolts are securely fastened to prevent any wobbling or movement of the hitch head. It’s important to double-check your work and ensure that the hitch head is properly attached before towing any trailers or other heavy loads. By taking the time to carefully install the hitch head, you can have peace of mind knowing that your towing setup is safe and secure.
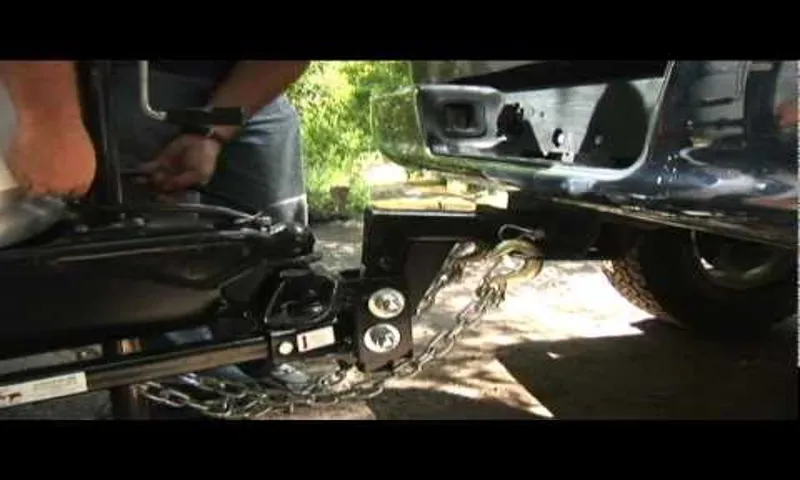
Step 4: Connect the Spring Bars to the Hitch Head
In this step of installing a weight distribution hitch, we will connect the spring bars to the hitch head. This is an important part of the installation process as it helps distribute the weight of the trailer more evenly across the towing vehicle. The spring bars play a crucial role in providing the necessary tension and stability to ensure a smooth and safe towing experience.
To begin, make sure that the hitch head is in the correct position on the hitch receiver. Depending on the specific weight distribution hitch you are using, there may be different mounting holes on the hitch head. Choose the appropriate hole that will provide the desired amount of tension on the spring bars.
Next, take the spring bars and slide them into the spring bar hangers on the hitch head. The spring bars should fit snugly into the hangers without any looseness. It’s important to ensure that the spring bars are properly aligned and seated securely in the hangers to prevent any accidents or damage while towing.
Once the spring bars are in place, you will need to attach the spring bar chains to the designated connection points on the hitch head. These chains help provide additional support and stability, adding an extra layer of security to the weight distribution system. Make sure to connect the chains securely, ensuring that they are not twisted or tangled.
After attaching the spring bar chains, you may need to adjust the tension on the spring bars. This can be done by using the appropriate tools to either increase or decrease the tension, depending on the weight distribution requirements of your specific towing setup. It’s important to follow the manufacturer’s instructions and recommendations for proper tension adjustment to ensure optimal performance.
Once you have connected the spring bars to the hitch head and adjusted the tension, give everything a final check to ensure that all connections are secure and properly tightened. This will help ensure a safe and smooth towing experience. In conclusion, connecting the spring bars to the hitch head is a crucial step in the installation of a weight distribution hitch.
Step 5: Level the Trailer
level the trailer
Step 6: Adjust the Chain Tension
When it comes to installing a new chain on a bicycle, it’s important to ensure the tension is properly adjusted. Why is this important? Well, if the chain is too loose, it can easily come off while riding and cause a dangerous situation. On the other hand, if the chain is too tight, it can put unnecessary strain on the drivetrain components and lead to premature wear and damage.
So, how do you adjust the chain tension? Step 6 of our installation guide covers this crucial step. First, you’ll need to locate the derailleur on your bike. This is the mechanism that moves the chain between gears.
Next, find the tension adjustment screw, typically located near the derailleur. Turn the screw clockwise to tighten the chain or counterclockwise to loosen it. It’s important to make small adjustments and test the tension frequently to ensure it’s just right.
A good rule of thumb is to aim for about half an inch of movement in the chain when applying light pressure with your finger. Remember, proper chain tension is essential for smooth and efficient shifting, as well as for the overall longevity of your drivetrain components. So, take the time to adjust the tension correctly and enjoy a safe and smooth ride on your newly installed chain!
Step 7: Test the Hitch
When it comes to installing a hitch on your vehicle, the final step is to test it to ensure everything is secure and functioning properly. This is an important step because you want to make sure the hitch can handle the weight and stress of your trailer or other equipment. One way to test the hitch is to attach your trailer and take it for a short test drive.
Pay attention to how the vehicle handles and make sure there are no noises or vibrations coming from the hitch. Additionally, check to see if the hitch is securely attached to the frame of your vehicle and that all bolts and connectors are tightened properly. By testing the hitch before hitting the road, you can have peace of mind knowing that it is safe and ready for your next adventure.
Tips and Tricks
Looking to install an equalizer hitch? You’ve come to the right place! An equalizer hitch is a great way to add stability and control to your towing setup, especially if you’re hauling a heavy load. And the best part? It’s not as complicated as it may seem. So let’s dive right in and get you on your way to a smoother towing experience.
First things first, gather all the necessary tools and materials: the equalizer hitch itself, a torque wrench, socket set, and a jack if needed. Start by attaching the hitch head to your trailer’s tongue using the included bolts. Make sure to tighten them securely, but be careful not to overtighten.
Next, position the hitch onto the ball mount and secure it with the provided pin or locking mechanism. Adjust the equalizer bars to the proper height by using the built-in spring bars. This will help distribute the weight evenly between your trailer and your towing vehicle.
Lastly, tighten all the nuts and bolts using a torque wrench to ensure they are properly secured. It’s always a good idea to double-check your work before hitting the road. And voila! You’ve successfully installed an equalizer hitch.
Now you can enjoy a smoother, more controlled towing experience. Happy trails!
Check for Proper Weight Distribution
One important aspect of maintaining a safe and smooth ride is ensuring proper weight distribution in your vehicle. This is especially crucial when carrying heavy loads or towing trailers. Proper weight distribution helps to maintain control and stability while minimizing the risk of accidents.
So, how can you check if your vehicle’s weight is distributed correctly? One simple method is to take a look at your tires. If one tire is noticeably more worn than the others, it could indicate that too much weight is being placed on that side of the vehicle. Additionally, you can use a weighing scale to measure the weight on each tire.
Ideally, the weight should be evenly distributed across all four tires. If you notice any imbalance, you may need to redistribute the weight or consult with a professional. Remember, maintaining proper weight distribution is an essential part of keeping your vehicle safe on the road.
Regularly Inspect and Maintain Your Equalizer Hitch
Equalizer hitch, inspect, maintain, tips and tricks When it comes to towing your trailer, having the right equipment is crucial for a safe and smooth journey. One essential piece of equipment is an equalizer hitch, which helps distribute the weight between your trailer and towing vehicle, ensuring stability and control. However, like any other piece of equipment, an equalizer hitch requires regular inspections and maintenance to ensure it is working effectively.
One tip for maintaining your equalizer hitch is to regularly inspect the components for any signs of wear or damage. This includes checking the bolts and nuts for tightness, examining the bushings for cracks or excessive wear, and inspecting the head assembly for any signs of bending or distortion. By catching and addressing any issues early on, you can prevent further damage and ensure the hitch is performing optimally.
Another important aspect of maintaining your equalizer hitch is to keep it clean and lubricated. This involves regularly cleaning the hitch and removing any dirt or debris that may have accumulated. Additionally, applying grease or lubricant to the moving parts of the hitch, such as the spring bars and pivot points, can help reduce friction and extend the lifespan of the hitch.
Furthermore, it’s crucial to follow the manufacturer’s guidelines for maintenance. This includes understanding the weight rating and limitations of your equalizer hitch and ensuring it is properly adjusted for your specific towing setup. By adhering to the manufacturer’s recommendations, you can avoid unnecessary wear and tear on the hitch and ensure its longevity.
In conclusion, regular inspections and maintenance of your equalizer hitch are essential for safe and effective towing. By inspecting the components, keeping it clean and lubricated, and following the manufacturer’s guidelines, you can extend the lifespan of your hitch and enjoy worry-free towing experiences. So take the time to give your equalizer hitch the attention it deserves and enjoy a smooth and stable journey on the road.
Take a Test Drive
test drive, car shopping, tips and tricks
Conclusion
So there you have it folks, installing an equalizer hitch is a breeze! With just a few simple steps, you can have a smoother, more balanced towing experience. Remember, it’s all about finding that perfect harmony between your vehicle and trailer, just like a symphony. So go forth and conquer the open road, knowing that your trailer is dancing to the same beat as your trusty steed.
And hey, if anyone asks how you managed to make towing look so effortless, just tell them you’ve got a secret weapon – your trusty equalizer hitch. Safe travels, my fellow adventurers!”
Disclaimer
So you’ve decided to upgrade your towing setup and invest in an equalizer hitch. That’s a great choice! An equalizer hitch is designed to distribute the weight of your trailer more evenly across all four wheels of your tow vehicle, resulting in better stability and control on the road. But how do you go about installing one? Don’t worry, it’s not as complicated as it may seem.
The first step is to ensure that your tow vehicle is properly equipped to handle an equalizer hitch. This typically involves having a receiver hitch installed, as well as the appropriate wiring for your trailer lights. Once you have the necessary equipment, it’s time to start the installation process.
Begin by attaching the equalizer hitch head to the receiver hitch on your tow vehicle. This is done by sliding the hitch head into the receiver and securing it with a hitch pin and clip. Next, you’ll need to adjust the height of the hitch head to ensure that it is level with your trailer.
This can be done by adjusting the drop shank or ball mount on the hitch head. Finally, you’ll want to connect the spring bars to the hitch head. These bars are what actually distribute the weight of your trailer to your tow vehicle’s axles.
To do this, simply insert the spring bars into the hitch head and secure them with the appropriate pins and clips. Once everything is properly installed, be sure to check that all connections are secure and that the hitch is level before hitting the road. And there you have it – you’ve successfully installed an equalizer hitch! Now you can enjoy a safer and more stable towing experience.
Happy towing!
FAQs
What is an equalizer hitch?
An equalizer hitch is a type of towing accessory that helps distribute the weight between the towing vehicle and the trailer, providing better stability and control during towing.
Why do I need an equalizer hitch?
An equalizer hitch is necessary when towing heavy loads or trailers to maintain proper weight distribution. It helps prevent swaying, pitching, and sagging of the tow vehicle, which can lead to unsafe driving conditions.
How does an equalizer hitch work?
An equalizer hitch works by using spring bars that connect the trailer tongue to the tow vehicle’s hitch. The bars redistribute the weight of the trailer’s tongue evenly across all axles, ensuring better control and reducing the strain on the rear axle of the tow vehicle.
How do I select the right equalizer hitch for my setup?
To select the right equalizer hitch, you need to consider factors such as the trailer weight, tongue weight, and the towing vehicle’s specifications. It’s recommended to consult the manufacturer’s guidelines or seek expert advice to ensure you choose the appropriate hitch for your specific towing setup.
Can I install an equalizer hitch myself, or do I need professional help?
While it is possible to install an equalizer hitch yourself, it is recommended to have a professional installer handle the installation. They have the expertise and knowledge to ensure the hitch is properly installed and adjusted for optimal performance and safety.
How often should I inspect and maintain my equalizer hitch?
It is important to regularly inspect and maintain your equalizer hitch to ensure safe towing. Check for any signs of wear or damage and lubricate the necessary parts according to the manufacturer’s instructions. It’s also a good idea to have the hitch inspected by a professional annually.
Can I use an equalizer hitch with any type of trailer?
An equalizer hitch is generally suitable for most types of trailers, including travel trailers, enclosed trailers, and utility trailers. However, it’s crucial to ensure that the hitch’s weight capacity matches or exceeds the trailer’s tongue weight. Always consult the manufacturer’s guidelines to determine compatibility.