Hey there! Are you ready to get pumped up and dive into the exciting world of fitness? Well, look no further because we’ve got just the blog for you. Whether you’re a seasoned gym-goer or someone who’s just starting their fitness journey, our blog is here to provide you with all the information and motivation you need to crush your fitness goals. We know that the fitness industry can sometimes be overwhelming, with so many different workout regimens, diet plans, and supplement options to choose from.
But don’t worry – we’re here to guide you through it all, breaking down complex concepts into simple, easy-to-understand terms. Think of this blog as your personal fitness coach, ready to cheer you on, challenge you, and help you push past your limits. We’ll share tips and tricks, debunk common fitness myths, and provide you with workouts that will leave you feeling strong and accomplished.
But this blog isn’t just about physical fitness. We believe that true wellness extends beyond the gym floor. That’s why we’ll also be diving into topics like mental health, self-care, and nutrition, because we believe that a holistic approach to wellness is the key to a happy and healthy life.
So, whether you’re looking to lose weight, gain muscle, boost your energy levels, or simply improve your overall well-being, this blog is here to support you every step of the way. It’s time to lace up your sneakers, put on your game face, and get ready to become the best version of yourself. Get ready to unleash your inner fitness warrior, because this blog intro is just the beginning of an epic fitness journey.
Ready to take on the challenge? Let’s do this!
Table of Contents
Benefits of Installing an RV Awning
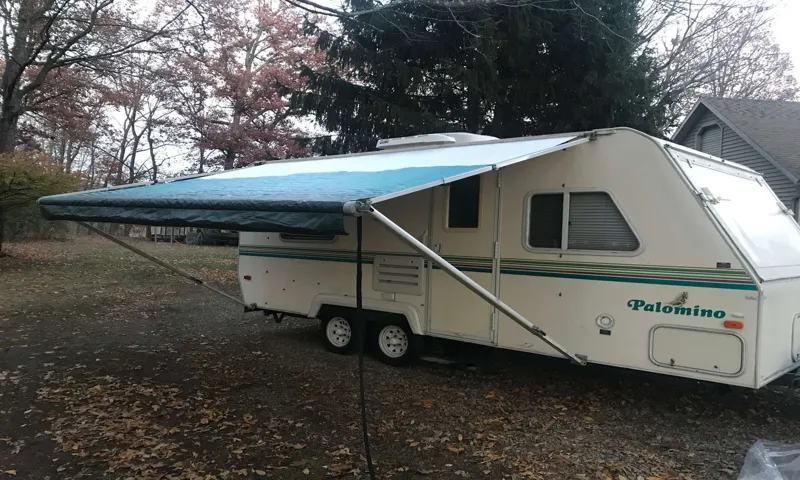
“how to install an rv awning” Installing an RV awning can provide a multitude of benefits for your outdoor adventures. Not only does it provide shade and protection from the sun’s harmful rays, but it also creates a cozy outdoor living space. But you may be wondering, how do you install an RV awning? First, you’ll need to gather the necessary tools and materials, including a power drill, screws, a tape measure, and the awning kit itself.
Start by measuring the length of your RV and choose the appropriate size awning. Once you have your measurements, begin by attaching the awning brackets to the side of your RV. Make sure to securely fasten them using the screws provided.
Next, carefully unroll the awning fabric and attach it to the awning roller tube. This may require some assistance as the fabric can be quite large and heavy. Once the fabric is attached, roll it back up using the manual or electric controls, making sure it is evenly distributed and smoothly rolls up.
Lastly, extend the awning by using the controls or hand cranks, ensuring it is fully extended and secure. Adjust the tension of the fabric as needed, making sure it is not too loose or too tight. And voila! You have successfully installed your RV awning.
With your new awning in place, you will be able to enjoy the great outdoors in comfort and style. Whether you’re lounging in a chair under the shade, cooking up a delicious meal, or simply enjoying the views, an RV awning provides a versatile and functional space for all your outdoor activities. So why wait? Install an RV awning today and enhance your camping experience like never before.
Protection from the Sun and Rain
RV awnings provide essential protection from the sun and rain, making them a valuable addition to any RV or camper. One of the key benefits of installing an RV awning is the ability to shield yourself from the harsh rays of the sun. Whether you’re enjoying a hot summer day at the beach or parked at your favorite campground, having a shady spot to relax in can make all the difference.
Not only does this protect you from the harmful effects of UV rays, but it also helps to keep your RV cooler, reducing the need for excessive air conditioning and saving you money. Additionally, an RV awning is a great way to stay dry when unexpected rain showers roll in. Instead of scrambling to close windows and find shelter, you can simply extend your awning and continue enjoying your outdoor space.
This convenience is especially beneficial for those who love to camp and spend time in nature, as it allows you to fully embrace the beauty of the outdoors without worrying about getting wet. So, whether you’re seeking relief from the sun or a way to stay dry during a sudden rainstorm, installing an RV awning is a smart choice that enhances your overall camping experience.
Extended Living Space
RV awnings provide a multitude of benefits for campers and outdoor enthusiasts. One of the main advantages is that they extend your living space, allowing you to enjoy the outdoors while still being protected from the elements. Whether it’s shade from the scorching sun or shelter from the rain, an RV awning provides a comfortable and functional space outside of your vehicle.
This extended living space can be used for cooking, dining, socializing, or simply relaxing and enjoying the view. Imagine sitting under your awning with a cold drink in hand, watching the sunset over the mountains, or hosting a BBQ with friends and family under the shade. With an RV awning, the possibilities are endless, and you can create your own outdoor oasis wherever you go.
So why limit yourself to the confines of your RV when you can have the luxury of an extended living space? Install an RV awning today and unlock the full potential of your outdoor adventures.
Energy Savings
Installing an RV awning can bring about significant benefits in terms of energy savings. Not only does it provide shade, shielding you from the scorching sun, but it also helps in keeping your RV cool and comfortable during hot summer days. By reducing direct sunlight exposure, the awning prevents the interior of your RV from heating up, ultimately reducing the need for excessive air conditioning.
This can result in substantial energy savings, as you won’t have to rely on your AC as much to maintain a comfortable temperature. Additionally, an RV awning also acts as a barrier against rain, preventing water from seeping into your RV and potentially causing damage. So not only does it save energy, but it also protects your investment.
With the added bonus of creating an extra outdoor living space, installing an RV awning is a wise choice for any RV enthusiast looking to enhance their camping experience while keeping energy costs in check.
Different Types of RV Awnings
If you own an RV, you probably know how important it is to have a reliable awning. RV awnings provide shade and protection from the elements, making your outdoor camping experience more comfortable and enjoyable. But did you know that there are different types of RV awnings to choose from? One popular type is the manual awning, which is operated by hand and can be easily extended or retracted.
Another option is the automatic awning, which can be operated with the touch of a button. It’s a convenient choice for those who want a hassle-free awning experience. Additionally, there are slide-out awnings that cover the slide-outs of your RV, providing extra protection from sun and rain.
Whichever type of RV awning you choose, it’s important to know how to install it properly to ensure its longevity. From measuring the area to mounting the brackets, there are several steps involved in installing an RV awning. By following the manufacturer’s instructions and taking the time to do it right, you’ll be able to enjoy the benefits of your awning for years to come.
Manual Awnings
When it comes to manual awnings for RVs, there are a few different types to choose from. One popular option is the patio awning, which extends out from the side of the RV to provide shade and protection from the elements. These awnings can be manually cranked out and adjusted to the desired angle.
Another type of manual awning is the window awning, which is smaller and designed specifically for covering the windows of the RV. These awnings can also be manually adjusted and provide shade and privacy inside the RV. Lastly, there are slide-out awnings, which are attached to the sides of slide-out rooms and extend out to provide additional shade and protection.
These awnings can be manually extended and retracted as needed. Overall, manual awnings offer a simple and cost-effective solution for adding shade and comfort to your RV.
Electric Awnings
electric awnings, different types of RV awnings
Slide-Out Awnings
slide-out awnings, RV awnings, types of awnings, outdoor living space, shade and protection, extendable awnings, roll-out awnings, electric awnings, manual awnings, retractable awnings, awning materials, patio awnings, deck awnings, fabric awnings, aluminum awnings, vinyl awnings. When it comes to enhancing your RV’s outdoor living space, slide-out awnings are a must-have accessory. These awnings provide shade and protection for the area around your RV’s slide-out room, creating a comfortable oasis wherever you go.
There are several different types of RV awnings to choose from, each with its own set of advantages and features. One popular option is the extendable awning, which rolls out automatically at the touch of a button. These electric awnings are convenient and easy to use, providing instant shade and protection from the sun.
Another option is the roll-out awning, which requires manual operation but offers more flexibility in terms of size and positioning. Whether you prefer the convenience of an electric awning or the versatility of a manual one, slide-out awnings can greatly enhance your RVing experience. When selecting an awning, it’s important to consider the materials used.
Fabric awnings are a popular choice, as they offer a wide range of colors and patterns to match your RV’s aesthetic. Additionally, fabric awnings are lightweight and easy to clean. However, if durability is a top priority, you may want to consider aluminum or vinyl awnings, which are resistant to harsh weather conditions and are built to last.
Whatever type of awning you choose, it’s sure to enhance your outdoor living space and provide the shade and protection you need for a comfortable camping experience. So sit back, relax, and enjoy the great outdoors, all while staying cool and comfortable under the shade of your slide-out awning.
Tools and Materials Needed
When it comes to installing an RV awning, there are a few tools and materials that you will need to have on hand. First and foremost, you will need the actual awning itself, which is typically made of a durable fabric material that can withstand the elements. You will also need a set of mounting brackets, which will attach the awning to the side of your RV.
Additionally, you will need a drill and screws to secure the brackets in place. Depending on the specific awning you choose, you may also need a level to ensure that it is installed properly. Finally, it is always a good idea to have a ladder or step stool available to help you reach the top of your RV safely.
With these tools and materials in hand, you will be well-prepared to install your new RV awning and start enjoying the shade and protection it provides.
Measuring Tape
measuring tape
Drill
“Drill” is a versatile tool that can be used for a wide range of tasks, from simple home repairs to more complex construction projects. To get the most out of your drill, it’s important to have the right tools and materials on hand. First and foremost, you’ll need a drill itself.
There are many different types of drills to choose from, including cordless drills, electric drills, and even pneumatic drills. Consider the specific needs of your project and choose a drill that is suitable for the task at hand. Alongside the drill, you’ll also need a set of drill bits.
These come in various sizes and types, including twist drill bits, spade bits, and masonry bits. Having a selection of drill bits will ensure that you have the right bit for each specific job. Additionally, don’t forget about safety equipment.
Safety glasses or goggles are essential to protect your eyes from flying debris, and ear protection is recommended to reduce noise levels. Finally, having a good supply of screws, nails, and anchors on hand will ensure that you have everything you need to complete your drilling tasks. With the right tools and materials, you’ll be well-equipped to tackle any drilling project that comes your way.
Screws
screws, tools and materials needed
Awning Fabric
awning fabric
Preparing the RV
Installing an RV awning is a great way to add some much-needed shade and comfort to your outdoor living space. To get started, you’ll want to make sure you have all the necessary tools and materials on hand. This usually includes the awning itself, as well as mounting brackets, screws, a drill, a tape measure, and a level.
Once you have everything ready, you’ll need to find the right spot on your RV to install the awning. Most awnings are designed to be mounted on the side of the RV, so take some time to measure and determine the best location. Once you’ve found the perfect spot, use the tape measure and level to mark where the brackets will be installed.
After that, attach the brackets securely to the RV using screws and a drill. Finally, carefully slide the awning into the brackets and secure it in place. Voila! You now have a beautiful and functional awning on your RV.
Choosing the Right Spot
“Choosing the Right Spot to Prepare Your RV” When it comes to preparing your RV for your next adventure, one of the most important decisions you’ll need to make is choosing the right spot. This is the place where you’ll set up camp, relax, and make memories with your loved ones. But with so many options out there, how do you know which spot is truly the right one for you? First and foremost, consider the location.
Do you prefer to be surrounded by nature, or do you prefer being closer to amenities and attractions? Think about the activities you want to do during your trip and choose a spot that is convenient for those. If you’re an avid hiker, you might want to choose a spot near a national park or a hiking trail. If you’re a beach lover, look for a spot near the coast with easy access to the ocean.
Next, consider the size of your RV and the amenities you need. If you have a larger RV, make sure the spot you choose can accommodate its size. Look for spots with spacious pull-through sites or wide driveways.
If you’re planning to stay for an extended period of time, you might also want to consider spots with full hookups for water, electricity, and sewage. Another important factor to consider is the atmosphere. Do you prefer a quieter, more secluded spot, or do you prefer a lively campground with activities and events? Some people enjoy the peace and tranquility of a remote spot in the woods, while others prefer the social aspect of a bustling campground.
Think about what kind of experience you want to have and choose a spot accordingly. Lastly, don’t forget to consider the reviews and recommendations from other RVers. Reading reviews can give you a good idea of what to expect, as well as any potential issues or concerns.
Check out online forums and RVing communities to get insights from fellow travelers who have been to the area before. In conclusion, choosing the right spot for your RV is essential to having a memorable and enjoyable trip. Consider the location, the size and amenities of your RV, the atmosphere you prefer, and the experiences of others.
Cleaning the RV
RV cleaning, preparing the RV
Measuring the Area
“Measuring the Area: Preparing the RV” So, you’ve decided to go on an adventure and take your RV out for a spin! Before you hit the road, it’s crucial to make sure you have all the measurements you need for a smooth journey. This includes measuring the area inside your RV, so you know what furniture and belongings will fit comfortably. To prepare your RV for measuring, start by clearing out any excess clutter or unnecessary items.
This will give you a clear space to work with and make it easier to measure accurately. Next, remove any furniture or fixtures that may obstruct your measurements, such as tables or chairs. Once you have a clear area, grab a measuring tape and get to work! Measure the length, width, and height of the space, taking into account any irregularities or angles.
Don’t forget to measure any slide-outs or pop-outs as well, as these can significantly increase your living space. By taking the time to accurately measure your RV’s interior, you can better plan the layout and ensure that everything fits perfectly. So, grab your measuring tape and get ready to hit the road in style!
Installing the Awning
Are you ready to add some shade to your RV? Installing an awning is a great way to create a comfortable outdoor space. But how do you go about installing an RV awning? Don’t worry, it’s not as complicated as it may seem. First, you’ll want to start by choosing the right awning for your RV.
Consider the size, style, and material that will work best for your needs. Once you have your awning, you’ll need to locate the mounting brackets on your RV. These are typically found near the roofline, so you may need a ladder to access them.
Next, you’ll want to measure and mark where you want your awning to be installed. Use a level to ensure that it will be straight and even. Then, it’s time to attach the mounting brackets to your RV.
Make sure to use the proper screws and secure them tightly. With the brackets in place, you can now attach the awning to the brackets. Follow the manufacturer’s instructions for your specific brand and model of awning.
Once it is securely attached, test it out by extending and retracting the awning a few times. Finally, make any necessary adjustments to ensure that the awning operates smoothly. Now you can sit back, relax, and enjoy the shade provided by your new awning.
Attaching the Awning Arms
“Attaching the Awning Arms” When it comes to installing an awning, one crucial step is attaching the awning arms. This is what gives the awning its structure and allows it to provide shade and protection from the elements. To get started, you’ll need to locate the mounting points on your wall or roof where the awning arms will be attached.
Once you’ve found these points, you can attach the brackets securely using screws or bolts. Make sure to follow the manufacturer’s instructions closely to ensure that the brackets are properly aligned and tightened. Next, it’s time to attach the arms to the brackets.
This is typically done by sliding the arms into the brackets and securing them in place with pins or clips. This step requires some strength and coordination, as the arms can be quite heavy and unwieldy. It can be helpful to have a second person assisting you to ensure that the arms are aligned correctly and that they engage with the brackets fully.
Once the arms are secure, give them a gentle tug to make sure they are firmly in place. Finally, it’s important to test the awning to make sure it opens and closes smoothly. This will ensure that the arms are correctly attached and that the awning will function properly.
If you notice any issues, such as resistance or misalignment, double-check the installation and make any necessary adjustments. It’s better to take the time to get it right at the beginning to avoid any problems down the line. Attaching the awning arms is an essential part of the installation process.
By following these steps and taking your time, you can ensure that your awning is securely in place and ready to provide shade and protection for years to come.
Mounting the Awning Brackets
awning brackets, installing the awning, mounting the awning brackets So you’ve decided to install an awning to provide some shade and protection outside your home. That’s a great choice! Now it’s time to get down to the nitty-gritty of actually installing the awning. One of the first steps in the process is mounting the awning brackets.
These brackets are what will hold the awning securely in place. They need to be positioned correctly and securely attached to the wall. Start by measuring and marking where the brackets will go.
Then, using a drill, create holes in the marked spots. Insert the screws into the holes, making sure they are tight and secure. Once the brackets are securely attached, you can move on to the next steps of installing the awning.
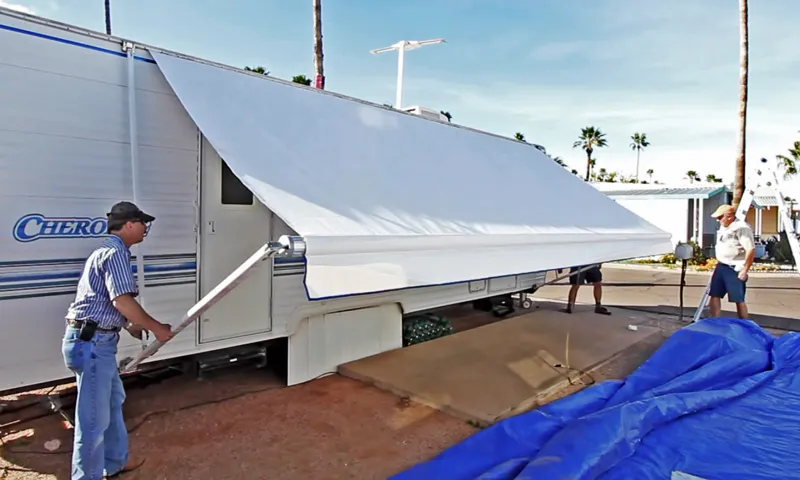
Securing the Awning Fabric
Securing the Awning Fabric Now that you’ve chosen the perfect awning fabric for your outdoor space, it’s time to install it and make sure it stays in place. Securing the awning fabric is an essential step to keep it from getting damaged or blown away by strong winds. One of the most common methods to secure the awning fabric is by using snap fasteners or grommets.
These small metal or plastic attachments can be easily installed along the edges of the fabric and then fastened to the frame of the awning. This provides a secure and durable connection that will withstand the elements. Another option is to use Velcro strips.
Velcro is a versatile and easy-to-use fastener that can be attached to both the fabric and the awning frame. It offers a strong hold while still allowing for easy removal and adjustments when needed. Whichever method you choose, make sure to follow the manufacturer’s instructions and double-check the fabric’s tension to ensure a tight and secure fit.
With the awning fabric properly secured, you can now enjoy your outdoor space without worrying about the fabric coming loose or getting damaged.
Testing the Awning
awning installation So, you’ve finally decided to install an awning over your outdoor space? That’s a great idea! Not only will it provide shade and protection from the elements, but it can also add a touch of elegance to your home. But now comes the big question: How do you go about installing it? Don’t worry, it’s not as intimidating as it may seem. The first step in installing an awning is to carefully measure the area where you want it to be installed.
You’ll need to determine the length, width, and height of the awning, taking into account any surrounding structures or obstacles. Once you have the measurements, it’s time to start assembling the awning. Most awnings come with a complete set of instructions and all the necessary hardware for installation.
It’s important to carefully read the instructions and follow them step-by-step. Start by attaching the mounting brackets to the wall or roof, making sure they are level and securely fastened. Then, attach the awning frame to the brackets, checking for proper alignment and stability.
Finally, unfurl the fabric over the frame and secure it in place. Once you’ve installed the awning, it’s time to test it out. Open and close it several times to make sure it functions smoothly and securely.
Check for any loose or wobbly parts that might need tightening. If everything looks good, congratulations! You’ve successfully installed your awning. Now that your awning is installed and functioning properly, it’s time to sit back, relax, and enjoy your newfound outdoor oasis.
Whether you’re sipping a refreshing drink on a hot summer day or enjoying a barbecue with friends and family, your awning will provide the perfect amount of shade and protection. So go ahead, make the most of your outdoor space with a beautiful and functional awning installation.
Maintaining and Repairing the RV Awning
Installing an RV awning doesn’t have to be a daunting task. With a few simple steps, you can have a shady and comfortable outdoor space for your RV. First, gather all the necessary tools and materials, including the awning fabric, roller tube, and hardware.
Next, measure the length of your RV’s awning rail and cut the roller tube to fit. Attach the roller tube to the awning fabric, making sure it is centered and secure. Then, slide the fabric into the awning rail and secure it with the provided hardware.
Finally, extend the awning and adjust it to the desired angle. It’s important to regularly inspect and maintain your RV awning to ensure its longevity. Clean it regularly with soap and water, and make sure to remove any debris that may accumulate.
Additionally, check for any signs of wear or damage and repair or replace as necessary. By properly installing and maintaining your RV awning, you’ll be able to enjoy the great outdoors in comfort and style.
Cleaning the Awning Fabric
RV awnings are a great addition to any recreational vehicle, providing shade and protection from the elements. However, they can quickly become dirty and stained, detracting from the overall appearance of your RV. That’s why it’s important to regularly clean and maintain the fabric of your awning.
But how do you go about doing this? Well, the first step is to gather the necessary tools, such as a soft-bristle brush, mild detergent, and a hose. Start by sweeping away any loose debris, such as leaves or dirt, from the surface of the awning. Then, using a mixture of mild detergent and warm water, gently scrub the fabric with the soft-bristle brush.
Be sure to pay extra attention to any stains or areas of heavy dirt buildup. Once you’ve thoroughly cleaned the fabric, rinse it off with a hose, ensuring that all the soap residue is removed. Finally, allow the awning to air dry completely before retracting it.
By following these simple steps, you can keep your RV awning fabric looking clean and new for years to come.
Inspecting for Damage
When it comes to maintaining and repairing your RV awning, one of the most important things you can do is regularly inspect it for any damage. This is especially crucial if you’re planning on taking your RV on a long road trip or if you’ll be parked in an area with strong winds or heavy rain. Start by visually inspecting the fabric of the awning for any tears, fraying, or discoloration.
If you notice any damage, you’ll want to repair it as soon as possible to prevent further problems down the road. Additionally, take a look at the hardware of the awning, including the arms, brackets, and motor (if you have an automatic awning). Make sure everything is securely fastened and in good working condition.
By regularly inspecting your RV awning, you can catch any potential issues early on and ensure that you’ll be able to enjoy your outdoor space while on the road.
Repairing Tears or Holes
RV awnings are a great addition to your recreational vehicle, providing shade and protection from the elements. However, over time, tears or holes may occur in the fabric, which can be a real hassle. But fear not, because repairing these tears or holes is actually quite simple.
First, you’ll want to assess the damage and determine if it can be repaired or if the entire awning needs to be replaced. If it’s just a small tear or hole, you can fix it yourself with some basic materials. Start by cleaning the area around the tear or hole with a mild soap and water solution.
Then, apply a patch to the area using adhesive specially designed for outdoor fabrics. Make sure to smooth out any wrinkles or bubbles in the patch to ensure a secure bond. Once the patch is in place, allow it to dry completely before using the awning again.
If the tear or hole is too large to repair, you may need to replace the entire fabric. In this case, it’s best to consult a professional to ensure the new fabric is properly installed and secured. By regularly inspecting and maintaining your RV awning, you can prevent tears or holes from occurring in the first place.
Conclusion
In conclusion, installing an RV awning is like giving your mobile home a stylish top hat. It not only adds a touch of elegance and charm, but it also provides practical protection from the elements. Now, you may be wondering why on earth you would need a top hat for your RV, but think about it – just like a fancy hat can make any outfit pop, an awning can make your RV stand out amongst the sea of beige and white.
So, don’t be afraid to take your RV from drab to fab with a sleek and functional awning. Plus, it’s a surefire way to impress your fellow campers during your next adventure. Happy installing, darlings!”
FAQs
FAQ 1: How to measure for an RV awning? Answer: To measure for an RV awning, start by measuring the length of your RV’s awning rail from end to end. Then, measure the height from the awning rail to the ground. These measurements will help you determine the correct size awning for your RV. FAQ 2: Can I install an RV awning myself? Answer: Yes, it is possible to install an RV awning yourself. However, it is recommended to have some basic knowledge of tools and handyman skills. It is also essential to carefully follow the manufacturer’s instructions and safety precautions during the installation process. FAQ 3: What tools do I need to install an RV awning? Answer: The tools required to install an RV awning may vary depending on the specific model and manufacturer. However, some common tools that are often needed include a drill, screwdriver, measuring tape, level, and ladder. It is best to check the installation instructions provided with your awning for a complete list of necessary tools. FAQ 4: How long does it take to install an RV awning? Answer: The time it takes to install an RV awning can vary depending on factors such as your level of experience, the specific awning model, and any additional modifications required. On average, the installation process can take anywhere from a couple of hours to half a day. FAQ 5: How much does it cost to install an RV awning? Answer: The cost of installing an RV awning can vary depending on factors like the awning size, brand, and any additional accessories. On average, the cost of a basic RV awning installation can range from $300 to $800. However, it is recommended to obtain quotes from different suppliers and installers to get an accurate estimate for your specific requirements. FAQ 6: Can I use my RV awning in all weather conditions? Answer: RV awnings are designed to provide shade and protection from light rain. However, they are not designed to withstand heavy wind, snow, or extreme weather conditions. It is important to retract your awning during severe weather to prevent damage and ensure your safety. FAQ 7: How do I clean and maintain my RV awning? Answer: To clean and maintain your RV awning, start by retracting it and brushing off any loose dirt or debris. Then, mix a solution of mild soap and water and use a soft brush or cloth to gently scrub the awning fabric. Rinse thoroughly and allow the awning to dry completely before retracting it. It is also important to regularly inspect your awning for any signs of wear or damage and make any necessary repairs promptly.