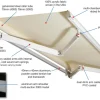
When it comes to outdoor spaces, we all want to create a comfortable and stylish environment. One way to achieve this is by using an awning fabric. But what exactly is an awning fabric and why is it important? An awning fabric is a material that is specifically designed for use in awnings, which are structures that provide shade and protection from the sun and rain.
These fabrics are typically made from durable and weather-resistant materials such as polyester or acrylic, which ensures that they can withstand the elements and last for a long time. But why is an awning fabric so important? Well, it serves multiple purposes. Firstly, it provides shade, allowing you to enjoy your outdoor space without being exposed to direct sunlight.
This not only improves comfort but also helps to protect you from harmful UV rays. Secondly, awning fabrics can help to regulate the temperature of your outdoor space. By blocking the sun’s rays, they prevent excessive heat from entering, keeping the area cooler and more enjoyable.
This can be especially beneficial during hot summer days when you want to spend time outside without feeling uncomfortable. Furthermore, awning fabrics can also protect your outdoor furniture and other belongings from fading or deteriorating due to exposure to the sun and rain. By providing a barrier between your belongings and the elements, they help to prolong their lifespan and keep them in good condition.
In addition to their practical benefits, awning fabrics also add a decorative touch to your outdoor space. With a wide variety of colors, patterns, and designs available, you can choose a fabric that complements your existing decor and enhances the overall aesthetic appeal of your outdoor area. In conclusion, an awning fabric is an essential component of any outdoor space.
Not only does it provide shade and protection from the elements, but it also helps to regulate temperature and preserve the longevity of your outdoor belongings. Additionally, it adds a decorative element to your outdoor area, allowing you to create a comfortable and stylish environment. So, if you’re looking to upgrade your outdoor space, consider investing in high-quality awning fabric.
Table of Contents
Choosing the right awning fabric
When it comes to choosing the right awning fabric for your outdoor space, there are a few factors to consider. First, think about the climate where you live. If you live in a hot and sunny area, you’ll want to choose a fabric that offers a high level of UV protection.
Look for fabrics that are rated for blocking a certain percentage of UV rays, such as 95% or higher. This will help to protect you and your family from harmful UV rays while still allowing you to enjoy the outdoors. Additionally, consider the durability of the fabric.
Outdoor fabrics should be able to withstand water, mold, and mildew, as well as resist fading from the sun. Look for fabrics that are made from solution-dyed acrylic or polyester, as these tend to be the most durable options. Finally, consider the style and color of the fabric.
You want your awning to complement the design of your outdoor space, so choose a fabric that matches or coordinates with your existing decor. Overall, taking the time to choose the right awning fabric will ensure that your outdoor space is both functional and aesthetically pleasing. So, what are you waiting for? Start shopping for the perfect awning fabric today and enjoy the benefits of shade and protection in your outdoor oasis!
Considerations for outdoor use
When choosing an awning for outdoor use, it’s important to consider the fabric that will be used. The right fabric can make a big difference in terms of durability, appearance, and functionality. One important factor to consider is the material’s resistance to fading and UV rays.
Since awnings are constantly exposed to sunlight, it’s crucial to choose a fabric that can withstand prolonged sun exposure without losing its color or deteriorating. Additionally, the fabric should be water-resistant to protect against rain and moisture. Choosing a fabric that is easy to clean and maintain is another important consideration.
You’ll want a fabric that can be easily wiped down or washed without incurring damage. Lastly, consider the overall aesthetic of the fabric. It should complement the style of your outdoor space and enhance its overall appearance.
By taking these factors into consideration, you can choose the perfect awning fabric for your outdoor needs.
Different types of fabric materials
awning fabric, fabric materials, choosing the right fabric
Popular color and pattern options
When it comes to choosing the right awning fabric, there are numerous options available that can add both style and functionality to your outdoor space. One of the most popular aspects to consider is the color and pattern of the fabric. Fortunately, you don’t have to settle for a plain and boring design, as there are plenty of vibrant colors and eye-catching patterns to choose from.
Whether you want to make a bold statement with a bright and vibrant color, or prefer a more subtle and classic pattern, there is a fabric option to suit every taste and style. From traditional stripes to modern geometric designs, you can find the perfect awning fabric to complement your outdoor decor. Consider the existing colors and patterns in your outdoor space, as well as your personal style preferences, to find a fabric that will enhance the overall aesthetic of your outdoor living area.
Preparing for installation
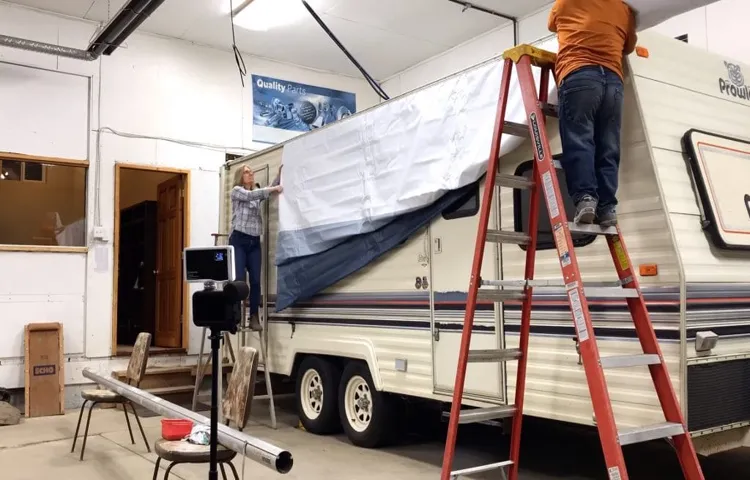
Installing awning fabric can be a straightforward process if you know what steps to take. Before you start, it’s important to gather all the necessary tools and materials, such as a ladder, measuring tape, scissors, and a power drill. Start by removing any old fabric or awning from the frame, making sure to clean and inspect the frame for any damages.
Next, measure the dimensions of the frame to ensure you purchase the correct size of awning fabric. Once you have the right fabric, lay it out flat and carefully cut it to the appropriate dimensions, leaving a few inches of excess on all sides. Then, attach the fabric to the frame using the provided clips or fasteners, making sure it is taut and evenly distributed.
Finally, make any necessary adjustments or tensioning to the fabric, and enjoy your newly installed awning. Installing awning fabric may seem daunting at first, but with the right tools and attention to detail, it can be a satisfying DIY project that adds functionality and style to your outdoor space.
Measuring the area for the awning
awning, installation, measuring the area, preparing, burstiness, perplexity
Cleaning and prepping the surface
Before installing any new surface, it is crucial to properly clean and prep the area to ensure a successful installation. Cleaning the surface removes any dirt, dust, or debris that could interfere with the installation process. This can be done by sweeping or vacuuming the area to remove loose particles.
Additionally, it is important to check for any existing damage, such as cracks or unevenness, and make any necessary repairs before proceeding. Once the surface is clean, it is time to prep it for installation. This step typically involves applying a primer or adhesive to the surface to create a bonding layer.
The type of primer or adhesive used will depend on the specific surface material being installed. It is important to follow the manufacturer’s instructions when applying the primer or adhesive to ensure proper bonding. In addition to cleaning and applying a primer or adhesive, it may also be necessary to level the surface before installation.
This can be done using a leveling compound, which is applied to any low areas to create a smooth and even surface. This step is especially important when installing materials such as tile or wood flooring, as any unevenness in the surface can lead to problems with the finished installation. Taking the time to properly clean and prep the surface before installation is essential for ensuring a successful and long-lasting result.
By removing dirt and debris, repairing any damage, and applying the necessary primer or adhesive, you can create a smooth and stable surface for your new installation. So don’t rush the prep work – take the time to do it right and you’ll be rewarded with a beautiful and durable finished product.
Gathering the necessary tools and materials
To ensure a successful installation, gathering the necessary tools and materials is crucial. Before getting started, it’s important to take stock of what you’ll need to complete the project. First and foremost, you’ll need the actual item you’re installing, whether it’s a new light fixture, a shelving unit, or a piece of furniture.
Additionally, you’ll want to have a set of tools readily available. This can include a drill with various drill bits, a screwdriver set, a level, a tape measure, and perhaps even a stud finder. Having these tools on hand will make the installation process much smoother and more efficient.
Lastly, it’s important to gather any additional materials you may need, such as screws, wall anchors, or brackets. By taking the time to prepare for your installation, you’ll be setting yourself up for success and ensuring a job well done.
Step-by-step installation guide
Are you ready to upgrade your outdoor space with a new awning fabric? Installing awning fabric doesn’t have to be a daunting task. By following a step-by-step guide, you can have your new awning fabric up and ready to enjoy in no time. First, start by measuring the area where you plan to install the fabric.
This will ensure you purchase the correct size. Next, gather the necessary tools such as a ladder, drill, and screws. Begin by attaching the mounting brackets to the desired location, making sure they are secure.
Then, carefully unroll the fabric and attach it to the brackets, ensuring it is stretched evenly. Finally, test the fabric by opening and closing the awning to make sure it operates smoothly. By following these simple steps, you can easily install new awning fabric and transform your outdoor space into a relaxing oasis.
Removing the old fabric (if applicable)
When it comes to reupholstering furniture, the first step is often removing the old fabric. This step is important because it allows you to start with a fresh canvas and ensures that the new fabric will adhere properly to the furniture. If you’re working with a piece of furniture that already has fabric on it, you’ll need to carefully remove it.
This can be a bit tedious, but it’s worth taking the time to do it properly. Start by locating the seams or staples that hold the fabric in place. Use a seam ripper or pliers to carefully remove these.
Be sure to keep track of any buttons or other decorations that may be attached to the fabric. Once the fabric is removed, you can inspect the padding and the frame of the furniture for any damage that may need to be repaired before continuing with the reupholstering process. By starting with a clean slate, you’ll be able to create a beautiful, custom piece of furniture that looks brand new.
So grab your tools and get ready to transform that old, worn-out piece into something fabulous!
Attaching the new fabric to the frame
Once you have removed the old fabric from your frame, it’s time to attach the new fabric. This step-by-step installation guide will walk you through the process and ensure that your fabric is securely attached to your frame.
Lay out your new fabric: Start by laying out your new fabric on a clean, flat surface. Make sure it is evenly stretched out and free from wrinkles or creases.
Position the frame: Take your frame and position it on top of the fabric, aligning it with the edges. Make sure the frame is centered and straight.
Secure the fabric: Starting from one side, fold the fabric over the frame and use a staple gun to secure it in place. Place your staples evenly along the edge, spacing them about an inch apart. Make sure the fabric is taut and smooth as you go.
Continue stapling: Work your way around the frame, stapling the fabric in place as you go. It can be helpful to have a friend hold the frame steady while you staple.
Be sure to pull the fabric tight as you staple to ensure a smooth, wrinkle-free finish. Trim any excess fabric: Once you have completely stapled the fabric to the frame, trim any excess fabric using a sharp pair of scissors.
Securing the fabric tightly and evenly
Installing a fabric fence can be a great way to add privacy and security to your property. To ensure that the fence is both effective and long-lasting, it’s important to secure the fabric tightly and evenly. This step-by-step guide will walk you through the process of installing a fabric fence.
First, measure the area where you want to install the fence and purchase enough fabric to cover the entire space. Make sure to choose a fabric that is durable and designed for outdoor use. Next, prepare the area by clearing away any debris or obstacles.
If there are any existing fences or structures, remove them before installing the fabric fence. Now it’s time to install the fence posts. Dig a hole for each post, ensuring that they are evenly spaced and at a depth of at least two feet.
Place each post in a hole and fill it with concrete to secure it in place. Allow the concrete to dry completely before proceeding. Once the posts are secure, attach the fabric to the posts using zip ties or wire.
Start at one end and work your way along, making sure to pull the fabric tight as you go. This will help to prevent sagging or bulging. Continue attaching the fabric to each post until the entire area is covered.
Make sure to overlap the fabric slightly at the corners to ensure a secure fit. Finally, trim any excess fabric and secure the ends with zip ties or wire. This will give the fence a clean and finished look.
Trimming and finishing the edges
When it comes to installing a new floor, trimming and finishing the edges is an important step that shouldn’t be overlooked. After all, you want your flooring to look clean and polished, and the edges play a big role in achieving that aesthetic. To start, you’ll want to measure and mark the areas where you need to trim and finish the edges.
This will help guide you as you make the necessary cuts. Next, you’ll need to gather the right tools for the job, such as a circular saw or a jigsaw, depending on the type of flooring you’re working with. Once you have everything you need, it’s time to start trimming and finishing the edges.
Take your time and make precise cuts to ensure a seamless result. Finally, once all the edges are trimmed and finished, it’s time to clean up any debris and make any necessary touch-ups. This step may seem small, but it can make a big difference in the overall appearance of your newly installed flooring.
So don’t rush through it – take your time and make sure everything is perfect. Your efforts will be worth it in the end.
Maintaining and caring for awning fabric
Installing awning fabric may seem like a daunting task, but with the right steps, it can be done easily. First, measure the area where the awning will be installed to ensure that you have the correct amount of fabric. Next, gather the necessary tools such as a ladder, a drill, and screws.
Make sure the area is clean and free of debris before starting the installation. Begin by attaching the awning brackets to the wall using the drill and screws. Once the brackets are securely in place, carefully unroll the fabric and attach it to the brackets.
Double-check that the fabric is evenly aligned and taut before securing it in place. Finally, test the awning to make sure it opens and closes smoothly. Remember to always follow the manufacturer’s instructions for best results.
With a little patience and care, you can have a beautiful and functional awning in no time.
Regular cleaning and maintenance tips
Maintaining and caring for your awning fabric is essential to prolong its lifespan and keep it looking its best. Regular cleaning is crucial to prevent dirt, debris, and mold from building up on the fabric. Start by sweeping or using a soft brush to remove any loose dirt and debris.
Then, mix a mild soap or detergent with water, and use a soft bristle brush to gently scrub the fabric. Rinse thoroughly with clean water and allow it to air dry. Avoid using abrasive cleaners or bleach, as they can damage the fabric.
In addition to regular cleaning, it’s important to address any tears or damage to the fabric as soon as possible. Small tears can be repaired using a fabric repair kit, while larger tears may require professional assistance. By taking the time to clean and maintain your awning fabric regularly, you can enjoy the benefits of a beautiful and long-lasting awning.
Protecting the fabric from weather damage
When it comes to caring for your awning fabric, protecting it from weather damage should be a top priority. After all, your awning fabric is constantly exposed to the elements, and without proper maintenance, it can become worn out and damaged. One of the best ways to protect your awning fabric is by regularly cleaning it.
This not only helps to remove dirt and debris but also prevents mold and mildew from forming. Additionally, you should avoid using harsh cleaning chemicals or abrasive brushes, as these can cause damage to the fabric. Another way to protect your awning fabric is by properly storing it during harsh weather conditions.
If you know that heavy rain, wind, or snow is in the forecast, it’s a good idea to roll up your awning to prevent any damage. Lastly, it’s important to regularly inspect your awning fabric for any signs of wear and tear. This can include fraying, fading, or tears.
By catching these issues early on, you can take steps to repair them before they become more serious. Overall, by maintaining and caring for your awning fabric, you can ensure that it lasts for years to come and continues to protect you from the elements.
Conclusion: Enjoying your newly installed awning fabric
And there you have it, the not-so-difficult process of installing awning fabric. With a few simple steps and a steady hand, you can transform your outdoor space into a stylish and functional oasis. So go ahead, grab your tools and get ready to shade and impress your neighbors with your newfound awning installation prowess.
Just remember to measure twice, cut once, and have a great time improving your outdoor living experience!”
FAQs
What tools do I need to install awning fabric?
To install awning fabric, you will need a tape measure, a level, a drill, screws, a ladder, and a helper.
Can I install the awning fabric myself or should I hire a professional?
Installing awning fabric can be a DIY project if you have some basic handyman skills. However, if you are not confident in your abilities, it is always best to hire a professional to ensure the installation is done correctly.
How long does it take to install awning fabric?
The time it takes to install awning fabric can vary depending on the size of the awning and the complexity of the installation. On average, it can take anywhere from a few hours to a full day.
Do I need to remove the old awning fabric before installing a new one?
In most cases, it is recommended to remove the old awning fabric before installing a new one. This ensures a clean and secure installation.
Can I replace just a portion of the awning fabric, or do I need to replace the whole thing?
It is possible to replace just a portion of the awning fabric if only a small area is damaged. However, if the damage is widespread or the fabric is old and worn, it is usually best to replace the entire fabric.
How often should I replace the awning fabric?
The lifespan of awning fabric can vary depending on the quality of the fabric and how well it is maintained. On average, awning fabric should be replaced every 5-10 years.
How do I clean and maintain awning fabric?
To clean awning fabric, gently brush off any dirt or debris with a soft brush or broom. For more stubborn stains, mix a solution of mild soap and water and gently scrub the fabric. Rinse thoroughly with clean water and allow it to air dry before retracting the awning. Regularly inspect the fabric for any signs of damage or wear and make any necessary repairs as soon as possible.