Are you eager to hit the road in your RV or towing trailer, but worried about the stress that comes with hauling a heavy load? Look no further than an equalizer hitch! This nifty device, also known as a weight distribution hitch, is a game-changer when it comes to towing stability and safety. But how exactly do you install one? In this blog post, we’ll walk you through the steps of installing an equalizer hitch, so you can enjoy a smoother and safer towing experience. So, grab your wrench and let’s get started!
Table of Contents
What is an Equalizer Hitch?
If you’re towing a trailer, especially a heavy one, it’s crucial to have the right equipment to ensure a safe and smooth journey. One essential piece of equipment that can greatly improve your towing experience is an equalizer hitch. But what exactly is an equalizer hitch? An equalizer hitch is a device that helps distribute the weight of the trailer evenly across both the tow vehicle and the trailer’s axles.
This is accomplished through the use of spring bars that are connected to the hitch and the trailer’s frame. The spring bars work by transferring some of the trailer’s weight to the front axle of the tow vehicle, effectively leveling the load and reducing the amount of sway and bounce experienced while towing. Installing an equalizer hitch may seem like a daunting task, but it’s actually not as difficult as it sounds.
With a bit of knowledge and the right tools, you can easily install an equalizer hitch yourself and enjoy a safer and more stable towing experience.
Definition and Function
An equalizer hitch is a device used for towing trailers that helps distribute the weight of the load evenly between the trailer and the towing vehicle. It basically “equalizes” the weight so that the trailer does not put too much strain on the rear of the towing vehicle. This type of hitch is especially useful when towing heavy loads or when the weight of the trailer is significantly greater than the weight of the towing vehicle.
It consists of a hitch receiver, spring bars, and a weight distribution system that allows for better control and stability while towing. The function of an equalizer hitch is to ensure a safer and smoother towing experience by reducing the sway, bouncing, and sagging that can occur when towing heavy loads. It helps maintain the proper balance between the tow vehicle and the trailer, making it easier to steer, brake, and handle the entire setup.
In simpler terms, an equalizer hitch works like a balance beam, keeping both the towing vehicle and the trailer in harmony during the towing process. So, whether you are hauling a camper, a boat, or any other type of trailer, using an equalizer hitch can greatly improve the overall towing experience.
Types of Equalizer Hitches
equalizer hitch An equalizer hitch, also known as a weight distribution hitch, is a device that is used to evenly distribute the weight of a trailer across the towing vehicle. This helps to improve stability and control while towing, making it a crucial tool for anyone who tows heavy loads or trailers. There are several types of equalizer hitches available on the market, each with its own unique features and benefits.
One popular type is the round bar or trunnion bar hitch. This type of hitch uses curved bars that attach to the trailer and the towing vehicle, distributing the weight more evenly. Another type is the Andersen hitch, which is a lightweight, aluminum hitch that offers easy installation and superior sway control.
There are also weight distributing hitches that incorporate a sway control system, which helps to minimize sway and improve overall towing performance. When choosing an equalizer hitch, it’s important to consider factors such as the weight of your trailer, the towing capacity of your vehicle, and the specific towing needs that you have. Taking these factors into account will help you determine which type of equalizer hitch is the best fit for your specific situation.
In conclusion, an equalizer hitch is an essential tool for anyone who tows heavy loads or trailers. With several types available, it’s important to choose the right hitch that meets your towing needs. Whether you opt for a round bar hitch, an Andersen hitch, or a weight distributing hitch with a sway control system, investing in an equalizer hitch can greatly enhance the stability and control of your towing experience.
Tools and Materials Needed
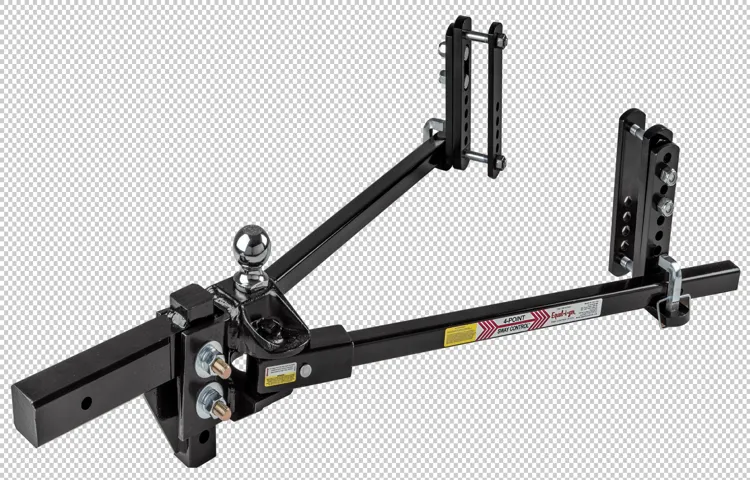
To install an equalizer hitch, there are a few tools and materials that you will need. First and foremost, you will need the equalizer hitch itself, which typically includes the hitch head assembly, sway control brackets, spring bars, and necessary bolts and hardware. You will also need a torque wrench to ensure that the bolts are tightened to the correct specifications.
Additionally, you may need a socket wrench or adjustable wrench for some of the assembly tasks. To properly level your trailer, you may also need a trailer tongue jack and a bubble level. Lastly, it is always a good idea to have some grease or lubricant on hand to ensure smooth operation of the hitch components.
With these tools and materials, you’ll be ready to install your equalizer hitch and enjoy a safer, more stable towing experience.
List of Required Tools
tools and materials needed, required tools for a project, essential tools and equipment, tools list, handyman tools, DIY tools. In order to successfully complete any project, it is essential to have the right tools and materials on hand. Whether you are a seasoned handyman or a DIY enthusiast, having the necessary tools can save you time, money, and frustration.
The specific tools you will need will vary depending on the project at hand, but there are a few essentials that every toolbox should contain. A good starting point is a set of screwdrivers in various sizes, as they come in handy for everything from assembling furniture to tightening loose screws. A pair of pliers is also a must-have tool, as they can be used for gripping, bending, and cutting wires.
A utility knife is essential for cutting materials like cardboard, carpet, and plastic. Other basic tools that should be part of your toolkit include a hammer, a tape measure, an adjustable wrench, and a set of hex keys. Additionally, you may need more specialized tools depending on the nature of your project, such as a saw, a power drill, or a level.
By having these essential tools on hand, you will be well-equipped to tackle any project that comes your way.
List of Required Materials
“tools and materials needed for a specific project” When starting a new project, it’s important to have all the necessary tools and materials on hand. This ensures that you can work efficiently and effectively, without any unnecessary delays or frustrations. The specific tools and materials you’ll need will depend on the nature of your project, but there are some common items that are useful in a wide range of situations.
First and foremost, a basic set of hand tools is essential. This should include items like a hammer, screwdrivers (both Phillips and flathead), pliers, and an adjustable wrench. These tools will come in handy for a variety of tasks, from hanging pictures to tightening loose screws.
For more specialized tasks, you may also need power tools. These can include a drill, circular saw, and jigsaw, among others. These tools can make specific jobs much easier and faster, so it’s worth investing in them if you anticipate needing them frequently.
In addition to tools, you’ll also need various materials for your project. This can include things like lumber, nails, screws, and paint. It’s a good idea to make a list of all the materials you’ll need before starting your project, so you can ensure you have everything on hand.
This will save you time and frustration later on. Lastly, don’t forget about safety equipment. Depending on the nature of your project, this could include items like safety glasses, gloves, and a dust mask.
It’s important to prioritize safety while working on any project, so make sure you have the necessary equipment to protect yourself. By having the right tools and materials on hand, you’ll be well-prepared to tackle any project that comes your way. Whether you’re a seasoned DIY enthusiast or just starting out, investing in quality tools and materials will make your projects go much more smoothly.
Step-by-Step Installation Guide
So, you’ve decided to install an equalizer hitch on your trailer, but you’re not quite sure where to start. Well, you’ve come to the right place! In this step-by-step installation guide, I’ll walk you through the process of installing an equalizer hitch, making your towing experience safer and more comfortable. First, gather all the necessary tools and equipment for the installation.
You’ll need a wrench, socket set, torque wrench, measuring tape, and a drill with appropriate drill bits. It’s also a good idea to have a helper to assist you during the installation process. Next, locate the trailer hitch on your vehicle and clean it thoroughly.
Remove any dirt or debris that could interfere with the installation process. Once the hitch is clean, measure the height of the hitch from the ground. This measurement will be used later to ensure proper weight distribution.
Now, it’s time to attach the equalizer hitch head onto the trailer tongue. Slide the hitch head over the tongue and line up the holes. Secure the hitch head using the provided bolts and tighten them using a torque wrench.
Make sure the hitch head is level and centered before tightening the bolts completely. Next, attach the spring bars to the hitch head. Slide the spring bars into the designated slots on the hitch head and secure them with the provided pins or clips.
Make sure the weight rating on the spring bars matches the requirements of your trailer. Once the spring bars are attached, it’s time to connect the equalizer hitch to your trailer. Position the trailer coupler directly over the hitch ball on the hitch head.
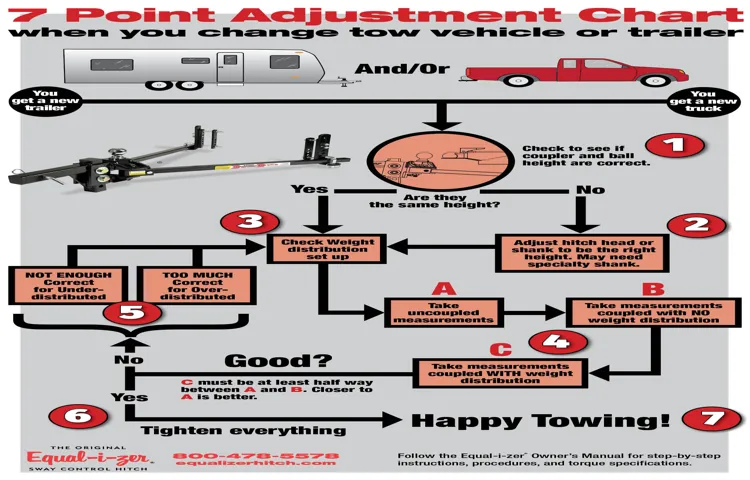
Step 1: Measure and Adjust the Ball Height
In this step-by-step installation guide, we will help you measure and adjust the ball height of your equipment. The ball height refers to the distance between the ground and the center of the ball used in your equipment. It is crucial to get this measurement right to ensure proper performance and safety.
To begin, you will need a measuring tape or ruler and a flat, level surface to place your equipment on. Start by placing the measuring tape or ruler vertically against the ground, with its bottom end touching the ground. Then, slowly raise the tape or ruler until it reaches the center of the ball.
Take note of the measurement and compare it to the recommended ball height for your specific equipment. If the measurement is too high or too low, you will need to adjust the height accordingly. This can usually be done by adding or removing air or adjusting the position of the ball.
Remember, getting the ball height right is essential for optimal performance, so take your time and make any necessary adjustments.
Step 2: Attach the Hitch to the Trailer
In order to safely tow a trailer, you need to properly attach the hitch. This step is crucial for ensuring that the trailer is securely connected to your vehicle. So, how exactly do you attach the hitch to the trailer? Let’s break it down into a step-by-step installation guide.
First, make sure you have the right hitch for your trailer. Hitches come in different sizes and weight capacities, so it’s important to choose one that is compatible with your trailer. Once you’ve selected the right hitch, you can begin the installation process.
Start by positioning the trailer and the vehicle in a straight line. This will make it easier to attach the hitch. Next, lift the hitch and align it with the trailer’s coupler.
The coupler is the part of the trailer that connects to the hitch. It usually has a ball on top that fits into the hitch. Now, lower the hitch onto the coupler, making sure the ball on the hitch fits securely into the coupler.
Once it’s in place, use the latch or locking mechanism to secure the hitch to the coupler. This will prevent the trailer from becoming detached while you’re towing it. Finally, give the hitch a good tug to make sure it’s securely attached to the trailer.
If it feels loose or wobbly, double-check the latch or locking mechanism to ensure it’s properly engaged. Attaching the hitch to the trailer may seem like a simple task, but it’s an important one. Taking the time to properly install the hitch will help ensure a safe and secure towing experience.
Step 3: Connect the Hitch to the Tow Vehicle
tow hitch installation, connect hitch to tow vehicle, installation guide
Step 4: Adjust the Sway Control
In step 4 of the installation guide for sway control, it’s time to fine-tune and adjust the sway control device. This important step ensures that your trailer is properly balanced and controlled while on the road. Sway control works by minimizing the side-to-side movement of your trailer, which can occur when driving at high speeds or in strong winds.
By adjusting the sway control, you can find the perfect balance for your specific towing needs. This will give you greater peace of mind and make your towing experience safer and smoother. So, let’s dive into this next step and get your sway control set up just right.
Step 5: Verify Proper Installation
When it comes to installing anything, double-checking your work is always a good idea. The same goes for installing a new device or system in your home or office. After you have followed all the steps for installation, it’s crucial to verify that everything is properly installed and functioning correctly.
This step-by-step installation guide will walk you through the process of making sure that your installation is successful. By checking for any loose connections, making sure that all components are functioning as they should, and testing the system to ensure it is working properly, you can have peace of mind knowing that your installation is complete and successful. So don’t skip this final step – take the time to verify the installation and enjoy your new device or system!
Troubleshooting Tips
So, you’re ready to hit the road and tow your trailer, but you want to make sure you have the right equipment to do it safely and smoothly. One essential piece of equipment for towing is an equalizer hitch. Installing an equalizer hitch can be a bit daunting if you’ve never done it before, but with a few simple steps, you’ll be on your way in no time.
First things first, make sure you have all the necessary tools and equipment. You’ll need a wrench, a torque wrench, and a socket set. It’s also a good idea to have a second person help you with the installation, as some steps may require an extra set of hands.
Start by attaching the hitch ball to the hitch head. Make sure it’s securely tightened using the torque wrench. Next, position the hitch head on the trailer hitch and secure it in place using the bolts and nuts provided with the hitch.
Again, use the torque wrench to ensure everything is tightened properly. Now it’s time to attach the spring bars. These bars help distribute the weight of the trailer evenly across the tow vehicle.
Slide one end of the spring bar into the hitch head and secure it with the retaining pin or clip. Repeat this step for the other spring bar. Make sure the spring bars are level and parallel to the ground.
Next, attach the chains to the spring bars. These chains provide additional support and help prevent the trailer from swaying. Attach one end of each chain to the sides of the trailer frame and the other end to the snap-up brackets on the spring bars.
Common Installation Mistakes
In the world of installations, there are bound to be mistakes along the way. Whether you’re a seasoned pro or a DIY enthusiast, troubleshooting installation issues can be frustrating. One of the most common mistakes people make is not reading the instructions thoroughly before getting started.
It might seem like a simple step, but it can save you a lot of time and headaches in the long run. Another common mistake is not measuring accurately. It’s easy to eyeball a measurement and assume it’s close enough, but when it comes to installations, precision is key.
Taking the time to measure accurately can prevent misalignments and ensure a secure fit. Additionally, using the wrong tools or materials can lead to installation complications. Using the right tools for the job can make a world of difference in the outcome of your installation.
Lastly, rushing through the installation process can often lead to mistakes. Taking your time and being patient can help ensure that everything is done correctly. Remember, a few extra minutes spent double-checking can save you hours of frustration down the line.
So, the next time you find yourself troubleshooting an installation, take a step back and consider these common mistakes.
How to Fix Sway Issues
If you’re experiencing sway issues with your vehicle, don’t despair – there are steps you can take to troubleshoot and fix the problem. Sway is when your vehicle tends to lean or sway excessively when going around corners or making turns, and it can be a sign of various issues. One common cause of sway is worn-out or damaged suspension components such as struts, shocks, or sway bars.
These components help stabilize your vehicle and prevent excessive body roll, so if they are worn or damaged, they won’t be able to perform their job effectively. Another common cause of sway is imbalanced or improperly inflated tires. Ensuring that your tires are properly balanced and inflated to the recommended pressure can help minimize sway.
Additionally, you may want to check the alignment of your wheels, as misaligned wheels can also contribute to sway. If you’re still experiencing sway after checking these components, it’s best to consult with a professional mechanic who can diagnose and fix the issue. Taking your vehicle to a trusted mechanic can ensure that any underlying issues are properly addressed and resolved, giving you peace of mind on the road.
So don’t let sway issues get in the way of your driving experience – follow these troubleshooting tips and get back to enjoying a smooth and stable ride.
How to Properly Adjust the Weight Distribution
As a car owner, it’s important to understand the importance of proper weight distribution in your vehicle. Not only does it affect the overall performance of your car, but it also plays a crucial role in maintaining stability and safety on the road. If you’re experiencing any issues with your car’s weight distribution, don’t worry – there are some troubleshooting tips you can try.
Firstly, you’ll want to assess the weight distribution of your car. Start by ensuring that the passenger and cargo load is evenly distributed throughout the vehicle. If one side of the car is significantly heavier than the other, it can throw off the balance and result in handling problems.
Consider moving heavier items closer to the center of the car to improve weight distribution. Next, take a look at your suspension system. A worn-out or imbalanced suspension can cause the weight to be unevenly distributed, leading to handling issues.
Inspect your suspension components for any signs of damage or wear, such as leaking shocks or broken springs. If you notice any problems, it’s best to have them addressed by a professional mechanic. Another aspect to consider is tire pressure.
Uneven tire pressure can affect weight distribution and cause the car to pull to one side or experience uneven tire wear. Check your tire pressure regularly and make adjustments as needed to ensure proper inflation on all four tires. Lastly, take a look at your wheel alignment.
Misaligned wheels can cause the car to drift to one side and put excessive strain on certain tires, leading to uneven weight distribution. If you notice any signs of misalignment, such as uneven tire wear or a crooked steering wheel, it’s best to have your wheels aligned by a professional. Proper weight distribution is essential for a safe and smooth driving experience.
Conclusion
And that, my friends, is how you become the master of balance and control on the road! Installing an equalizer hitch may seem like a daunting task at first, but with the right tools, a little bit of patience, and a sprinkling of wit, you can accomplish it with ease. Just remember, the key to a smooth and enjoyable towing experience is all about finding that perfect balance. So, grab your trusty toolbox and get ready to level up your towing game.
Happy trails!”
FAQs
What is an equalizer hitch and why is it important for towing?
An equalizer hitch is a device that helps distribute the weight of a trailer across the towing vehicle’s axles. It is important for towing because it helps maintain stability and control, improves handling, and reduces the risk of trailer sway.
How does an equalizer hitch work?
An equalizer hitch works by using spring bars to transfer some of the weight from the trailer’s tongue to the front axles of the towing vehicle. This helps level the load and distribute it evenly, improving stability and control.
Can an equalizer hitch be used with any type of trailer?
Yes, an equalizer hitch can be used with most types of trailers, including travel trailers, utility trailers, and boat trailers. However, it is important to choose a hitch that is appropriate for the weight and size of your specific trailer.
How do I choose the right equalizer hitch for my towing setup?
When choosing an equalizer hitch, you should consider the weight of your trailer, the tongue weight, and the towing capacity of your vehicle. It is recommended to consult the manufacturer’s guidelines or seek professional advice to ensure you choose the right hitch for your specific setup.
Can I install an equalizer hitch myself, or do I need professional help?
While it is possible to install an equalizer hitch yourself, it is recommended to seek professional help, especially if you are not experienced with towing setups. A professional can ensure the hitch is installed correctly and provide expert advice.
Are there any maintenance tasks I need to perform on an equalizer hitch?
Yes, regular maintenance is important to ensure the proper functioning of an equalizer hitch. This may include lubricating the hitch components, inspecting for wear and tear, and ensuring all bolts and connections are tight.
Can an equalizer hitch help reduce trailer sway?
Yes, an equalizer hitch can help reduce trailer sway by distributing the weight evenly and improving stability. However, it is important to note that other factors such as wind, road conditions, and driving speed can also contribute to trailer sway, and caution should always be exercised when towing.