Welcome to our blog! If you’re curious about the topic of “Introduction” and eager to learn more, you’ve come to the right place. In this blog post, we’ll delve into what an introduction is and why it’s important in various aspects of our lives. Whether you’re writing an essay, starting a conversation, or presenting a new idea, the introduction plays a crucial role in capturing the attention of your audience and setting the tone for the rest of your piece.
Think of it as the doorway to your thoughts and ideas – it needs to be inviting, intriguing, and engaging to ensure that your readers or listeners want to venture further. The power of a well-crafted introduction cannot be understated. It acts as a hook, drawing people in and making them eager to discover what lies ahead.
With a captivating beginning, you can pique curiosity, create a sense of anticipation, and motivate your audience to keep reading or listening. It sets the stage for the entire piece and establishes your credibility and expertise. Imagine an introduction as a sizzling appetizer in a fancy restaurant – it gets your taste buds tingling, making you eager for the main course.
But what elements make a great introduction? How can you master the art of engaging your audience right from the start? Fear not! Throughout this blog, we’ll provide you with tips, tricks, and examples of fantastic introductions to help you navigate the world of introductory writing with confidence. So, whether you’re a student looking to ace your next essay, a business professional seeking to deliver an impactful presentation, or simply someone who wants to captivate their audience in any form of communication, this blog has got you covered. Get ready to unlock the secrets of captivating introductions, grab your readers’ attention, and make a lasting impression.
So, let’s dive in and discover the power of a well-crafted introduction together!
Table of Contents
- 1 What is an equalizer sway control hitch?
- 2 Why do you need an equalizer sway control hitch?
- 3 Choosing the right equalizer sway control hitch
- 4 Step 1: Gather the necessary tools and materials
- 5 Step 2: Preparing the trailer
- 6 Step 3: Attaching the hitch head assembly
- 7 Step 4: Installing the spring bars
- 8 Step 5: Connecting the trailer to the tow vehicle
- 9 Step 6: Adjusting the sway control
- 10 Final checks and safety reminders
- 11 Benefits of using an equalizer sway control hitch
- 12 Frequently Asked Questions
- 13 Conclusion
- 14 FAQs
What is an equalizer sway control hitch?
So, you’re wondering how to install an equalizer sway control hitch? Well, you’ve come to the right place. An equalizer sway control hitch is a device that helps to reduce sway and improve the stability of your trailer when towing. It consists of a weight distribution system and friction sway control.
The weight distribution system helps to evenly distribute the tongue weight of the trailer across the axles of the tow vehicle, which helps to improve the handling and control of the trailer. The friction sway control, on the other hand, uses friction to resist the movement of the trailer, reducing sway and providing a more stable towing experience. Installing an equalizer sway control hitch is not too difficult, but it does require some basic tools and a little know-how.
So, let’s get started!
Why do you need an equalizer sway control hitch?
If you’re planning on towing a trailer or caravan, investing in an equalizer sway control hitch is essential. This type of hitch helps to distribute the weight evenly across the trailer and towing vehicle, preventing swaying and providing greater stability on the road. So, how do you install an equalizer sway control hitch? First, you’ll need to ensure that you have the correct hitch size and weight capacity for your specific towing needs.
Next, attach the hitch to the towing vehicle’s receiver, making sure it is securely fastened. Then, connect the trailer’s coupler to the hitch ball, ensuring it is properly locked in place. Finally, adjust the weight distribution bars to level out the trailer and towing vehicle, taking into account the weight distribution and the specific instructions provided with your hitch.
By following these steps and properly installing your equalizer sway control hitch, you can have peace of mind knowing that your towing experience will be safer and more stable.
Choosing the right equalizer sway control hitch
Are you tired of dealing with sway while towing your trailer? If so, installing an equalizer sway control hitch could be the solution you’re looking for. These hitches are designed to distribute the weight evenly between the trailer and the towing vehicle, making the entire towing experience safer and more stable. But before you rush out to buy one, it’s important to know how to properly install it.
The process isn’t complicated, but it does require a few steps to ensure everything is set up correctly. The first step is to attach the hitch head to the trailer tongue. This is done by inserting the shank into the hitch receiver and securing it with a hitch pin.
Once the hitch head is in place, the next step is to attach the spring bars. These bars are what provide the equalizing and sway control capabilities of the hitch. They should be attached to the hitch head using the provided hardware and then hooked onto the trailer using the spring bar chains.
Finally, it’s important to make sure that the hitch is properly adjusted before hitting the road. This includes adjusting the tension on the spring bars to achieve the desired weight distribution and sway control. To do this, simply use the included wrench to tighten or loosen the chains.
It may take some trial and error to find the right adjustment, but once you do, you’ll be able to tow your trailer with confidence and peace of mind. So, why put up with the stress and danger of trailer sway? Install an equalizer sway control hitch and enjoy a smoother, safer towing experience.
So you’ve just purchased a brand new device or software, and now you’re faced with the daunting task of installing it. Whether it’s a new piece of hardware for your computer or a fancy new app for your smartphone, the installation process can be both exciting and overwhelming at the same time. But fear not! In this blog post, we’ll walk you through the ins and outs of the installation process and give you some tips and tricks to make it as smooth and painless as possible.
So grab a cup of coffee, sit back, and get ready to become a pro at navigating the installation process!
Step 1: Gather the necessary tools and materials
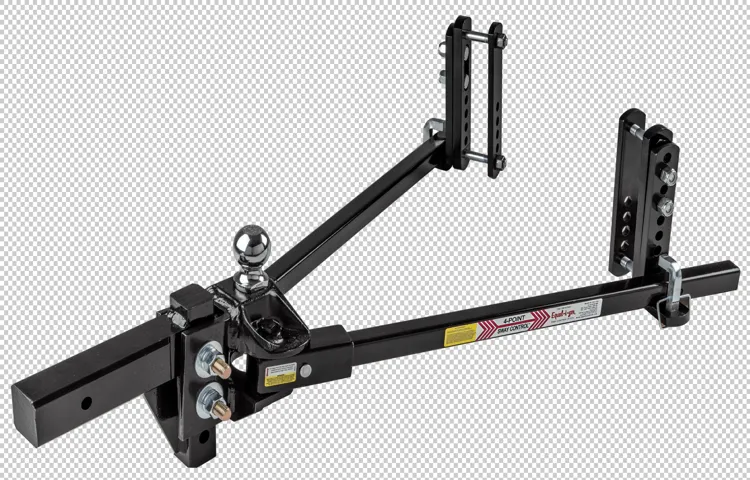
So you’ve decided to install an equalizer sway control hitch on your trailer, but you’re not sure where to start? Don’t worry, I’ve got you covered! The first step in this process is to gather all the necessary tools and materials. You’ll need a few things to properly install the hitch and ensure it functions correctly. First, you’ll need the actual equalizer sway control hitch, which typically includes the hitch head, spring bars, and sway control brackets.
You’ll also need a wrench or socket set, a torque wrench, a tape measure, and a level. Additionally, you may need some lubricant for the hitch ball and a pair of pliers for adjusting the tension on the sway control brackets. Once you have all of these tools and materials ready to go, you’re one step closer to installing your equalizer sway control hitch and hitting the road with peace of mind.
Step 2: Preparing the trailer
Installing an equalizer sway control hitch on your trailer is an important step to ensure a smoother and safer towing experience. Once you have purchased the necessary equipment, it’s time to prepare your trailer for the installation process. Start by ensuring that your trailer is on a level surface and chock the wheels to prevent any movements.
Next, detach the trailer from your tow vehicle and make sure it is parked in a safe and open area. This will give you ample space to work on the installation without any obstructions. Remove any items from your trailer that may impede the installation process and make sure it is clean and free from any debris.
It’s also a good idea to inspect the trailer’s frame and hitch receiver for any signs of wear or damage. If you notice any issues, be sure to address them before proceeding with the installation. Taking the time to properly prepare your trailer will help ensure a successful installation and a smoother towing experience.
Substep 2.1: Positioning the trailer
positioning the trailer When it comes to preparing your trailer for your next adventure, one of the first steps is positioning it correctly. This is important not only for safety reasons but also for ensuring a smooth and hassle-free towing experience. So, how do you go about positioning your trailer? Well, the first thing you need to consider is the type of hitch you are using.
If you have a traditional ball hitch, you will need to line up the coupler on the trailer with the ball on the hitch. This may take a bit of maneuvering, but with practice, it will become second nature. Once the coupler is lined up, you can lower it onto the ball, making sure it is securely locked in place.
If you have a fifth-wheel or gooseneck hitch, the process is slightly different. You will need to back your truck up to the trailer so that the hitch plate on the truck lines up with the kingpin on the trailer. Again, this may take a bit of practice, but with time, you will become an expert at positioning your trailer.
Remember, taking the time to position your trailer correctly will ensure a safe and enjoyable towing experience.
Substep 2.2: Leveling the trailer
In this step of preparing the trailer, we will be focusing on leveling it. This is an important substep because if the trailer is not level, it can cause problems when towing and set up at the campsite. When a trailer is not level, it can put unnecessary strain on the tires and suspension, leading to uneven tire wear and potential damage.
It can also make it difficult to properly set up the trailer, such as leveling the refrigerator and stabilizing the trailer. To level the trailer, you will need a leveling device, such as a bubble level or an electronic leveling system. Start by positioning your trailer on a level surface, such as a parking lot or driveway.
Place the leveling device inside the trailer and check if it is level from side to side. If it is not level, you will need to adjust the trailer’s leveling jacks or blocks under the tires until it is level. Repeat the process for the front and back leveling.
Once the trailer is level, you can move on to the next step of preparing the trailer for your outdoor adventure.
Step 3: Attaching the hitch head assembly
Installing an equalizer sway control hitch may seem daunting, but with the right steps, it can be a straightforward process. Step 3 involves attaching the hitch head assembly. This assembly is the part of the hitch that connects to your trailer’s coupler.
Start by lifting the hitch head onto the hitch shank and aligning the bolt holes. Once aligned, insert the bolts and secure them tightly with the nuts provided. It’s important to ensure that the hitch head is level and parallel to the ground.
You can use a level tool to check if needed. Additionally, make sure the hitch head is positioned at the correct height for your specific trailer. This will help to evenly distribute the weight and reduce sway while towing.
Once everything is securely in place, double-check all the connections before moving on to the next step. Following these instructions will ensure a proper installation of your equalizer sway control hitch, providing you with a safer and smoother towing experience.
Substep 3.1: Positioning the hitch head assembly
When it comes to attaching the hitch head assembly, positioning is key. This step is crucial in ensuring that your hitch is securely attached to your vehicle and ready for towing. To start, you’ll want to make sure that your vehicle is parked on a level surface, as this will make the process much easier.
Then, locate the hitch receiver on your vehicle and remove any protective caps or covers. Next, attach the hitch head assembly to the receiver, making sure that it lines up correctly. It’s important to follow the manufacturer’s instructions for your specific hitch, as each one may have slightly different installation requirements.
Once the hitch head assembly is in position, use the appropriate tools to tighten any bolts or screws, making sure that the assembly is securely attached. Finally, double-check that everything is secure before attempting to tow. And just like that, you’re one step closer to hitting the road with your trailer in tow.
Substep 3.2: Tightening the bolts and nuts
To ensure a safe and secure towing experience, it is important to properly attach the hitch head assembly. In this substep, we will focus on tightening the bolts and nuts to ensure that the hitch head assembly is securely connected to the trailer. This is a crucial step in the installation process as it will prevent any movement or shifting while towing.
To start, make sure that all the bolts and nuts provided in the hitch head assembly kit are accounted for. It is important to use the correct size and type of bolts and nuts as specified in the instructions. Using the wrong ones can lead to a loose connection and compromise the integrity of the hitch.
Once you have confirmed that you have the correct bolts and nuts, begin by tightening them using a wrench or socket set. Start with the bolts and nuts that are closest to the hitch head assembly and work your way outwards. This will ensure an even and secure tightening process.
When tightening the bolts and nuts, it is important to apply even pressure. Do not overtighten them as this can strip the threads or damage the components. Conversely, making them too loose can also lead to a loose connection.
Find a balance and tighten them until they are snug and secure. After tightening all the bolts and nuts, give the hitch head assembly a gentle shake to check for any movement or looseness. If you notice any, double-check the tightness of the bolts and nuts and adjust as necessary.
By properly tightening the bolts and nuts, you can ensure that the hitch head assembly is securely attached to the trailer and ready for towing. This will provide you with peace of mind knowing that your trailer is safely and securely connected to your vehicle.
Step 4: Installing the spring bars
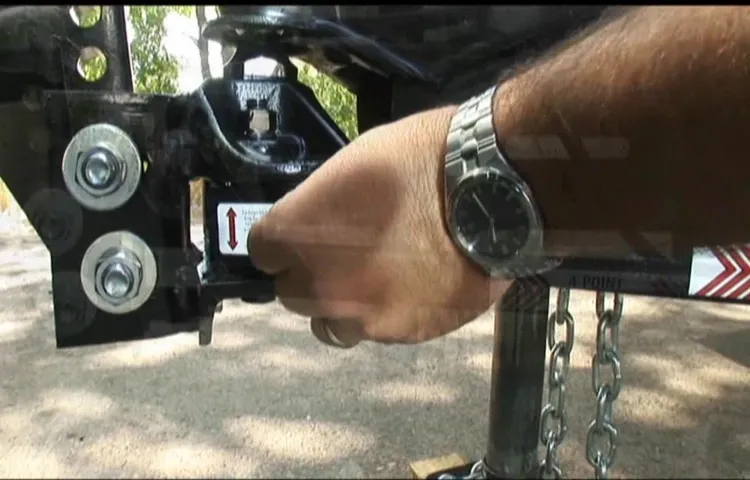
Now that you have successfully attached the weight distribution hitch to your trailer tongue and the ball mount is properly installed, it’s time to move on to the next step: installing the spring bars. The spring bars are an essential component of the equalizer sway control hitch system, as they help distribute the weight evenly between your vehicle and trailer, reducing sway and improving stability. To install the spring bars, start by releasing the tension on the chain brackets.
This can typically be done by using the built-in lever on the weight distribution hitch. Next, lift the spring bars onto the L-shaped brackets on either side of the hitch head. Ensure that the ends of the spring bars are securely seated on the brackets.
Once the spring bars are in place, re-engage the tension by hooking the chains onto the spring bars. This will help provide the necessary tension to properly distribute the weight. Make sure to adjust the chains so that they are evenly tensioned on both sides.
To gauge the correct tension, you can use the built-in indicators on the weight distribution hitch. These indicators typically have different markings for different trailer weights, helping you achieve the optimal tension for your specific setup. Once the spring bars are installed and properly tensioned, it’s important to double-check all the connections and make sure everything is securely in place.
Give the hitch system a gentle shake to ensure there is no excessive play or movement. By following these steps and properly installing the spring bars, you can greatly improve the stability and towing performance of your trailer. It’s important to always refer to the manufacturer’s instructions and guidelines for your specific weight distribution hitch system, as installation methods may vary.
With the spring bars installed, you can now confidently hit the road, knowing that you have taken the necessary steps to ensure a safe and smooth towing experience.
Substep 4.1: Attaching the spring bars to the hitch head assembly
When it comes to towing a trailer, it’s important to have the right equipment in place to ensure a safe and stable ride. One crucial component of this setup is the spring bars, which help distribute the weight of the trailer evenly across the towing vehicle. In this fourth step of the installation process, we will be attaching the spring bars to the hitch head assembly.
This is a straightforward task, but it’s important to follow the manufacturer’s instructions carefully. Begin by positioning the spring bars on either side of the trailer tongue, making sure they are aligned properly with the hitch head assembly. Then, insert the spring bar into the appropriate slot on the hitch head assembly and secure it in place using the provided hardware.
Repeat this process for the second spring bar. Once both spring bars are securely attached, you can move on to the next step in the installation process. Remember, proper installation of the spring bars is crucial for maintaining stability while towing, so take your time and double-check your work to ensure everything is in place correctly.
With the spring bars securely attached, you’ll be one step closer to hitting the road with confidence and peace of mind. So, let’s keep going and move on to the next substep!
Substep 4.2: Adjusting the spring bar tension
When it comes to installing spring bars on your watch, one important step is adjusting the spring bar tension. Spring bars are the small metal bars that hold your watch strap or bracelet in place. They have a small spring inside that allows them to compress and expand to fit into the watch lugs.
Adjusting the tension of the spring bar is necessary to ensure that your watch strap or bracelet fits securely and comfortably on your wrist. If the tension is too loose, the strap could easily detach from the watch. On the other hand, if the tension is too tight, it could put unnecessary stress on the spring bar and risk damaging your watch.
To adjust the spring bar tension, you can gently compress the spring bar inward to increase the tension or expand it outward to decrease the tension. It’s important to make these adjustments slowly and carefully, testing the fit and comfort of the strap as you go. Finding the right balance of tension will ensure that your watch stays securely in place while also being comfortable to wear.
Step 5: Connecting the trailer to the tow vehicle
Now that you have successfully installed the weight distribution hitch, it’s time to connect the trailer to the tow vehicle. This step is crucial for ensuring a safe and smooth towing experience. Begin by lining up your vehicle’s hitch receiver with the trailer’s coupler.
Make sure the trailer is on level ground to avoid any misalignment. Next, lower the coupler onto the ball mount by releasing the latch and lowering it down. Once the coupler is securely on the ball mount, lock it in place by engaging the latch and locking pin.
Double-check that the coupler is fully locked by giving it a gentle tug. Finally, connect the safety chains from the trailer to the tow vehicle’s hitch. Cross the chains under the coupler and hook them to the appropriate attachment points on the vehicle.
This will provide an extra layer of security in case the trailer becomes detached from the hitch. With the trailer successfully connected to the tow vehicle, you are now ready to hit the road with confidence and peace of mind.
Substep 5.1: Aligning the hitch and coupler
One crucial step in connecting a trailer to a tow vehicle is aligning the hitch and coupler. This ensures a secure connection between the two and prevents any accidents or damage while on the road. The hitch is located on the tow vehicle, while the coupler is attached to the trailer.
To align them, start by positioning the tow vehicle and trailer in a straight line. You want to line up the hitch directly in front of the coupler. Then, slowly back up the tow vehicle until the hitch and coupler are aligned and the trailer can be lowered onto the hitch.
Pay attention to any adjustments that need to be made and take your time to ensure a proper alignment. Once aligned, you can proceed with the final steps of connecting the trailer to the tow vehicle.
Substep 5.2: Locking the coupler
It’s time to move on to the next substep of connecting your trailer to the tow vehicle: locking the coupler. This step is crucial to ensure that the trailer remains securely attached to the tow vehicle while you’re on the road. Locking the coupler is a simple process that involves inserting a pin or lock into the designated hole on the coupler.
This prevents the coupler from accidentally disconnecting from the hitch ball during transportation. By locking the coupler, you can have peace of mind knowing that your trailer is securely attached and won’t come loose while driving. Remember, it’s always important to double-check that the coupler is properly locked before hitting the road.
Step 6: Adjusting the sway control
Now that you have successfully installed your Equalizer sway control hitch, you may need to make some adjustments to ensure that it is properly set up. One important aspect of the installation process is adjusting the sway control. Sway control helps to reduce the side-to-side movement of your trailer, making your towing experience safer and more stable.
To adjust the sway control, start by hitching up your trailer to your tow vehicle. Next, take a test drive and see how the trailer behaves. If you experience any excessive swaying, you can adjust the sway control to help reduce it.
The specific method for adjusting the sway control will depend on the type of equalizer hitch you have installed. Some hitches allow for adjustments to be made by simply turning a knob, while others may require you to move a bracket up or down. Follow the instructions provided by the manufacturer of your sway control hitch to make the necessary adjustments.
Once you have made the adjustments, take another test drive to see if the sway has been reduced. Repeat this process as necessary until you achieve the desired level of sway control. Properly adjusting the sway control will help to ensure that your towing experience is safe and enjoyable.
Substep 6.1: Positioning the sway control
sway control, adjusting, positioning, trailer, safety, prevent, sway, weight distribution, hitch, towing, distribute, tongue weight, stability. In Step 6 of adjusting the sway control, the next substep is to correctly position the sway control on your trailer. This is an important step in ensuring the safety of your towing experience.
The purpose of sway control is to prevent your trailer from swaying or fishtailing while on the road, which can be extremely dangerous. By properly positioning the sway control, you can effectively distribute the weight of your trailer and improve stability. To begin, you will need to attach the sway control to the hitch on your towing vehicle.
Most sway control systems have a ball mount that attaches to the trailer’s ball coupler. It is important to ensure that the sway control is securely attached and properly tightened to prevent any movement or slippage during towing. Once the sway control is attached to the hitch, you can begin adjusting its position.
The goal is to distribute the tongue weight of the trailer evenly between the tow vehicle and the trailer axles. This helps to stabilize the trailer and reduce the risk of sway. To do this, you will need to make adjustments to the sway control’s position.
Start by loosening the adjustment nut located on the sway control arm. This will allow you to move the sway control bracket up or down along the arm. The general rule of thumb is to position the sway control bracket so that it is roughly parallel to the trailer frame.
As you make adjustments, it’s important to consider the weight distribution of your trailer. If you find that your trailer is still swaying after making adjustments, you may need to redistribute the weight within the trailer or adjust the weight distribution system if you have one. Remember, properly positioning the sway control is crucial for maintaining the stability and safety of your trailer while towing.
Substep 6.2: Adjusting the sway control tension
When towing a trailer, it’s important to have proper sway control to ensure a safe and stable ride. Adjusting the sway control tension is a crucial step in achieving this. So how do you go about adjusting the tension? Well, it’s actually quite simple.
The first thing you’ll want to do is make sure your trailer is level. This will help determine the starting position for the sway control tension. Next, locate the sway control arm on your trailer hitch.
There should be a small lever or knob that can be turned to adjust the tension. Begin by loosening the tension and take your trailer for a short test drive. Pay attention to how the trailer handles and if there is any excessive swaying.
If there is, tighten the tension slightly and test it again. Keep making small adjustments until you find the sweet spot where your trailer rides smoothly and without sway. It may take a few tries to get it just right, but it’s worth the effort for a safe towing experience.
Welcome to the conclusion of our blog series on [topic]. Over the past few weeks, we have explored various aspects of [topic] and delved into its complexities, challenges, and opportunities. We have examined different perspectives, analyzed data, and shared insights from experts in the field.
Throughout this series, we have sought to provide a comprehensive understanding of [topic]. We have addressed common questions, debunked myths, and offered practical advice for those looking to navigate the world of [topic]. From beginners to seasoned professionals, we hope there was something for everyone in our exploration of [topic].
As we wrap up this series, it is important to reflect on what we have learned and consider the bigger picture. [Topic] is a multifaceted subject with far-reaching implications. It affects not only individuals but also communities, businesses, and society as a whole.
One thing that has become evident is that there is no one-size-fits-all solution or approach when it comes to [topic]. It requires a nuanced understanding and a willingness to adapt to changing circumstances. The challenges and opportunities presented by [topic] are constantly evolving, and our approach must evolve with them.
In conclusion, [topic] is a complex and dynamic field that requires ongoing exploration and adaptation. There are no easy answers or quick fixes, but by engaging in open dialogue, staying informed, and embracing innovation, we can make meaningful progress in our understanding and application of [topic]. Thank you for joining us on this journey, and we hope you found our series on [topic] enlightening and inspiring.
Stay curious and continue to explore the world of [topic] with an open mind.
Final checks and safety reminders
So, you’ve decided to install an equalizer sway control hitch on your trailer or RV. That’s a great choice! Adding a sway control hitch can greatly improve the stability and safety of your towing experience. But before you hit the road, there are some final checks and safety reminders you should keep in mind.
First and foremost, make sure you have read and understood the instructions that come with your equalizer sway control hitch. Each manufacturer may have specific guidelines and recommendations for installation, so it’s important to follow them carefully. Before installing the hitch, inspect all the components to ensure they are in good working condition.
Look for any signs of damage or wear and replace any parts as necessary. It’s also a good idea to lubricate the ball and socket connection to ensure smooth operation. When mounting the hitch, make sure it is securely attached to your trailer’s frame.
Use the appropriate bolts and hardware and tighten them down according to the manufacturer’s specifications. Double-check that all connections are tightened and secure before hitting the road. Once the hitch is installed, you’ll need to properly set up the sway control.
This involves adjusting the tension on the sway control bars to effectively reduce trailer sway. Follow the instructions provided by the manufacturer to ensure the proper setup. After everything is in place, take the time to do a thorough test drive.
Start by driving at low speeds and gradually increase to highway speeds. Pay attention to how the trailer tows and make any necessary adjustments to the sway control. Finally, remember to always practice safe towing habits.
Benefits of using an equalizer sway control hitch
If you’re planning on hauling a trailer, a must-have accessory is an equalizer sway control hitch. This type of hitch provides several benefits that can greatly improve your towing experience. One of the main advantages is its ability to reduce sway or fishtailing of the trailer.
This is important for maintaining stability and control while driving, especially at higher speeds or when encountering strong winds. Installing an equalizer sway control hitch is relatively simple and can be done by following a few steps. First, you’ll need to identify the appropriate location for the hitch on your tow vehicle’s frame.
Once you’ve determined the location, you can attach the hitch using the provided bolts or hardware. Next, you’ll need to connect the spring bars to the hitch and adjust them to the appropriate tension for your specific trailer weight. Finally, you’ll want to test the hitch to ensure that it is properly balanced and functioning correctly.
By installing an equalizer sway control hitch, you can have peace of mind knowing that your trailer will stay securely behind you, allowing for a safer and more enjoyable towing experience.
Frequently Asked Questions
Are you looking to improve your towing experience and ensure a smoother, safer ride? One way to achieve this is by installing an equalizer sway control hitch. This type of hitch is designed to minimize trailer sway and provide better stability while on the road. But how exactly do you install one? The process is actually quite simple! First, you’ll need to gather the necessary tools, including a socket wrench, torque wrench, and safety chains.
Next, you’ll want to line up the hitch and coupler, ensuring that they are centered. Once in position, you can start tightening the bolts, making sure to alternate sides to achieve an even distribution of weight. Finally, attach the safety chains, making sure they are crossed under the coupler to provide additional stability.
And that’s it! With your new equalizer sway control hitch properly installed, you can hit the road with confidence, knowing that your towing experience will be safer and more enjoyable.
Conclusion
In conclusion, installing an equalizer sway control hitch is like unleashing the magical powers of balance and control on your towing adventures. It’s like giving your trailer a set of training wheels, ensuring that it doesn’t wobble or veer off course like a tipsy tightrope walker. With this hitch, you’ll be the maestro of the open road, conducting the harmony between your vehicle and trailer as smoothly as Beethoven’s symphony.
So, say goodbye to white-knuckle driving, and hello to a towing experience that’s as steady as a tightrope walker with a perfect sense of balance. Installation may require a bit of elbow grease, but the reward of a stress-free journey is well worth it. So, grab your tool belt, embrace your inner handyman, and enjoy the sweet, sweet sound of stability on the highways.
“
FAQs
How does an equalizer sway control hitch work?
An equalizer sway control hitch works by using tensioned bars to distribute the weight of the trailer evenly between the tow vehicle and trailer, reducing sway and improving stability during towing.
What are the benefits of using an equalizer sway control hitch?
Using an equalizer sway control hitch provides several benefits, including improved stability and control while towing, reduced trailer sway, increased safety on the road, and better weight distribution between the vehicle and trailer.
How do I install an equalizer sway control hitch?
To install an equalizer sway control hitch, follow these steps: 1) Position the hitch head onto the trailer hitch ball. 2) Attach the spring bars to the hitch head and the trailer frame. 3) Adjust the tension on the spring bars according to the manufacturer’s instructions. 4) Install the sway control unit, if included, onto the trailer frame. 5) Make sure all connections are secure and properly tightened.
Can an equalizer sway control hitch be installed on any type of trailer?
Yes, an equalizer sway control hitch can be installed on most types of trailers, including travel trailers, utility trailers, and boat trailers. However, it is important to check the weight capacity and compatibility of the hitch with your specific trailer before installation.
How do I choose the right size equalizer sway control hitch for my trailer?
When choosing the right size equalizer sway control hitch, consider the weight of your trailer and the towing capacity of your vehicle. Ensure that the hitch can support the maximum trailer weight, and that the weight distribution is balanced evenly.
Can I use an equalizer sway control hitch with a weight distribution system?
Yes, many equalizer sway control hitches are designed to work in conjunction with a weight distribution system. This combination can provide both sway control and improved weight distribution for a safer and more stable towing experience.
Do I need any special tools to install an equalizer sway control hitch?
The tools required for installing an equalizer sway control hitch may vary depending on the specific hitch model and manufacturer’s instructions. However, common tools that may be needed include a wrench or socket set, torque wrench, and a level for ensuring proper hitch alignment. It is always recommended to refer to the hitch installation manual for the specific tools required.