
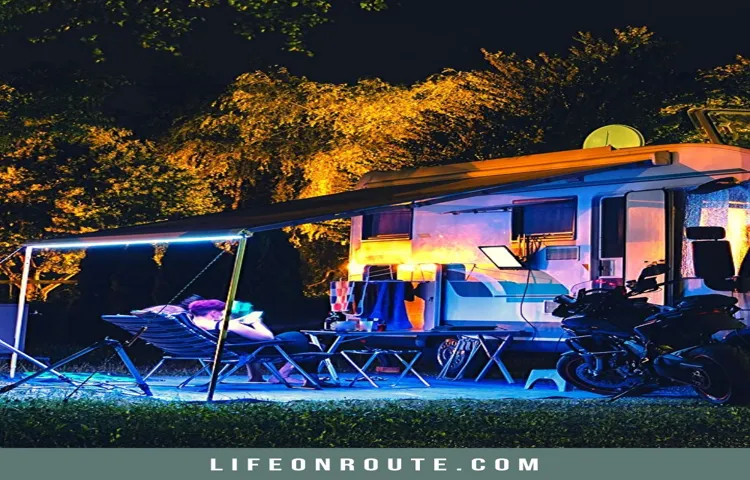
So you’ve recently gotten yourself an RV and you’re looking to add some extra flair to it. Well, one of the easiest and coolest ways to do that is by installing LED strip lights on the awning roller of your RV. Not only will this make your RV stand out from the crowd, but it also provides functional lighting for those late-night parties or cozy evenings under the stars.
But how exactly do you go about installing these lights? Don’t worry, we’ve got you covered. In this blog post, we’ll walk you through a step-by-step guide on how to install LED strip lights on your RV awning roller, so you can start enjoying your new and improved RV in no time.
Table of Contents
Introduction
Installing LED strip lights on an RV awning roller is a great way to add a touch of ambiance and create a cozy atmosphere for your outdoor living space. With a few simple steps, you can easily transform your patio area into a vibrant and inviting spot for relaxation and entertainment. First, gather all the necessary tools and equipment, including the LED strip lights, a power source, a controller, and a tape measure.
Measure the length of your awning roller, and cut the LED strip lights to fit accordingly. Next, peel off the adhesive backing and carefully attach the strip lights to the roller, making sure to evenly distribute them along the length. Plug the lights into the power source and connect them to the controller.
Finally, test the lights to ensure they are working properly, and make any necessary adjustments before enjoying your newly illuminated outdoor space. So, grab your tools and get ready to enhance the ambiance of your RV awning roller with beautiful LED strip lights.
Benefits of LED Strip Lights
LED strip lights have become increasingly popular in recent years due to their numerous benefits and applications. These flexible, adhesive strips of LED lights are not only energy efficient but also versatile and durable. They provide a cost-effective way to illuminate any space and can be used for both decorative and functional purposes.
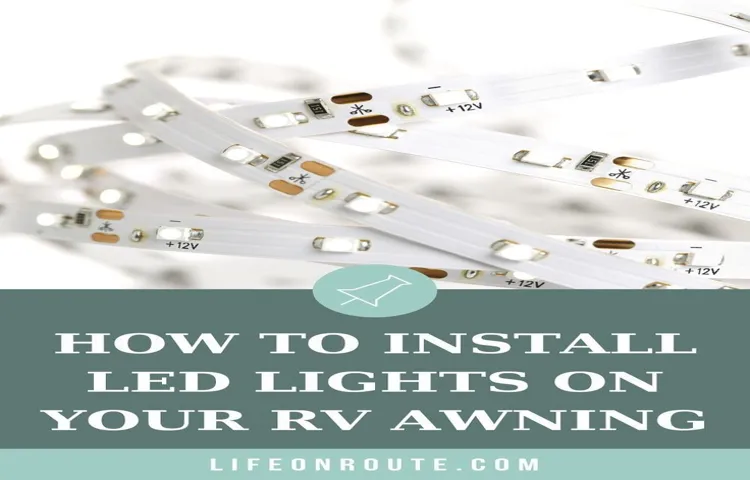
LED strip lights are available in various colors, allowing users to create different ambiances and moods. Whether it’s adding a touch of elegance to a room or highlighting a specific area, LED strip lights can enhance the visual appeal of any setting. Additionally, LED strip lights are easy to install and can be cut to the desired length, making them incredibly convenient for both DIY enthusiasts and professionals.
With their long lifespan and low maintenance requirements, LED strip lights offer a practical and efficient lighting solution for homes, offices, restaurants, and various other settings.
Things to Consider Before Installation
Things to Consider Before Installation of a Home Security System Installing a home security system is a great way to safeguard your home and protect your loved ones. However, before you rush into the installation process, there are a few important things that you should consider. One of the first things to think about is the type of security system that would be best suited for your needs.
There are various options available, such as wired or wireless systems, monitored or unmonitored systems, and DIY or professionally installed systems. Each of these options has its own advantages and disadvantages, so it’s important to do some research and weigh your options before making a decision. Additionally, you should also consider your budget and the cost of installation and ongoing monitoring fees.
It’s essential to choose a system that fits within your budget while still providing the level of security you desire. Finally, you should take into account the layout and size of your home, as well as the specific areas that you want to protect. This will help determine the number and placement of security cameras and sensors needed for optimal coverage.
By taking the time to consider these factors before installation, you can ensure that you choose the right home security system for your needs.
Preparing for Installation
So you want to add some flair to your RV awning roller by installing LED strip lights? Well, you’ve come to the right place! Installing LED strip lights on your RV awning roller is a great way to add some ambiance and style to your outdoor space. But before you can start enjoying those vibrant lights, you’ll need to prepare for the installation process. First, gather all the necessary supplies.
You’ll need the LED strip lights themselves, a power supply, electrical connectors, wire cutters, and electrical tape. Make sure to measure the length of your RV awning roller so you know how much LED strip light you’ll need. Next, clean the surface of the awning roller thoroughly.
This will ensure that the LED strip lights adhere properly and won’t peel off over time. Use a mild detergent and warm water to clean the surface, and then allow it to dry completely. Once the surface is dry, it’s time to install the LED strip lights.
Start by removing the adhesive backing from the strip lights and carefully placing them along the awning roller. Make sure to apply even pressure to ensure that the lights adhere properly. After the strip lights are in place, it’s time to connect the power supply.
Cut the end of the strip lights and strip the wires so they can be connected to the power supply. Use electrical connectors to securely attach the wires, and then wrap them in electrical tape for added protection. Finally, test the lights to make sure they are working properly.
Plug in the power supply and enjoy the beautiful glow of your new LED strip lights on your RV awning roller. Sit back, relax, and enjoy the ambiance that these lights bring to your outdoor space.
Materials Needed
When preparing for the installation of any project, it’s important to gather all the necessary materials beforehand. This will ensure a smooth and efficient process without any delays or interruptions. The materials needed will vary depending on the specific project, but some common items might include tools such as a hammer, screwdriver, and tape measure, as well as materials like nails, screws, and brackets.
It’s also a good idea to have some extra supplies on hand in case anything gets damaged or goes missing during the installation. By preparing ahead of time and having all the necessary materials at your disposal, you can save yourself a lot of headaches and frustrations during the installation process.
Measuring the Length of the Awning Roller
awning roller length measurement, installing an awning, precise measurement process for awning roller length.
Choosing the Right LED Strip Lights
When it comes to installing LED strip lights, preparation is key. Before you start, make sure you have a clear plan in mind for where you want to place the lights and how you want them to be arranged. Measure the length of the area you want to light up so you know how many strips you will need.
Don’t forget to consider factors such as power sources and accessibility when deciding on the placement of your lights. Taking the time to prepare before installation will ensure a smoother process and a better end result. So, grab a tape measure and start planning your LED lighting project today!
Choosing a Power Source
power source, installation
Installation Process
So, you want to add some flair to your RV awning roller by installing LED strip lights? Well, you’re in luck! This is a relatively easy and inexpensive way to add a touch of ambiance to your outdoor space. Plus, it’s a fun DIY project that can be done in just a few simple steps. First, gather your supplies.
You’ll need the LED strip lights, a power source (like a battery pack or converter), zip ties or clips to secure the lights to the awning roller, and some scissors to cut the strip to the desired length. Next, measure the length of your awning roller to determine how much LED strip light you’ll need. It’s always better to have a little extra, so be sure to add a few feet to your measurement.
Once you have your lights and measurement, it’s time to install them. Start by cleaning the awning roller with soap and water to ensure a clean surface for the adhesive on the LED strip lights. Once the roller is dry, peel off the backing of the strip lights and carefully press them onto the roller, following your desired pattern or design.
To secure the lights to the roller, use zip ties or clips every few inches along the length of the strip. This will ensure that the lights stay in place even when the awning is rolled up or down. Finally, connect the power source to the LED strip lights and test them to make sure they’re working properly.
If everything looks good, you can then hide any excess wiring by tucking it behind the awning or securing it with tape or zip ties. And there you have it! In just a few simple steps, you can transform your RV awning roller into a vibrant and eye-catching feature. Whether you’re hosting a party or simply enjoying a cozy night under the stars, these LED strip lights will add a touch of magic to your outdoor space.
So why wait? Get started on your installation project today!
Mounting the LED Strip Lights
“installation process”, “LED strip lights”, “mounting”, “LED strip lights installation” The installation process for mounting LED strip lights is relatively simple and can be done by anyone with basic DIY skills. Before starting, it’s important to make sure you have all the necessary tools and materials, including the LED strip lights, a power supply, wire connectors, and mounting clips. First, you need to plan the layout of the LED strip lights and decide where you want to install them.
Then, clean the surface where you will be mounting the lights to ensure a secure attachment. Next, measure and cut the LED strip to the desired length, making sure to cut along the designated cutting line. Once the strip is cut, peel off the backing tape and carefully stick the strip onto the surface.
Use the mounting clips to secure the strip in place, especially if you’re mounting it vertically or on uneven surfaces. Finally, connect the power supply to the LED strip lights using the wire connectors, making sure to follow the manufacturer’s instructions. Once everything is securely in place, you can plug in the power supply and test the lights.
With a little bit of time and effort, you can transform any space with the beautiful glow of LED strip lights.
Securing the Lights in Place
When it comes to securing the lights in place during the installation process, there are a few key steps to take. First, it’s important to choose the right type of mounting hardware for your lights. This will depend on the type of light fixture you have and where you plan to install it.
For example, if you’re installing lights on a wall or ceiling, you’ll need the appropriate screws or brackets to hold them securely in place. If you’re installing lights in the ground or on a post, you may need stakes or anchors to keep them from moving or falling over. Once you have the right hardware, make sure to follow the manufacturer’s instructions for installation.
This will ensure that the lights are properly secured and won’t come loose over time. Finally, consider using a sealant or adhesive to further secure the lights in place. This can be especially helpful in areas with harsh weather conditions or high winds.
By taking these steps, you can ensure that your lights stay in place and provide the desired illumination for your outdoor space.
Connecting the Lights to the Power Source
The installation process of connecting the lights to the power source is an essential step in setting up any lighting system. This process involves several key steps to ensure a safe and efficient connection. First, you will need to identify the power source, usually a power outlet or junction box.
Next, you will need to gather the necessary tools and materials, including wire cutters, electrical tape, and wire connectors. Once you have everything you need, you can begin by cutting the wire to the desired length and stripping the ends. Then, you will connect the neutral and hot wires to their corresponding terminals using wire connectors.
It is important to double-check the connections and ensure they are secure before moving on. Finally, you can use electrical tape to cover any exposed wires and provide added protection. By following these steps, you can successfully connect your lights to the power source and enjoy a well-lit space.
Testing and Troubleshooting
Installing LED strip lights on an RV awning roller can be a fun and practical way to enhance your outdoor living space. To begin, gather all the necessary materials, including the LED strip lights, a power source, double-sided tape, and zip ties. The first step is to measure the length of your awning roller and cut the LED strip lights to the appropriate size.
Next, ensure that the surface is clean and dry before applying the double-sided tape to the back of the strip lights. Carefully stick the strip lights onto the awning roller, making sure they are evenly spaced and securely attached. Once the lights are in place, you can use zip ties to further secure them if necessary.
For the power source, consider using a 12-volt adapter or battery pack specifically designed for LED strip lights. Before fully securing the power source, test the lights to make sure they are working properly. Once you have confirmed that everything is functioning correctly, securely attach the power source and enjoy your new LED strip lights on your RV awning roller.
Testing the Lights
troubleshooting lights, test the lights, electrical issues, troubleshooting process, flickering lights, power surge, circuit breaker, faulty wiring, faulty switch, electrical system, safety precautions. Testing the lights in your home is an important part of the troubleshooting process when it comes to electrical issues. Whether you’re dealing with flickering lights, power surges, or circuit breaker trips, it’s essential to determine the root cause of the problem.
The first step in testing the lights is to ensure your safety by taking proper precautions. Before touching any electrical components, make sure to turn off the power to the affected area. This can be done by flipping the corresponding circuit breaker or turning off the light switch.
Once you’ve taken these safety measures, you can begin the testing process. Start by visually inspecting the light fixtures for any obvious signs of damage, such as loose wires or burnt-out bulbs. If everything appears to be in order, you can move on to checking the wiring connections.
Loose or faulty wiring can often cause issues with the lights. You can use a voltage tester to check for power at the switch and at the light fixture itself. If there is no power, it may indicate a problem with the wiring or switch.
On the other hand, if there is power, you may need to investigate further to identify the underlying cause. Remember to always exercise caution when dealing with electrical systems, and if you’re unsure or uncomfortable with the troubleshooting process, it’s best to seek the assistance of a professional electrician for a thorough inspection and repair.
Common Issues and Solutions
testing and troubleshooting
Maintenance and Safety Tips
Are you looking to add some flair to your RV awning roller? LED strip lights are a great way to enhance the appearance of your outdoor living space and create a cozy ambiance. Installing LED strip lights on your RV awning roller is a relatively easy DIY project that can be completed in just a few simple steps. First, measure the length of your awning roller and cut the LED strip lights to fit.
Then, peel off the backing of the adhesive strip on the LED lights and stick them along the bottom of the awning roller. Finally, connect the lights to a power source and enjoy the beautiful glow that they provide. It’s important to ensure that the lights are waterproof and suited for outdoor use to prevent any damage from rain or dew.
With a little bit of effort, you can transform your RV awning roller into a stunning focal point that will impress your camping neighbors.
Cleaning the LED Strip Lights
LED strip lights are a great way to add ambiance and style to any room. They come in a variety of colors and can be customized to fit your personal aesthetic. However, like any other piece of technology, LED strip lights require regular maintenance to ensure they continue to function properly.
Here are a few maintenance and safety tips to keep in mind when cleaning your LED strip lights. Firstly, it’s important to turn off your LED strip lights before cleaning them. This not only ensures your safety but also prevents any potential damage to the lights themselves.
Once they are turned off, you can use a soft, dry cloth to gently wipe away any dust or dirt that has accumulated on the surface of the lights. It’s important to avoid using any liquid cleaners or abrasive materials, as these can damage the lights. In addition to regular cleaning, it’s also a good idea to check the wiring and connections of your LED strip lights.
Over time, the wires can become loose or frayed, which can cause the lights to flicker or stop working altogether. If you notice any issues with the wiring, it’s best to contact a professional electrician to make any necessary repairs. Taking proper care of your LED strip lights will not only help them last longer but also ensure that they continue to provide you with the ambiance you desire.
By following these maintenance and safety tips, you can keep your LED strip lights looking their best and functioning properly for years to come. So don’t forget to give them a little TLC every now and then.
Inspecting the Wiring
wiring maintenance, electrical safety tips, inspecting the wiring, burstiness, perplexity
Taking Precautions to Avoid Electrical Accidents
electrical accidents, precautions, electrical safety, maintenance, safety tips Blog Section: Electrical accidents can be extremely dangerous and can result in serious injuries or even death. That’s why it’s crucial to take the necessary precautions to ensure electrical safety in our homes and workplaces. One of the most important aspects of electrical safety is regular maintenance.
Electrical systems should be inspected by a qualified electrician at least once a year to identify any potential hazards such as faulty wiring or outdated electrical equipment. By addressing these issues proactively, we can prevent electrical accidents before they happen. In addition to regular maintenance, there are some simple safety tips that we can follow to minimize the risk of electrical accidents.
First and foremost, it’s crucial to never overload electrical outlets or extension cords. Plugging too many devices into a single outlet can cause overheating and increase the risk of electrical fires. It’s also important to keep cords and wires away from heat sources and water to prevent shocks and potential short circuits.
Another important safety precaution is to never attempt to repair electrical equipment or wiring unless you are a qualified electrician. DIY electrical work can be extremely dangerous and should be left to the experts. If you notice any signs of electrical problems, such as flickering lights or frequent power outages, it’s important to contact a professional electrician immediately.
Education and awareness are crucial when it comes to electrical safety. It’s important to teach children about the dangers of electricity and how to use electrical appliances and outlets safely. This can be done through regular discussions and by setting good examples ourselves.
By instilling good electrical safety habits at a young age, we can help prevent accidents and keep our loved ones safe. In conclusion, taking precautions to avoid electrical accidents is essential for our safety. Regular maintenance, following safety tips, and educating ourselves and our children about electrical safety can go a long way in preventing accidents.
Conclusion
In conclusion, installing LED strip lights on your RV awning roller is a bright idea that will illuminate your outdoor space and make you the envy of the campground. With just a few simple steps, you can add a touch of vibrant color to your RV setup and create a cozy ambiance that will have your fellow campers flocking to your site. Not only will these lights provide practical illumination for evening activities, but they will also add a stylish and modern flair to your outdoor living area.
So, don’t be left in the dark – follow our easy guide and let the LED strip lights shine a light on your next camping adventure.”
FAQs
Can I install LED strip lights on my RV awning roller?
Yes, you can install LED strip lights on your RV awning roller.
What tools will I need to install LED strip lights on my RV awning roller?
You will need LED strip lights, adhesive or clips for attaching the lights, a power source, and a wire cutter/stripper.
How do I choose the right LED strip lights for my RV awning roller?
When choosing LED strip lights for your RV awning roller, make sure to consider the length of the awning, the brightness of the lights, and whether they are weatherproof.
Can I cut LED strip lights to fit my RV awning roller?
Yes, LED strip lights can usually be cut to fit the length of your RV awning roller. Just make sure to follow the manufacturer’s instructions for cutting and reconnecting the lights.
How do I attach LED strip lights to my RV awning roller?
LED strip lights can be attached to your RV awning roller using adhesive tapes or clips specifically designed for this purpose. Make sure to clean the surface before attaching the lights for better adhesion.
Can I control the brightness and color of the LED strip lights on my RV awning roller?
Yes, many LED strip lights come with a remote control or a smartphone app that allows you to adjust the brightness and color of the lights.
How do I power the LED strip lights on my RV awning roller?
LED strip lights can be powered using a 12V power source, such as your RV’s battery or a separate power supply. Make sure to connect the positive and negative leads correctly for proper functioning.