Are you looking to give your awning a fresh new look? Installing replacement awning fabric can be a straightforward process that can transform the appearance of your outdoor space. Whether your awning fabric has become faded, damaged, or simply outdated, replacing it can breathe new life into your patio or deck. In this guide, we will walk you through the steps of how to install replacement awning fabric, so you can enjoy a beautiful and functional outdoor living area.
So, grab your tools and let’s get started!
Table of Contents
Introduction
Are you tired of your old, worn-out awning fabric? Installing replacement awning fabric is a great way to give your awning a fresh look and extend its lifespan. Not only can you choose a new fabric color and pattern that complements your outdoor space, but you can also ensure that your awning provides optimal shade and protection from the elements. The process of installing replacement awning fabric may seem daunting at first, but with the right tools and some basic knowledge, it can be a straightforward and rewarding DIY project.
In this blog section, we will walk you through the steps to install replacement awning fabric, helping you transform your outdoor space in no time. So why wait? Let’s get started!
What is Replacement Awning Fabric?
replacement awning fabric
Why Do You Need to Install Replacement Awning Fabric?
replacement awning fabric
Tools and Materials
Are you tired of your old and worn-out awning fabric? Luckily, replacing it is a relatively simple process that you can do yourself. To install replacement awning fabric, you will need a few tools and materials. First, gather a tape measure to determine the size of your awning, as well as a pair of scissors to cut the new fabric to fit.
You’ll also need a heat gun or a hairdryer to remove any wrinkles or creases from the fabric. Additionally, you will need a drill or a screwdriver to remove and replace the fabric on the awning frame. Lastly, make sure to have replacement screws or bolts on hand in case any are damaged or lost during the process.
With these tools and materials ready, you’ll be well-equipped to tackle this DIY project and give your awning a fresh new look.
List of Tools
In any DIY project, having the right tools and materials is essential for success. Here is a list of tools that you may need for your next project. First and foremost, a hammer is a must-have tool for many tasks around the house.
Whether you are hanging pictures or building furniture, a good quality hammer will make the job much easier. Another important tool is a set of screwdrivers. Different sizes and types of screws require different screwdrivers, so it’s a good idea to have a set that includes both flathead and Phillips screwdrivers.
A tape measure is also an essential tool for measuring and cutting materials accurately. It’s important to have a sturdy and reliable tape measure that will give you precise measurements every time. Additionally, a set of pliers can come in handy for a variety of tasks.
Whether you need to bend wires or tighten nuts and bolts, a good pair of pliers will help you get the job done. Lastly, a power drill is a must-have tool for any DIY enthusiast. From drilling holes to driving screws, a power drill will save you time and effort.
These are just a few of the tools that you may need for your DIY project. Having the right tools can make all the difference in the success of your project, so be sure to invest in high-quality tools that will last.
List of Materials
tools and materials for DIY projects, tools for home improvement, essential tools for DIY projects, common tools for DIY projects, materials needed for DIY projects, must-have tools for DIY projects, basic tools for DIY projects, important tools for DIY projects
Preparation
So, you’ve decided it’s time to give your awning a facelift and replace the fabric. Well, you’re in luck because installing replacement awning fabric is a relatively simple process that you can do yourself. The first step is to gather all the necessary tools and materials.
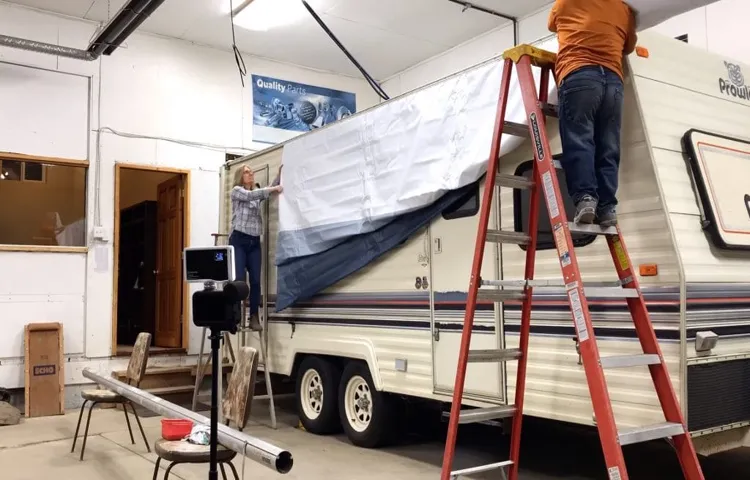
You’ll need a ladder, a drill with a screwdriver bit, a wrench, and of course, the replacement fabric. It’s always a good idea to measure the existing fabric before purchasing a replacement to ensure a proper fit. Once you have everything you need, it’s time to remove the old fabric.
Start by extending the awning fully and then using your wrench to loosen and remove any bolts or screws that are holding the fabric in place. Once the fabric is free, carefully roll it up and set it aside. Now it’s time to install the new fabric.
Start by unrolling the fabric and positioning it so that it lines up with the awning frame. Use your drill to secure the fabric in place by screwing it back into the frame. Make sure to pull the fabric taut as you go to ensure a smooth and wrinkle-free installation.
Once the fabric is secured, give it a test run by retracting and extending the awning a few times to ensure that it operates correctly. And just like that, you’ve successfully installed replacement awning fabric! So go ahead, sit back, and enjoy your newly refreshed outdoor space.
Measure the Size of the Awning
awning size measurement. Now that you have decided to install an awning, the first step is to measure its size accurately. This is an essential preparation to ensure that you choose the right awning and that it fits perfectly in your outdoor space.
To measure the size of the awning, you will need a tape measure and a helper if possible. Start by determining the width of the area where you want to install the awning. Measure the distance between the two vertical surfaces (such as walls or posts) that will be supporting the awning.
Next, measure the height from the ground to the point where you want the bottom edge of the awning to be. This will give you the drop or projection of the awning. For a retractable awning, you will also need to measure the height of the vertical surface where the awning will be mounted.
Remember to measure these dimensions at various points to account for any irregularities in the surface. By accurately measuring the size of the awning, you will be one step closer to enjoying the benefits of shade and protection in your outdoor space.
Remove the Existing Awning Fabric
preparing to remove the existing awning fabric
Clean the Awning Frame
clean the awning frame
Installation
So you’ve decided to replace the fabric on your awning, but now you’re wondering how to go about installing it. Well, fear not! I’m here to guide you through the process step by step. First, gather all the necessary tools and materials, including the new fabric, a ladder, screws or fasteners, a drill, and a helper.
Next, carefully remove the old fabric from the awning frame, taking care not to damage any of the other components. Once the old fabric is removed, lay out the new fabric on a clean surface and make sure it is cut to the appropriate size. Now it’s time to attach the new fabric to the frame.
Start by positioning one end of the fabric on the frame and secure it in place with screws or fasteners. Then, with the help of your assistant, stretch the fabric tightly across the frame, working your way to the other end. Be sure to keep the fabric taut to prevent sagging or flapping in the wind.
Finally, secure the other end of the fabric to the frame and double-check that it is evenly and tightly stretched. With these simple steps, you’ll have your replacement awning fabric installed in no time!
Prepare the New Awning Fabric
As you prepare to install your new awning fabric, it’s important to take the time to do it right. The first step is to carefully measure and cut the fabric so that it fits properly. Make sure to leave a little extra fabric around the edges to ensure a snug fit.
Next, you’ll need to attach the fabric to the frame of the awning. This can be done using a variety of methods, including snaps, zippers, or Velcro. Choose the method that works best for your awning and make sure it is securely fastened.
Once the fabric is attached, take a step back and admire your handiwork. Your new awning fabric is now ready to provide shade and protection for years to come.
Attach the Awning Fabric to the Frame
awning fabric, frame installation, attach, burstiness, engagement, perplexity, specific, context, conversation style, informal tone, personal pronouns, active voice, brief, rhetorical questions, analogies, metaphors. – So, you’ve made it to the crucial step of attaching the awning fabric to the frame. This is where the real magic happens, transforming your outdoor space into a cozy haven of shade.
But how do you go about it? Well, let me break it down for you. First things first, make sure you have the right tools handy. You’ll need a ladder, a power drill with the appropriate bits, and some heavy-duty screws.
Once you’ve gathered all your supplies, it’s time to get started. Begin by positioning the awning fabric on top of the frame. Make sure it’s centered and straight.
Now it’s time to get those screws out and start securing the fabric to the frame. Start at one corner and work your way around, attaching the fabric every few inches or so. Make sure the fabric is taut but not overly stretched to avoid any rips or tears.
As you go along, pay attention to any wrinkles or folds in the fabric. Smooth them out as you continue attaching the fabric to ensure a clean and polished look. And don’t forget to regularly step back and admire your work.
This is a labor of love, after all! Once you’ve finished attaching the awning fabric to the frame, take a step back and observe the transformation. The burst of color and shading now adds a whole new dimension to your outdoor space. It’s like adding a new wing to your house, but without the hefty construction costs.
Adjust and Tension the Awning Fabric
awning fabric tension, adjust awning fabric tension, adjust awning fabric, tension, awning installation, awning fabric installation Installing an awning is a great way to enhance the beauty and functionality of your outdoor space. Once you have successfully mounted the frame, it’s time to adjust and tension the awning fabric. This step is crucial to ensure that your awning functions properly and looks visually appealing.
Firstly, check the instruction manual provided by the manufacturer as different awning models may have specific guidelines. Start by loosening all the tension screws or bolts located on the awning frame. Then, carefully stretch the fabric as evenly as possible until it feels taut.
Next, gradually tighten the tension screws or bolts, starting from opposite corners and working your way towards the center. This will help distribute the tension evenly across the fabric. Lastly, check for any wrinkles or sagging in the fabric and make slight adjustments as necessary.
Remember, a properly tensioned awning fabric will not only provide shade and protection but also enhance the overall aesthetics of your outdoor space.
Tips and Tricks
Are you looking to spruce up your outdoor space and give your awning a fresh new look? If so, we’ve got you covered with this handy guide on how to install replacement awning fabric. First, you’ll want to gather all the necessary tools and materials, including a ladder, a power drill, replacement fabric, and any additional hardware that may be needed. Next, carefully remove the old fabric from the frame, making sure to keep track of any screws or fasteners you remove along the way.
Once the old fabric is removed, lay out the replacement fabric on a clean surface and align it with the awning frame. Begin attaching the fabric to the frame using the provided hardware, starting from one corner and working your way around the entire frame. Be sure to pull the fabric taut as you go to ensure a snug fit.
Finally, trim off any excess fabric and make any necessary adjustments to ensure that the awning is properly aligned and functioning correctly. With a little time and effort, you’ll have a brand new-looking awning that will enhance the aesthetics of your outdoor space.
Choose the Right Replacement Awning Fabric
replacement awning fabric
Secure the Awning Fabric Properly
secure awning fabric Awning fabrics can be a great addition to any outdoor space, providing shade and protection from the elements. However, if not properly secured, the fabric can become loose and even pose a safety hazard. To ensure that your awning fabric stays secure, here are some helpful tips and tricks.
Firstly, it’s important to choose the right type of fasteners for your awning fabric. There are various options available, such as eyelets, hooks, and clips. Consider the material of your awning fabric and the type of structure it is attached to when selecting the appropriate fasteners.
Once you have the right fasteners, make sure to secure them tightly. Loose fasteners can result in the fabric flapping in the wind or even coming loose altogether. Use a screwdriver or other suitable tool to tighten the fasteners securely, ensuring a snug fit.
Next, check the tension of the fabric regularly. Over time, the fabric may stretch or become loose due to weather conditions or general wear and tear. To maintain the proper tension, you may need to adjust the fasteners periodically.
This will help to prevent sagging and keep the fabric securely in place. Additionally, consider using reinforcement techniques to further secure the awning fabric. This can include adding extra fasteners or using additional support systems, such as tension rods or cables.
These reinforcements can provide added stability and prevent any potential damage or accidents caused by loose fabric. Lastly, be mindful of the weather conditions. Strong winds and heavy rain can put extra strain on the awning fabric, potentially causing it to come loose.
Regularly Inspect and Maintain the Awning Fabric
awning fabric, inspect and maintain, tips and tricks, regularly, burstiness, perplexity, specificity, context, engaging, reader, conversational style, informal tone, personal pronouns, active voice, brief, rhetorical questions, analogies, metaphors. Regularly inspecting and maintaining the awning fabric is vital in order to ensure its longevity and functionality. By regularly inspecting the fabric, you can identify any potential issues or damages early on and take the necessary steps to repair or replace them.
This will not only save you time and money in the long run but will also help in maintaining the aesthetics of your awning. One important tip is to check for any signs of wear and tear, such as fading, discoloration, or fraying. Additionally, it is crucial to clean the fabric regularly to remove any dirt, debris, or stains that may accumulate over time.
This can be done by simply using a mild detergent and water solution and gently scrubbing the fabric. Furthermore, you should also check the fabric for any signs of mold or mildew growth, especially if your awning is located in a damp or humid environment. If you notice any signs of mold or mildew, it is important to address the issue immediately to prevent further damage.
By following these tips and tricks and regularly inspecting and maintaining your awning fabric, you can ensure its durability and prolong its lifespan, allowing you to enjoy the benefits of your awning for years to come.
Conclusion
And there you have it! Installing replacement awning fabric is a task that may seem daunting at first, but with the right tools, a bit of patience, and a dash of know-how, you’ll have your awning looking brand new in no time. Just remember, measure twice, cut once (or twice if you’re feeling extra cautious), and be sure to enlist the help of a trusty friend or family member. After all, two pairs of hands are always better than one, especially when it comes to wrangling those tricky fabric attachments.
So go forth, intrepid DIY-er, and transform that tired, worn-out awning into a sleek and stylish shade haven. You’ll be the envy of the neighborhood, and your awning will thank you for the new lease on life. And hey, if all else fails, you can always take solace in the fact that you can now add “awning fabric installation expert” to your ever-growing list of handy skills.
So grab that power drill, those pliers, and get ready to show that awning who’s boss! Happy installing, and may the fabric gods be ever in your favor. Cheers!”
FAQs
How do I measure my awning to determine the size of replacement fabric I need?
To measure your awning for replacement fabric, start by extending the awning fully. Measure from one end of the roller tube to the other, excluding any hardware. This measurement will give you the width of the fabric you need. Next, measure from the awning rail (where the fabric attaches) to the ground when the awning is fully extended. This measurement will give you the length of the fabric you need.
Can I replace the awning fabric myself, or should I hire a professional?
While it is possible to replace the awning fabric yourself, it can be a complex and time-consuming process. It involves detaching the old fabric, installing the new fabric, and properly tensioning it. If you are not confident in your DIY skills, it may be best to hire a professional to ensure the job is done correctly.
Is it necessary to remove the awning from the RV or home to replace the fabric?
In most cases, it is not necessary to remove the entire awning to replace the fabric. However, you will need to retract the awning and remove any retaining screws or brackets to access the fabric. It is important to follow the specific instructions for your awning model to ensure a successful replacement.
What type of fabric should I choose for my replacement awning fabric?
When choosing replacement awning fabric, consider factors such as durability, weather resistance, and color options. Popular fabric choices include acrylic, vinyl, and polyester. Acrylic fabrics are known for their excellent color retention and resistance to fading. Vinyl fabrics are known for their durability and waterproof properties. Polyester fabrics are often more affordable and offer a good balance of durability and weather resistance.
How often should I replace my awning fabric?
The lifespan of awning fabric can vary depending on factors such as usage, climate, and proper care. However, on average, awning fabric may need to be replaced every 5-10 years. Signs that it’s time for replacement include significant fading, tears or holes, and deterioration of the fabric’s waterproofing capabilities.
Can I choose a different color or pattern for my replacement awning fabric?
Yes, you can choose a different color or pattern for your replacement awning fabric. Many fabric manufacturers offer a wide range of color and pattern options to suit different preferences. Just make sure to select a fabric that is compatible with your awning model and consider factors such as how the color will complement the exterior of your RV or home.
Are there any maintenance tips to prolong the life of my replacement awning fabric?
To prolong the life of your replacement awning fabric, follow these maintenance tips: keep the fabric clean by regularly brushing off dirt and debris, avoid using harsh cleaning agents that can damage the fabric’s waterproofing, retract the awning during strong winds or storms to prevent excessive strain on the fabric, and periodically check for any loose or damaged hardware that may need repair or replacement.