
Are you looking to enhance the ambiance and functionality of your RV? Installing awning lights can be a great way to do just that! These lights not only add a touch of style and personality to your RV, but they also provide extra lighting for outdoor activities such as camping and entertaining. Whether you’re a seasoned RVer or new to the world of recreational vehicles, installing RV awning lights is a fairly simple process that can be done in just a few easy steps. In this blog post, we’ll guide you through the process of installing these lights, from choosing the right ones for your needs to ensuring they are properly installed and wired.
So let’s dive in and shed some light on how to install RV awning lights!
Table of Contents
Gather the Necessary Tools
When it comes to installing RV awning lights, it’s important to gather the necessary tools beforehand. This will ensure that the process goes smoothly and you have everything you need within reach. Some of the tools you will need include a ladder or step stool, a drill with the appropriate drill bits, a screwdriver, wire cutters, wire connectors, and electrical tape.
These tools will help you properly secure the lights to your RV and safely connect them to a power source. It’s always a good idea to double-check your tool kit before starting the installation to avoid any unnecessary delays or trips to the hardware store.
List of tools needed
When it comes to taking on a DIY project, it’s essential to have the right tools on hand. Gather the necessary tools before you begin your project to make sure you have everything you need. A few basic tools that are commonly needed for most projects include a tape measure for accurate measurements, a level to ensure things are straight, a hammer for driving in nails, and a screwdriver set for any screws or bolts that need to be tightened.
Depending on the specific project, you may also need tools like a power drill, saw, or wrench. By having these tools ready in advance, you can save yourself time and frustration during your DIY project.
Explanation of each tool
When it comes to completing any task, having the right tools is crucial. The same goes for gathering information and data. In order to effectively gather the necessary information, there are several tools that can be used.
One such tool is a survey, which allows you to collect data from a large number of people. Surveys are a great way to gather information quickly and efficiently. Another tool that can be used is an interview.
By conducting interviews with individuals, you can gain a deeper understanding of their thoughts and opinions. This can be especially useful when trying to gather qualitative data. Additionally, focus groups can be used as a tool for gathering information.
Focus groups allow for a more in-depth conversation and can provide valuable insights. Lastly, observation can be used as a tool for gathering information. By simply observing people or processes, you can gather valuable data.
Overall, having a variety of tools at your disposal is essential when it comes to gathering the necessary information.
Choose the Type of Lights
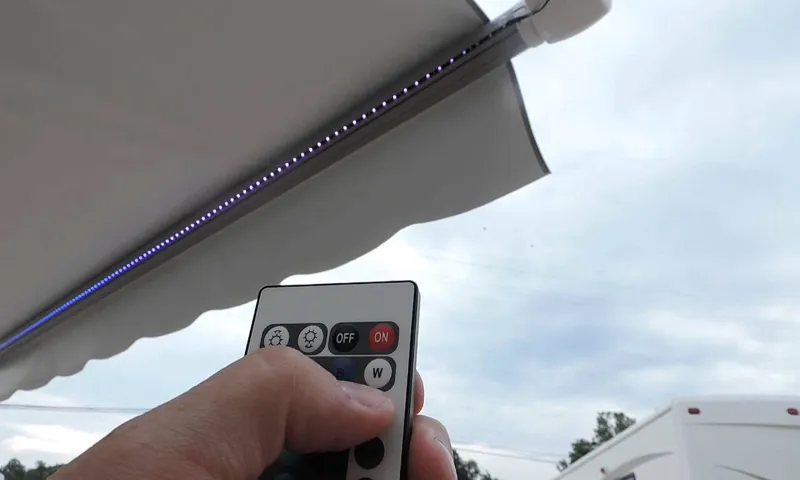
When it comes to installing RV awning lights, one of the first decisions you’ll need to make is what type of lights to choose. There are a few different options available, each with its own benefits and considerations. One popular choice is LED lights.
LED lights are energy efficient and long-lasting, making them a great option for RVs. They also come in a variety of colors and can be easily dimmed or brightened to create the perfect ambiance for your outdoor space. Another option is string lights, which can add a whimsical and festive touch to your RV awning.
These lights are typically easy to install and can be easily moved or adjusted as needed. Lastly, you may also consider solar-powered lights, which are a great choice for those who want to conserve energy while still enjoying the convenience of outdoor lighting. These lights are powered by the sun and can be charged during the day to provide illumination at night.
Overall, the type of lights you choose will depend on your personal preferences, budget, and the overall aesthetic you want to achieve.
Different types of RV awning lights
When it comes to choosing lights for your RV awning, there are a variety of options to consider. One popular type is LED lights, which offer bright and energy-efficient lighting. LED lights come in different colors and can be easily controlled with a remote, allowing you to create the perfect ambience for your outdoor space.
Another option is string lights, which are classic and versatile. These lights come in various lengths and styles, such as globe or fairy lights, and can be easily hung along your awning. They add a festive touch and are great for outdoor gatherings.
Additionally, there are rope lights, which are flexible and can be easily bent to fit the shape of your awning. These lights are durable and weather-resistant, making them ideal for outdoor use. With so many options available, you can choose the type of lights that best suit your style and needs.
Pros and cons of each type
led lights, fluorescent bulbs, incandescent bulbs, halogen lights
Measure and Plan
Are you looking to add a touch of ambiance to your RV? Installing awning lights can be a great way to enhance the outdoor space and create a cozy atmosphere. But how do you go about installing them? The first step is to measure your awning to determine the length of lights you will need. You can do this by extending your awning fully and measuring from end to end.
Once you have the measurements, you can start planning the layout of your lights. Consider where you want to place them and how many lights you will need to achieve the desired effect. Next, you will need to gather the necessary tools and materials.
This may include a ladder, screws or clips for mounting the lights, and a power source. Make sure to choose lights that are specifically designed for outdoor use and have a waterproof rating. Once you have everything you need, you can begin the installation process.
Start by mounting the lights to the awning using the screws or clips provided. Be sure to secure them tightly to prevent them from falling. Finally, connect the lights to a power source and test them out to ensure they are working properly.
Now you can sit back, relax, and enjoy the cozy glow of your new awning lights.
Importance of measuring the length of the awning
awning measurement, measure and plan, importance of measuring the length of the awning, awning installation When it comes to installing an awning, one of the most important steps is measuring the length of the awning. Why is it so important? Well, think of it this way – if you don’t measure it correctly, you may end up with an awning that is either too short or too long for your space. And let’s face it, that’s not the kind of mistake you want to make when investing in something as important as an awning.
Measuring the length of the awning allows you to plan and ensure that it fits perfectly in your desired location. It helps you determine the appropriate size and dimensions of the awning, ensuring that it provides the optimal coverage and shade for your outdoor space. Additionally, measuring the length of the awning also allows you to determine the ideal positioning and installation orientation, ensuring that it is correctly aligned and structurally sound.
Furthermore, measuring the length of the awning enables you to make informed decisions about the type of awning that would be most suitable for your needs. For example, if you have a larger outdoor space, you may want to consider a retractable awning that can easily be extended or retracted based on your preferences. On the other hand, if you have a smaller area, a fixed awning might be a better fit.
In summary, measuring the length of the awning is an essential step in the planning and installation process. It ensures that you get the right size, fit, and coverage for your outdoor space. So, before you go ahead with your awning installation project, take the time to measure and plan – you’ll thank yourself later.
Tips for planning the installation
When planning the installation of a new device or appliance, one of the most important steps is proper measurement and planning. This step is crucial in order to ensure that the installation goes smoothly and that the device fits properly in the designated space. Start by measuring the available area where the device will be installed, taking into consideration any obstacles or obstructions that may need to be taken into account.
Make note of any necessary clearances or spacing requirements that the device may have, as well as any special hardware or connectors that may be needed. By taking the time to carefully measure and plan the installation, you can save yourself time, effort, and potential headache later on.
Mounting the Lights
Installing RV awning lights can be a great way to add some ambiance and functionality to your outdoor living space. Mounting the lights is a relatively simple process that can be done in just a few steps. First, you’ll need to decide where you want to place the lights.
Take a look at your RV awning and determine where the lights will look and function best. Next, measure the length of the awning and cut the lights to fit. Make sure to leave a little extra length so that you have some wiggle room when it comes time to attach them.
Once you have the lights cut to the right length, you can start attaching them to the awning. One common method is to use adhesive clips, which can be found at most hardware stores. Simply attach the clips to the back of the lights and then slide them onto the awning.
If you prefer a more secure option, you can also use zip ties to attach the lights. Just be sure to space them out evenly so that you get a consistent glow. Once all of the lights are attached, plug them in and enjoy your newly illuminated outdoor space.
Whether you’re hosting a party or just relaxing by the fire, RV awning lights can add a touch of magic to your outdoor adventures.
Step-by-step instructions for mounting the lights
Mounting the lights is a crucial step in the installation process, as it ensures that the lights are securely attached and positioned correctly. To begin, gather all the necessary tools and materials, such as a ladder, screws, and a screwdriver. Start by determining the placement of the lights, keeping in mind the desired lighting effect and any specific guidelines provided by the manufacturer.
Once you have decided on the placement, use a pencil to mark the spots where the lights will be mounted. Next, position the ladder securely and carefully climb up to reach the marked spots. Hold the light fixture in place and use the screwdriver to insert screws through the holes on the fixture and into the wall or ceiling.
Make sure to use the appropriate screws and anchors based on the surface you are mounting the lights on. Tighten the screws snugly, but be careful not to overtighten and damage the fixture or the surface. Repeat this process for each light fixture, ensuring that they are evenly spaced and aligned.
Finally, double-check all the lights to make sure they are secure and properly mounted before proceeding with any electrical connections. Mounting the lights may seem like a simple task, but taking the time to do it correctly will ensure that your lights are safe, stable, and provide the desired lighting effect.
Different mounting options
mounting options for lights, lighting fixtures
Wiring and Power Source
So, you’ve got your RV awning lights ready and you’re excited to install them to enhance your outdoor space. But the big question is, how do you actually install them and where do you get the power from? Well, let me break it down for you. First things first, you’ll need to decide where you want to install your RV awning lights.
Many people choose to mount them on the underside of the awning itself, as this provides a nice diffused lighting effect. Once you have chosen the location, you’ll need to gather your tools and materials, which typically include mounting clips, awning light strips, screws or adhesive, and a power source. Now, let’s talk about the power source.
You have a few options here. One popular choice is to tap into your RV’s existing 12-volt electrical system. This can be done by locating the nearest power source, such as a nearby light fixture or outlet, and splicing into the wiring.
Make sure to properly secure and insulate the connections to ensure a safe and reliable power source. Another option is to use a separate power source, such as a portable battery pack or a solar panel. This can be a great option if you plan on using your awning lights in remote locations or if you want to minimize the drain on your RV’s battery.
Once you have your power source sorted, it’s time to actually install the lights. Start by attaching the mounting clips to the awning or the desired location. Then, carefully attach the light strips to the mounting clips, making sure they are securely attached.
If needed, you can use screws or adhesive to further secure the strips. Finally, connect the lights to the power source. This can be done by either plugging them into a nearby outlet or connecting them to the wiring you spliced into earlier.
Choosing a power source
choosing a power source
Steps for wiring the lights
When it comes to wiring lights, it’s important to have a clear understanding of how to connect them to a power source. The first step is to determine where your power source will be located. This could be an existing outlet or switch, or you may need to install a new electrical box.
Once you have your power source established, you can start running your wiring. This involves running cables from the power source to each light fixture. You’ll need to choose the appropriate gauge of wire for your specific lighting needs.
It’s important to follow electrical code requirements and ensure that your wiring is properly grounded. Once your wiring is complete, you can connect each light fixture to the appropriate wires. This usually involves connecting the black wire to the black wire and the white wire to the white wire.
You may also need to connect a ground wire if your fixtures have one. Finally, you’ll need to test your lights to make sure they are working properly. With a little bit of planning and careful wiring, you can have a beautifully illuminated space in no time.
Testing and Troubleshooting
Are you looking to add some extra ambiance to your RV camping experience? Installing awning lights on your RV can give your outdoor space a cozy and inviting feel. But how exactly do you install RV awning lights? Well, it’s actually a fairly simple process that you can do yourself with just a few tools and some basic electrical knowledge. First, you’ll want to measure the length of your RV awning to determine how many lights you’ll need.
Then, gather your materials, including the lights themselves, a drill, screws, and a voltage tester. Next, find the location where you want to mount the lights and mark the spots where you’ll be drilling. Use the drill to create holes for the screws, making sure to keep them evenly spaced.
Once the holes are made, attach the lights using the screws. Finally, use a voltage tester to ensure that the wiring is properly connected and that the lights are working correctly. With just a little bit of time and effort, you can have beautiful and functional awning lights to enhance your RV camping experience.
How to test the lights
To properly test the lights in your home or office, you’ll want to follow a few simple steps. First, you’ll want to make sure the light bulbs are installed correctly and securely in the fixtures. Next, you’ll want to check the wiring to ensure there are no loose or damaged connections.
If everything looks good so far, you can move on to actually turning on the lights and observing their functionality. Pay attention to any flickering or dimming, as this could be a sign of an electrical issue. If the lights don’t turn on at all, it could be a problem with the switch or the circuit breaker.
In that case, you may need to call a professional electrician to troubleshoot further. Overall, testing the lights is a relatively simple process that just requires a little observation and common sense.
Common issues and troubleshooting tips
Testing and troubleshooting are crucial steps in ensuring the smooth functionality of any system or device. When encountering common issues, it is essential to approach the problem systematically and follow a few troubleshooting tips. One common issue that people often encounter is a slow internet connection.
If you are experiencing this problem, start by checking if multiple devices are connected to the network and if they are all equally affected. Then, try restarting your modem and router to refresh the connection. If the problem persists, consider contacting your internet service provider for further assistance.
Another common issue is a device not turning on. In such cases, ensure that the device is properly plugged in and that the power source is functioning. Try using a different power outlet or replacing the power cable.
If the problem still persists, it might be a hardware issue, and you may need to take the device to a professional for repair. Remember, troubleshooting is all about methodically working through the problem and ruling out potential causes until you find a solution. With a systematic approach and these troubleshooting tips, you can quickly identify and resolve common issues.
Final Thoughts
Installing RV awning lights can be a great way to enhance the ambiance and functionality of your outdoor living space. Whether you want to create a cozy atmosphere for evening gatherings or simply improve visibility during nighttime activities, awning lights are a practical and stylish addition to any RV. So, how exactly do you install them? Well, the process is relatively simple and can usually be completed in just a few steps.
First, you’ll need to select the type of awning lights you want to install. There are many options available, including string lights, rope lights, and LED strips. Once you’ve chosen your preferred style, you’ll need to measure the length of your awning and purchase enough lights to cover it.
Next, you’ll need to decide on the placement of the lights. Many RVers choose to attach them to the underside of the awning, but you could also opt for attaching them to the side or even the ground if that’s more convenient for you. After determining the placement, you’ll need to securely attach the lights to your desired location.
This can usually be done using adhesive clips or zip ties. Finally, you’ll want to test the lights to ensure they are working properly before securing any loose wires or making any final adjustments. Once everything is in place and functioning as intended, you can sit back, relax, and enjoy your new RV awning lights.
Summary of the installation process
“Summary of the installation process” Installing a new software or application on your computer can sometimes feel like a daunting task, but it doesn’t have to be. In this blog post, we have provided a detailed summary of the installation process to help guide you through the steps. First, you will need to download the installation file from the official website or a trusted source.
Once the download is complete, locate the file and double-click on it to start the installation process. You may be prompted to choose a language and accept the terms and conditions. Next, you will need to choose the installation location, which is typically the default option unless you have a specific preference.
The installation process will then begin, and you may need to wait for a few minutes while the software is being installed. Once the installation is complete, you can launch the software and start using it. It’s always a good idea to restart your computer after installing new software to ensure that any changes are properly applied.
Overall, the installation process can vary slightly depending on the software you are installing, but these general steps should help you get started.”
Tips for maintenance and care of RV awning lights
RV awning lights are a great addition to any camping trip or outdoor gathering, but they do require some maintenance and care to keep them operating properly. One important tip is to make sure the lights are securely attached to the awning and are not hanging loose or swinging in the wind. This can cause strain on the wires and connectors, leading to damage or even a complete malfunction.
Additionally, it’s important to regularly inspect the lights for any signs of wear or damage, such as fraying wires or broken bulbs. If any issues are found, it’s best to address them quickly before they worsen. Another tip is to clean the lights regularly to remove any dirt or debris that may have accumulated.
This can help prevent any buildup that could obstruct the light and make it less effective. Finally, when not in use, it’s a good idea to store the lights in a safe and dry place, away from extreme temperatures or moisture. This will help prolong their lifespan and keep them in good working condition for years to come.
Overall, taking the time to properly maintain and care for your RV awning lights will ensure they continue to provide the perfect ambiance for your outdoor adventures.
Inspiration for different lighting ideas
For those looking to enhance the ambiance of their space, lighting can make all the difference. Whether you’re aiming for a cozy and intimate atmosphere or a bright and energetic vibe, finding the right lighting ideas can help set the mood you desire. So, where can you find inspiration for different lighting ideas? One great place to start is by observing your surroundings.
Take note of the lighting in restaurants, hotels, and other public spaces that create a certain mood or atmosphere. You can also browse through interior design magazines or online platforms for inspiration and ideas. Additionally, experimenting with different types of lighting fixtures, such as pendant lights, table lamps, or even fairy lights, can provide endless possibilities in creating a unique and personalized lighting setup.
Finally, consider the specific needs and requirements of your space. Are you looking to illuminate a particular focal point, or do you need overall ambient lighting? By understanding the purpose of the lighting, you can narrow down your choices and find the perfect lighting ideas to suit your space. Whether you’re drawn to warm, soft lighting or bold, statement-making fixtures, finding inspiration and exploring various lighting options can help you create a space that is both visually pleasing and functional.
So go ahead, let your creativity shine and transform your space with the power of light.
Conclusion
So there you have it, folks! Installing RV awning lights may seem like a daunting task, but with a little patience and the right tools, it can be a breeze. Whether you’re looking to add a touch of ambiance to your outdoor living space or just want to show off your #RVLife to the world, these lights are sure to make your motorhome the envy of the campground. And remember, if all else fails, don’t be afraid to ask for help from your camping neighbors – they might just have a few tricks up their sleeves too.
Happy RVing!”
FAQs
How do I install RV awning lights?
To install RV awning lights, first, determine the desired location for the lights. Then, clean the area and make sure it is dry. Next, attach the lights to the awning using the provided adhesive or clips. Finally, connect the lights to a power source, either using batteries or by wiring them to your RV’s electrical system.
What are the benefits of installing RV awning lights?
Installing RV awning lights can enhance the appearance of your RV, provide additional lighting for outdoor activities, and improve safety during nighttime. It can also create a cozy ambiance and extend the usability of your RV’s outdoor living space.
What type of RV awning lights should I choose?
The type of RV awning lights you choose depends on your personal preferences and needs. Popular options include LED strip lights, globe lights, and rope lights. Consider factors such as durability, power source, brightness, and ease of installation when selecting the right type for you.
Can I install RV awning lights on any type of awning?
Yes, in most cases, you can install RV awning lights on any type of awning. However, it is important to check the compatibility of the lighting system with your specific awning model. Some awnings may require specific mounting accessories or modifications for proper installation.
Are RV awning lights waterproof?
Many RV awning lights are designed to be waterproof or at least water-resistant. However, it is always recommended to check the product specifications or manufacturer’s instructions to ensure the lights can withstand outdoor conditions and any potential exposure to moisture.
How can I power my RV awning lights?
RV awning lights can be powered in various ways. Some options include connecting them to your RV’s electrical system, using battery-powered lights, or using a portable power source such as a generator or solar panel. Choose the power source that suits your needs and availability.
Can I install RV awning lights myself, or do I need professional help?
Installing RV awning lights is generally a DIY-friendly task. Most light kits come with installation instructions and are designed for easy installation. However, if you are unsure about electrical connections or feel uncomfortable working at heights, it is recommended to consult a professional for assistance.