RV awning replacement fabric, also known as awning fabric or canopy fabric, is an essential component of your recreational vehicle’s outdoor living space. Whether you’re camping, tailgating, or simply enjoying a sunny day on the road, having a sturdy and reliable awning is crucial for maximizing your comfort and protection. But over time, exposure to the elements, including sun, wind, rain, and even bird droppings, can take a toll on your RV’s awning fabric.
Tears, fraying, fading, and mold are all common signs of wear and tear, indicating that it’s time for a replacement. Luckily, replacing your RV awning fabric is a straightforward process that can breathe new life into your outdoor space. With a bit of time and effort, you can restore your awning to its former glory and enjoy many more adventures under a shady and sheltered oasis.
When choosing a replacement fabric for your RV awning, you’ll want to consider several factors. From the material to the color, size, and style, there are plenty of options to customize and upgrade your awning to suit your unique needs and preferences. In this blog, we’ll explore everything you need to know about RV awning replacement fabric.
We’ll provide a comprehensive guide on how to select the right fabric, step-by-step instructions for replacing it, and helpful tips and tricks to ensure a successful installation. So, whether you’re a seasoned RV enthusiast or a newbie looking to upgrade your outdoor living space, join us on this journey as we demystify the world of RV awning replacement fabric and help you create a cozy and weather-resistant sanctuary on wheels.
Table of Contents
What is RV awning replacement fabric?
Installing RV awning replacement fabric can be a simple and cost-effective way to refresh the look of your RV’s awning. RV awning replacement fabric is designed to be durable and resistant to weathering, making it a popular choice for those looking to upgrade their awning. To install the replacement fabric, start by removing the old fabric from the awning frame.
Then, lay out the new fabric and align it with the awning track. Secure the fabric to the track using the provided cord or snaps. Once the fabric is in place, carefully roll up the awning, making sure the fabric is evenly distributed.
Finally, test the awning to ensure it opens and closes smoothly. With a bit of patience and some basic tools, you can easily install RV awning replacement fabric and give your RV a fresh, new look.
Explanation of what RV awning replacement fabric is and why it may need to be replaced
RV awning replacement fabric is the material used to cover and protect the awning on an RV. The fabric is typically made of a durable and weather-resistant material, such as vinyl or acrylic. Over time, the fabric can become worn, faded, or damaged due to exposure to the elements, including sun, rain, wind, and dirt.
When this happens, it may be necessary to replace the fabric to ensure the awning continues to provide shade and protection. Replacing the fabric can also give the RV a fresh and updated look. Additionally, if the fabric is torn or has holes, it can affect the functionality of the awning and may pose a safety hazard.
Therefore, it is important to regularly inspect the awning fabric and replace it as needed to maintain the overall integrity and appearance of the RV.
Selecting the Right Replacement Fabric
Installing a replacement fabric for your RV awning may seem like a daunting task, but with the right guidance, it can be a relatively simple process. The first step is to select the right replacement fabric for your specific RV awning. There are a few key factors to consider when making this decision.
Firstly, you’ll want to ensure that the replacement fabric is the correct size for your awning. Measure the length of your existing fabric and choose a replacement that matches those dimensions. Additionally, you’ll want to consider the material of the replacement fabric.
There are several options available, including acrylic, vinyl, and polyester. Each material has its own benefits and drawbacks, so it’s important to think about your specific needs and preferences. For example, if durability is a priority, you may prefer a vinyl fabric.
On the other hand, if you’re looking for a fabric that is breathable and resistant to mold and mildew, acrylic may be the best choice. By carefully considering the size and material of the replacement fabric, you can ensure that your new awning will fit perfectly and provide the functionality and style you desire.
Factors to consider when choosing replacement fabric for your RV awning
When it comes to choosing replacement fabric for your RV awning, there are several factors to consider. First and foremost is the size and fit of the fabric. You want to make sure that the replacement fabric fits your awning properly to ensure a snug and secure fit.
Additionally, the material of the fabric is important. You’ll want to choose a fabric that is durable and can withstand the elements, such as sun and rain. Another factor to consider is the color and design of the fabric.
Do you want a fabric that matches your RV’s exterior, or do you prefer a different color or pattern? Lastly, consider your budget. Replacement fabric comes in a range of prices, so it’s important to choose one that fits within your budget without sacrificing quality. By considering these factors, you can select the right replacement fabric for your RV awning and enjoy the benefits of a fresh and updated look.
Different types and materials of replacement fabric available
Selecting the right replacement fabric for your furniture can be a daunting task, but it’s essential to choose wisely to ensure longevity and quality. There are various types and materials of replacement fabric available, each with its own unique properties and advantages. One popular option is cotton fabric, known for its softness and breathability.
It is also easy to clean and maintain, making it perfect for everyday use. Another option is linen fabric, which is renowned for its durability and natural beauty. Linen is resistant to pilling and static, making it a great choice for high-traffic areas.
If you’re looking for a more luxurious feel, velvet fabric might be the right choice for you. It boasts a soft and plush texture that can add elegance to any piece of furniture. For those looking for a more durable and stain-resistant option, microfiber fabric is a great choice.
It is highly resistant to stains and requires minimal upkeep. When selecting replacement fabric, consider factors such as the color, pattern, and texture that will complement your existing decor. Additionally, think about the specific needs of your furniture, such as whether it will be in a high-traffic area or if it needs to be kid-friendly.
By carefully considering these factors, you can select the right replacement fabric that will not only enhance the aesthetic of your furniture but also stand the test of time.
Preparing for Installation
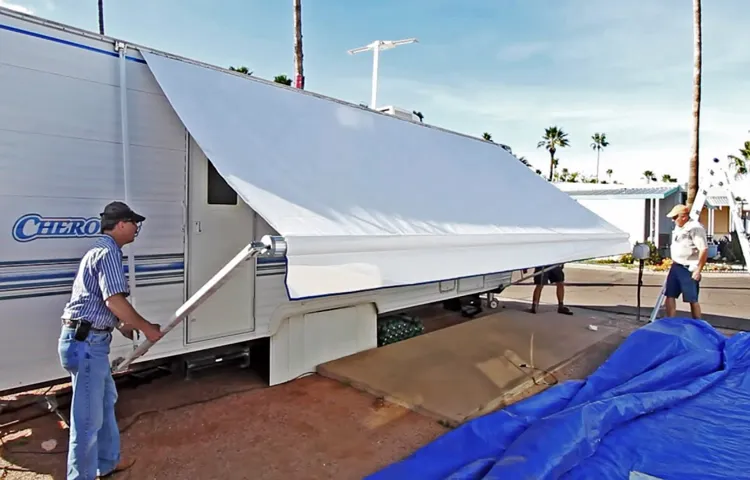
Today, we will be discussing how to install RV awning replacement fabric. If your RV’s awning fabric has seen better days and is in need of a replacement, fear not! Installing new fabric can be a relatively straightforward process. First, you’ll want to gather all the necessary tools and materials, including a ladder, tape measure, screwdriver, and replacement fabric specifically designed for your RV’s awning.
Before you begin, make sure to fully extend your awning to its maximum length and secure it in place to avoid any accidents. Next, carefully remove the old awning fabric by unscrewing it from the roller tube and side arms. Take note of the order and arrangement of any brackets or hardware that may be attached to the fabric.
Lay out the new replacement fabric on a clean surface and align it with the roller tube, making sure it is centered. Attach the fabric to the roller tube and side arms using the screws and brackets provided. Finally, retract the awning and check for any adjustments that may be needed for proper tension and alignment.
With a little patience and attention to detail, you’ll have your RV looking good as new with a fresh awning fabric!
Tools and materials needed for the installation process
When it comes to installing anything, whether it’s a new appliance, a piece of furniture, or even a new piece of software, it’s important to be prepared with the right tools and materials. The same goes for installing a new system in your home or office. To ensure a smooth installation process, there are a few key tools and materials that you will need.
First and foremost, you will need the system itself, whether it’s a new security system, a home automation system, or a solar power system. You will also need the necessary cables and connectors to connect the different components of the system. Additionally, you will need tools such as screwdrivers, pliers, wire strippers, and a ladder.
These tools will come in handy for mounting cameras, running wires, and connecting various components. Finally, you may need additional materials such as mounting brackets, adhesive pads, and cable ties to properly secure and install the system. By having all of these tools and materials ready beforehand, you can ensure a successful installation process with minimal disruption.
So, are you ready to get started?
Preparing the area around the awning for replacement fabric installation
preparing area, awning, replacement fabric installation
Removing the Old Fabric
So, you’ve decided to replace the old fabric on your RV awning. Great choice! It’s a relatively simple process that can give your RV a fresh new look while also protecting you from the elements. The first step in this process is to remove the old fabric.
This may seem like a daunting task, but don’t worry, I’ve got you covered. First, retract your awning fully and secure it in place so it doesn’t accidentally roll out while you’re working. Next, locate the screws or bolts that hold the fabric in place and carefully remove them.
Once they’re out, you can carefully slide the old fabric out of the grooves or tracks on the awning frame. Take your time with this step to ensure that you don’t damage the frame in the process. And voila! The old fabric is removed, and you’re now ready to install the new replacement fabric.
Step-by-step instructions for safely removing the old fabric from your RV awning
RV awning fabric can wear out over time due to exposure to the elements and constant use. To replace the old fabric, you’ll need to remove it from the awning. This may seem like a daunting task, but with the right tools and a little patience, you can easily remove the old fabric and prepare your awning for a shiny new replacement.
Here’s a step-by-step guide to help you safely remove the old fabric from your RV awning. First, make sure your RV is parked on a level surface and the awning is fully retracted.
This will provide a stable base and make it easier to work with the fabric. Locate the awning arms and find the screws or bolts that hold the fabric in place.
Use a screwdriver or wrench to remove these fasteners, being careful not to damage the awning arms or other components. Once the fasteners are removed, carefully slide the fabric out of the awning rail.
This may require some wiggling and maneuvering, but take your time to avoid tearing or damaging the fabric. As you remove the fabric, pay attention to any additional attachments or clips that may be holding it in place.
These can vary depending on the type and model of your RV awning. Remove them as needed, being careful not to lose any small parts.
Tips for proper disposal of the old fabric
Removing the old fabric is the first step in the process of properly disposing of it. To do this, start by carefully cutting away any excess fabric and trimmings to make it easier to handle. Use scissors or a utility knife to cut through the seams and remove the fabric in sections.
Take your time and be cautious not to damage any underlying materials or structures. Once the fabric has been removed, fold it up neatly and set it aside for proper disposal. This may involve recycling, donating, or properly disposing of it in accordance with local regulations.
By taking the time to remove the old fabric properly, you can ensure that it is handled responsibly and reduces its impact on the environment.
Measuring and Cutting the Replacement Fabric
Now that you’ve purchased a replacement fabric for your RV awning, it’s time to measure and cut it to the appropriate size. Before starting, make sure you have all the necessary tools, such as a tape measure, scissors, and a marking pen. Begin by extending the awning fully to its maximum length and height.
Measure the width of the existing fabric from end to end, ensuring that you measure from the inside of the awning track. Note down this measurement as it will be used later. Next, measure the length of the awning fabric from top to bottom, again taking the measurement from the inside of the awning track.
Once you have these measurements, add a few inches to each measurement for seam allowance and to ensure a proper fit. This extra fabric will be trimmed later. Using your marking pen, mark the additional inches on the replacement fabric.
Now, carefully cut along these marked lines, being sure to make straight and clean cuts. Take your time and use a steady hand to ensure accuracy. Once you have finished cutting, you should have a perfectly sized replacement fabric for your RV awning.
With this step complete, you’re one step closer to installing your new awning fabric and enjoying the comfort and shade it provides.
Instructions for accurately measuring your awning and cutting the replacement fabric to size
awning replacement fabric, measuring, cutting, accurate measurements When it comes to replacing the fabric on your awning, it’s important to get accurate measurements to ensure a perfect fit. To begin, grab a measuring tape and measure the length and width of your awning. Start by measuring the length from one end to the other, making sure to follow the curve of the awning if it’s not a straight line.
Next, measure the width of the awning from side to side. It’s important to measure both the length and width accurately to ensure the replacement fabric fits snugly. Once you have your measurements, it’s time to cut the replacement fabric to size.
Lay the replacement fabric on a flat surface and use your measurements as a guide. Using a sharp pair of fabric scissors, carefully cut along the marked lines. Take your time and make sure to follow the measurements precisely to avoid any uneven edges or a fabric that is too small or too big.
By taking accurate measurements and cutting the replacement fabric carefully, you can ensure a perfect fit for your awning.
Recommended techniques for cutting the fabric to prevent fraying
When it comes to cutting fabric to prevent fraying, there are a few recommended techniques to keep in mind. First and foremost, be sure to measure and mark your fabric accurately before making any cuts. This will help ensure that you have the correct dimensions for your project.
Next, use sharp fabric scissors or a rotary cutter to make clean, precise cuts. Dull scissors or blades can cause the fabric to fray more easily. Additionally, consider using pinking shears, which have a zigzag edge that helps to reduce fraying.
Another technique to prevent fraying is to use a fabric stabilizer or fray check solution along the cut edges. Simply apply a small amount of the product to the raw edges, and it will help seal them and prevent fraying. Finally, be sure to handle the fabric gently and avoid any unnecessary pulling or stretching, as this can also contribute to fraying.
By following these techniques, you can cut your fabric with confidence, knowing that it will be less likely to fray.
Attaching the Replacement Fabric
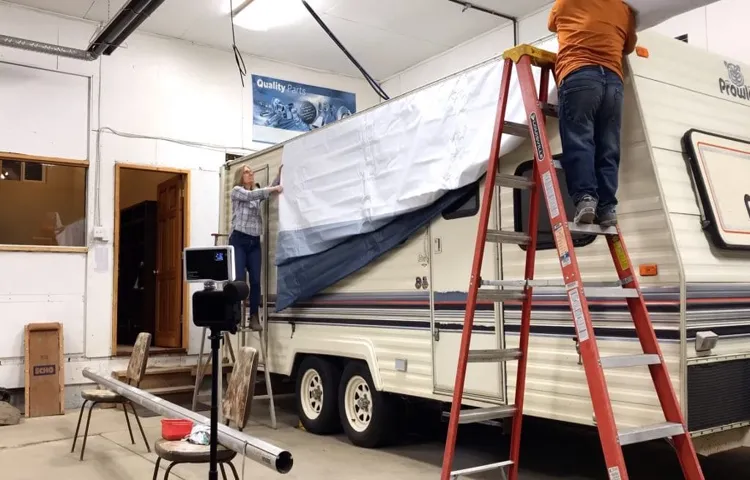
Now that you have all the necessary tools and have removed the old fabric, it’s time to attach the replacement fabric to your RV awning. The first step is to unroll the new fabric and lay it out flat on the ground. Make sure the fabric is aligned properly, with the awning’s hem facing downwards.
Next, slide the awning cord through the designated slot in the fabric. This will help secure the fabric in place and prevent it from slipping. Once the cord is in place, carefully pull the fabric up and over the awning roller.
Take your time to ensure the fabric is evenly distributed and there are no wrinkles or folds. Now, it’s time to secure the fabric to the awning roller. Start by aligning the holes on the fabric with the holes on the roller.
Insert the screws that came with the replacement fabric through the holes and into the roller. Make sure to tighten them securely to ensure the fabric stays in place. Once the fabric is securely attached to the roller, it’s time to slide the awning arms back into position.
Carefully extend the arms out and align them with the fabric. Once the arms are in place, secure them with the necessary hardware, such as pins or clips. Lastly, roll out the awning to its full extension to ensure the fabric is properly tensioned.
Adjust the tension if necessary by tightening or loosening the adjustment knobs on the arms. Congratulations, you have successfully installed the replacement fabric on your RV awning!
Step-by-step guide for securely attaching the replacement fabric to your RV awning
RV awning, replacement fabric, securely attach
Tips for ensuring proper tension and alignment of the fabric
In order to ensure proper tension and alignment of the fabric, it is important to attach the replacement fabric correctly. One tip is to start by removing the old fabric and any remaining staples or adhesive from the frame. This will create a clean surface for the new fabric to adhere to.
Next, lay the fabric over the frame and start attaching it in the center. Work your way outwards, pulling the fabric tight as you go. This will help to eliminate any wrinkles or sagging.
It may also be helpful to have a second set of hands to assist with holding the fabric taut as you secure it to the frame. Once the fabric is securely attached, double check the tension and alignment to ensure a smooth and even appearance. Taking the time to properly attach the replacement fabric will result in a finished product that not only looks great but also has a longer lifespan.
Maintenance and Care
When it comes to maintaining and caring for your RV, one important aspect to consider is the awning. Over time, the awning fabric may become worn out or damaged, requiring a replacement. But how do you install RV awning replacement fabric? Don’t worry, it’s not as complicated as it may seem.
First, you’ll need to remove the old fabric by disengaging the spring and roll tube assembly. Be sure to take note of how the fabric was originally installed, as this will help with the installation of the new fabric. Once the old fabric is removed, you can begin installing the new fabric.
Start by attaching the new fabric to the roll tube, making sure it is evenly aligned. Then, carefully feed the fabric into the awning rail, ensuring it is straight and taut. Finally, reattach the spring and roll tube assembly, making sure it is securely fastened.
With proper installation and regular maintenance, your RV awning can provide shade and protection for many years to come.
Tips for extending the longevity of your RV awning replacement fabric
RV awning replacement fabric is an essential part of your RV’s awning system, providing shade and protection from the elements. To ensure the longevity of your replacement fabric, it’s important to properly maintain and care for it. One of the first things you can do is regularly clean your awning fabric.
Use a mild soap and water solution to gently scrub away any dirt or debris. Avoid using harsh chemicals or abrasive cleaners, as they can damage the fabric. Additionally, make sure to regularly inspect your awning fabric for any signs of wear or damage.
If you notice any tears or fraying, it’s important to address them promptly to prevent further damage. In addition to cleaning and inspecting, another way to extend the life of your RV awning replacement fabric is by properly storing it when not in use. UV rays from the sun can cause the fabric to fade and deteriorate over time.
Consider investing in a quality RV awning cover to protect your replacement fabric from the sun’s harmful rays and other environmental factors. Finally, be mindful of how you use your awning. Avoid leaving it open in extreme weather conditions such as high winds or heavy rain.
If you’re expecting inclement weather, it’s best to retract your awning to prevent any potential damage to the fabric. By following these maintenance and care tips, you can help extend the longevity of your RV awning replacement fabric and enjoy its benefits for years to come.
Proper cleaning and storage techniques
Proper cleaning and storage techniques are essential for maintaining the longevity and performance of any item, whether it’s a kitchen appliance, a piece of clothing, or even a car. When it comes to cleaning, it’s important to use the right cleaning agents and methods for the specific item. For example, delicate fabrics may require gentle washing by hand, while heavy-duty kitchen appliances may benefit from a thorough scrubbing using warm, soapy water.
Similarly, storage plays a crucial role in preserving the quality of an item. Storing items in cool, dry places away from direct sunlight and harsh elements can prevent damage and deterioration. Additionally, certain items may require special storage methods such as using airtight containers or hanging garments on proper hangers.
By taking the time to properly clean and store our belongings, we can ensure that they not only last longer but also continue to look and perform their best. So let’s give our possessions the care they deserve and adopt these maintenance practices for a happier, healthier home.
Conclusion
In conclusion, installing RV awning replacement fabric is like giving your RV a stylish new outfit. It’s like a fashion show on wheels, with your awning strutting its stuff and turning heads at every campsite. So, put on your DIY hat and get ready to transform your old, tired awning into a statement piece.
First, gather your tools and materials. It’s like getting all the necessary supplies for a fashion designer to create a masterpiece. You’ll need a ladder, a tape measure, a screwdriver, and of course, the star of the show – the replacement fabric.
Next, follow the steps with precision. It’s like a seamstress meticulously sewing a garment together. Measure twice, cut once – just like a tailor taking precise measurements for a perfect fit.
Unscrew the old fabric, carefully remove it, and attach the new one in its place. It’s like changing clothes on a mannequin, but in this case, your RV gets the fashion makeover. Finally, step back and admire your handiwork.
It’s like seeing a stunning model grace the catwalk. Your RV will be the envy of the campground, turning heads and garnering compliments left and right. You’ve taken a tired, worn-out awning and given it new life, just like a fashion makeover that leaves everyone in awe.
So, grab your tools, unleash your inner DIY fashionista, and get ready to install RV awning replacement fabric. It’s a project that’s both practical and stylish, turning your RV into the trendsetter of the camping world. Happy camping and happy awning-installation fashion show!”
Final thoughts and reminders for successful installation of RV awning replacement fabric
One essential aspect of maintaining and caring for your RV awning replacement fabric is regular cleaning. Over time, dirt, mold, and mildew can accumulate on the fabric, causing it to become stained or degraded. To prevent this, it’s important to regularly clean your awning fabric with a mild detergent and a soft brush or sponge.
Be sure to rinse thoroughly and allow the fabric to air dry before retracting the awning. Additionally, it’s important to inspect the fabric for any tears or damage before and after each use. By promptly repairing any tears or holes, you can prevent further damage and extend the lifespan of your awning fabric.
Lastly, when storing your RV, make sure to retract the awning and cover it with a protective cover to shield it from the elements. By following these maintenance and care practices, you can ensure that your RV awning replacement fabric remains in good condition for years to come.
FAQs
What is the purpose of an RV awning replacement fabric?
The purpose of an RV awning replacement fabric is to provide shade and protection from the sun and rain while enjoying outdoor activities.
How often should RV awning replacement fabric be replaced?
It is recommended to replace RV awning fabric every 5-7 years, or when signs of wear and tear, such as tears or faded color, are noticeable.
Can I install RV awning replacement fabric myself?
Yes, RV awning replacement fabric can be installed by a DIY enthusiast with basic tools and instructions. However, if you are not confident in your abilities, it is always advisable to seek professional help.
What are the steps to install RV awning replacement fabric?
The steps to install RV awning replacement fabric typically include removing the old fabric, measuring and cutting the new fabric to size, attaching it to the roller tube, and extending and securing the awning.
How long does it take to install RV awning replacement fabric?
The time it takes to install RV awning replacement fabric can vary depending on the individual’s experience and the complexity of the awning system. On average, it can take a few hours to complete the installation.
Are there different types of RV awning replacement fabric available?
Yes, there are different types of RV awning replacement fabric available on the market, including vinyl, acrylic, and polyester materials. Each type has its own benefits and considerations.
How do I choose the right RV awning replacement fabric?
When choosing the right RV awning replacement fabric, consider factors such as durability, UV resistance, ease of maintenance, and overall appearance. It is also important to ensure that the fabric size matches your specific awning model.