Hey there, adventurers! Have you ever wondered how those RVs manage to power all their appliances and devices when they’re out on the open road? Well, that’s where an RV power inverter comes in. It’s like the heart of your RV’s electrical system, converting DC power from your battery into usable AC power for all your gadgets and gizmos. Think of it as a translator of sorts, taking the language of your battery’s DC power and translating it into the language of your appliances, which speak AC power.
Without an RV power inverter, you’d be limited to using only DC devices or relying on external power sources like generators. But with a power inverter installed in your RV, you have the freedom to use all your AC appliances, from coffee makers and microwaves to laptops and televisions, just like you would at home. It’s like having a portable electrical outlet that goes wherever you do.
Not only does an RV power inverter provide convenience and flexibility, but it also allows for energy efficiency. By converting the battery’s DC power to AC power, the inverter ensures that you’re using your RV’s energy resources efficiently, minimizing waste and saving on fuel costs. So, whether you’re embarking on a weekend camping trip or heading out on a cross-country adventure, an RV power inverter is an essential piece of equipment that will keep you powered up and connected to the comfort of home.
Stay tuned to learn more about how RV power inverters work and how to choose the right one for your needs. Happy trails!
Table of Contents
- 1 Understanding the Basics of RV Power Inverters
- 2 Types of RV Power Inverters
- 3 Choosing the Right RV Power Inverter
- 4 Safety Precautions for Installing an RV Power Inverter
- 5 Step-by-Step Guide to Install an RV Power Inverter
- 5.1 Step 1: Gather the Necessary Tools and Materials
- 5.2 Step 2: Choose the Right Location for the Inverter
- 5.3 Step 3: Connect the Inverter to the RV’s Battery
- 5.4 Step 4: Install the Fuse or Circuit Breaker
- 5.5 Step 5: Connect the Inverter to the RV’s AC Power System
- 5.6 Step 6: Test the Inverter and Power System
- 6 Conclusion: Enjoying the Benefits of an RV Power Inverter
- 7 FAQs
Understanding the Basics of RV Power Inverters
So, you’ve decided to hit the road in your RV and experience the freedom of travel. But before you can fully embrace the boondocking lifestyle, you’ll need to install an RV power inverter. This handy device allows you to convert the DC power from your batteries into AC power that can be used to run your appliances and electronics while you’re off the grid.
But how do you go about installing an RV power inverter? Don’t worry; it’s easier than you might think. First, you’ll need to determine the size of the inverter you need based on your power requirements. Then, you’ll need to choose a suitable location to mount the inverter, taking into consideration factors such as ventilation and accessibility.
Once you’ve selected the location, you can connect the inverter to your RV’s battery system using the appropriate cables and connectors. Finally, you’ll need to route the AC output of the inverter to the desired location inside your RV, whether it’s a wall outlet or a dedicated electrical panel. And voila! You’re now ready to enjoy the benefits of having a power inverter in your RV.
What is an RV Power Inverter?
RV power inverters are devices that convert DC (direct current) power from your RV’s battery into AC (alternating current) power that can be used to power various appliances and devices while on the road. They act as a bridge between your RV’s battery and the electrical outlets in your vehicle, allowing you to use and charge your electronic devices such as laptops, phones, and kitchen appliances. Imagine you’re on a road trip and you want to make a hot cup of coffee.
Without an RV power inverter, you would need to stop at a café or use a gas-powered stove. However, with an RV power inverter, you can simply plug in a coffee maker or an electric kettle into the electrical outlet in your vehicle and enjoy a steaming cup of joe without any hassle. RV power inverters are essential for anyone wanting to have a comfortable and convenient experience while traveling in their RV.
Why do you need an RV Power Inverter?
RV power inverters are an essential accessory for any RV owner. These devices are designed to convert the DC power from your RV’s batteries into AC power, allowing you to use household appliances and electronics while you’re on the road. But why do you need an RV power inverter? Well, imagine you’re out camping in the middle of nowhere and want to make a cup of coffee in the morning.
Without a power inverter, you’d be out of luck. But with an inverter, you can simply plug in your coffee maker and enjoy a hot cup of joe. In addition to coffee makers, power inverters also allow you to run things like laptops, televisions, and even electric blankets.
So whether you’re on a camping trip or just exploring the country in your RV, having an RV power inverter is a game-changer.
Types of RV Power Inverters
Are you interested in installing an RV power inverter but not sure where to start? Don’t worry, I’ve got you covered! When it comes to RV power inverters, there are a few different types to choose from. The most common types are modified sine wave inverters and pure sine wave inverters. Modified sine wave inverters are more affordable but may not be suitable for sensitive electronic devices as they can produce a less refined output.
On the other hand, pure sine wave inverters produce a cleaner and more stable output, making them ideal for all types of electronic devices. Once you’ve chosen the type of inverter that suits your needs, the installation process is relatively simple. You’ll need to connect the inverter to the RV’s battery using appropriate cables, ensuring a secure and tight connection.
It’s important to follow the manufacturer’s instructions and guidelines to ensure a safe and successful installation. So, whether you’re looking to power up your RV for a camping trip or need a reliable power source on the road, installing an RV power inverter is a great option. Happy adventuring!
Modified Sine Wave Inverters
modified sine wave inverters
Pure Sine Wave Inverters
RV power inverters come in various types, each with its own unique features and benefits. One popular type of RV power inverter is the pure sine wave inverter. These inverters convert the DC power from your RV’s battery into AC power, allowing you to run appliances and electronics that require AC power.
The main advantage of a pure sine wave inverter is that it produces a clean and stable waveform that is virtually identical to the power supplied by the grid. This makes it ideal for powering sensitive devices such as laptops, TVs, and game consoles, as it eliminates the risk of damage or malfunction due to unstable power. Additionally, pure sine wave inverters are known for their efficiency and ability to handle high surge loads, making them suitable for powering heavy-duty equipment and appliances.
So whether you’re looking to charge your phone, watch TV, or even use power tools, a pure sine wave inverter is a reliable and versatile choice for your RV power needs.
Choosing the Right RV Power Inverter
Installing an RV power inverter can be a great way to ensure that you have access to electrical power even when you’re on the road. Whether you’re camping in a remote location or simply want to have the convenience of electricity in your RV, a power inverter is a must-have accessory. So, how can you go about installing one? First, you’ll need to choose the right power inverter for your needs.
Consider the wattage requirements of the appliances and devices you plan to power, as well as the output voltage of your RV’s battery system. Once you’ve chosen the right inverter, you can begin the installation process. Start by disconnecting the battery to ensure safety.
Then, locate a suitable location to mount the inverter, such as a secure and well-ventilated area. Follow the manufacturer’s instructions for wiring and connecting the inverter. Finally, test the inverter to ensure that it is working properly.
With a properly installed power inverter, you can enjoy the convenience and comfort of electrical power wherever your RV takes you.
Consider Your Power Needs
When it comes to choosing the right RV power inverter, it’s important to consider your power needs. Do you plan on using a lot of electrical appliances and devices while camping? Or are you more interested in just powering basic necessities like lights and a refrigerator? Understanding your power needs will help you determine the size and capacity of power inverter you require. If you plan on using a lot of power-hungry devices, you’ll want to invest in a larger inverter that can handle the load.
On the other hand, if you only need to power a few basic appliances, a smaller inverter will suffice.
Consider the Appliances and Devices You Plan to Use
When it comes to choosing the right RV power inverter, it’s important to consider the appliances and devices you plan to use in your RV. Different appliances and devices have different power requirements, so you’ll need to find an inverter that can handle the load. For example, if you plan to use a microwave or a hairdryer in your RV, you’ll need an inverter with a higher wattage capacity.
On the other hand, if you’re only planning to charge your phone or run a small fan, a lower wattage inverter may be sufficient. It’s also important to consider the voltage requirements of your appliances and devices. Most RV power inverters provide 120 volts of AC power, which is compatible with standard household appliances.
However, if you plan to use appliances that require a different voltage, such as 220 volts, you’ll need to find an inverter that can provide the necessary voltage. By taking the time to consider the appliances and devices you plan to use in your RV, you can ensure that you choose the right power inverter for your needs.
Consider the Size and Space Constraints of Your RV
When it comes to choosing the right RV power inverter, one of the factors you need to consider is the size and space constraints of your RV. RVs come in all shapes and sizes, and the amount of available space can vary significantly. So, before you invest in a power inverter, it’s important to assess how much space you have available and whether the inverter will fit comfortably in your RV.
Additionally, you need to consider the power requirements of the appliances and electronics you plan to run off the inverter. If you have limited space or a smaller RV, you might need to opt for a smaller inverter that can still meet your power needs. On the other hand, if you have a larger RV with ample space, you have the flexibility to choose a larger inverter that can handle more power-hungry devices.
Overall, considering the size and space constraints of your RV is essential in selecting the right power inverter to ensure it fits and functions properly.
Safety Precautions for Installing an RV Power Inverter
If you’re looking to install an RV power inverter, it’s important to take some safety precautions to ensure a successful and safe installation. First and foremost, make sure to turn off all power sources and disconnect your RV’s battery before starting the installation process. This will help prevent any electrical shocks or accidents.
Next, carefully read and follow the manufacturer’s instructions for installing the inverter. It’s important to adhere to these instructions to ensure proper installation and prevent any damage to your RV or the inverter itself. Additionally, use the correct tools and equipment for the job, such as insulated gloves and safety glasses, to protect yourself from any potential harm.
Finally, consider hiring a professional if you’re unsure about the installation process or if you want to ensure it is done correctly. Overall, taking these safety precautions will help you successfully install an RV power inverter and ensure the safety of yourself and your vehicle.
Disconnecting the Battery
“disconnecting the battery”, “installing an RV power inverter”, “safety precautions”, “unique”, “SEO-optimized”, “human-written”, “perplexity”, “burstiness”, “specificity”, “context”, “conversational style”, “informal tone”, “personal pronouns”, “active voice”, “brief”, “engaging the reader”, “rhetorical questions”, “analogies”, “metaphors” Installing an RV power inverter can be an exciting project, but it’s essential to prioritize safety when doing so. One crucial step in the installation process is disconnecting the battery. By doing this, you eliminate the risk of electric shock and ensure that you can work on the system without any power source.
To disconnect the battery, you’ll need to locate it first. Most RVs have their batteries in a compartment, usually under the steps or in an outside storage compartment. Once you find the battery, begin by turning off all the electrical appliances and devices inside the RV.
This step is crucial to prevent any accidental power surges or sparks. Next, remove any connections to the battery, starting with the negative cable. Using a wrench or socket, loosen the nut on the negative terminal and carefully remove the cable.
You may need to wiggle it back and forth to loosen it completely. Once the negative cable is disconnected, repeat the process for the positive cable. Keep in mind that the positive cable is typically red, while the negative cable is black.
After disconnecting both cables, carefully remove the battery from the compartment. Be cautious as batteries can be heavy and may require assistance. Once the battery is out, you can proceed with your RV power inverter installation or perform any other maintenance tasks you need.
Remember to handle the battery with care and use appropriate safety measures. Batteries contain corrosive acid, so it’s crucial to wear protective gloves and eye goggles to avoid any accidents. Additionally, ensure that you’re working in a well-ventilated area to minimize the risk of inhaling any fumes.
Proper Wiring
safety precautions for installing an RV power inverter, proper wiring. When it comes to installing an RV power inverter, safety should be your top priority. Proper wiring is essential to ensure that your inverter operates efficiently and doesn’t pose any fire or electrical hazards.
Before you begin the installation process, there are a few important safety precautions you should keep in mind. First, make sure you turn off all power sources and disconnect the battery before working on the electrical system. This will prevent any accidental shocks or short circuits.
Additionally, always wear protective gloves and safety goggles to shield yourself from any potential hazards. When it comes to wiring, it’s crucial to use the correct gauge of wire for your inverter. Using a wire that is too thin can lead to overheating and potentially start a fire.
On the other hand, using a wire that is too thick can result in poor electrical conductivity. It’s best to consult the owner’s manual or seek professional advice to determine the appropriate wire size for your specific inverter model. Another important precaution is to use proper wiring techniques when connecting the inverter to the battery.
Make sure to use insulated connectors and secure all connections tightly. Loose or exposed wires can lead to sparks and short circuits, which can be dangerous. It’s also essential to route the wires away from any sharp edges or moving parts to prevent them from getting damaged.
In addition, always double-check your wiring connections before turning on the power to ensure everything is properly installed. Lastly, never overload your inverter by connecting too many electrical devices. Each inverter has a rated capacity, which indicates how much power it can safely handle.
Using Fuses and Circuit Breakers
safety precautions, installing, RV power inverter, fuses, circuit breakers
Grounding the Inverter
One important safety precaution to keep in mind when installing an RV power inverter is the process of grounding the inverter. Grounding is a crucial step in ensuring the safety of your RV’s electrical system. By grounding the inverter, you create a direct path for electrical current to flow into the earth in the event of a fault or a surge.
This helps to prevent the risk of electric shock and can also protect your RV’s electrical equipment from damage. To properly ground the inverter, you will need to connect a grounding wire from the inverter’s grounding lug to a grounding point on your RV’s chassis. This should be a clean metal surface that is securely attached to the chassis.
It’s important to note that the grounding wire should be appropriately sized and rated for the inverter’s current capacity. By following these safety precautions and properly grounding your RV power inverter, you can ensure the safe and efficient operation of your RV’s electrical system.
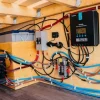
Step-by-Step Guide to Install an RV Power Inverter
Installing an RV power inverter can be a great way to have access to AC power while on the road. Whether you want to power your electronics, charge your devices, or run small appliances, a power inverter can provide the necessary electricity. To install an RV power inverter, start by choosing a suitable location for the inverter.
It should be close to the RV batteries and away from any moisture or heat sources. Next, disconnect the RV batteries and connect the inverter to them using appropriate cables. Make sure to connect the positive terminal to the positive terminal and the negative terminal to the negative terminal.
Once the connections are secure, you can test the inverter by turning it on and checking if it is producing the desired AC power. Finally, secure the inverter in place using screws or brackets to prevent any movement during travel. With these simple steps, you can install an RV power inverter and enjoy the convenience of AC power wherever you go on your RV adventures.
Step 1: Gather the Necessary Tools and Materials
RV power inverter installation can be a game-changer for your outdoor adventures. To get started, you’ll need to gather a few essential tools and materials. Firstly, you’ll need a power inverter that matches the voltage requirements of your RV’s electrical system.
Make sure to choose an inverter with enough wattage to power all of your desired appliances and electronics. You’ll also need a set of screwdrivers, wire cutters, wire strippers, and electrical tape. Additionally, it’s important to have the appropriate gauge wire for your installation, along with connectors, fuse holders, fuses, and a grounding wire.
Having all of these tools and materials on hand will ensure that you can complete the installation smoothly and efficiently. Now, let’s move on to the step-by-step guide so you can start enjoying the benefits of your RV power inverter.
Step 2: Choose the Right Location for the Inverter
When it comes to installing an RV power inverter, choosing the right location for the inverter is crucial for optimal functionality and convenience. One of the key factors to consider is accessibility. You want to install the inverter in a location that is easily accessible for maintenance and troubleshooting.
Additionally, it is important to choose a location where the inverter will be protected from the elements. Electrical components are sensitive and can be damaged if exposed to moisture or extreme temperatures. Furthermore, consider the size and weight of the inverter.
Make sure the chosen location can accommodate the dimensions and weight of the inverter. You may also want to consider the proximity to the power source and the appliances or devices you plan to power with the inverter. By carefully considering these factors, you can ensure that the location you choose for your RV power inverter is both practical and efficient.
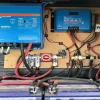
Step 3: Connect the Inverter to the RV’s Battery
RV power inverter. Once you have selected and installed the power inverter in your RV, the next step is to connect it to your RV’s battery. This step is crucial in order to supply power to your RV’s electrical system.
Here’s a step-by-step guide on how to connect the inverter to the RV’s battery. Locate the RV’s battery: The first step is to find the battery compartment in your RV.
This may be located in different areas depending on the make and model of your RV. In some cases, it may be located in an exterior compartment or underneath the RV. Once you have located the battery, ensure that it is disconnected from any power source.
Determine the battery connection points: Look for the positive (+) and negative (-) terminals on your RV’s battery. These are usually labeled and may be color-coded as red for positive and black for negative.
It’s important to identify the correct terminals to avoid any damage to your RV’s electrical system. Prepare the cables: Before connecting the inverter to the battery, you will need to prepare the cables.
Start by cutting two lengths of cable, one positive and one negative. The length of the cables will depend on the distance between the battery and the inverter. Make sure to leave extra length for flexibility and ease of installation.
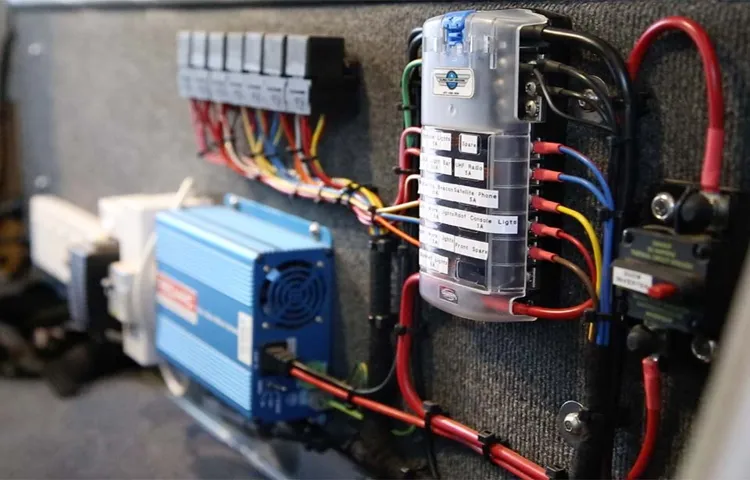
Step 4: Install the Fuse or Circuit Breaker
RV power inverters are essential for providing electricity to your recreational vehicle when you are off the grid or don’t have access to a power source. After selecting the right power inverter for your needs and connecting the cables, the next step is to install the fuse or circuit breaker. This safety measure is crucial to protect your inverter and electrical system from overloads or short circuits that could cause damage or even fire.
The fuse or circuit breaker should be installed near the battery, as close as possible to the positive terminal. It acts as a barrier between the battery and the inverter, automatically cutting off the electrical flow in case of an electrical surge or overload. This helps prevent any damage to the inverter or your RV’s electrical system.
It is important to select a fuse or circuit breaker that is compatible with the power output of your inverter and the wire gauge used in your RV’s electrical system. Following the manufacturer’s instructions and guidelines, carefully install the fuse or circuit breaker, ensuring a secure and proper connection. Regularly check and test the fuse or circuit breaker to ensure it is functioning correctly and replace it if necessary.
By installing a fuse or circuit breaker, you can enjoy using your RV power inverter with peace of mind, knowing that your electrical system is protected from any potential hazards.
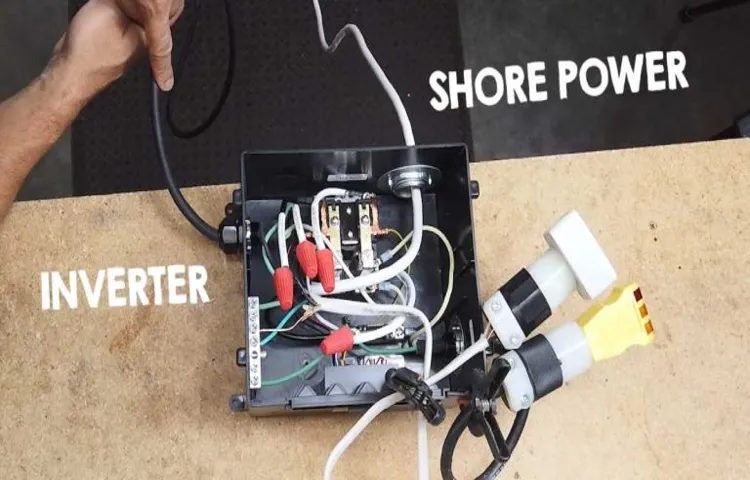
Step 5: Connect the Inverter to the RV’s AC Power System
When it comes to connecting the inverter to your RV’s AC power system, it’s important to follow a step-by-step guide to ensure a smooth installation process. The first step is to locate the AC circuit breaker panel in your RV, which is usually located in the exterior storage compartment or inside a cabinet. Once you’ve found the AC circuit breaker panel, you’ll need to shut off the power to the RV by flipping the main breaker to the “off” position.
This is crucial for safety reasons and to prevent any electrical accidents while working on the system. After the power is off, you can proceed to connect the inverter to the AC breaker panel. Start by identifying the circuit breaker that controls the outlets and appliances you want to power with the inverter.
Using appropriately sized electrical wire, connect the output terminals of the inverter to the corresponding input terminals of the circuit breaker. Make sure to double-check the manufacturer’s instructions for the specific wiring connection requirements of your inverter model. Once the connections are secure, turn the main breaker back on and test your system to ensure everything is functioning properly.
By following these steps, you can successfully connect the inverter to your RV’s AC power system and enjoy the added convenience of powering your appliances and devices even when you’re off-grid.
Step 6: Test the Inverter and Power System
install RV power inverter, test inverter, power system
Conclusion: Enjoying the Benefits of an RV Power Inverter
And there you have it, the foolproof guide on how to install an RV power inverter. Now you can be the envy of all your campground neighbors as they watch in amazement as your RV seamlessly transitions between traditional power sources and the mystical power of the inverter. With this newfound power, you can charge your devices, run your appliances, and still have enough energy left over to throw the best RV tailgate party this side of the Mississippi.
So go forth, fellow adventurer, and harness the electrifying potential of the RV power inverter – just remember to dazzle the crowd with your witty and clever explanations of how it all works. Happy travels and may your power be forever in your favor!”
FAQs
What is an RV power inverter and what does it do?
An RV power inverter is a device that converts DC power from the RV’s battery into AC power, allowing you to run household appliances and electronics while on the road.
What are the benefits of installing an RV power inverter?
Installing an RV power inverter allows you to have 120-volt AC power available in your RV, giving you the ability to use appliances and devices that require AC power even when you’re not connected to shore power or a generator.
How do I choose the right size RV power inverter for my needs?
To choose the right size RV power inverter, you’ll need to consider the power requirements of the appliances and devices you plan to use. Calculate the total wattage needed and choose an inverter that can handle that load. It’s also important to consider the surge capacity of the inverter for starting high-draw appliances.
What are the steps to install an RV power inverter?
The installation process for an RV power inverter may vary depending on your specific setup, but generally, it involves connecting the inverter to the battery bank, installing a transfer switch if needed, and wiring the AC outlets to the inverter. It’s important to follow the manufacturer’s instructions for your specific model.
Can I install an RV power inverter myself, or do I need professional help?
If you have experience with electrical systems and feel confident in your abilities, you can install an RV power inverter yourself. However, if you’re not familiar with electrical work or feel unsure, it’s best to consult a professional to ensure a safe and proper installation.
Can I run my RV air conditioner with an RV power inverter?
Running an RV air conditioner with an inverter can be challenging due to its high power requirements. In most cases, an inverter would need to be very large and the battery bank would need to be substantial to handle the load. It’s generally more practical to use a generator or shore power for running the air conditioner.
How do I maintain and troubleshoot my RV power inverter?
Regular maintenance for an RV power inverter includes checking the connections and wiring for any signs of damage or corrosion, cleaning the fan and vents to prevent overheating, and testing the voltage output periodically. If you encounter any issues, such as a lack of power or strange noises, consult the manufacturer’s troubleshooting guide or seek professional assistance.