Hey there! Are you ready to dive into the fascinating world of introductions? Whether it’s the opening lines of a book, the first few seconds of a conversation, or the way you introduce yourself to a new group of people, introductions play a crucial role in capturing attention and setting the stage for what’s to come. Think of introductions as a grand entrance – they’re the first impression, the hook that grabs hold of your audience and compels them to keep reading or listening. Just like a captivating movie trailer or a mouthwatering appetizer, a well-crafted introduction sets the tone and piques curiosity.
But how exactly can you create an introduction that leaves a lasting impression? How can you captivate your readers and make them want to learn more? That’s where the art of storytelling comes in. By tapping into emotions, painting vivid pictures with words, and creating an element of surprise, you can create an introduction that draws readers in and keeps them engaged. In this blog, we’ll explore the power of introductions and uncover the secrets behind crafting attention-grabbing opening lines.
From the techniques used by master storytellers to the psychology behind captivating introductions, we’ll delve into the world of first impressions and equip you with the tools to create introductions that leave a lasting impact. So, are you ready to take your writing, speaking, and overall communication skills to the next level? Get ready to unlock the secrets of captivating introductions and unleash your creative potential. Let’s dive in!
Table of Contents
What is a Tyger Tonneau Cover?
Installing a Tyger Tonneau Cover may seem like a daunting task at first, but with a little patience and the right tools, it can be a relatively straightforward process. The first step is to gather all the necessary materials, including the tonneau cover itself, the mounting brackets, and any additional hardware that may be required. Once you have everything you need, start by unpacking the tonneau cover and laying it out flat on a clean surface.
Next, position the mounting brackets on the truck bed, ensuring they are evenly spaced and aligned properly. From there, you will need to secure the brackets to the truck bed using the provided hardware. Once the brackets are in place, carefully lift the tonneau cover onto the truck bed, making sure it lines up with the brackets.
Finally, secure the tonneau cover to the brackets using the provided screws or clips, making sure to tighten them securely. With a little bit of time and effort, you will have your Tyger Tonneau Cover installed and ready to go, providing protection and style to your truck bed.
Definition and Purpose
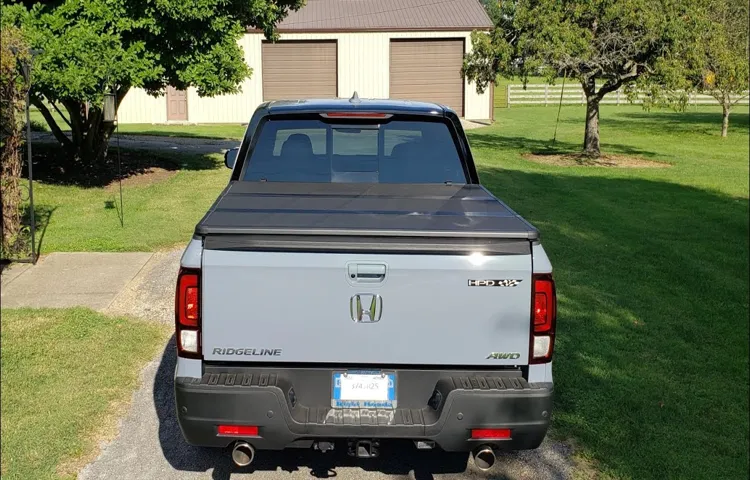
Tyger Tonneau Cover is a popular truck accessory that is designed to provide protection and security for the cargo bed of a pickup truck. Made from high-quality materials such as vinyl or aluminum, these covers are durable and weather-resistant, ensuring that your belongings stay safe and dry even in harsh conditions. But what sets Tyger Tonneau Covers apart from other brands? Well, the answer lies in their superior quality and innovative design.
These covers are not only easy to install but also provide a sleek and streamlined look to your truck, enhancing its overall appearance. Moreover, the Tyger Tonneau Cover can be easily rolled up or folded, allowing for convenient access to the cargo bed when needed. Whether you use your truck for work or play, a Tyger Tonneau Cover is an essential accessory that combines style and functionality in one package.
So, if you’re looking to protect your truck bed and enhance its aesthetics, look no further than a Tyger Tonneau Cover.
Benefits of Using a Tonneau Cover
Tyger Tonneau Cover, Tonneau Cover, Benefits of Using a Tonneau Cover
Preparing for Installation
So you’ve decided to upgrade your truck with a Tyger Tonneau Cover, but you’re not quite sure how to install it. Don’t worry, I’ve got you covered! Installing a Tyger Tonneau Cover is actually quite simple and can be done in just a few easy steps. First, you’ll want to make sure you have all the necessary tools and hardware that came with your cover.
This typically includes clamps, brackets, and screws. Once you have everything you need, start by positioning the cover on your truck bed and ensure it is centered and aligned properly. Then, secure the clamps onto the side rails of the truck bed and tighten them down.
Finally, attach the brackets to the cover and secure them in place with the screws. It’s important to note that the specific installation process may vary depending on the model of your Tyger Tonneau Cover, so be sure to consult the included instructions for any additional steps or details. With a little patience and attention to detail, you’ll have your Tyger Tonneau Cover installed in no time, providing you with added security and protection for your truck bed.
Gathering the Necessary Tools
Preparing for Installation Before starting on your installation project, it’s important to gather all the necessary tools. Having the right tools on hand will make the process much smoother and less frustrating. Some of the tools you may need include a tape measure, a level, a screwdriver, a drill, pliers, and a hammer.
It’s also a good idea to have some safety equipment, such as safety goggles and gloves, to protect yourself while working. Once you have gathered all of your tools, it’s time to prepare the installation area. Make sure the area is clean and free from any debris or obstructions.
This will make it easier to work and create a safer environment. Additionally, take the time to read through the installation instructions thoroughly. Familiarize yourself with the process and any specific steps or requirements.
This will ensure that you are well-prepared and can complete the installation successfully.
Cleaning the Truck Bed
Cleaning the Truck Bed: Preparing for Installation So, you’ve decided to install a new truck bed liner to protect your vehicle and keep it looking great. But before you can begin the installation process, there’s some prep work that needs to be done. One of the first steps is to make sure your truck bed is clean and free of any dirt, debris, or grease.
This is important not only for the adhesive to adhere properly, but also to ensure the liner’s longevity. Plus, who wants to install a liner over a dirty bed? To get started, grab a bucket of soapy water and a soft brush or sponge. Begin by rinsing your truck bed with water to remove any loose dirt or debris.
Then, dip your brush or sponge into the soapy water and start scrubbing the bed, paying special attention to any areas that are particularly dirty or greasy. Use a back and forth motion to agitate the dirt and lift it off the surface. If you come across any stubborn stains or grease spots, you may need to use a stronger cleaning solution.
There are many truck bed cleaners on the market that are specifically designed to tackle tough stains and grease. Simply follow the instructions on the label and apply the cleaner to the affected areas. Let it sit for a few minutes to allow the cleaner to penetrate and break down the stain or grease, then rinse it off with water.
Once you’ve finished cleaning the truck bed, don’t forget to dry it thoroughly before moving on to the next step. Moisture can prevent the adhesive from bonding properly, so take the extra time to make sure everything is completely dry. You can use a clean, dry cloth to wipe down the bed or let it air dry if you have the time.
Cleaning your truck bed might not be the most glamorous part of installing a new liner, but it’s an essential step in ensuring a successful and long-lasting installation. By taking the time to clean the bed properly, you’ll not only improve the bond between the liner and the bed, but also create a clean slate for your new liner. So, roll up your sleeves and get ready to start scrubbing – your truck bed will thank you!
Step-by-Step Installation Guide
Looking to install a Tyger tonneau cover on your truck bed? Don’t worry, it’s easier than you might think! In just a few simple steps, you can have your truck bed protected and looking stylish. Start by laying out all the parts and hardware that came with your tonneau cover. Make sure you have everything you need before beginning the installation process.
Next, position the side rails onto the side of the truck bed. Align them properly and secure them using the provided clamps or bolts. Once the side rails are securely in place, it’s time to install the crossbars.
These crossbars will support the top cover of the tonneau. Slide the crossbars into the side rails and make any necessary adjustments. Finally, attach the top cover onto the crossbars.
It might take some trial and error to ensure a snug fit, but once it’s in place, secure it using the provided clamps or latches. And that’s it! You’ve successfully installed your Tyger tonneau cover. Now you can enjoy the added protection and enhanced look for your truck bed.
Step 1: Unpack and Inspect the Tonneau Cover
Unpacking and inspecting your new tonneau cover is an exciting first step towards transforming your truck’s bed. When your package arrives, take a moment to carefully open it and inspect the contents. Make sure all the necessary parts are included and in good condition.
Check for any signs of damage or defects, such as scratches or dents. It’s important to address any issues early on, so reach out to the manufacturer or retailer if you notice anything amiss. By taking the time to properly inspect your tonneau cover, you can ensure a smooth and successful installation process.
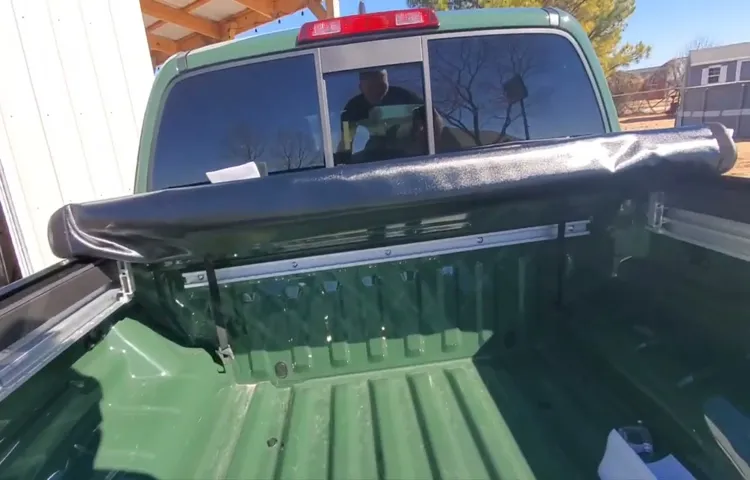
Step 2: Positioning the Cover on the Truck Bed
truck bed cover installation, positioning the cover on the truck bed
Step 3: Attaching the Side Rails
In this step of the installation process, we will be attaching the side rails to your bed frame. This is an essential part of the assembly as it ensures the stability and support of the bed. To start, you will need the side rails that came with your bed frame, as well as any necessary screws or bolts.
Begin by positioning one of the side rails at the side of the bed frame. Make sure that it is flush with the headboard and footboard. Then, using the pre-drilled holes on the side rail, line them up with the corresponding holes on the headboard and footboard.
Once the holes are aligned, take the screws or bolts provided and insert them into the holes. Use a screwdriver or wrench to tighten them securely, ensuring that the side rail is firmly attached to the bed frame. Repeat this process for the other side rail, making sure to align it properly with the headboard and footboard.
Once both side rails are attached, give them a gentle shake to ensure that they are securely in place. If there is any wobbling or movement, tighten the screws or bolts further until the side rails are stable. Attaching the side rails is an important step in the installation process, as it provides the necessary support for your mattress and ensures the bed frame’s overall stability.
By following these step-by-step instructions, you can confidently complete this stage of the assembly and move on to the next step.
Step 4: Installing the Clamps
Installing the clamps is a crucial step in the installation process of any project that requires clamping materials together securely. Clamps are commonly used in woodworking, metalworking, and even in household repairs. Proper installation of the clamps ensures that the materials are held tightly in place, allowing you to work with precision and accuracy.
When installing clamps, there are a few key steps to follow. First, you’ll need to determine the correct size and type of clamp for your specific project. Clamps come in various sizes and styles, including C-clamps, bar clamps, and pipe clamps.
The right clamp will depend on the materials you’re working with and the level of pressure required. Once you have chosen the appropriate clamp, place it near the area where you need to apply pressure. Position it so that the pressure pad is in direct contact with the material you are clamping.
This will ensure that the clamp holds the material securely and prevents any slippage. Next, tighten the clamp using either a manual ratchet or a screw mechanism, depending on the type of clamp you are using. Start by tightening the clamp gently and gradually increase the pressure until the materials are firmly held together.
Be careful not to over-tighten the clamp, as this can cause damage to the materials or distort their shape. Finally, double-check the tightness of the clamp to ensure that it is holding the materials securely. If necessary, make any adjustments to the pressure or positioning of the clamp to achieve the desired result.
By following these simple steps, you can install clamps properly and ensure that your materials are securely held together during your project. Remember to choose the right clamp for the job, position it correctly, and apply the appropriate amount of pressure. Taking the time to install the clamps properly will result in a more successful and accurate project overall.
Step 5: Securing the Tonneau Cover
“Securing the tonneau cover is the final step in installing this essential truck accessory. Once you have successfully attached the cover to the truck bed, it is crucial to ensure it is securely fastened to prevent any movement or potential damage. The process may vary depending on the specific tonneau cover model you have purchased, but there are some general steps you can follow to ensure a secure fit.
First, make sure all the attachment points (such as clamps or Velcro straps) are properly affixed to the truck bed. Tighten them as needed to create a snug and secure connection. Next, check the tension of the cover by gently pulling on it.
It should be taut and not sag or flap in the wind. If necessary, adjust the tension using the provided mechanisms or hardware. Finally, test the sturdiness of the cover by giving it a gentle shake.
It should remain firmly in place without any shifting or wobbling. Taking the time to properly secure your tonneau cover will not only protect your truck bed but also ensure that your belongings stay safe and secure while on the road.”
Tips and Troubleshooting
So, you’ve just purchased a Tyger tonneau cover for your truck and you’re excited to install it. Don’t worry, we’ve got you covered! Installing a Tyger tonneau cover is a relatively simple process that can be done in a few easy steps. First, make sure you have all the necessary tools and hardware that came with your tonneau cover.
Then, locate the mounting brackets and position them on the truck bed rail. Ensure they are evenly spaced and secure them with the provided bolts and nuts. Next, attach the cross bars to the mounting brackets using the adjustable clamps.
Make sure they are centered and secure them tightly. Finally, unroll the tonneau cover and slide it into the rear cross bar. Secure it in place with the provided tension control system.
Voila! Your Tyger tonneau cover is installed and ready to go. Enjoy the added protection and style it brings to your truck.
Common Issues and Solutions
In the world of technology, it’s no surprise that we encounter common issues with our devices and software. But don’t worry, because there are always tips and troubleshooting solutions to help you out. One common issue that many people face is slow internet connection.
If you find yourself constantly waiting for web pages to load or videos to buffer, there are a few things you can try. First, make sure your Wi-Fi router is placed in a central location and not obstructed by walls or other objects. Additionally, you can try restarting your router and modem, as this can sometimes help improve speed.
If all else fails, you may need to contact your internet service provider for further assistance. Another common issue is a frozen computer or application. This can be frustrating, but there are a few things you can do to resolve it.
First, try closing the frozen application by using the task manager (Ctrl + Alt + Delete on Windows or Command + Option + Escape on Mac) and then reopen it. If that doesn’t work, try restarting your computer. If the problem persists, you may need to uninstall and reinstall the application or seek help from a professional.
Remember, technology can be complex, but with a little troubleshooting, you can often find a solution to common issues. Stay patient and persistent, and you’ll be back up and running smoothly in no time.
Maintenance and Care
In order to keep your appliance running smoothly, it’s important to provide regular maintenance and care. One tip for keeping your appliance in top shape is to regularly clean and check for any signs of wear or damage. This can help prevent any small issues from turning into larger problems.
Another troubleshooting tip is to refer to the appliance’s user manual for guidance on common issues and how to fix them. The manual can also provide useful information on how to properly care for your appliance. Additionally, if you are experiencing a problem with your appliance, don’t be afraid to reach out to the manufacturer or a professional technician for assistance.
They can provide expert advice and guidance to help resolve any issues you may be facing. By taking the time to properly care for and maintain your appliance, you can help extend its lifespan and ensure that it continues to work efficiently for years to come. So remember, regular cleaning, checking for damage, and seeking help when needed are all essential steps in keeping your appliance in tip-top shape.
Conclusion
Congratulations, you have successfully transformed your truck into the ultimate crime-fighting machine with the installation of the Tyger Tonneau Cover! Now, not only will your truck turn heads with its sleek and stylish appearance, but it will also keep your belongings safe and secure from the prying eyes of villains and ne’er-do-wells. Installing the Tyger Tonneau Cover is a breeze, thanks to its user-friendly design and the handy step-by-step instructions found in the package. Trust me, even a bumbling sidekick could do it! Just remember to channel your inner superhero and suit up with the necessary tools, because with great power comes great responsibility (and a few bolts and screws).
Once you’ve completed the installation, you’ll feel like a true champion of justice as you zip through the streets, knowing that your cargo is shielded from wind, rain, and even the evil genius who always seems to be plotting against you. You’ll be the envy of your fellow crime fighters, and dare I say, even the caped crusaders themselves. But beware, with great truck accessories comes the temptation to abuse your newfound powers.
Don’t let the influx of requests for favors from grateful citizens go to your head. Yes, the Tyger Tonneau Cover makes your truck look like it’s ready to save the day, but remember, its primary function is to protect your gear, not to become a makeshift Batmobile. So, enjoy the benefits of your Tyger Tonneau Cover, but use it responsibly.
Stay vigilant, keep your truck in tip-top crime-fighting shape, and never forget the importance of a good catchphrase. Now go forth, my brave truck-owning friend, and let the Tyger Tonneau Cover be your secret weapon in the battle against disorganization and chaos.
FAQs
How do I install a Tyger Tonneau Cover on my truck?
To install a Tyger Tonneau Cover on your truck, follow these steps:
1. Start by ensuring that your truck bed is clean and dry.
2. Lay out the tonneau cover on top of the truck bed and position it so that it aligns with the edges of the bed.
3. Attach the front clamps to the truck bed using the provided hardware.
4. Stretch the cover towards the rear of the truck and secure the rear clamps in place.
5. Adjust the tension of the cover by tightening or loosening the clamps as needed.
6. Close the tailgate and check if the cover is properly aligned.
7. Test the functionality of the cover by opening and closing it a few times to ensure smooth operation.
Are there any tools required for installing a Tyger Tonneau Cover?
Yes, you may need a few basic tools to install a Tyger Tonneau Cover, including a socket wrench or adjustable wrench, a screwdriver, and a tape measure. Additionally, some Tyger Tonneau Covers may come with their own specific installation tools, so be sure to check the package contents before starting the installation process.
Can I install a Tyger Tonneau Cover on my own, or do I need professional help?
While it is possible to install a Tyger Tonneau Cover on your own, it is recommended to have basic mechanical skills and some experience with DIY projects. The installation process may vary depending on the make and model of your truck, so it’s important to carefully read and follow the instructions provided by Tyger Tonneau Covers. If you are unsure or uncomfortable with the installation process, it is always advisable to seek professional help to ensure a proper and secure installation.
What are the benefits of installing a Tyger Tonneau Cover on my truck?
Installing a Tyger Tonneau Cover on your truck offers several benefits, including:
– Protection: The cover helps protect your truck bed and cargo from rain, snow, sun, and other elements.
– Security: It adds an extra layer of security by keeping your belongings hidden and protected from theft.
– Aerodynamics: The cover improves the aerodynamics of your truck, resulting in better fuel efficiency.
– Style: A Tyger Tonneau Cover adds a sleek and stylish look to your truck, enhancing its overall appearance.
– Versatility: Some Tyger Tonneau Covers are designed to fold, roll, or retract, allowing you to easily access your truck bed and adjust the cover according to your needs.
Can I still use my truck bed with a Tyger Tonneau Cover installed?
Yes, you can still use your truck bed with a Tyger Tonneau Cover installed. Most Tyger Tonneau Covers are designed to be easily opened, closed, or removed, allowing you to access the truck bed whenever needed. Some covers may have additional features such as folding panels, roll-up designs, or retractable systems, providing even more flexibility in using your truck bed.
Are Tyger Tonneau Covers compatible with bed liners?
Yes, Tyger Tonneau Covers are generally compatible with most bed liners. However, it is recommended to check the specifications and compatibility information provided by Tyger to ensure a proper fit. Some bed liners may require slight modifications or adjustments during the installation process to accommodate the tonneau cover.
How do I maintain and clean my Tyger Tonneau Cover?
To maintain and clean your Tyger Tonneau Cover, follow these tips:
– Clean the cover regularly using mild soap, water, and a soft cloth or sponge.
– Avoid using harsh chemicals, abrasive cleaners, or brushes that can damage the cover’s finish.
– Remove any debris or dirt from the cover before opening or closing it to prevent scratching or damaging the surface.
– Lubricate the moving parts and hinges of the cover with a silicone-based lubricant to ensure smooth operation.
– Check and tighten the clamps or hardware periodically to keep the cover securely in place.
– If you live in an area with extreme weather conditions, consider using a protective cover or treatment specifically designed for tonneau covers to extend their lifespan and maintain their appearance.