Have you just bought an RV and are now ready to hit the road for your first adventure? You may be wondering how to let out your RV awning to create some shade and outdoor living space. Luckily, it’s a simple process that takes just a few minutes. All you need is a helping hand and some basic knowledge about your RV’s awning system.
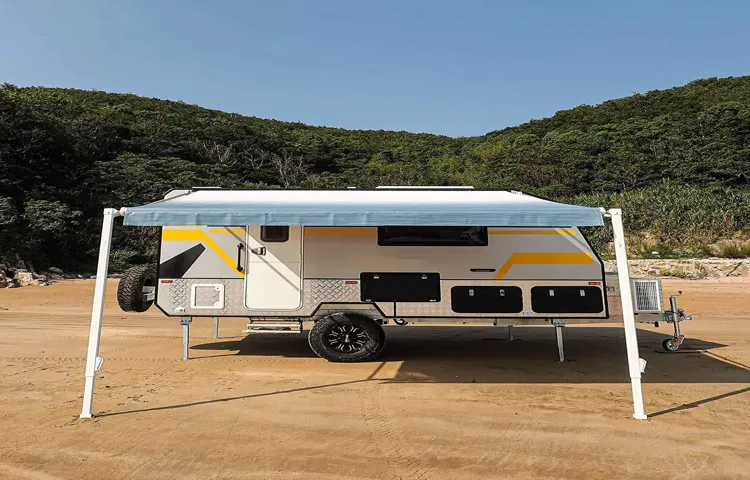
Think of your RV’s awning as a small umbrella that extends from the side of your vehicle. It’s a great way to create some shade on sunny days and add some extra living space to your RV. But before you can use it, you need to know how to let it out and secure it properly.
In this blog post, we will explain step-by-step how to let out your RV awning with ease. From unlocking the awning to extending it to the desired length, we will guide you through the entire process. We will also share some tips and tricks for securing your awning in windy conditions and protecting it from damage.
So, buckle up and get ready to enjoy some outdoor living with your RV awning. Let’s dive into the details!
Table of Contents
Check for Proper Conditions
If you’re wondering how to let out your awning on your RV, there are a few important things to keep in mind. First and foremost, you’ll want to make sure that the conditions are just right for extending your awning. Check the weather forecast and avoid extending your awning during high winds or heavy rain.
Additionally, you’ll want to make sure that the surface beneath your RV is level and stable. Uneven terrain can cause serious problems when extending your awning, so take the time to find a flat and solid surface before getting started. Finally, make sure that you have all of the necessary tools and equipment on hand before starting the process.
This might include a ladder, a ratchet wrench, and any additional hardware or parts required for your specific awning type. By taking the time to properly prepare and assess the conditions, you can safely and effectively extend your RV awning with ease.
Check the weather and wind conditions before proceeding.
Before taking on any outdoor activities, it’s essential to check the weather and wind conditions to ensure that you’ll be safe and have an enjoyable experience. Checking the weather forecast can give you an idea of what the weather will be like during your activity and if there is any chance of rain, snow, or storms. If you’re planning to spend your time on the water or going high up in the mountains, it’s important to check the wind conditions.
Strong winds can make water activities dangerous and cause difficulty in reaching high elevations. If the wind conditions are not favorable, it’s best to postpone your adventure until a later time when the conditions have improved. Remember, safety should always come first, and being aware of the weather and wind conditions is crucial in ensuring a fun and safe outdoor experience.
Ensure that the RV is parked on a flat surface.
When it comes to RV camping, it’s important to ensure that your vehicle is properly parked on a flat surface. This may seem like a small detail, but it can make a big difference in your RV experience. Not only will parking on a flat surface keep you from rolling out of bed in the middle of the night, but it’ll also help ensure that your RV’s systems are running smoothly.
If your RV isn’t properly leveled, it can cause problems with your refrigerator, air conditioner, and other appliances. Plus, it’ll be uncomfortable to walk around or sit inside your RV if it’s not level. So take the time to check that your RV is parked on a flat surface before you start your camping adventure.
Your comfort and safety depend on it!
Make sure the awning is securely latched in place.
When setting up your awning for your next outdoor adventure, it’s essential to check that everything is properly secured. The last thing you want is for your awning to fly off or collapse while you’re trying to enjoy the great outdoors. One critical step to ensuring your awning is in good condition is to check that it’s securely latched in place.
Take a few moments to inspect the latches and make sure they’re in good working order. If they’re rusty or damaged, replace them before hitting the road. It’s always better to err on the side of caution, especially when it comes to your safety.
By taking the time to check for proper conditions, you can have peace of mind knowing that your awning is secure and ready for whatever adventure comes your way. So before you set off on your next camping trip, make sure to double-check those latches!
Extend Your Awning
So, you’re ready to relax and unwind in the great outdoors under the shade of your awning on your RV. But how do you let it out? First things first, make sure any obstructions like tree branches or power lines are out of the way. Locate the crank handle near the base of the awning and give it a few turns.
You should notice the awning fabric starting to unroll. Keep turning the crank until it is fully extended, making sure the arms are locked in place. If your RV is equipped with an electric awning, look for the switch inside your RV.
Once you have found it, press and hold until the awning is fully extended. It’s important to remember to never leave your awning extended during high winds or extreme weather conditions, as they can cause damage to both your RV and your awning. Now, sit back and enjoy the shade.
Locate the awning release levers on both sides of the awning.
To extend your awning, it’s essential to locate the awning release levers on both sides of the awning. These levers are what you need to release the locking mechanism of the awning and let it unfurl. Don’t worry if you haven’t used your awning levers in a while; they are usually easy to find.
The release levers are typically located on the awning’s arms or near its base, so give your awning a quick scan until you spot them. Once you’ve found them, ensure that they are both in the unlocked position before proceeding. Unlocking your awning release levers is usually straightforward.
You might need to flip a latch or push a button near the lever to disengage the locking mechanism. Depending on the type of awning you have, you might need to use a bit of force to release the levers at first. But, once unlocked, you should be able to extend your awning by manually pulling it outwards until it reaches its maximum length.
If you have a motorized awning, try using the remote control to extend it. Always follow the manufacturer’s instructions before extending your awning. Doing so will ensure that you don’t accidentally damage the awning or the surrounding area.
It’s also a good idea to have someone assist you in extending your awning. Trying to extend it alone can be dangerous, especially if it’s a larger model. In conclusion, extending your awning is a straightforward process as long as you know where to find the release levers.
If you’re unsure about how to extend your awning, seek help from a professional. By following these steps, you should be able to enjoy your outdoor space comfortably and in the shade in no time.
Pull the levers down and release the awning from its latches.
If you’re ready to extend your awning and create some extra shade in your outdoor space, the first step is to pull the levers down and release the awning from its latches. This will free the awning and allow you to extend it outward, providing coverage and shade. As you extend the awning, make sure to keep an eye on it to ensure that it isn’t getting stuck or caught on anything.
Once the awning is fully extended, you can adjust the pitch to provide additional shade and coverage depending on the angle of the sun. Remember to secure the awning in place once you’ve found the perfect position – this will help to prevent it from moving or flapping in the wind. Overall, extending your awning is a great way to create a comfortable and inviting outdoor space that you can enjoy all season long.
Gently pull the awning out until it is at desired length.
Once you have secured your awning in place, it’s time to extend it to your desired length. Start by gripping the pull strap firmly and giving it a gentle tug, slowly drawing the awning outwards. Continue pulling until it reaches the length that you desire.
Remember to take your time and not to exert too much force, as you don’t want to damage your awning or the mechanism used to extend it. Once the awning is at the desired length, lock it in place by engaging the locking mechanism. This will ensure that your awning stays in place and won’t suddenly retract while you’re trying to enjoy some shade.
By taking the time to properly extend and lock your awning, you’re not only protecting it from damage but also making sure that you can have many happy afternoons relaxing in the shade. So go ahead and give it a try – you’ll be surprised at how easy it is!
Secure Your Awning
Are you wondering how to let out your awning on your RV? It’s important to know the steps to ensure that your awning is secure and won’t come loose while you’re enjoying the outdoors. First, locate the awning on your RV – it’s usually on the side or above the entrance. Once you’ve located it, unlock the awning from its brace by releasing the lock handles or buttons.
Gently pull the awning outwards until it is fully extended and securely set in place on the ground. Use the awning’s adjustable legs to adjust the height and ensure it is level. Secure the awning using stakes or heavy-duty weights to prevent it from moving in wind or rain.
Remember to retract your awning in extreme weather or when leaving your campsite to avoid damaging it. By following these simple steps, you can enjoy safe and secure outdoor living with your RV awning.
Slide the awning arms down until they lock into place.
As you gear up for your next adventure, it’s important to make sure that your awning is properly secured. One crucial step in this process is sliding the awning arms down until they lock into place. This ensures that your awning won’t suddenly collapse or blow away during strong winds.
If you’re not sure how to do this, don’t worry – it’s actually quite simple. Start by extending the awning fully and then locate the locking mechanism on the arms. Gently pull the arms down until you hear a click, indicating that they are now locked into place.
Once you’ve done this, your awning should be safely secured and ready for use. Remember, taking the time to properly secure your awning is essential for ensuring a safe and enjoyable camping experience. So don’t forget this important step before hitting the road!
Adjust the tension of the awning as necessary.
If you’ve got an awning that isn’t properly secured, then you’re running the risk of your awning becoming damaged or even hurting someone. It’s imperative that you keep your awning secure by adjusting the tension of the awning as necessary. If your awning isn’t tight enough, then it could easily flap around in the wind, potentially causing damage to your awning or nearby objects.
On the other hand, if your awning is too tight, then it can put undue pressure on the fittings and even warp the fabric over time. Adjusting the tension of your awning should be done regularly, taking into account weather conditions and any changes to the positioning of the awning. Doing so will ensure that your awning remains secure and in good condition for years to come.
Retracting Your Awning
Having an awning on your RV can be a lifesaver during hot summer days, providing much-needed shade and protection from the sun. However, retracting your awning might seem like a daunting task, particularly if you’re a newbie. But don’t worry, it’s actually quite easy.
First, make sure that your awning is completely dry before retracting it. Then, remove any accessories or cords that you might have attached to the awning. Once that’s done, make sure that the locking arms are disengaged, and use the awning rod to turn the retracting mechanism in the opposite direction to the way it extends.
Finally, gently guide the awning back into its housing and secure it in place. Remember to take things slow and steady to avoid any accidents or damage to your awning. With a bit of practice, retracting your awning will soon become second nature, and you’ll be able to hit the road with confidence and ease!
Reverse the steps to bring in the awning.
Retracting your awning after a relaxing afternoon outside can be just as important as putting it out. You want to make sure that the awning is secured and safe from any possible damage. Here’s how to do it: First, start by slowing down the motor or retracting the arms manually if there is no motor.
Make sure you watch the awning as it comes in to avoid any possible obstructions in the way. Next, retract the fabric into the roll, being careful to keep it tight and smooth to prevent any wrinkles. Once the fabric is completely rolled up, tighten the awning cover so it doesn’t flap around while you’re driving down the road.
Finally, return the arms to their locked position for transport and make sure they are secured in place. By following these steps, you can safely and efficiently retract your awning, preparing it for your next outdoor adventure.
Make sure the awning is fully retracted and secure before traveling.
Retracting an awning before traveling is a crucial step for RV owners. Awnings are an excellent addition to your RV as they provide shade and extend your living space, but leaving them out while traveling poses a danger to yourself and others on the road. To retract your awning, start by removing any accessories or items attached to it.
Secure any loose items inside or outside the RV to prevent them from flying off while retracting. Then, approach the awning from the center and grab both arms simultaneously. Slowly and steadily retract the awning until it is completely closed.
Once closed, secure it using the latches provided. Double-check that the awning is tightly secured before hitting the road. Not retracting your awning before traveling can result in damage to your RV, the awning, and other vehicles on the road.
So, avoid the hassle and take a few minutes to properly retract and secure your awning. Safe travels!
Conclusion
Congratulations! You are now officially an awning expert. Your journey to mastering the art of letting out your RV’s awning may have begun with uncertainty and confusion, but now you can confidently unfurl that canopy and bask in the shade like a pro. Keep in mind the important safety tips and precautions, and always remember to check the weather forecast before deploying your awning.
With these simple steps and a bit of practice, you’ll soon be the envy of every campsite around.”
FAQs
What is the process of letting out an awning on an RV?
First, locate the awning controls on your RV. Then, hold the switch in the ‘out’ position until your awning is fully extended. Adjust the pitch of the awning if needed for rain runoff.
Can I manually extend my RV awning if the controls are not working?
Yes, you can manually extend your awning by locating the crank handle and using it to roll out the awning.
How do I reset my RV awning if it gets jammed while rolling out or in?
Locate the reset button on the awning motor and hold it down for a few seconds until the awning begins to move.
What should I do if my RV awning fabric is torn or damaged?
It is best to replace the entire fabric of the awning. You can purchase a new awning fabric online or from an RV store, and then follow the installation instructions carefully.
How do I clean my RV awning?
Mix a solution of warm water and mild soap, then use a soft-bristled brush to gently scrub the awning. Rinse thoroughly with a hose and allow to air dry before retracting.
Can I leave my awning out in the rain?
It is not recommended to leave your RV awning out in heavy rain, as pooling water can cause damage. Adjust the pitch of the awning to allow rain runoff, and always retract in high winds or storms.
How do I maintain the motor on my RV awning?
Keep the area around the motor clean and free of debris, and lubricate moving parts as recommended by the manufacturer. Check the motor and wiring periodically for signs of wear or damage.