Have you ever found yourself in a situation where you needed a portable power source, but didn’t want to rely on batteries or generators? Well, look no further because I’m here to show you how to make your own 400-watt inverter power. An inverter power is a device that converts DC power from a battery into AC power that can be used to power various electronic devices. With just a few simple steps and some basic materials, you’ll be able to create your very own power source that can come in handy in emergency situations, camping trips, or even outdoor parties.
So, let’s dive in and unleash your inner inventor!
Table of Contents
Introduction
So, you’re interested in learning how to make a 400 watt inverter power? Well, you’ve come to the right place! Making your own inverter power can be a fun and rewarding project, not to mention it can save you some money too. First things first, let’s discuss what an inverter power is. Basically, an inverter power is a device that converts DC (direct current) electricity into AC (alternating current) electricity.
This is particularly useful when you want to power your electronic devices, such as laptops or smartphones, using a battery or any other DC power source. Now, onto making your 400 watt inverter power. The first step is to gather all the necessary materials and tools, including a DC to AC inverter, a battery, and some electrical wires.
Once you have everything ready, you can start by connecting the battery to the inverter. Make sure to follow the instructions provided with the inverter to ensure the correct connections. Once everything is connected, you can test your inverter power by plugging in a small electronic device and turning it on.
If it works, congratulations! You’ve successfully made your own 400 watt inverter power. However, if it doesn’t work, don’t worry. Troubleshooting is part of the process, and with a little bit of patience and persistence, you’ll be able to figure out what went wrong and fix it.
So go ahead and give it a try, and soon enough, you’ll be enjoying the fruits of your DIY labor!
Understanding Power Requirements
power requirements
Selecting the Right Components
When it comes to building a computer, selecting the right components is crucial. Each component plays a unique role in the overall performance and functionality of the computer. From the processor to the graphics card to the storage drives, every decision you make will impact your computer’s speed, capabilities, and even its ability to handle specific tasks such as gaming or video editing.
So how do you go about selecting the right components? Well, it starts with understanding your needs and budget. Are you a casual user who mainly browses the internet and uses office applications? Or are you a hardcore gamer or video editor who needs a high-performance machine? Once you have determined your needs, you can begin researching and comparing different components to find the best fit for your budget and requirements.
Building the Inverter Circuit
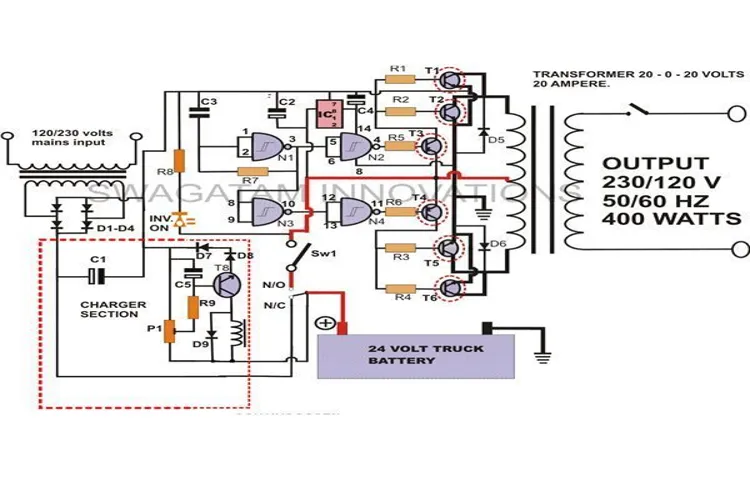
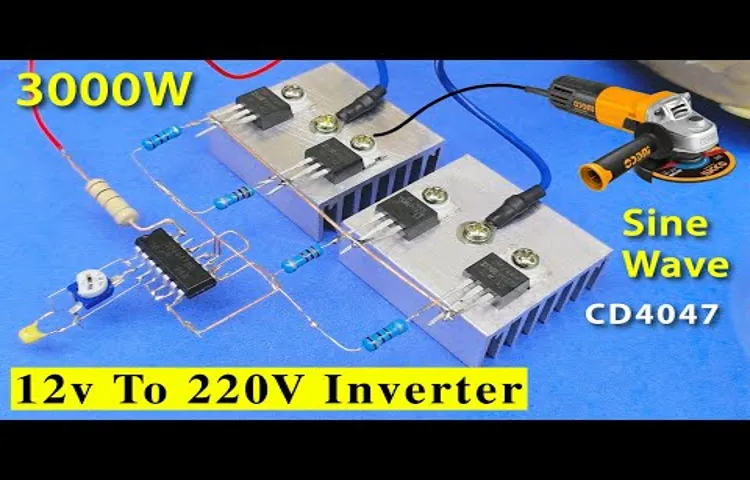
If you’re looking to build a 400 watt inverter power circuit, you’ve come to the right place! An inverter circuit is a crucial component in many power systems, as it is responsible for converting DC power into AC power. To create a 400 watt inverter power circuit, you will need a few key components, including a power transistor, a transformer, resistors, capacitors, and diodes. The power transistor serves as the main switch for the circuit, allowing the flow of current to alternate between the positive and negative ends.
The transformer is used to step up the voltage to the desired AC level, while the resistors and capacitors help regulate the flow of current and stabilize the circuit. It’s important to follow a detailed circuit diagram and carefully connect all the components to ensure proper functioning of the inverter power circuit. With a bit of patience and some basic knowledge of electronics, you’ll be able to create your very own 400 watt inverter power circuit.
So what are you waiting for? Get started on your DIY project today and enjoy the convenience of having your own inverter power supply!
Gathering the Necessary Materials
In order to build an inverter circuit, you will need to gather several necessary materials. One of the most important components is the inverter chip, which is the heart of the circuit. Additionally, you will need capacitors and resistors to regulate the flow of electricity.
To connect everything together, you will also need a breadboard or a printed circuit board (PCB). Lastly, you will need some basic tools such as a soldering iron and wire cutters to assemble the circuit. By having all these materials ready, you will be well-prepared to start building your own inverter circuit.
Wiring the Circuit
inverter circuit. In order to build the inverter circuit, there are a few key steps involved. First, it’s important to gather all the necessary components.
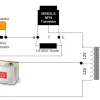
These include a DC power source, a transformer, a capacitor, and an oscillator circuit. Once you have all the components ready, you can start wiring the circuit. First, connect the positive terminal of the DC power source to one terminal of the transformer primary coil.
The other terminal of the primary coil should be connected to one terminal of the oscillator circuit. Next, connect the remaining terminal of the oscillator circuit to the negative terminal of the power source. Now, it’s time to connect the secondary coil of the transformer.
One terminal of the secondary coil should be connected to one terminal of the capacitor, while the other terminal of the capacitor should be connected to the negative terminal of the power source. Finally, connect the remaining terminal of the secondary coil to the positive terminal of the power source. Once the circuit is wired, you can turn on the power source and the oscillator circuit should start generating an alternating current (AC) signal.
This AC signal is then transformed by the transformer into a higher or lower voltage, depending on the turns ratio of the transformer. The capacitor acts as a filter to smooth out any fluctuations in the current, resulting in a stable AC output. Building an inverter circuit may seem daunting at first, but by following these steps and ensuring all the connections are secure, you’ll be able to create a functional inverter circuit.
Whether you’re looking to power electronic devices during a power outage or experiment with electronics, having an inverter circuit can be a useful tool. So gather your components, get your hands dirty, and start building your own inverter circuit today!
Testing and Troubleshooting
building the inverter circuit
Powering Your Devices
If you’re looking to power your devices off the grid or during a power outage, a 400-watt inverter can be a great solution. This handy device converts DC power from a battery into AC power that can be used to charge and run your electronic devices. But how do you make a 400-watt inverter power your devices? Here’s what you need to know.
First, you’ll need a 400-watt inverter that is compatible with the voltage of your devices. Most electronic devices operate on either 120V or 220V, so make sure your inverter can provide the correct voltage. Once you have your inverter, connect it to a suitable power source, such as a deep-cycle battery or a solar panel.
Next, you’ll need to connect your devices to the inverter. This can be done using the appropriate cables and connectors. Make sure to check the power requirements of your devices to ensure they won’t exceed the capacity of your inverter.
It’s also a good idea to use surge protectors to prevent any damage to your devices. Once everything is connected, you can power on your inverter and start using your devices. Keep in mind that the power output of your inverter may vary depending on the load and the state of the battery.
It’s a good idea to monitor your battery level and recharge it when needed to ensure a continuous power supply. In conclusion, making a 400-watt inverter power your devices is a straightforward process. Just make sure you have a compatible inverter, connect it to a suitable power source, and connect your devices properly.
With a little planning and preparation, you can enjoy the convenience of powering your devices wherever you go.
Connecting Your Devices to the Inverter
powering devices with solar energy
Testing the Inverter’s Power Output
is “inverter’s power output”
Conclusion
In conclusion, harnessing the power of a 400-watt inverter is like unlocking the hidden superpowers of electricity. It’s like turning a meek little Clark Kent into a full-fledged Superman. With a clever concoction of the right components and a touch of ingenuity, you can transform your direct current (DC) energy into the alternating current (AC) power that runs the world.
Think of it as a marvelous dance between electrons, where the inverter steps in as the maestro, conducting and converting the flow to create a symphony of electric energy. But this is no ordinary symphony – it’s a powerful, electrifying performance that can light up your home or charge your devices. Like a master chef in the kitchen, you’ll need the perfect recipe of ingredients to bring this inverter power to life.
Start with your trusty battery, the fuel that will power it all. Then add a dash of cables and connectors, carefully intertwining them to create a robust and efficient system. Next, pour in some fuses and switches to add a pinch of safety and control to the mix.
Safety first, after all! Sprinkle in some circuit breakers to protect your precious devices from any unexpected surges or overflows. But it’s not just about the hardware – your secret ingredient is knowledge. Understanding the ins and outs of electronics, voltage, and wattage will give you the power to optimize your inverter and truly make the most of those 400 watts.
And voila! Just like that, you have the power to run your favorite gadgets, power tools, or even your own DIY science experiments. You’re the alchemist of electricity, turning ordinary DC into extraordinary AC power. So, get ready to embark on a journey that combines technical prowess with a spark of creativity.
With your newfound power of a 400-watt inverter, you can shine a light on the darkest corners, bring life to your adventures, and keep your devices charged wherever you go. The possibilities are electrifying!
FAQs
What is a 400 watt inverter?
A 400 watt inverter is a device that converts DC (direct current) power from a battery into AC (alternating current) power that can be used to power various electrical devices.
How do I calculate the power consumption of my electrical devices?
To calculate the power consumption of your electrical devices, you can use the formula: Power (in watts) = Voltage (in volts) x Current (in amps). Make sure to check the specifications of each device for its voltage and current requirements.
Can a 400 watt inverter power a refrigerator?
It depends on the power rating and energy consumption of the refrigerator. A 400 watt inverter may be able to power a small refrigerator with low power consumption, but it may not be sufficient for larger models or those with higher energy requirements. It is recommended to check the power requirements of your specific refrigerator model before using a 400 watt inverter.
How long can a 400 watt inverter power a laptop?
The duration for which a 400 watt inverter can power a laptop depends on the battery capacity of the inverter and the power consumption of the laptop. To estimate the runtime, you can divide the battery capacity of the inverter (in watt-hours) by the power consumption of the laptop (in watts). However, keep in mind that this is a rough estimation and actual runtime may vary.
Are there any safety precautions I should take when using a 400 watt inverter?
Yes, it is important to follow safety precautions when using a 400 watt inverter or any other electrical device. Some important precautions include:
– Properly grounding the inverter to prevent electric shocks.
– Using the correct size and type of cables for connecting the inverter to the battery.
– Avoiding overloading the inverter by not exceeding its power capacity.
– Keeping the inverter and its components away from moisture, heat, and other potential hazards.
Can a 400 watt inverter power household appliances?
It depends on the power requirements of the household appliances. A 400 watt inverter may be able to power small household appliances such as fans, lights, or small electronics. However, larger appliances like refrigerators, air conditioners, or washing machines typically require higher power capacity and may not be suitable for a 400 watt inverter. Always check the power requirements of the specific appliances before using the inverter.
How can I extend the battery life of a 400 watt inverter?
To extend the battery life of a 400 watt inverter, you can:
– Use energy-efficient electrical devices.
– Avoid running the inverter at its maximum power capacity for extended periods.
– Disconnect devices when not in use to minimize standby power consumption.
– Keep the battery properly charged and maintained.
– Avoid overheating the inverter by keeping it in a well-ventilated area.