Hey there! So you’ve decided to dive into the world of blogging? Fantastic! Blogging is not only a great way to express yourself and share your passions, but it’s also an incredibly powerful tool for connecting with others and building an online presence. Whether you’re a seasoned writer or just starting out, this introduction is here to guide you through the exciting journey ahead. So grab a cup of coffee, get comfy, and let’s get ready to embark on this blogging adventure together!
Table of Contents
Understanding the Need for a 6V to 12V Converter
Are you looking to convert a 6-volt direct current (DC) to a 12-volt DC? If so, you may be wondering why a converter is necessary in the first place. Well, the need for a 6V to 12V converter arises when you have a device or equipment that requires a higher voltage than what your power source can provide. This is a common issue, especially when it comes to automotive applications.
For example, if you have a 6-volt battery but need to power a 12-volt accessory, you’ll need a converter to step up the voltage. By converting the voltage, you can ensure that your device or equipment receives the correct amount of power it needs to function properly.
Explaining the Purpose of a Converter
6V to 12V Converter, purpose of a converter

Highlighting the Benefits of Using a Converter
6V to 12V Converter, benefits, understanding need, converter
Gathering the Required Components
So, you want to make a 6 volt DC to 12 volt DC converter? Well, the first step is gathering all the necessary components. You’ll need a few things to get started. First, you’ll need a step-up transformer or a boost converter.
This will be responsible for increasing the voltage from 6 volts to 12 volts. Next, you’ll need capacitors to smooth out any fluctuations in voltage. These will help ensure a stable output for your converter.
You’ll also need diodes to prevent any reverse current flow and protect your circuit. Lastly, don’t forget about resistors and transistors to control the current and voltage levels. These components are essential for regulating the output of your converter.
Once you have all these components, you’ll be ready to start building your 6 volt DC to 12 volt DC converter.
List of Components
building a PC, components In order to build your own PC, you’ll need to gather all the necessary components. These components are essentially the building blocks that will come together to create a functioning computer. The main components you’ll need to consider are the processor, motherboard, memory, storage, graphics card, power supply, and a case to house everything.
The processor, often referred to as the CPU, is the brain of the computer and handles all the calculations and instructions. The motherboard acts as a central hub, connecting all the other components together. Memory, or RAM, is where the computer stores data for quick access.
Storage refers to the hard drive or solid-state drive where all your files and programs will be stored. The graphics card is responsible for rendering images and videos. The power supply provides the necessary electrical power to all the components.
And finally, the case is what holds everything together and provides protection. Gathering these components is the first step in building your own PC, and it’s important to make sure they are all compatible with each other.
Explaining the Function of Each Component
One of the first steps in building your own computer is gathering all the necessary components. Each component plays a crucial role in the overall function of the computer. The main components you’ll need are a motherboard, processor, memory (RAM), storage (hard drive or solid-state drive), power supply, and a computer case to house everything.
The motherboard is the main circuit board that connects all the other components together. It allows for communication between the different parts of the computer and provides power to them. Think of it as the central nervous system of the computer, coordinating all the activities.
The processor, also known as the CPU (central processing unit), is like the brain of the computer. It carries out most of the computer’s calculations and processes the instructions given by the software. The speed and power of the processor can greatly affect the overall performance of the computer.
Memory, or RAM (random access memory), provides temporary storage for data that the computer needs to access quickly. It allows for faster multitasking and smoother operation of the computer. The more RAM you have, the more programs and tasks you can have open simultaneously.
Storage is where all your files and data are stored long-term. You can choose between a traditional hard drive (HDD) or a solid-state drive (SSD). HDDs offer more storage capacity at a lower cost, while SSDs provide faster access times and improved performance.
Many people opt for a combination of both, with an HDD for storing large files and media and an SSD for the operating system and frequently-used programs. The power supply provides electrical power to all the components of the computer. It’s important to choose a power supply with enough wattage to support all your components and any future upgrades.
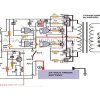
Step-by-Step Procedure to Build a 6V to 12V Converter
So you have a project that requires converting 6 volts DC to 12 volts DC, but you’re not sure how to do it? Don’t worry, I’ve got you covered! In this step-by-step guide, I’m going to walk you through the process of building a 6V to 12V converter. First things first, let’s gather the materials you’ll need for this project. You’ll need a switch mode power supply module, a step-up converter module, a soldering iron, soldering wire, wire cutters, and wires.
Once you have all your materials ready, it’s time to start building. Start by connecting the input terminals of the switch mode power supply module to your 6V DC power source. Then, connect the output terminals of the switch mode power supply module to the input terminals of the step-up converter module.
Make sure to follow the correct polarity. Next, connect the output terminals of the step-up converter module to your load, which is the device or circuit that requires 12 volts DC power. Now, it’s time to test your converter.
Turn on your 6V DC power source, and if everything is connected properly, you should see a 12V DC output at the output terminals of the step-up converter module. Congratulations, you’ve successfully built a 6V to 12V converter! Now you can use this converter for your project and power your devices that require 12 volts DC.
Step 1: Identifying the Input and Output Voltage
6V to 12V converter, input voltage, output voltage, step-by-step, procedure, build, identify. In this blog section, I will guide you through the step-by-step procedure to build your own 6V to 12V converter. The first step in this process is to identify the input and output voltage.
This is crucial because it determines the range of voltages the converter should be able to handle. In this case, the input voltage is 6V and the desired output voltage is 12V. By knowing the input voltage, you can choose the appropriate components and design the circuit that will allow you to achieve the desired output.
It’s important to consider the specifications and limitations of the components you use, as different components have different voltage ratings. Once you have identified the input and output voltage, you can move on to the next steps in building the converter. Stay tuned for the next blog section where we will discuss the next steps in detail.
Step 2: Selecting the Converter IC
converter IC, step-by-step procedure, 6V to 12V converter Now that we have selected the input voltage and defined the requirements for our 6V to 12V converter, the next step is to choose the appropriate converter IC. The converter IC is the heart of our circuit, responsible for converting the incoming voltage to the desired output voltage. When selecting a converter IC, there are a few factors to consider.
Firstly, we need to ensure that the IC can handle the input voltage range of 6V to 12V. This means that the maximum input voltage rating of the IC should be greater than or equal to 12V. Secondly, we need to consider the output voltage requirement of 12V.
The converter IC should be capable of providing a stable output voltage of 12V, even under varying load conditions. Another important factor to consider is the efficiency of the converter IC. Higher efficiency means less power dissipation and longer battery life in our circuit.
Therefore, it is recommended to choose a converter IC with high efficiency. Additionally, it is important to consider the package type of the converter IC. Depending on our specific application and design constraints, we might prefer a surface mount (SMD) package or a through-hole package.
Furthermore, it is always a good practice to check the datasheet of the converter IC for additional specifications such as maximum current output, operating temperature range, and any protection features like overvoltage or overcurrent protection. By considering all these factors and choosing the right converter IC, we can ensure that our 6V to 12V converter will perform reliably and efficiently. In the next step, we will discuss the design and layout considerations for our circuit.
So stay tuned!
Step 3: Calculating the Required Current and Power Ratings
6V to 12V Converter, Required Current, Power Ratings
Step 4: Designing the Voltage Regulator Circuit
voltage regulator circuit, 6V to 12V converter, step-by-step procedure, designing, components, calculations. So, you’ve decided that you need a voltage regulator circuit to convert your 6V power source to a 12V output. This can be a useful tool in various electronic projects where you need a higher voltage than what your power source can provide.
But how do you go about designing this circuit? Well, let’s break it down into a step-by-step procedure to make it easier for you. The first step in designing a voltage regulator circuit is to gather all the necessary components. You will need a transformer, a diode bridge rectifier, filter capacitors, a voltage regulator IC, resistors, and capacitors.
Make sure to choose components that can handle the desired output voltage and current. Once you have all the components, the next step is to calculate the values of the resistors and capacitors in your circuit. This can be done using the formulas provided in the datasheet of the voltage regulator IC.
These formulas will help you determine the right values to obtain the desired output voltage and current. After calculating the values, it’s time to start building your voltage regulator circuit. Begin by connecting the diode bridge rectifier to the transformer, which will convert the AC input voltage into a DC voltage.
Make sure to follow the proper polarity and connections as stated in the datasheet. Next, connect the filter capacitors to smooth out the DC voltage and remove any ripples or fluctuations. These capacitors will help provide a stable and clean output voltage.
Now it’s time to connect the voltage regulator IC to the circuit. This IC will regulate the output voltage and ensure it stays at the desired level. Make sure to connect the input and output pins of the IC correctly according to the datasheet.
Step 5: Assembling the Circuit on a Breadboard
Step 5: Assembling the Circuit on a Breadboard Now that we have all our components ready, it’s time to assemble the circuit on a breadboard. A breadboard is a great tool for prototyping circuits as it allows you to easily connect and disconnect components without the need for soldering. Here’s a step-by-step procedure to help you build a 6V to 12V converter:
Start by placing the IC regulator (LM7812) on the breadboard. Make sure the notch on the IC aligns with the notch on the breadboard for correct orientation.
Connect the GND pin (usually pin 2) of the regulator to the common ground rail by inserting a jumper wire. Next, connect pin 1 (VIN) of the regulator to the positive terminal of the 6V power supply using another jumper wire.
Connect pin 3 (VOUT) of the regulator to the positive rail on the breadboard. This will be the output voltage of the converter.
Now, connect the negative terminal of the 6V power supply to the common ground rail on the breadboard using a jumper wire.
Finally, connect a capacitor between the input and output pins of the regulator to stabilize the voltage. Connect the positive terminal of the capacitor to the output pin (pin 3) of the regulator, and the negative terminal of the capacitor to the ground rail. And there you have it! Your 6V to 12V converter circuit is now fully assembled on the breadboard.
Step 6: Testing the Converter
Once you have assembled all the components and wired them together, it’s time to test the 6V to 12V converter. Before connecting it to your electronic device, though, it’s important to first check if the converter is working properly. To do this, you will need a multimeter.
Start by setting the multimeter to the DC voltage measurement mode and connecting the red probe to the output terminal of the converter and the black probe to the ground terminal. With the converter turned on, you should see a reading of around 12 volts on the multimeter. If you get a significantly lower or higher reading, there might be an issue with the components or the wiring.
Double-check all the connections and make sure everything is properly soldered. If you’re confident that everything is correct and you’re still not getting the expected voltage output, you may need to troubleshoot further or seek assistance from someone knowledgeable in electronics.
Troubleshooting and Safety Tips
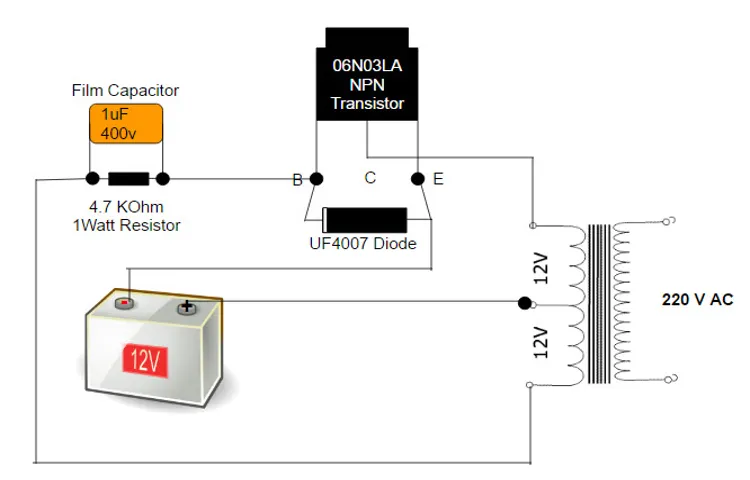
If you’re looking to make a 6 volt DC to 12 volt DC converter, there are a few things to keep in mind to ensure that the process goes smoothly and safely. First, you’ll need to gather the necessary materials, which include a step-up transformer, capacitors, diodes, and a voltage regulator. Once you have all of the components, you can begin the assembly process.
Start by connecting the diodes and capacitors to create a bridge rectifier, which will convert the AC current to DC. Then, connect the transformer to the rectifier and the output terminals of the transformer to the input of the voltage regulator. Finally, connect the output of the voltage regulator to the designated output terminals.
However, it’s important to note that working with electricity can be dangerous, so be sure to take proper safety precautions. Always wear insulated gloves and goggles, and work in a well-ventilated area. Additionally, double-check all of your connections before testing the converter to avoid any shorts or other potential hazards.
With the right materials and careful attention to safety, you can successfully create a 6 volt DC to 12 volt DC converter.
Common Issues and Solutions
In any home, there are bound to be some common issues that arise with electrical systems. From flickering lights to power surges, these problems can be frustrating and even dangerous if not handled properly. Fortunately, there are some troubleshooting and safety tips that can help homeowners solve these issues and ensure the safety of their electrical systems.
One of the most common issues is a circuit breaker tripping. This can be caused by too many devices connected to a single circuit or a faulty appliance. By unplugging unnecessary devices and resetting the breaker, homeowners can often resolve this issue.
Another common problem is flickering lights, which can be caused by loose or faulty light bulbs or wiring issues. Replacing the bulbs or securing the wiring can usually solve this problem. It’s also important to take safety precautions when working with electricity, such as turning off the power and using insulated tools.
Overall, by following these troubleshooting and safety tips, homeowners can address common electrical issues and keep their homes safe.
Safety Precautions
In every home, safety should always be a top priority, especially when it comes to electrical appliances and devices. Troubleshooting any electrical issues and taking proper safety precautions is essential to protect yourself and your loved ones. One important safety tip is to always ensure that your electrical appliances and cords are in good condition and not damaged.
Check for frayed wires or exposed cables and replace them immediately if necessary. It’s also important to never overload outlets or power strips, as this can lead to overheating and potential electrical fires. Additionally, it’s crucial to unplug appliances when not in use and when you’re not at home to minimize any potential risks.
And don’t forget to regularly test and replace your smoke detectors to ensure they are functioning properly. By being proactive and following these safety precautions, you can enjoy your electrical devices and appliances with peace of mind.
Conclusion
And there you have it, folks! With just a few simple steps, some basic electronic components, and a little bit of magic, you can transform a humble 6 volt DC into a magnificent 12 volt DC converter! It’s like turning lead into gold, but for electronics enthusiasts. Now, I know what you’re thinking. Why go through all this trouble just to double the voltage? Well, let me tell you, my friends.
Sometimes in life, we need a little extra power. Maybe you want to give your old car a jumpstart, or perhaps you just crave the thrill of pushing your electronic devices to their limits. Whatever your reasons may be, this 6 volt to 12 volt DC converter is here to fulfill your power desires.
But please, proceed with caution. This is not a task for the faint-hearted or the inexperienced. It requires a keen eye for detail, a steady hand, and a penchant for tinkering.
And remember, with great voltage comes great responsibility. Double-check your connections, keep an extinguisher handy, and for goodness sake, don’t forget to wear your safety goggles! So, what are you waiting for? Dust off that soldering iron, gather your components, and let the conversion commence! With a little bit of know-how and a whole lot of determination, you’ll soon be basking in the glory of your very own self-made 12 volt DC converter. It’s electrifying, it’s empowering, and it’s the stuff that dreams are made of.
So go forth, my friends, and may the volts be ever in your favor!
References
If you are looking to convert a 6 volt DC power source to a 12 volt DC power source, there are several methods you can try. One possible method is to use a step-up transformer. This device is able to increase the voltage of the input signal to a higher voltage level.
Another option is to use a voltage booster circuit, which can also be used to increase the voltage of a DC power source. This circuit typically consists of an inductor, a diode, and a capacitor, and can be easily built using common electronic components. Additionally, you can consider using a DC-to-DC converter module, which is specifically designed to convert one voltage level to another.
These modules are widely available and easy to use, making them a popular choice for voltage conversion tasks. Overall, with the right approach and the right components, it is possible to convert a 6 volt DC power source to a 12 volt DC power source.
FAQs
What is a 6 volt DC to 12 volt DC converter?
A 6 volt DC to 12 volt DC converter is a device that converts electrical voltage from 6 volts direct current (DC) to 12 volts DC. It allows you to power devices that require a 12 volt power supply using a 6 volt power source.
Why would I need a 6 volt DC to 12 volt DC converter?
You would need a 6 volt DC to 12 volt DC converter if you have a device that requires a 12 volt power supply but you only have a 6 volt power source. It enables you to provide the correct voltage for your device to function properly.
How does a 6 volt DC to 12 volt DC converter work?
A 6 volt DC to 12 volt DC converter works by using electronic components, such as diodes and capacitors, to regulate and increase the voltage from 6 volts to 12 volts. It utilizes a step-up converter circuit to achieve this voltage conversion.
Can I build my own 6 volt DC to 12 volt DC converter?
Yes, you can build your own 6 volt DC to 12 volt DC converter if you have knowledge and experience in electronics and circuit design. However, it is recommended to use pre-built converters or seek professional help if you are not familiar with circuitry.
Are there any safety considerations when using a 6 volt DC to 12 volt DC converter?
Yes, there are some safety considerations when using a 6 volt DC to 12 volt DC converter. It is important to ensure that the converter is rated for the correct voltage and current requirements of your device. Overloading the converter can cause damage or malfunction.
Are there any limitations or drawbacks to using a 6 volt DC to 12 volt DC converter?
Yes, there are some limitations and drawbacks to using a 6 volt DC to 12 volt DC converter. One limitation is that the converter can only provide a maximum output voltage of 12 volts, so it may not be suitable for devices that require higher voltages. Additionally, the converter may have efficiency losses, leading to a slight decrease in power output.
Can a 6 volt DC to 12 volt DC converter be used for other voltage conversions?
No, a 6 volt DC to 12 volt DC converter is specifically designed for converting 6 volts to 12 volts. It is not suitable for other voltage conversions. For different voltage conversions, different converters or transformers should be used.
Can a 6 volt DC to 12 volt DC converter be used for both AC and DC power sources? A8. No, a 6 volt DC to 12 volt DC converter is specifically designed for DC power sources. It cannot be used for converting AC voltages. If you need to convert AC voltages, an AC to DC converter or transformer should be used instead.
Can a 6 volt DC to 12 volt DC converter be used for automotive applications?
Yes, a 6 volt DC to 12 volt DC converter can be used for automotive applications. It can be used to power 12 volt devices using a 6 volt automotive power source. However, it is important to ensure that the converter is designed for automotive use and can handle the electrical demands of the vehicle.
What are some common applications for a 6 volt DC to 12 volt DC converter?
Some common applications for a 6 volt DC to 12 volt DC converter include powering LED lights, small motors, and electronic devices that require a 12 volt power supply. It can also be used in automotive and marine applications to power 12 volt devices using a 6 volt power source.