Hey there, truck owners! Are you tired of your cargo being exposed to the elements every time you hit the road? Well, we’ve got just the solution for you – a fiberglass tonneau cover! But what exactly is a fiberglass tonneau cover, you ask? Allow me to explain. Think of a tonneau cover as a protective shield for your truck bed. It’s like a sturdy roof that keeps your cargo safe from rain, snow, and harsh sunlight.
And when it comes to tonneau covers, fiberglass is the cream of the crop. Why fiberglass, you wonder? Well, imagine a sleek and shiny surface that not only adds a touch of elegance to your vehicle but also offers unbeatable durability. That’s exactly what a fiberglass tonneau cover brings to the table.
Made from lightweight yet tough fiberglass material, these covers are designed to resist dents, scratches, and even fading. But it’s not just about the looks and durability. A fiberglass tonneau cover also provides excellent security for your cargo.
Whether you’re hauling valuable equipment or simply want to keep your belongings out of sight, these covers come with reliable locking systems that keep everything locked tight. And let’s not forget the convenience factor. Installing and using a fiberglass tonneau cover is a breeze.
With easy-to-use latches and hinges, you can quickly open and close the cover whenever you need to access your truck bed. Plus, some models even come with gas struts that assist in the opening and closing process, so no need to strain your back! So, if you’re in the market for a tonneau cover that combines style, durability, security, and convenience, look no further than a fiberglass tonneau cover. It’s the ultimate upgrade for any truck owner who wants to protect their cargo in style.
Stay tuned for our upcoming blog posts where we’ll dive deeper into the benefits and features of fiberglass tonneau covers. Happy trucking!
Table of Contents
Benefits of a Fiberglass Tonneau Cover
One of the most popular options for tonneau covers is fiberglass. Fiberglass tonneau covers have several benefits that make them a great choice for truck owners. First and foremost, fiberglass tonneau covers are known for their durability and strength.
They are resistant to scratches, dents, and other damage, making them a long-lasting option for protecting your truck bed. Additionally, fiberglass tonneau covers are lightweight and easy to install and remove. This means that you can easily take off the cover when you need to transport larger items in your truck bed.
Furthermore, fiberglass tonneau covers are highly customizable. They can be painted to match the color of your truck, adding to its overall aesthetic appeal. Overall, a fiberglass tonneau cover is a practical and stylish choice for any truck owner looking to protect their truck bed.
Improved Fuel Efficiency
fiberglass tonneau cover, improved fuel efficiency
Enhanced Security
fiberglass tonneau cover, enhanced security, benefits
Weather Protection
fiberglass tonneau cover, weather protection, benefits, durable, water resistance, wind resistance, cargo, truck bed, security, aerodynamic, style, fuel efficiency Having a fiberglass tonneau cover for your truck bed can offer numerous benefits, especially when it comes to weather protection. The durable construction of fiberglass provides excellent water resistance, keeping your cargo safe and dry even in the heaviest rainstorms. Additionally, the wind resistance of a fiberglass tonneau cover ensures that your belongings won’t be blown around or damaged by strong gusts of wind.
This is particularly important if you frequently transport fragile or valuable items in your truck bed. In addition to providing weather protection, a fiberglass tonneau cover also offers enhanced security. With a locked tonneau cover, you can keep your belongings safe and out of sight, reducing the risk of theft.
This is especially useful if you often leave your truck unattended or park it in areas with a high risk of theft. Another advantage is the aerodynamic design of a fiberglass tonneau cover. By reducing wind resistance, it can improve your truck’s fuel efficiency, saving you money on gas in the long run.
This is particularly useful if you frequently drive long distances or use your truck for work purposes. Lastly, a fiberglass tonneau cover adds a touch of style to your truck. It gives your vehicle a sleek and seamless appearance, enhancing its overall aesthetic appeal.
Whether you use your truck for work or personal purposes, a fiberglass tonneau cover can elevate its look and make it stand out from the crowd. In conclusion, a fiberglass tonneau cover offers a range of benefits, from weather protection and enhanced security to improved fuel efficiency and style. Investing in a high-quality fiberglass tonneau cover is a smart decision for any truck owner looking to protect their cargo and enhance the overall functionality and appearance of their vehicle.
Aesthetics
fiberglass tonneau cover
Materials and Tools Needed
When it comes to making a fiberglass tonneau cover for your truck bed, there are a few materials and tools that you will need. First and foremost, you will need fiberglass mat and resin. These can be found at your local hardware or automotive store.
Additionally, you will need a fiberglass roller to ensure that the mat is properly adhered to the surface. A brush or spray gun will also be necessary to apply the resin. In terms of tools, you will need a saw to cut the fiberglass to the desired size and shape.
A sanding block or power sander will also be needed to smooth out any rough edges or imperfections. Finally, you will need safety equipment such as gloves, goggles, and a mask to protect yourself from any fumes or particles. By having these materials and tools on hand, you will be well-equipped to create your own custom fiberglass tonneau cover.
Fiberglass Cloth
fiberglass cloth, materials, tools needed
Fiberglass Resin
fiberglass resin
Mold Release Agent
mold release agent, materials and tools needed. When it comes to using a mold release agent, there are a few materials and tools that you will need to have on hand. First and foremost, you will need the mold itself.
This can be made from various materials such as silicone or plastic, depending on the type of mold you are using. Next, you will need the mold release agent itself. This is a substance that prevents the mold from sticking to the material being poured into it.
There are many different types of mold release agents available, including sprays, liquids, and powders. It’s important to choose the right one for your specific project, as different materials may require different types of release agents. In addition to the mold and the release agent, you will also need some basic tools.
For example, you may need a brush to apply the release agent evenly to the inside of the mold. A small spatula or scraper can also be useful for removing any excess release agent before pouring in your material. It’s also a good idea to have some cleaning supplies on hand, as mold release agents can be sticky and messy.
Warm, soapy water and a sponge or cloth should be sufficient for cleaning up any spills or residue. Overall, using a mold release agent can greatly simplify the mold-making process and help ensure that your finished product comes out cleanly and easily. By having the right materials and tools on hand, you can make the most of this handy product and create beautiful molds with ease.
Gloves and safety glasses
Gloves and safety glasses are essential items for ensuring your safety during various tasks and activities. When working with potentially hazardous materials or tools, it is important to protect your hands and eyes from any potential harm. Gloves provide a protective barrier between your skin and any chemicals, sharp objects, or heat sources that you may come into contact with.
Safety glasses shield your eyes from flying debris, chemicals, or any other potential eye hazards. These items not only protect you from immediate injuries, but they also help prevent long-term damage to your hands and eyes. So, before you start any task that could pose a risk, make sure you have a good pair of gloves and safety glasses on hand.
Your safety should always be a priority!
Preparing the Truck Bed
If you’re thinking about making your own fiberglass tonneau cover for your truck bed, there are a few steps you’ll need to take to prepare the bed before starting the fiberglassing process. First, you’ll want to make sure the truck bed is clean and free of any debris or dirt. Give it a thorough wash and let it dry completely before moving on to the next step.
Next, you’ll want to remove any existing bed liner or paint from the truck bed. This can be done using a sander or grinder, making sure to wear protective gear such as goggles and a mask. Once the bed is stripped down to the bare metal, you’ll want to sand it down to create a rough surface for the fiberglass to adhere to.
This will help ensure a strong bond between the fiberglass and the truck bed. Finally, you’ll want to apply a layer of primer to the truck bed to further enhance adhesion. Once the primer is dry, you’ll be ready to start the fiberglassing process and create your own custom tonneau cover.
Cleaning the Surface
truck bed cleaning
Sanding the Surface
truck bed, sanding the surface, preparing, surface, smooth finish
Applying Primer
Applying Primer When it comes to protecting the bed of your truck, applying primer is an important step. Primer acts as a base coat that helps the paint adhere better and provides an extra layer of protection against rust and damage. But before you can apply primer, you need to make sure the truck bed is properly prepared.
The first step in preparing the truck bed is to thoroughly clean it. Remove any loose dirt or debris using a broom or shop vacuum. Then, use a degreasing agent to remove any oil or grease that may be on the surface.
This will ensure that the primer adheres properly and provides long-lasting protection. Once the bed is clean, you may also need to sand down any rough or uneven spots. Sanding helps to smooth out the surface and removes any existing paint or rust.
It’s important to use a fine-grit sandpaper and work in a circular motion to achieve the best results. After sanding, wipe down the bed with a clean cloth to remove any dust or residue. Before applying primer, it’s essential to protect the surrounding areas.
Use masking tape or painter’s tape to cover any areas you don’t want to get primer on, such as the sides of the truck or the tailgate. This will ensure a clean and professional finish. Now it’s time to apply the primer.
Shake the primer can well to mix it thoroughly. Holding the can about 12 inches away from the truck bed, apply a thin and even coat of primer. Make sure to overlap each pass slightly to ensure full coverage.
Creating the Mold
If you’re looking to make a fiberglass tonneau cover for your truck, you’ll first need to create the mold. This is an essential step in the process, as it will determine the shape and size of your finished cover. To begin, you’ll need materials such as foam, plywood, and fiberglass resin.
Start by measuring the length and width of your truck bed and cutting the foam to fit. Next, create a frame out of plywood that will act as the base for your mold. Attach the foam to the plywood using adhesive, and then apply a layer of fiberglass resin to the foam to strengthen it.
Once the resin has dried, you can sand down any rough edges and apply a second layer of resin for added durability. The result will be a custom-made mold that perfectly fits your truck bed, ready for the final step of creating your fiberglass tonneau cover.
Covering the Truck Bed with Plastic
When it comes to protecting your truck bed, one of the best options is to cover it with plastic. This not only helps to prevent scratches and damage, but it also keeps your bed clean and free from debris. But how exactly do you go about creating the mold for the plastic cover? Well, it’s actually quite simple.
All you need is a large sheet of plastic, some tape, and a few tools. First, start by measuring the dimensions of your truck bed and cut the plastic sheet to size. Then, use the tape to secure the plastic in place, making sure it fits snugly and covers the entire bed.
Smooth out any wrinkles or folds and make sure the plastic is pulled tight. Once you’re happy with the shape and fit, use a heat gun or hairdryer to gently warm the plastic. This will help it mold to the shape of your truck bed, ensuring a perfect fit.
Once the plastic has cooled and hardened, you can remove the tape and admire your newly molded truck bed cover. It’s as easy as that! So why not give it a try and give your truck bed the protection it deserves?
Applying Mold Release Agent
Creating the mold is an important step in the manufacturing process. Before pouring any material into the mold, it is essential to apply a mold release agent. This ensures that the finished product can easily be removed from the mold without causing any damage or distortion.
The mold release agent acts as a barrier between the material and the mold surface, preventing them from sticking together. It is like using cooking spray on a baking pan before putting in the cake batter – it helps the cake come out easily once it’s baked. Similarly, the mold release agent allows for a smooth and efficient production process, as the molds can be reused multiple times without any issues.
Applying the mold release agent is a relatively simple process. It can be sprayed or painted onto the mold surface before pouring in the material. The amount and method of application may vary depending on the type of mold and material being used.
However, it is important to ensure that the entire mold surface is covered evenly to achieve the desired results. By taking this extra step during the mold creation process, manufacturers can ensure that their products are consistently produced to high standards while also extending the lifespan of their molds.
Laying the Fiberglass Cloth
fiberglass cloth, fiberglass mold, lay the fiberglass cloth
Applying Fiberglass Resin
So you’ve decided to make your own fiberglass tonneau cover. That’s great! Fiberglass is a popular material for tonneau covers because it’s lightweight, durable, and can be molded to fit virtually any truck bed. One of the key steps in making a fiberglass tonneau cover is applying the fiberglass resin.
This resin acts as a binding agent, helping to reinforce the fiberglass and create a solid, waterproof surface. Before you begin applying the resin, make sure you have all the necessary materials and safety gear, including gloves, goggles, and a respirator. Start by preparing the fiberglass surface, sanding it down to remove any imperfections and creating a rough texture for the resin to adhere to.
Next, mix the resin according to the manufacturer’s instructions, making sure to work in a well-ventilated area. Use a brush or roller to apply a thin, even layer of resin to the fiberglass surface, working in small sections at a time. Make sure to smooth out any air bubbles or brush strokes as you go.
Repeat this process until the entire surface is covered in resin. Once the resin has dried, you can sand it down and apply additional layers if desired. And there you have it – a professionally made fiberglass tonneau cover!
Mixing the Resin
“Mixing the Resin” When it comes to applying fiberglass resin to your project, it’s important to get the mixing process just right. The resin is what gives the fiberglass its strength and durability, so it’s crucial to ensure a proper ratio of resin and hardener. Think of it like baking a cake – if you use too much or too little of one ingredient, the end result won’t come out as intended.
So, follow the directions on the resin packaging carefully and measure out the correct amounts of resin and hardener. Then, in a clean and disposable container, mix the two components together thoroughly. You want to stir the mixture until it is well blended and doesn’t have any streaks or lumps.
A smooth and uniform consistency is what you’re aiming for. Once the resin is mixed, you’ll need to work quickly, as it will start to harden within a certain timeframe. This is where burstiness comes into play – you have a limited window to work with the resin before it becomes too thick to use.
So, ensure that you have everything you need and are prepared to apply the resin as soon as it’s mixed. With a little practice and attention to detail, you’ll be able to mix the resin like a pro and achieve excellent results in your fiberglass project.
Applying the Resin on the Mold
Applying fiberglass resin on the mold is a crucial step in creating a strong and durable fiberglass product. Fiberglass resin is a liquid substance that, when mixed with a hardener, hardens into a solid material. This resin is used to coat the mold and provide the structure for the fiberglass.
To apply the resin, start by preparing the mold. Clean it thoroughly and make sure it is dry before proceeding. Next, mix the resin and hardener according to the manufacturer’s instructions.
This is an important step, as the ratio of resin to hardener determines the curing time and strength of the final product. Once the resin is mixed, it can be applied to the mold using a brush or roller. Start by applying a thin, even coat and make sure to reach all corners and edges of the mold.
It’s essential to work quickly, as the resin will begin to harden as soon as it is exposed to the air. After the first coat is applied, wait for it to become tacky before applying subsequent coats. This will help the layers bond together and create a stronger finished product.
Depending on the size and complexity of the mold, multiple coats may be required. As you apply the resin, it’s important to wear protective gear, such as gloves and goggles, to avoid any contact with the skin or eyes. Fiberglass resin can be harmful if not handled properly, so take the necessary precautions.
Once the resin has cured and hardened, the mold is ready for the next step in the fiberglass production process. Whether you’re creating a boat, a car part, or any other fiberglass product, applying the resin correctly is essential for ensuring its strength and durability.
Applying Layers of Fiberglass Cloth
Applying Fiberglass Resin: the Key to a Stronger and More Durable Project When it comes to working with fiberglass cloth, applying the right type of resin is essential for achieving a strong and long-lasting result. Fiberglass resin is a two-part material that consists of a resin and a hardening agent. These two components are mixed together in a specific ratio to create a reactive substance that bonds the layers of fiberglass cloth together, creating a sturdy and durable structure.
To apply the fiberglass resin, start by laying the fiberglass cloth on the surface you wish to reinforce. Make sure the cloth is smooth and free of any wrinkles or bubbles. Then, using a brush or roller, evenly spread the resin over the cloth, ensuring that it is fully saturated.
The resin will begin to react with the hardener, causing it to harden and create a strong bond with the cloth. It’s important to work quickly but efficiently when applying the resin, as it has a limited working time before it starts to harden. This means that once you mix the resin and hardener together, you need to apply it to the cloth and smooth out any air bubbles or imperfections before it becomes too thick to work with.
As you apply the resin, you may notice that it starts to soak through the cloth and saturate the surface underneath. This is a good sign, as it indicates that the resin is penetrating the layers of the cloth and ensuring a strong bond. However, be careful not to apply too much resin, as an excess amount can lead to a weaker structure and potential cracking or delamination.
Once you have applied the resin to the cloth, allow it to cure according to the manufacturer’s instructions. This curing process can take anywhere from several hours to a couple of days, depending on the specific resin and environmental conditions. During this time, the resin will harden and solidify, creating a strong and durable foundation for your project.
Applying fiberglass resin is not only a crucial step in the construction process but also an opportunity to create a stronger and more durable finished product. By following the proper techniques and guidelines, you can ensure that your project will withstand the test of time and provide you with years of reliable performance. So, next time you work with fiberglass cloth, remember the importance of applying the right resin and enjoy the benefits of a stronger and more durable outcome.
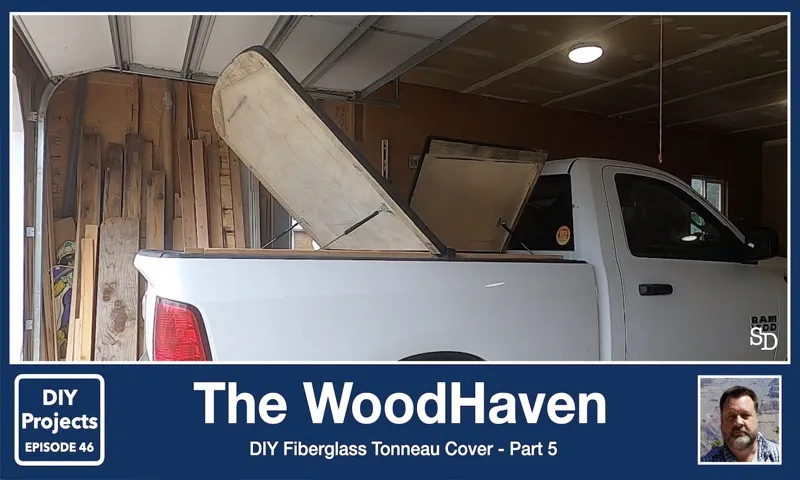
Removing the Mold
Have you recently purchased a fiberglass tonneau cover for your truck, but you’re not sure how to install it? Don’t worry, we’ve got you covered! In this guide, we will walk you through the process of making a fiberglass tonneau cover. First, you will need some materials including fiberglass sheets, resin, hardener, a roller, and a mold release agent. To start, create a mold of your truck bed using plywood or foam.
Apply the mold release agent to ensure the fiberglass doesn’t stick to the mold. Then, cut the fiberglass sheets to the size and shape of your truck bed. Mix the resin and hardener according to the instructions and apply it to the fiberglass sheets using a roller.
Repeat this process multiple times to create multiple layers. Once the fiberglass has cured, remove it from the mold and trim any excess material. Sand the edges to smooth them out and attach the tonneau cover to your truck bed using hinges or clamps.
With a little patience and effort, you’ll have a custom fiberglass tonneau cover that fits your truck perfectly!
Removing the Plastic and Mold Release Agent
Removing the plastic and mold release agent is an essential step when it comes to removing the mold from a surface. So, how do we go about it? Well, first things first, we need to get rid of the plastic. Some molds come with a plastic covering, and it needs to be carefully removed before we can get to the mold itself.
The best way to do this is by using a sharp knife or a pair of scissors to carefully cut away the plastic. We need to be gentle here to avoid damaging the mold or the surface underneath. Once the plastic is removed, we can move on to tackling the mold release agent.
This is a substance that is applied to the mold before it is used to make a product, and it helps to release the mold from the product once it has hardened. The release agent can be sticky and difficult to remove, but a good cleaning solution and a scrub brush should do the trick. Just be sure to rinse the surface thoroughly afterward to ensure that all of the release agent is removed.
And there you have it – a clean, mold-free surface!
Release the Cover from the Truck Bed
If you’re a truck owner, you know the convenience of having a cover for your truck bed. It protects your cargo from the elements, keeps it secure, and adds a sleek look to your vehicle. But what happens when your truck bed cover starts to show signs of mold? It’s important to take action and remove the mold as soon as possible to prevent further damage and potential health risks.
Removing the mold from your truck bed cover can be a straightforward process if you know what you’re doing. The first step is to release the cover from the truck bed. This can typically be done by unlatching it or removing any fasteners that are holding it in place.
Once the cover is free, you can easily access the moldy areas and begin the removal process.
Finish and Trim the Edges
Removing the Mold Now that your concrete countertop has cured and dried, it’s time to remove the mold and reveal the beautiful finished product. Removing the mold is an exciting step because it’s when you finally get to see the true potential of your countertop. To start, carefully remove any screws or clamps that were used to secure the mold in place.
Then, gently pry the edges of the mold away from the concrete. It’s important to be patient and take your time during this process to avoid damaging the countertop. Once the edges are free, gently lift the mold off the surface of the countertop.
You may need a helping hand for this part since the mold can be quite heavy. As you remove the mold, take a moment to admire your hard work and imagine how the finished countertop will look in your space. Just remember, the mold removal is only the beginning – there are still a few more steps to go before you can fully enjoy your new countertop.
Installation and Finishing Touches
After constructing your fiberglass tonneau cover, the next step is to proceed with the installation and finishing touches. First, thoroughly clean the truck bed and ensure it is dry. This will help the tonneau cover adhere properly.
Then, lay the cover on the truck bed and align it with the edges. Use clamps to keep it in place and prevent any shifting during installation. Next, secure the tonneau cover to the truck bed using the required hardware and instructions provided by the manufacturer.
Make sure to tighten all the screws and bolts securely to prevent any movement while driving. Once the cover is securely attached, check for any gaps or unevenness. Use weather stripping or sealant to seal any gaps and ensure a tight fit.
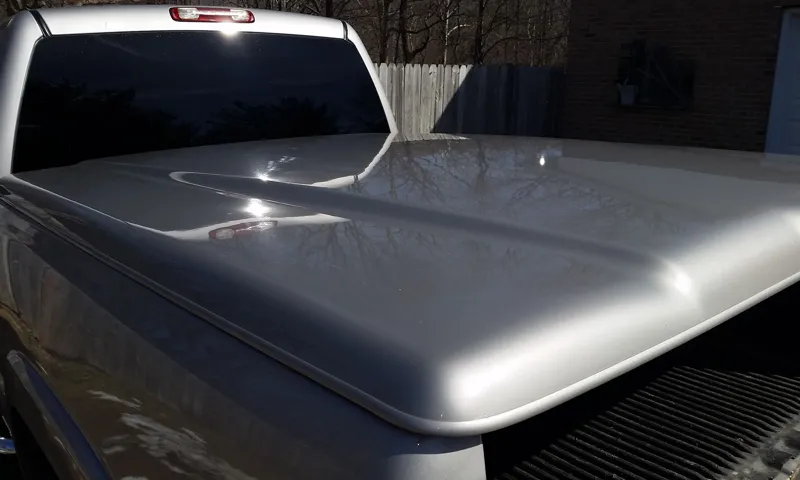
Additionally, consider adding gas struts to make it easier to open and close the tonneau cover. Lastly, give your tonneau cover a final wipe down and polish to enhance its appearance. With these steps, your fiberglass tonneau cover will be installed and ready to use, providing both functionality and a sleek look to your truck.
Installing the Fiberglass Tonneau Cover
fiberglass tonneau cover, installation, finishing touches
Adding Additional Accessories
“additional accessories for installation and finishing touches” So you’ve purchased your new gadget or appliance, but you feel like it’s missing something. That’s where additional accessories come in, adding the perfect finishing touch to complete your setup. Whether it’s a sleek stand for your new monitor, a protective cover for your smartphone, or a wireless keyboard for your tablet, these accessories can enhance both the functionality and aesthetic appeal of your devices.
When it comes to installation, you want to make sure everything is set up correctly for optimal performance. This may involve mounting your TV on the wall using a sturdy bracket or installing a docking station for your laptop. Additionally, cable management tools like cable clips or sleeves can help keep your workspace organized and free from tangled cords.
For those looking to protect their gadgets, there are plenty of options available. Screen protectors, for example, can safeguard your phone or tablet from scratches and fingerprints, while phone cases offer an extra layer of protection against bumps and drops. Similarly, laptop sleeves or bags can shield your device from potential damage while on the go.
Beyond functionality and protection, accessories can also add a touch of personal style to your devices. From colorful keyboard skins to decorative laptop stickers, there are endless ways to customize your gadgets and make them uniquely yours. So why settle for a basic setup when you can take it to the next level with additional accessories? Whether you’re looking to improve functionality, protect your devices, or add a personal touch, there are plenty of options available to suit your needs.
So go ahead and give your gadgets the finishing touches they deserve.
Painting or Clear Coating the Cover
When it comes to installing a cover for your project, you might be wondering whether to paint it or clear coat it. Well, the good news is that both options have their own advantages and it ultimately comes down to your personal preference. Painting the cover can give it a unique and vibrant look.
You can choose any color you like and even add designs or patterns to make it truly stand out. Plus, painting can provide an extra layer of protection against the elements, helping the cover last longer. It’s like giving your project a fresh coat of personality! On the other hand, clear coating the cover can give it a sleek and glossy finish.
This option allows the natural beauty of the material to shine through, whether it’s wood, metal, or plastic. Clear coating can also provide protection against scratches and UV rays, keeping your cover looking new for years to come. It’s like adding a coat of armor to your project! Ultimately, the decision to paint or clear coat the cover is up to you.
Consider the overall look and feel you want to achieve, as well as the level of protection you desire. Whichever option you choose, remember to properly prepare the surface by cleaning and sanding it beforehand. This will ensure a smooth and long-lasting finish.
So go ahead and unleash your creativity or go for a more minimalist approach. Either way, your project will look stunning with a painted or clear coated cover!
Are you ready to take your truck to the next level? A custom fiberglass tonneau cover is the perfect accessory to enhance both the functionality and style of your vehicle. With its sleek design and durable construction, a fiberglass tonneau cover can provide numerous benefits for truck owners. In this article, we will delve into the advantages of having a custom fiberglass tonneau cover and why it’s worth investing in one for your truck.
So, grab a cup of coffee and let’s dive in!
Conclusion
In conclusion, discovering the secret to making a fiberglass tonneau cover is like unlocking the treasure chest of truck accessories. With a few simple steps, a bit of creativity, and a touch of craftsmanship, you can transform your truck bed into a sleek and stylish statement piece. Just imagine the envy that will wash over your friends as they gaze upon your custom-made fiberglass tonneau cover, perfectly molded to fit your truck like a tailored suit.
They’ll ask themselves, “How did they do it?” And you’ll chuckle to yourself, knowing that it was your clever handiwork that brought this masterpiece to life. So, unleash your inner MacGyver and dive into the world of fiberglass tonneau cover creation. Armed with determination and a sense of adventure, there’s no limit to what you can achieve.
Who knows, maybe one day the word “fiberglass” will be synonymous with your name, as you become the go-to guru for all things tonneau cover. But remember, with great power comes great responsibility. Don’t let the power of fiberglass go to your head.
Use it wisely, and with caution. And always remember to wear a mask and gloves, because nobody likes the look of fiberglass in their eyes or under their fingernails. So go forth, fearless truck enthusiasts, and create your very own fiberglass tonneau cover.
Make your mark on the world of truck customization and leave a trail of stunned onlookers in your wake. After all, life is too short for boring truck beds. It’s time to turn heads, break stereotypes, and show the world that in the realm of truck accessories, fiberglass is king.
FAQs
What materials are needed to make a fiberglass tonneau cover?
To make a fiberglass tonneau cover, you will need fiberglass cloth, epoxy resin, a mold or template, a roller, and a brush.
How long does it take to make a fiberglass tonneau cover?
The time it takes to make a fiberglass tonneau cover can vary depending on your skill level and the complexity of the design. However, it typically takes several hours to complete.
Can I make a fiberglass tonneau cover without any prior experience?
While prior experience can be helpful, it is not necessarily required. With proper research, preparation, and guidance, you can successfully make a fiberglass tonneau cover as a beginner.
How do I create a mold for a fiberglass tonneau cover?
To create a mold for a fiberglass tonneau cover, you can use a preexisting tonneau cover as a template. Alternatively, you can build a mold using foam or other materials and shape it to the desired design.
What is the best way to ensure a smooth surface finish when working with fiberglass?
To ensure a smooth surface finish when working with fiberglass, it is important to thoroughly wet out the fiberglass cloth with epoxy resin, remove any air bubbles, and use a roller or brush to evenly distribute the resin.
Can a fiberglass tonneau cover be painted to match my vehicle’s color?
Yes, a fiberglass tonneau cover can be painted to match your vehicle’s color. However, it is important to properly prepare the surface, prime it, and use automotive-grade paint for the best results.
Are there any maintenance tips for keeping a fiberglass tonneau cover in good condition?
To keep a fiberglass tonneau cover in good condition, it is recommended to regularly clean it with mild soap and water, avoid using abrasive cleaners or tools, and periodically check for any cracks or damage that may need repair.