Hey there! Are you ready to delve into the topic of “Introduction” with me? Well, let’s get started! Think of an introduction as the opening lines of a book or the first few moments of meeting someone new. It sets the stage for what’s to come, grabs your attention, and sparks curiosity. In the world of writing, an introduction serves as the gateway to a whole world of information, ideas, and stories.
But what makes a good introduction? Much like the first few notes of a catchy song, it needs to grab your attention and make you want to keep reading. It needs to immediately engage the reader and hold their interest. And most importantly, it needs to set the tone and provide a clear sense of direction for what’s to come.
In the realm of search engine optimization (SEO), an introduction plays a vital role in attracting readers and search engines alike. It needs to be carefully crafted with relevant keywords and phrases that not only pique the interest of potential readers but also rank high in search engine results. Imagine you’re at a party, surrounded by a sea of unfamiliar faces.
How do you make a lasting impression? Well, your introduction is your chance to shine, to make a connection, and to leave a lasting impact. It’s your opportunity to showcase your expertise, captivate your audience, and entice them to explore further. In this blog, we’ll dive deep into the art of crafting powerful introductions.
We’ll explore different techniques, delve into the psychology behind captivating openings, and provide practical tips to help you create introductions that leave a lasting impact. So, whether you’re a seasoned writer looking to enhance your skills or a curious individual seeking to master the art of introductions, this blog is for you. Get ready to discover the secrets to captivating your audience from the very first word! Let’s begin this exciting journey together.
Table of Contents
- 1 What is a Tonneau Cover?
- 2 Advantages of a Fiberglass Tonneau Cover
- 3 Materials and Tools Needed
- 4 Step-by-Step Guide
- 4.1 Step 1: Designing the Tonneau Cover
- 4.2 Step 2: Creating a Mold
- 4.3 Step 3: Applying the Release Agent
- 4.4 Step 4: Cutting the Fiberglass Cloth
- 4.5 Step 5: Mixing the Resin with Catalyst
- 4.6 Step 6: Applying the First Layer of Fiberglass
- 4.7 Step 7: Adding the Honeycomb Core
- 4.8 Step 8: Applying Additional Layers of Fiberglass
- 4.9 Step 9: Sanding and Smoothing the Surface
- 4.10 Step 10: Applying a Gelcoat
- 5 Conclusion
- 6 Safety Precautions
- 7 FAQs
What is a Tonneau Cover?
If you’re looking to enhance the functionality and style of your truck, a tonneau cover is a great addition. A tonneau cover is a type of truck bed cover that protects your cargo from the elements while also improving your truck’s aerodynamics. It can also add a sleek and polished look to your vehicle.
While there are many tonneau covers available for purchase, you may be interested in making your own fiberglass tonneau cover. This DIY project can be a fun and rewarding way to customize your truck and save some money in the process. However, keep in mind that making a fiberglass tonneau cover requires some specialized tools and materials, as well as a basic understanding of fiberglass fabrication.
It’s important to take your time and follow all safety precautions when working with fiberglass. With the right tools and a little patience, you can create a custom tonneau cover that fits your truck perfectly and adds a personal touch to your vehicle.
Advantages of a Fiberglass Tonneau Cover
If you’re looking to customize your truck and add a little extra flair, making your own fiberglass tonneau cover might just be the perfect option. Fiberglass tonneau covers offer a range of advantages that make them a popular choice among truck owners. First and foremost, fiberglass tonneau covers are incredibly durable and built to withstand the elements.
They provide excellent protection for your truck bed, keeping your belongings safe and secure. In addition, fiberglass tonneau covers are lightweight and easy to install, making them a convenient option for truck owners of all skill levels. They also offer a sleek and streamlined appearance, enhancing the overall look of your vehicle.
With a little bit of time and effort, you can create a customized fiberglass tonneau cover that perfectly fits your truck and meets all of your needs. So why not take the plunge and give it a try? You’ll be rewarded with a tonneau cover that not only looks great but provides excellent functionality as well.
Materials and Tools Needed
If you’re looking to add a personal touch to your truck, making your own fiberglass tonneau cover can be a rewarding project. To get started, you’ll need a few materials and tools. First, you’ll need fiberglass cloth, which is typically sold in rolls.
You’ll also need fiberglass resin, which acts as the bonding agent. In addition, you’ll need a measuring tape to ensure accurate dimensions and a utility knife to cut the fiberglass cloth. A mixing container and stirring stick are necessary for mixing the resin.
You’ll also need a paintbrush or roller to apply the resin to the fiberglass cloth. Finally, safety equipment such as gloves, safety glasses, and a dust mask are essential to protect yourself during the process.
Fiberglass Resin
fiberglass resin, materials and tools needed
Fiberglass Cloth
fiberglass cloth, materials and tools needed
Catalyst
Catalyst, a substance that speeds up a chemical reaction without undergoing any permanent change, is an essential tool in many industries. It can be found in a wide range of materials and tools. One common material used as a catalyst is platinum.
This precious metal is highly effective in promoting chemical reactions, particularly in the production of hydrogen gas. Another commonly used catalyst is enzymes. These biological catalysts can be found in living organisms and are used in various industrial processes, such as the production of food and beverages.
In addition to materials, there are also specific tools that are designed to be catalysts. One example is a catalytic converter, which is used in automobiles to convert harmful gases into less harmful ones. These converters contain a catalyst, usually consisting of platinum, palladium, and rhodium, which helps in reducing pollution.
Overall, catalysts are indispensable in many industries, and their use is important for promoting efficiency and sustainability. Without catalysts, many chemical reactions would occur at an extremely slow rate, making them impractical for industrial applications. So next time you appreciate a fast and efficient chemical reaction, remember to thank the catalysts that make it possible!
Honeycomb Core
Honeycomb cores are a popular choice for various applications due to their strong and lightweight nature. When working with honeycomb cores, there are a few materials and tools that you will need to ensure a successful project. Firstly, you will need the honeycomb core itself, which can be made from materials such as aluminum, paper, or plastic.
The type of material you choose will depend on the specific requirements of your project. Additionally, you will need adhesive material to bond the honeycomb core to the desired surfaces. Epoxy, polyurethane, or acrylic adhesives are commonly used for this purpose.
Other materials you might need include clamps or weights to hold the honeycomb core in place while the adhesive sets, as well as protective gear such as gloves and goggles to ensure your safety throughout the process. Finally, you will need tools such as a utility knife or saw to cut the honeycomb core to the desired shape and size. With the right materials and tools, you can achieve great results with honeycomb cores.
Release Agent
In the world of mold making, a release agent is a vital tool that can make or break the success of your project. A release agent, as the name suggests, is a substance that is applied to the mold surface to prevent the material from sticking to it. This ensures that the molded item can be easily removed without any damage.
There are several materials and tools that you will need to effectively use a release agent. Firstly, you will need the appropriate release agent itself. This can come in the form of a liquid, spray, or wax.
It is important to choose the right type of release agent based on the material you are working with. Additionally, you will need a brush or applicator to evenly distribute the release agent onto the mold surface. This will ensure that there are no clumps or uneven areas that could cause problems during the demolding process.
Finally, you will need a clean cloth or towel to wipe away any excess release agent. This is important to avoid any buildup or residue that could affect the quality of your mold.
Sandpaper
When it comes to sanding and smoothing down surfaces, sandpaper is an essential tool. It’s made up of a sheet of paper or cloth that has abrasive particles such as aluminum oxide or silicon carbide bonded to it. These particles are what do the actual smoothing work when rubbed against the surface.
Sandpaper comes in various grit sizes, ranging from coarse to fine. Coarse grits, such as 40 or 60, are used for heavy-duty sanding and removing material quickly. Medium grits, like 80 or 120, are ideal for general sanding and preparing surfaces for painting or staining.
Fine grits, such as 220 or 320, are used for final sanding and achieving a smooth finish. It’s important to choose the right grit size for your project to avoid damaging the material. Additionally, sandpaper comes in different forms, such as sheets, rolls, or pads, and can be used with hand sanding blocks or power sanders.
So whether you’re sanding a wooden table or smoothing a piece of metal, having the right sandpaper is crucial for achieving the best results.
Scissors
scissors
Roller Brush
roller brush, materials and tools needed
Squeegee
When it comes to cleaning windows, having the right tools can make all the difference. One essential tool that every window cleaner needs is a squeegee. A squeegee is a handheld device that is used to wipe away excess water and dirt from glass surfaces.
It consists of a rubber blade attached to a handle, which allows you to easily glide the squeegee across the window. To effectively clean windows with a squeegee, there are a few materials and tools that you will need. First and foremost, you will need a squeegee with a rubber blade that is the appropriate size for the window you are cleaning.
Typically, a 12-inch or 18-inch squeegee blade will work well for most windows. Additionally, you will need a bucket or spray bottle filled with a solution of water and window cleaner. This will help to remove dirt and grime from the glass.
In addition to the squeegee and cleaning solution, you will also need a scrubber or window mop to loosen dirt and debris from the window before using the squeegee. This can be as simple as a microfiber cloth or a specialized window cleaning tool with a scrubbing pad. It’s important to choose a tool that will effectively clean the window without scratching the glass surface.
Lastly, you will need some lint-free rags or paper towels to wipe down the edges and corners of the window after using the squeegee. This will help to remove any excess water or cleaner and leave the window looking streak-free and sparkling clean. In conclusion, having the right materials and tools is essential for effectively cleaning windows with a squeegee.
By using a squeegee with a rubber blade, along with a cleaning solution, a scrubber, and lint-free rags, you can achieve streak-free and sparkling clean windows every time. So, the next time you tackle your window cleaning chores, be sure to have all the necessary tools on hand to make the job a breeze.
Step-by-Step Guide
Are you looking to add a personal touch to your truck? Making your own fiberglass tonneau cover can be a rewarding project that not only enhances the appearance of your vehicle but also provides added security and protection for your cargo. In this step-by-step guide, I will walk you through the process of creating your own fiberglass tonneau cover. With a few tools and some patience, you will be able to customize a tonneau cover that fits your truck perfectly and adds a touch of style to your ride.
So, let’s dive in and get started on this fun and rewarding project!
Step 1: Designing the Tonneau Cover
designing a tonneau cover. Designing a tonneau cover involves several crucial steps that ensure functionality, durability, and aesthetics. The first step is to determine the purpose of the tonneau cover.
Is it for protecting the truck’s bed from weather elements or securing cargo? Once the purpose is established, it’s time to consider the material options. Tonneau covers can be made from various materials such as vinyl, aluminum, or fiberglass. Each material has its advantages and disadvantages in terms of durability, weight, and flexibility.
Next, the design should take into account the truck’s make and model. A tonneau cover should fit seamlessly with the truck’s bed, ensuring a perfect and secure fit. Another important aspect is the style of the tonneau cover.
This includes options such as folding, rolling, or retractable covers based on the user’s convenience and preferences. A well-designed tonneau cover not only provides functionality and protection but also enhances the overall appearance of the truck. So, consider all these factors and choose the right design for your tonneau cover to ensure it meets your needs while complementing your truck’s style.
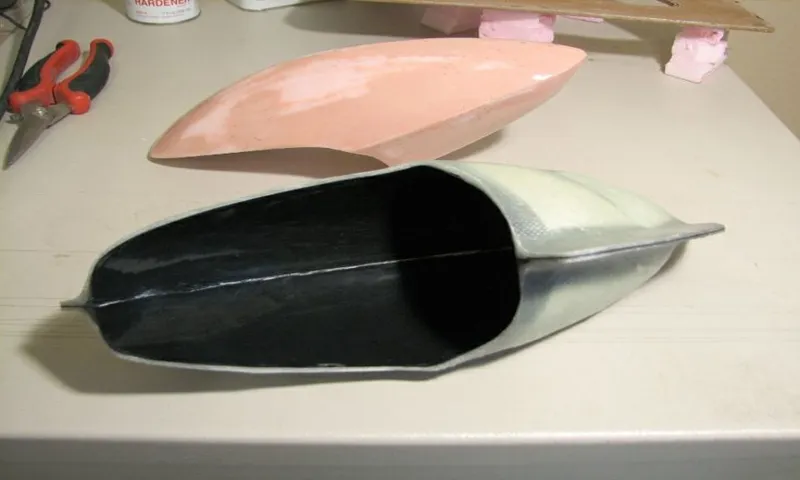
Step 2: Creating a Mold
mold, creating a mold, step-by-step guide
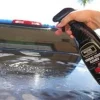
Step 3: Applying the Release Agent
release agent, applying, step-by-step guide, concrete molds Once you have prepared your concrete molds, the next step is to apply the release agent. This is an important step as it helps prevent the concrete from sticking to the mold and ensures a smooth release once the concrete has set. To apply the release agent, start by thoroughly cleaning the surface of the mold to remove any debris or dirt.
Once clean, you can then apply the release agent using a brush or spray bottle. It’s important to apply the release agent evenly and make sure all areas of the mold are covered. This will ensure that the concrete will release properly and avoid any damage to the mold.
After applying the release agent, allow it to dry for a few minutes before pouring the concrete into the mold. This will help to ensure a clean release and a smooth finish on your concrete project. So, don’t forget this important step when working with concrete molds to achieve the best results!
Step 4: Cutting the Fiberglass Cloth
cutting fiberglass cloth. Cutting fiberglass cloth is an important step in the process of working with fiberglass material. It is crucial to cut the cloth accurately to ensure a smooth and seamless finish.
To begin, you will need a sharp pair of scissors or a utility knife. Lay the fiberglass cloth on a flat surface and measure the required length and width needed for your project. Once you have your measurements, use a ruler or a straight edge to mark the cutting lines on the cloth.
Take your time and make sure the lines are straight and precise. Now, using your scissors or utility knife, carefully cut along the marked lines. It is important to note that fiberglass cloth can be quite tough and may require some effort to cut through.
Take breaks if you need to, but always try to maintain accuracy in your cuts. Once you have finished cutting the cloth, be sure to clean up any loose fibers or debris. And there you have it – you have successfully cut your fiberglass cloth and are ready to move on to the next step in your fiberglass project.
Step 5: Mixing the Resin with Catalyst
In the fifth step of the resin crafting process, it’s finally time to mix the resin with the catalyst. This is a crucial step that activates the resin and begins the curing process. To do this, you’ll need to carefully measure out the resin and catalyst according to the instructions provided by the manufacturer.
It’s important to follow these instructions closely, as the ratio of resin to catalyst can vary depending on the type of resin you’re using. Once you have measured out the appropriate amounts, you’ll want to pour the catalyst into the resin and stir the mixture thoroughly. This is typically done with a wooden stick or a silicone stirring tool.
Be sure to mix the resin and catalyst together evenly, making sure there are no streaks or clumps remaining. Once the mixture is well combined, it’s time to move on to the next step in the resin crafting process.
Step 6: Applying the First Layer of Fiberglass
Applying the first layer of fiberglass is a crucial step in the process of creating a strong and durable fiberglass structure. This layer serves as a foundation for additional layers and helps to reinforce the structure. To apply the first layer, you will need to mix the resin and catalyst according to the manufacturer’s instructions.
Once mixed, you can begin to brush the resin onto the surface of the mold or substrate. It is important to work quickly and evenly, making sure to cover the entire surface. As you brush on the resin, it will begin to saturate the fiberglass cloth, bonding it to the surface.
This layer should be relatively thin, allowing for better adhesion of the subsequent layers. After applying the first layer, it is important to let it cure fully before moving on to the next step. This will ensure that the fiberglass hardens properly and creates a strong bond with the substrate.
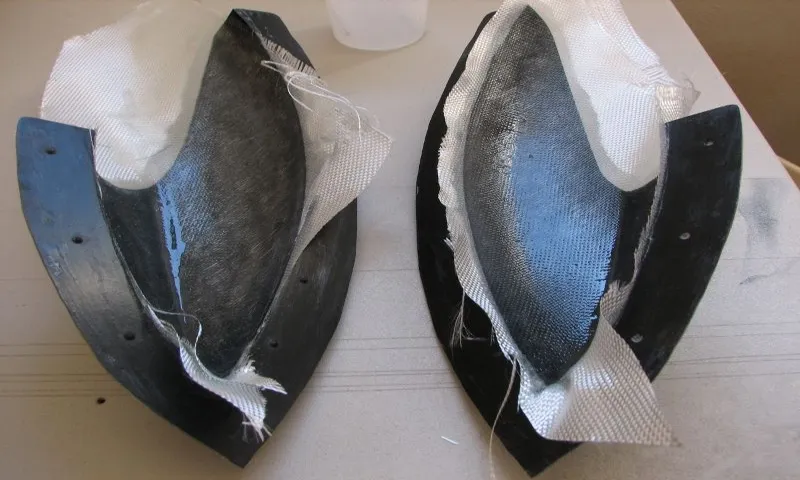
Step 7: Adding the Honeycomb Core
honeycomb core
Step 8: Applying Additional Layers of Fiberglass
Applying Additional Layers of Fiberglass
Step 9: Sanding and Smoothing the Surface
sanding and smoothing the surface, wood finishing techniques, sanding process, smooth and even surface, sandpaper grits, sanding blocks, orbital sander, hand sanding, sanding techniques, finishing touches, protect the wood surface, high-quality finish. After all the hard work of assembling and staining your wood project, it’s time for the finishing touches. In this step-by-step guide, we’ll walk you through the process of sanding and smoothing the surface to achieve a flawless result.
To begin, you’ll need to gather the necessary tools for the job. This includes sandpaper in various grits, ranging from coarse to fine, sanding blocks, an orbital sander (if available), and a dust mask for protection. Start by inspecting the wood surface for any imperfections or rough spots.
Use a coarse-grit sandpaper or sanding block to gently remove any bumps or uneven areas. Remember to sand in the direction of the wood grain to avoid creating scratches. Once the surface is relatively smooth, switch to a finer grit sandpaper or sanding block to further refine the surface.
The goal is to gradually remove the scratches left by the previous grit and create an even, satin-like finish. If you have access to an orbital sander, this can greatly speed up the sanding process. Simply attach the appropriate sandpaper grit and let the machine do the work for you.
However, be mindful not to exert too much pressure or stay in one spot for too long, as this can result in uneven sanding. For areas that are difficult to reach with an orbital sander, such as corners or intricately carved details, you may need to resort to hand sanding. Use a small piece of sandpaper or a sanding block and carefully sand those areas by hand.
Throughout the sanding process, it’s important to frequently check your progress and make adjustments as needed. Remember to always sand with the grain to avoid damaging the wood fibers. Once you’re satisfied with the smoothness of the surface, it’s time to do a final inspection.
Step 10: Applying a Gelcoat
Step 10: Applying a Gelcoat Now that you’ve taken all the necessary steps to prepare your boat’s surface, it’s time to apply the gelcoat. The gelcoat is not only responsible for giving your boat a smooth and glossy finish, but it also provides protection against the elements. To apply the gelcoat, start by choosing the right product for your boat.
Gelcoats come in different colors and formulations, so make sure to select one that matches your boat’s original color and meets your specific needs. Before applying the gelcoat, it’s essential to read the manufacturer’s instructions carefully. This will help you understand the mixing ratio and proper application techniques.
Some gelcoats require the addition of a catalyst, while others come pre-mixed. Next, prepare your workspace by ensuring it’s clean, well-ventilated, and free from dust and debris. It’s also a good idea to cover the surrounding areas to protect them from overspray or spills.
Once you’ve mixed the gelcoat according to the manufacturer’s instructions, you can start applying it to your boat. Use a brush or a roller, depending on the size of the area you’re working on. Begin by applying a thin and even coat, making sure to work in small sections at a time.
As you apply the gelcoat, be mindful of any drips, sags, or air bubbles that may occur. If you notice any imperfections, you can use a brush or roller to smooth them out immediately. Remember to maintain a consistent pressure and speed to ensure a uniform finish.
Once you’ve applied the first coat, allow it to dry according to the manufacturer’s instructions. This usually takes several hours or overnight. After it’s fully cured, you can apply additional coats if necessary.
Conclusion
And there you have it, your very own custom fiberglass tonneau cover! Now you can cruise down the road in style, turning heads and impressing everyone with your DIY skills. No longer will you have to settle for a generic, mass-produced cover – you can now enjoy the satisfaction of knowing that your truck is one-of-a-kind. Plus, imagine the envy of your friends when they see your sleek, aerodynamic cover that not only looks great but also provides added security for your belongings.
So go ahead, grab those tools and dive into the world of fiberglass fabrication. Trust me, it’s not as intimidating as it seems – just a little bit of patience, perseverance, and some creative thinking. And who knows, maybe one day you’ll be designing custom covers for others, revolutionizing the truck accessory industry.
But for now, enjoy the fruits of your labor and revel in the joy of saying, “I made that myself!”
Safety Precautions
If you’re looking to save some money and add some customization to your truck, making your own fiberglass tonneau cover could be a fun and rewarding project. However, it’s important to take some safety precautions before delving into this DIY endeavor. First and foremost, wear protective gear such as safety glasses, gloves, and a dust mask to protect yourself from chemicals and fibrous particles.
Additionally, make sure to work in a well-ventilated area to prevent inhaling any fumes. It’s also a good idea to have a fire extinguisher nearby in case of any accidents. Lastly, be mindful of working with sharp tools and be sure to handle any chemicals and solvents with care.
By taking these safety precautions, you can ensure a smooth and safe experience while making your own fiberglass tonneau cover.
FAQs
What materials do I need to make my own fiberglass tonneau cover?
To make your own fiberglass tonneau cover, you will need fiberglass cloth, epoxy resin, hardener, release agent, masking tape, sandpaper, and a squeegee.
How long does it take to make a fiberglass tonneau cover?
The time it takes to make a fiberglass tonneau cover can vary depending on your skill level and the complexity of the design. It can take anywhere from a few days to a couple of weeks.
Can I use a fiberglass tonneau cover on any truck?
Fiberglass tonneau covers can be customized to fit most truck models. However, it is important to check compatibility before starting the construction process.
Are fiberglass tonneau covers weatherproof?
Yes, fiberglass tonneau covers are weatherproof and can protect your truck bed from rain, snow, and other elements.
How durable are fiberglass tonneau covers?
Fiberglass tonneau covers are known for their durability. They can withstand normal wear and tear and provide long-lasting protection for your truck bed.
Can I paint my fiberglass tonneau cover?
Yes, fiberglass tonneau covers can be painted to match the color of your truck. However, it is important to follow proper painting techniques for best results.
How much does it cost to make a fiberglass tonneau cover?
The cost of making a fiberglass tonneau cover can vary depending on the materials used and the complexity of the design. It can range from a few hundred dollars to a few thousand dollars.
Can I install a fiberglass tonneau cover by myself? A8. While it is possible to install a fiberglass tonneau cover by yourself, it is recommended to seek professional assistance, especially if you have limited experience with fiberglass work.
Can I remove a fiberglass tonneau cover once it is installed?
Yes, fiberglass tonneau covers can be removed if needed. However, it may require some effort and tools to do so.
Can I use a fiberglass tonneau cover with a truck rack?
Yes, fiberglass tonneau covers can be used with truck racks. However, you may need to make some modifications or choose a specific tonneau cover design that is compatible with a truck rack.
How do I maintain a fiberglass tonneau cover?
To maintain a fiberglass tonneau cover, regularly clean it with mild soap and water, avoid using abrasive cleaners, wax the cover to keep it shiny, and inspect for any damages or cracks that may need repair.
Can I customize the design of my fiberglass tonneau cover?
Yes, fiberglass tonneau covers can be customized to match your preferences. You can choose different colors, textures, and even add additional features like spoilers or LED lights.