Have you recently purchased an RV awning and now you’re wondering how to measure it properly? Well, you’ve come to the right place! Measuring your RV awning correctly is crucial, as it ensures a perfect fit and helps you avoid any unnecessary headaches down the road. Think of it like buying a new shirt – if it doesn’t fit properly, it won’t be comfortable, and you won’t be able to fully enjoy it. So, in today’s guide, we’ll walk you through the steps to measure your RV awning like a pro.
Whether you’re a seasoned RVer or new to the world of recreational vehicles, this simple process will ensure that you get the right measurements for your awning every time. So, grab a tape measure, put on your measuring hat, and let’s get started!
Table of Contents
Introduction
If you’re a proud owner of an RV, then you already know how important the awning is for creating the perfect outdoor living space while on the road. But what do you do when it’s time to replace or repair your awning and you need to know the measurements? Don’t worry, measuring your RV awning is easier than you think. All you’ll need is a measuring tape, a pen or pencil, and a ladder if your awning is too high to reach.
In this article, we’ll guide you through the simple steps of measuring your RV awning, so you can ensure a perfect fit when it’s time for replacement or repair.
Understanding the importance of measuring your RV awning accurately
RV awnings can be a great addition to your outdoor living space, providing shade and protection from the elements. However, in order to ensure a proper fit and avoid any installation mishaps, it is essential to measure your RV awning accurately. This may seem like a simple task, but it is important to get it right in order to avoid any issues down the road.
In this blog post, we will discuss the importance of measuring your RV awning accurately and provide some tips to help you get it right. So, let’s dive in and learn more about how to measure your RV awning accurately to ensure a perfect fit for your outdoor adventures!
Step-by-Step Guide
If you’re the proud owner of an RV, you know just how important it is to have a properly functioning awning. Not only does it provide shade and protection from the elements, but it also adds an extra level of comfort to your outdoor space. However, in order to find the right replacement or upgrade for your awning, you’ll first need to know its measurements.
But don’t worry, measuring your RV awning is actually quite simple! First, fully extend the awning and make sure it’s secured in place. Then, grab a measuring tape and measure the distance from one end of the roller tube to the other. This measurement will give you the awning’s overall length.
Next, measure the length of the awning fabric by starting at one end and extending the tape measure to the other. Finally, measure the height of the awning by starting at the top and measuring down to the bottom. With these measurements in hand, you’ll be well on your way to finding the perfect replacement awning for your RV.
Step 1: Open the awning completely
awning, open, completely
Step 2: Measure the length
In the second step of measuring, it’s time to determine the length of the object or item you want to measure. This step is crucial as it will provide you with accurate measurements that you can rely on. To measure the length, you’ll need a ruler or a tape measure.
Place one end of the ruler or tape measure at the starting point of the object and extend it until you reach the other end. Make sure that you’re measuring from the same points each time to ensure consistency. If the object is curved or irregular in shape, try to measure along the longest or straightest section for the most accurate measurement.
Remember to take note of the measurement in inches, centimeters, or whatever unit of measurement you’re using. By following this step, you’ll be well on your way to obtaining precise and reliable measurements for your project.
Step 3: Measure the width
In this step, we will measure the width of the area where you plan to install your blinds. This is an important step because it will determine the size of the blinds you need to purchase. To measure the width, you will need a tape measure.
Start by positioning the tape measure at the left side of the window frame and extend it to the right side. Take note of the measurement in inches or centimeters. Make sure to measure the exact width of the window frame, from one edge to the other.
It’s essential not to include any trim or molding in your measurement, as this will affect the fit of the blinds. Once you have the width measurement, you can move on to the next step in the installation process.
Step 4: Measure the projection
In Step 4 of our guide on projection measurement, we’ll explore how to accurately measure the projection of your project. This step is crucial for understanding the success and impact of your project and for making informed decisions moving forward. There are several key metrics you can use to measure the projection, such as return on investment (ROI), market share, customer satisfaction, and brand awareness.
By analyzing these metrics, you’ll be able to quantify the success of your project and identify areas for improvement. Additionally, it’s important to consider external factors that may influence the projection, such as market trends, competition, and customer preferences. By continuously monitoring and measuring the projection of your project, you’ll be able to make data-driven decisions and optimize your strategy for success.
Common Measurement Mistakes to Avoid
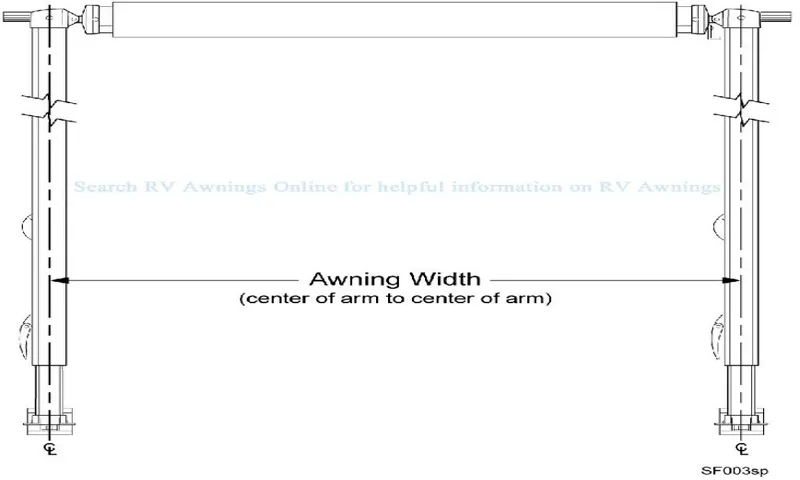
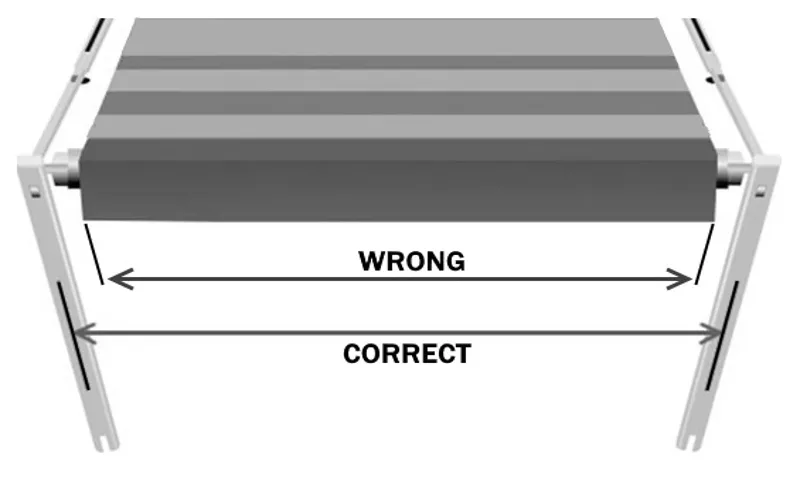
When it comes to measuring your RV’s awning, it’s important to avoid common mistakes that can lead to a poor fit. One of the most common mistakes is not measuring the awning’s width correctly. To get an accurate measurement, ensure that you measure from the outside edge of one arm to the outside edge of the other arm.
Another mistake to avoid is not considering the projection or length of the awning. This measurement is taken from the RV wall to the furthest point the awning extends. It’s also important to measure the height of the awning correctly, taking into account any obstructions such as lights or vents.
By avoiding these common measurement mistakes, you can ensure a perfect fit for your RV awning. So, next time you’re measuring your awning, remember to take your time and measure correctly to avoid any issues down the road.
Mistake 1: Not fully extending the awning
awning extension, measurement mistakes, avoid, burstiness, perplexity
Mistake 2: Measuring only the fabric
In the world of sewing and crafting, measuring is a crucial step that can make or break your project. One common mistake that many beginners make is only measuring the fabric and neglecting other important measurements. While knowing the dimensions of your fabric is important, it’s equally important to measure other elements such as your body or the area where the finished product will be used.
For example, if you’re making a dress, measuring your body accurately will ensure a proper fit. Likewise, if you’re making curtains, measuring the window will help you determine the length and width you need. By only measuring the fabric, you may end up with a garment that is too tight or curtains that are too short.
So remember, when it comes to measurements, think beyond just the fabric and consider all the other factors that will contribute to the final result.
Mistake 3: Not accounting for the roller and hardware
When it comes to measuring for window treatments, there are a few common mistakes that people make. One of these is not accounting for the roller and hardware. This is an important step to remember because it can make a big difference in the fit and functionality of your blinds or shades.
If you forget to factor in the size of the roller or hardware, you run the risk of your window treatment not fitting properly or not being able to be installed at all. So, when you’re measuring for your window treatments, make sure to include the size of the roller and any hardware that will be attached. This will ensure a perfect fit and a smooth installation process.
Don’t let this mistake derail your window treatment plans!
Mistake 4: Failing to measure the projection accurately
When it comes to planning and executing a project, it’s essential to measure the projection accurately. However, many people make the mistake of failing to do so, which can lead to a variety of problems down the line. For example, if you underestimate the time or resources required for a project, you may end up falling behind schedule or going over budget.
On the other hand, if you overestimate the projection, you could be wasting valuable resources that could have been allocated elsewhere. To avoid this common mistake, it’s important to take the time to carefully analyze the project requirements and gather all necessary information. Additionally, regularly monitoring and reassessing the projection throughout the project can help ensure that you stay on track and make necessary adjustments as needed.
By accurately measuring the projection, you’ll be better equipped to plan and execute your project effectively.
Tips for Accurate Measurements
Measuring your RV awning correctly is crucial to ensure a perfect fit and prevent any potential issues down the road. To accurately measure your RV awning, start by extending the awning fully and measuring the distance from the ground to the top of the roller tube. Next, measure the length of the awning fabric from one end to the other, including any additional overhang if applicable.
Finally, measure the width of the awning fabric from side to side. Make sure to measure both the roller tube end and the tension rafter end to account for any differences in size. By taking these precise measurements, you can be confident that the new awning will fit snugly and function properly on your RV.
Tip 1: Use a measuring tape
Have you ever measured something only to find out later that your measurements were off? It can be frustrating, especially when you’re working on a home improvement project or trying to order furniture that needs to fit just right. One simple tip to ensure accurate measurements is to use a measuring tape. This may seem obvious, but many people rely on guesswork or inaccurate tools when measuring.
A measuring tape offers the precision and flexibility needed for accurate measurements. With its clear markings and retractable design, you can easily measure both length and width. So, the next time you need to measure something, don’t underestimate the power of a good old-fashioned measuring tape.
It might just save you from costly mistakes and ensure that everything fits perfectly.
Tip 2: Have a second person assist you
When it comes to accurate measurements, having a second person to assist you can make a big difference. This is especially true when it comes to measuring larger or heavier objects. It can be difficult to hold the tape measure steady and get an accurate read at the same time.
Having a second person can help steady the tape measure and ensure that it is held in the correct position. They can also help to double-check the measurements to make sure they are accurate. Additionally, having a second person can help with complex measurements that require multiple points of reference.
They can hold one end of the tape measure while you measure from the other end, making it easier to get an accurate reading. So, if you want to ensure accurate measurements, don’t hesitate to ask for a helping hand.
Tip 3: Double-check your measurements
“Accurate measurements are crucial when it comes to any project, whether it’s a DIY home renovation or a culinary adventure in the kitchen. One of the key tips for ensuring precision in your measurements is to double-check them. It’s easy to make a mistake the first time around, especially if you’re in a hurry or distracted.
By taking the time to review your measurements, you can help avoid costly and time-consuming errors. So, before you cut that piece of wood or mix that batch of ingredients, grab your tape measure or kitchen scale and confirm the numbers. It may seem like a small step, but it can make a big difference in the success of your project.
“
Tip 4: Take measurements in multiple places
When it comes to measuring something accurately, it’s important to take measurements in multiple places. This is especially true when measuring a larger area or object, as there can often be variations in size or length from one spot to another. By taking measurements in multiple places, you can ensure that you get an accurate and comprehensive understanding of the dimensions you are working with.
This can be particularly helpful when it comes to projects like home renovations or building furniture, where precision is key. By measuring in multiple places, you can catch any inconsistencies or discrepancies and make adjustments accordingly. So, the next time you’re measuring something, be sure to take measurements in multiple places to ensure accuracy.
Conclusion
And there you have it, my fellow RV enthusiasts! The art of measuring a RV awning demystified. It may seem like a daunting task, but with these simple steps, you can confidently measure your awning with ease. Just remember, the key is to be as precise as a surgeon, as patient as a saint, and as determined as a marathon runner.
So grab your measuring tape, put on your thinking cap, and get ready to conquer the world of awning measurement! Because when it comes to RV living, it’s not just about the journey, it’s also about the shade. Now go forth, my fellow adventurers, and may your awning measurements always be accurate and your shade always be abundant. Happy RVing, my friends!”
Taking precise measurements is crucial for a successful RV awning installation
RV awning installation requires precise measurements to ensure a successful outcome. Taking accurate measurements is crucial because it determines the size and fit of the awning. To begin, you should measure the length of your RV from end to end.
This will give you an idea of the size of the awning you need. Next, measure the height of your RV. This measurement is important because it will determine the height of the awning and how it will be mounted.
Additionally, you should measure the distance between the RV’s awning rails. This measurement will determine the width of the awning and how it will be positioned. Lastly, don’t forget to measure the distance between any obstructions, such as windows or vents, to ensure the awning can be fully extended without any obstacles.
By taking these precise measurements, you can ensure a seamless and successful RV awning installation.
FAQs
How do I measure the width of my RV awning?
To measure the width of your RV awning, extend the awning fully and measure from one end of the roller tube to the other. Make sure to include any additional attachments or hardware that may affect the width.
What is the recommended method to measure the length of an RV awning?
To measure the length of your RV awning, extend it fully and measure from one end to the other, including any additional attachments or hardware. This will give you an accurate measurement for purchasing replacement fabric or accessories.
How do I measure the projection of my RV awning?
To measure the projection of your RV awning, extend it to its full length and measure from the RV wall to the furthest point that the awning extends outwards. This will help you determine the size of any additional awning accessories or sun shades.
Can I measure the RV awning without extending it fully?
It is recommended to fully extend the RV awning before measuring its dimensions. This ensures accurate measurements and takes into account any adjustments or expansions that may occur when the awning is fully deployed.
What tools do I need to measure an RV awning?
To measure an RV awning, you typically only need a measuring tape or ruler. However, it may be helpful to have a step ladder or assistance to reach higher points for accurate measurements.
Are there any specific guidelines for measuring a retractable RV awning?
When measuring a retractable RV awning, it is important to fully extend the awning before taking any measurements. This will help you determine the exact dimensions needed for replacements or modifications.
How can I ensure accurate measurements when measuring an RV awning?
To ensure accurate measurements when measuring an RV awning, make sure the awning is fully extended and the fabric is taut. Take measurements from one end to the other, including any additional attachments or hardware, and double-check them before making any purchases or modifications.
Do I need to consider the height of the RV when measuring the awning? A8. The height of the RV does not typically affect the measurement of the awning. However, if you plan to install any additional accessories or sun shades, it is recommended to consider the clearance between the awning and the RV roof.
Can I adjust the size of my RV awning if I measure it incorrectly?
It may not be possible to adjust the size of an RV awning if it is measured incorrectly. It is important to take accurate measurements to ensure proper fit and functionality.
Are there any specific instructions for measuring a curved RV awning?
When measuring a curved RV awning, it is best to use a flexible measuring tape or string to follow the curve of the awning and get an accurate measurement. Ensure that the measuring tape or string stays in contact with the awning at all times.
Can I measure the RV awning with someone else’s help?
Having someone else to assist you when measuring the RV awning can be beneficial, especially if the awning is located at a height or if it requires two people to fully extend it. This will help ensure accurate measurements and make the process easier.
What are the common mistakes to avoid when measuring an RV awning?
Some common mistakes to avoid when measuring an RV awning include not fully extending it before taking measurements, not considering additional attachments or hardware, not double-checking the measurements for accuracy, and not having the right tools or assistance for proper measurements.