Are you tired of taking your dirt bike to a mechanic every time the tire needs to be changed? Mounting your dirt bike tire can seem like a daunting task, but with some guidance, it can become an easy and cost-effective solution. In this step-by-step guide, we’ll show you how to properly mount your dirt bike tire without damaging the new rubber. Whether you are a seasoned pro or a newbie, this guide will help you save money and enhance your off-road experience.
So gear up and get ready to learn how to mount your dirt bike tire in just a few easy steps!
Table of Contents
Prepare Your Tools and Tire
To mount a dirt bike tire, you need to prepare your tools and tire before starting the process. First, ensure that you have all the necessary tools, including a tire mounting stand, tire iron, valve stem tool, and bead breaker. It’s crucial to check the tire’s condition, size, and type before mounting it.
Ensure that the tire and the rim are compatible to avoid any fitting issues. Once you’ve got everything ready, use the bead breaker to loosen the tire’s seal from the rim. Then, use the tire iron to pry out the tire from the rim.
Be gentle with the tire’s sidewalls to avoid puncturing or damaging it. Once the tire is off, remove the old valve stem and replace it with a new one. Finally, mount the new tire onto the rim, making sure to align the rim with the tire’s bead.
Push the tire onto the rim by hand, then use the tire iron to finish the job. With these steps, you can mount a dirt bike tire successfully and get back to riding in no time!
Tools You Need
When it comes to changing a tire, it’s essential to have the right tools on hand. First and foremost, you’ll need a spare tire. Make sure it’s inflated to the appropriate pressure and in good condition before you even attempt to change your tire.
Next, you’ll need a lug wrench to remove the lug nuts. Some cars come with a jack, but if yours doesn’t, you’ll need to buy one. A flashlight can also be helpful if you’re changing the tire at night or in low light conditions.
Keep all of these tools in your trunk or cargo area so they’re readily available when you need them. And don’t forget to familiarize yourself with how to use each tool so you’re prepared in case of an emergency. With these tools at your disposal, you’ll be ready to tackle a tire change and get back on the road in no time.
Inspect Your Tire
Before inspecting your tire and finding any problems, it’s important to prepare your tools and tire beforehand. Begin by gathering your tools, such as a tire pressure gauge, jack, lug wrench, and spare tire. Make sure you have all the necessary equipment to take care of any potential issues.
Once you have your tools ready, visually inspect your tire for any signs of wear or damage. Check for any punctures, cracks, or bulges in the tire. Use your tire pressure gauge to measure the tire pressure and ensure it matches the manufacturer’s recommended PSI.
If the pressure is too low, add air until it reaches the recommended level. Don’t forget to check the tread depth as well, as worn out treads can compromise the tire’s traction. Ensuring your tools are in good condition and that your tire is inspected thoroughly will keep you safe and prevent any potential accidents on the road.
Remove the Old Tire
When it comes to mounting a dirt bike tire, removing the old tire is the first step to take. This task can be quite tricky, especially if the tire has been on your bike for a while. To remove the old tire, you’ll need to use tire irons, which are specialized tools used to pry the tire off the rim.
Start by deflating the tire completely, then use the tire irons to work the tire off the rim, starting at the bead. Be careful not to damage the tire or the rim during this process. As you work around the tire with the tire irons, the tire should start coming loose.
Once the tire is completely off the rim, be sure to check for any damage or wear on the rim that might need to be repaired before putting on your new tire. With the tire removed, you can move on to mounting the new tire, but that’s a topic for another day. For now, focus on getting that old tire off and inspecting your rim for any damage or wear that might be present.
Remove the Valve Core
Removing the valve core is an essential step in the process of changing an old tire. The valve core is the central portion of the valve system that allows the tire to be inflated or deflated. Before removing it, ensure that the tire is entirely deflated.
Then, remove the valve cap to access the valve core. Using a valve core removal tool, twist it counterclockwise until it is loose enough to unscrew it by hand. Be careful when removing the valve core as it can sometimes shoot out with force due to trapped air pressure.
Once it is removed, set it aside, and dispose of it properly if it is worn out. Keep the old tire and other components aside until you have mounted the new tire and reinstalled the valve core. Only then can you discard them if they are no longer of use.
Break the Beads
When it comes to changing a tire, one of the first steps is removing the old tire. This process can seem intimidating, but with a few simple steps, it’s actually quite manageable. First, start by loosening the lug nuts on the tire with a lug wrench.
Then, use a jack to lift the car off the ground, making sure it’s stable before continuing. With the car lifted, finish removing the lug nuts and gently pull the old tire off the car. It’s important to be careful of any potential rust or debris that may have built up, as this can cause damage to the new tire.
Once the old tire is removed, it’s easy to move on to the next step and get your new tire properly installed. Whether you’re a seasoned mechanic or a first-time tire changer, taking the time to properly remove your old tire is a crucial step in the overall tire replacement process.
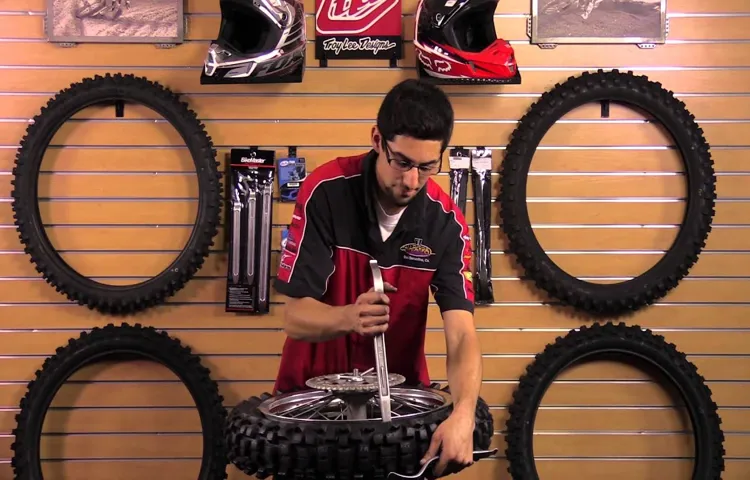
Remove the Tire from the Wheel
To remove the old tire from the wheel, you’ll need to follow a few steps. First, deflate the tire completely using a valve stem tool. Then, use a tire spoon or lever to gently pry the tire away from the rim.
Be careful not to damage the rim. Work your way around the tire, pulling it free from the rim gradually. You may need to apply some elbow grease to work the tire off.
If the tire is particularly stubborn, you may need to use a bead breaker or a box cutter to cut the tire away from the rim. Once the tire is removed, inspect the rim closely to ensure there are no damages or cracks. Clean the wheel thoroughly before installing the new tire.
By following these simple steps, you can easily and safely remove the old tire from your wheel.
Prepare the New Tire
Mounting a new tire on a dirt bike can be challenging, but with the right preparation, it can be done quickly and easily. First, ensure that the wheel is clean, dry, and free from any debris or residue from the previous tire. Next, lubricate the rim with tire-mounting lubricant.
This will help the tire slide onto the rim more easily and prevent damage to the tire or wheel. Once the rim is lubricated, position the tire over the rim and align the valve stem with the hole in the rim. Then, use a tire iron to gently pry the tire onto the rim.
It’s important to work your way around the tire and work on small sections at a time to avoid damaging the tire or rim. As you mount the tire, stop periodically to make sure it’s seated correctly on the rim and adjust as necessary. When you’ve mounted the tire, inflate it to the recommended air pressure, and check for any leaks or defects.
With these steps, you can mount a new tire on your dirt bike with ease, ensuring you’re ready for your next adventure on the tracks or trails.
Clean the Surface
Before you start installing a new tire, it’s essential to prepare the surface by cleaning it thoroughly. The area around the rim should be free of any debris, dirt, or rust. This is an often overlooked step that can lead to an improper fit of the tire once installed.
A clean surface provides a smooth and even base for the tire to adhere to, creating a secure and safe fit. You can use a wire brush or sandpaper to remove any rust or uneven surfaces from the rim, followed by a soap and water solution to wash off any remaining dirt or grime. After cleaning, inspect the rim for any cracks or damage.
If any are present, it’s best to replace the rim before installing the new tire. By taking the time to prepare the surface properly, you’ll ensure a long-lasting, safe fit of your new tire on your vehicle.
Lubricate the Beads
When installing a new tire, it’s important to properly prepare it before mounting it onto your vehicle. One important step in this process is to lubricate the beads of the tire. This involves applying a small amount of lubricant to the edges of the tire where it will come into contact with the rim.
By doing this, you’ll help ensure that the tire is able to slide onto the rim smoothly, without any resistance that could cause damage. Plus, it makes the installation process much easier overall. Be sure to choose a lubricant that’s specifically designed for this purpose, as using the wrong type of lubricant could cause problems down the line.
With a little bit of preparation, you’ll be ready to install your new tire with confidence and ease.
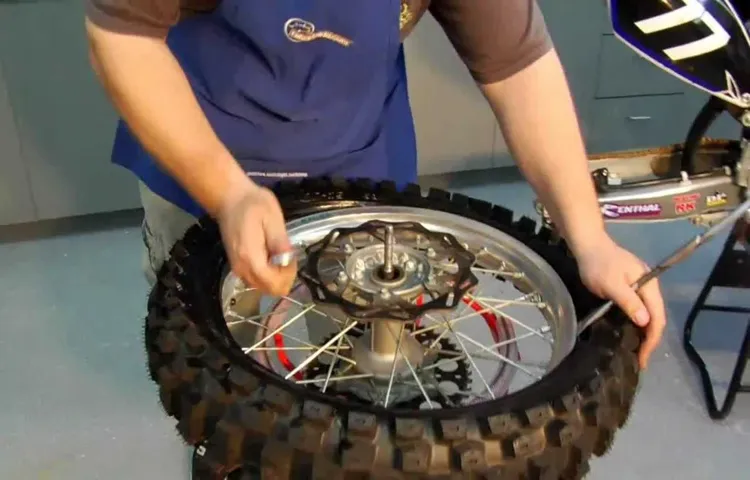
Install the New Tire
Mounting a new tire on your dirt bike might seem like a daunting task, but with the right tools and a little patience, it can be done in no time. Start by laying the wheel down on a stable surface with the valve stem facing up. After deflating the old tire, use tire irons to pry the old tire off the wheel, being careful not to damage the rim.
Once the old tire is removed, clean any residual debris from the wheel. Next, apply a liberal amount of tire lubricant to the inside of the new tire, then position the tire onto the wheel. Use your hands to work the tire onto the rim, making sure it’s correctly seated before proceeding.
Then, use the tire irons to carefully work the tire onto the wheel, being sure to keep the tire lubricated to prevent pinching. When the tire is in place, inflate it to the appropriate PSI level, checking for any leaks or damage before securing the wheel back onto your dirt bike. With a little practice, mounting a new tire can become a simple and stress-free task.
Put the Tire on the Wheel
When it comes to installing a new tire on your vehicle, it’s important to take the proper steps to ensure a safe and secure fit. The first step is to put the tire on the wheel itself, which can sometimes be a bit tricky. Start by aligning the valve stem of the tire with the hole in the wheel intended for it.
Then, push the tire onto the wheel, making sure it’s perfectly centered. Be sure to use a mounting machine that is specifically designed for this task, as it can be dangerous to attempt this step manually. Once the tire is securely on the wheel, follow the manufacturer’s instructions for tightening the lug nuts to ensure a proper fit.
With these steps in mind, you’ll be able to successfully install your new tire and hit the road with confidence knowing you’ve done it correctly.
Seat the Beads
When it comes to installing your new tire, it’s important to properly seat the beads to ensure a secure fit. The beads are the thick edges of the tire that lock onto the rim of the wheel. First, make sure the tire is properly aligned with the wheel.
Next, use a tire iron to push the tire’s bead onto the rim. You may need to use a lubricant, like soapy water, to make this process easier. Once one side is seated, move to the other side of the tire and repeat the process.
Be sure to check that both beads are fully seated all around the rim before inflating the tire. Proper bead seating will prevent the tire from slipping or blowing out when on the road. Remember, taking the time to correctly install your new tire can save you from future issues and keep you safe while driving.
Fill the Tire
Once you have successfully mounted the new tire on your vehicle, you should fill it up with air to the recommended level. This is a crucial step that ensures your safety and the proper functioning of your car. Overinflating or underinflating the tire can lead to potential hazards such as decreased traction, uneven wear, and even blowouts.
To fill the tire, attach the air hose to the valve stem on the tire and pump air until the desired pressure is reached. You can find the recommended tire pressure in your vehicle manual or sticker located on the driver’s side door jamb. If you do not have access to an air compressor, you can visit a gas station or tire shop for assistance.
Remember, maintaining proper tire inflation is essential for your vehicle’s overall performance and longevity, so be sure to check your tire pressure regularly.
Final Checks
Now that you have successfully mounted your dirt bike tire, it’s crucial to perform some final checks to ensure everything is secure and in place. The first thing you should always do is double-check the torque of the lug nuts. Make sure they are tightened to the manufacturer’s specifications.
Next, inspect the tire for any signs of stress or damage. Check the air pressure and make any necessary adjustments. Take the bike for a short ride and pay attention to any strange vibrations or handling issues.
Make sure the tire is wearing evenly and smoothly. If everything seems okay, then you’re ready to hit the dirt! Remember, proper tire maintenance is crucial to your safety and the longevity of your dirt bike. So, keep an eye on your tires regularly and replace them when needed.
Now that you know how to mount a dirt bike tire, you can tackle any trail with confidence, knowing your bike is ready for whatever comes your way.
Check the Pressure
When it comes to ensuring your vehicle is in tip-top shape, checking the pressure in your tires is an important final step. In fact, proper tire pressure not only improves the overall performance of your vehicle but can also increase your car’s fuel efficiency. Additionally, proper tire pressure can help prevent blowouts and other tire-related accidents, which can be dangerous and costly.
That being said, it’s important to check your tire pressure regularly and adjust it as needed. This can be easily done with a tire pressure gauge, which can be purchased at any auto parts store. By keeping your tires properly inflated, you can ensure your vehicle is running smoothly and safely on the road.
Check for Leaks
Now that you’ve installed your new plumbing system, it’s essential to check for leaks before you start using it. Leaks can lead to water damage, high utility bills, and mold growth. The best way to check for leaks is to turn on the water and inspect the pipes, connections, and valves for any signs of leakage.
You can also examine the water meter to determine if there’s an ongoing leak. If you notice any leaks, it’s important to fix them immediately to avoid further damage. By checking for leaks, you’ll ensure that your plumbing system is functioning efficiently and will provide you with clean, safe water for your everyday needs.
Conclusion
Mounting a dirt bike tire isn’t rocket science, but it does take a bit of finesse and the right tools. With these simple steps in mind, you can get that fresh rubber on your bike in no time. Just remember to stay safe and avoid any potential crashes, because nothing ruins a good ride like a busted tire.
Happy trails, fellow dirt bikers!”
FAQs
What tools do I need to mount a dirt bike tire?
You will need tire irons, a tire changer stand, and a valve stem tool.
Is it easy to mount a dirt bike tire?
Mounting a dirt bike tire can be challenging, especially if you’re a beginner. However, it can become easier with practice and the right tools.
Can I mount a dirt bike tire without a tire changer stand?
Yes, it is possible to mount a dirt bike tire without a tire changer stand, but it can be difficult.
How do I know what size tire to get for my dirt bike?
You can check your dirt bike’s manual or its tire sidewall for the correct tire size.
Can I reuse my old dirt bike tire’s inner tube?
It’s recommended to replace the inner tube when changing a dirt bike tire, but if it’s still in good condition, it can be reused.
What should I do if I can’t mount my dirt bike tire?
If you’re having trouble mounting your dirt bike tire, it’s best to seek help from a professional mechanic.
How often should I replace my dirt bike’s tires?
It’s recommended to replace your dirt bike’s tires every 40-50 hours of riding or once a year, whichever comes first.