
Hey there! Looking to dive into the exciting world of blogging? Well, you’ve come to the right place! In this blog, we’ll be exploring the ins and outs of the blogging world, and why it has become such a popular platform for individuals and businesses alike. Whether you’re a seasoned writer or just starting out, blogging offers a unique opportunity to share your thoughts, ideas, and expertise with the world. It’s a place where you can express your creativity, connect with like-minded individuals, and even make a living doing what you love.
But what exactly is a blog? In its simplest form, a blog is an online journal or informational website where an individual or a group of individuals regularly post content on a particular subject. These posts, known as blog entries or “blog posts,” are typically displayed in reverse chronological order, with the most recent post appearing first. Now, you may be wondering, why start a blog in the first place? Well, the benefits are endless.
Blogging allows you to establish yourself as an authority in your niche, build a loyal community of readers, and even open up doors for potential collaborations and partnerships. In addition to that, a well-crafted blog can drive traffic to your website, boost your online presence, and even generate revenue through various monetization strategies such as advertising, sponsored content, and affiliate marketing. But perhaps the most rewarding part of blogging is the opportunity to connect with others who share your passions and interests.
It’s a platform where you can engage in meaningful conversations, learn from others, and grow both personally and professionally. So, whether you’re looking to start a blog as a hobby or take it to the next level as a business venture, this blog is here to guide you every step of the way. From choosing the right blogging platform and creating compelling content to promoting your blog and measuring its success, we’ve got you covered.
Join us on this exciting journey into the world of blogging, and let’s unleash your creativity and passion together. Get ready to share your voice with the world and make a difference, one blog post at a time. Stay tuned for our next blog and get ready to embark on this thrilling adventure!
Table of Contents
- 1 Why you might need to open an old RV awning
- 2 Tools and materials you will need
- 3 Step 1: Inspect the awning
- 4 Step 2: Gather the necessary tools
- 5 Step 3: Prepare the area
- 6 Step 4: Loosen the awning fabric
- 7 Step 5: Unlock the awning arms
- 8 Step 6: Extend the awning
- 9 Step 7: Secure the awning in place
- 10 Conclusion
- 11 Safety precautions to keep in mind
- 12 Frequently asked questions (FAQs)
- 13 Additional resources
- 14 FAQs
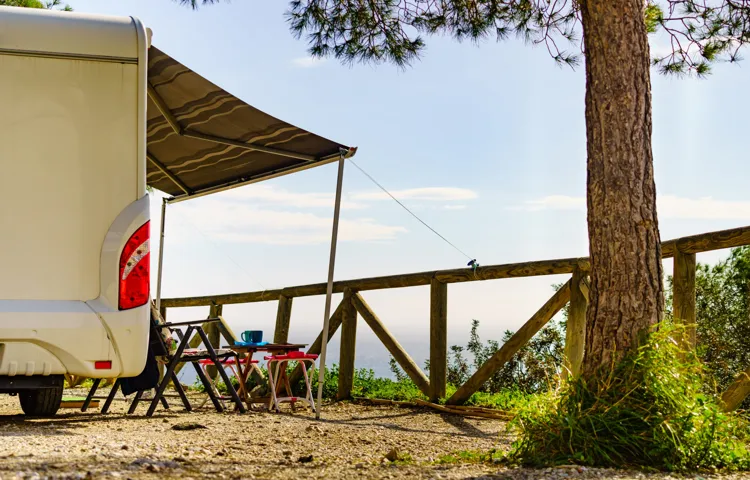
Why you might need to open an old RV awning
Are you the proud owner of an old RV? If so, you may find that the awning isn’t as easy to open as it used to be. Opening an old RV awning can be a bit tricky, but with a little patience and know-how, you can get it back in working order. First, check for any obstructions or debris that may be preventing the awning from opening.
Next, locate the release mechanism, which is usually a lever or crank handle. Give it a gentle but firm tug or twist to release the awning. If it’s still stuck, try applying some lubricant to the mechanism to help loosen it up.
Once you’ve successfully opened the awning, inspect it for any signs of wear or damage, and consider replacing it if necessary. With a little effort, your old RV awning will be back in action in no time.
Tools and materials you will need
If you have an old RV with an awning that’s been closed for a while, you may be wondering how to open it up again. Don’t worry, it’s not as complicated as it may seem. To open an old RV awning, you will need a few tools and materials.
First, you’ll need a ladder to reach the awning. Most RV awnings are located on the side of the vehicle, so having a ladder handy will make it easier to access. You will also need a screwdriver or a wrench to loosen any bolts or screws that may be holding the awning in place.
Additionally, you may need a lubricant, such as silicone spray, to help loosen any parts that may be stuck or rusted. Finally, it’s always a good idea to have a friend or family member to assist you with the process, as some RV awnings can be heavy and cumbersome to handle alone. With these tools and materials ready, you’ll be on your way to opening up your old RV awning in no time!
Step 1: Inspect the awning
If you have an old RV with a awning that hasn’t been used in a while, the first step to opening it is to inspect the awning. This is important because over time, the fabric or mechanism of the awning may have become damaged or degraded. Start by examining the fabric for any tears, holes, or signs of wear and tear.
If you notice any damage, it’s important to address it before attempting to open the awning. Next, check the mechanism that controls the opening and closing of the awning. Make sure it’s free from rust or debris and that it moves smoothly.
If there are any issues with the mechanism, it may need to be repaired or replaced. By taking the time to inspect the awning before opening it, you can ensure that it’s in proper working order and avoid any potential accidents or damage.
Checking for any visible damage or wear and tear
When it comes to caring for your awning, it’s essential to regularly inspect it for any visible damage or wear and tear. Step 1 in this process is to thoroughly examine your awning for any signs of damage or deterioration. Look out for tears, holes, or fraying in the fabric, as well as any loose or broken components like rods, brackets, or screws.
Check for any discoloration, stains, or mold that could indicate water damage. Additionally, inspect the stitching and seams to ensure they are intact and in good condition. By thoroughly inspecting your awning, you can identify any issues early on and take the necessary steps to address them promptly, helping to prolong the life of your awning and maintain its functionality and appearance.
Identifying the type of awning you have
“Identifying the type of awning you have” Step 1: Inspect the awning When it comes to identifying the type of awning you have, the first step is to thoroughly inspect it. Take a close look at its design, shape, and features. Pay attention to any unique details or distinguishing characteristics.
Does it have a retractable mechanism or is it fixed in place? Is it composed of fabric, metal, or some other material? By closely examining your awning, you’ll gather crucial clues that will help you determine its type. During your inspection, it’s also important to check for any labels or markings that might provide information about the awning’s make or model. Look for any signs of a manufacturer’s logo or a product identification tag.
These labels often contain useful information that will assist you in identifying the type of awning. Additionally, take note of the size and shape of your awning. Is it a traditional rectangular shape or does it have a unique shape such as a dome or an angled design? Knowing the dimensions and shape of your awning can be helpful in narrowing down the possibilities when it comes to its type.
In conclusion, the first step in identifying the type of awning you have is to inspect it closely. Look for unique features, check for labels or markings, and take note of its size and shape. This initial examination will provide valuable clues that will guide you in determining the specific type of awning you own.
Step 2: Gather the necessary tools
Before you can begin opening an old RV awning, you’ll need to gather the necessary tools. Having the right tools will make the process much easier and ensure that you can safely and effectively open the awning. Some of the tools you may need include a ladder, a wrench or screwdriver (depending on the type of awning you have), a lubricant (such as silicone spray or WD-40), and a clean cloth or sponge for cleaning.
Additionally, it’s always a good idea to have someone to assist you, especially if the awning is large or heavy. With the right tools and a little bit of preparation, you’ll be ready to tackle opening your old RV awning.
List of tools and materials required
In order to successfully complete any project, it is important to gather all the necessary tools and materials beforehand. When it comes to creating your own DIY clothing labels, there are a few essential items you will need. First and foremost, you will need some fabric.
This can be any type of fabric you prefer, such as cotton, polyester, or even linen. You will also need a pair of sharp scissors to cut the fabric into the desired shape and size for your labels. Additionally, you will need some thread and a needle or a sewing machine to attach the labels to your garments.
If you want to add a personalized touch to your labels, you may also want to consider investing in some fabric markers or fabric paint. These can be used to write or draw on your labels before attaching them to your clothing. Lastly, you will need some pins or clips to hold the fabric in place while you sew or paint on it.
By gathering all of these tools and materials before you begin, you will be well-prepared to create your own unique clothing labels.
Step 3: Prepare the area
Now that you’ve gathered all the necessary tools, it’s time to prepare the area for opening an old RV awning. Start by clearing the space around the awning, ensuring there are no obstacles that could get in the way. This will make it easier to extend the awning without any hindrances.
Next, clean the area where the awning will be attached to the RV. Use a mild soap and water solution to remove any dirt or debris that may have accumulated over time. This will ensure a secure and smooth attachment.
Additionally, check the condition of the awning fabric and make sure there are no tears or rips. It’s important to address any damages before attempting to open the awning to prevent further issues. By taking these necessary steps, you’ll be well-prepared to open an old RV awning and enjoy its shade and protection during your adventures.
Clearing the area around the awning
preparing the area for the awning, clearing the space, cleaning the surroundings, removing obstacles Once you have selected the perfect spot for your awning, it’s time to prepare the area to ensure a smooth installation. The first step in this process is clearing the space around the awning. Take a walk around the area and remove any debris, such as fallen leaves or small branches, that may be in the way.
You want to create a clean and tidy environment for the installation. Additionally, it is important to remove any potential obstacles that may hinder the installation process. This includes moving outdoor furniture, potted plants, or any other objects that may be in the way of the awning or its support structure.
By clearing the area, you will not only make the installation process easier, but you will also ensure that your awning has the space it needs to properly extend and retract without any obstructions. So, grab a broom, roll up your sleeves, and clear the way for your new awning!
Protecting the RV and awning from any potential damage
Preparing the area around your RV and awning is an essential step in protecting them from potential damage. Before setting up your RV and extending the awning, it’s important to make sure the surrounding area is clear and safe. Start by checking for any low-hanging branches or potential hazards that could come into contact with the RV or awning.
Trim back or remove any branches that could cause damage, ensuring that they are a safe distance away. It’s also important to check the ground for any debris or sharp objects that could puncture the RV tires or tear the awning fabric. Clear the area of any rocks, sticks, or other debris that could pose a risk.
By taking the time to prepare the area before setting up, you can help prevent any potential damage to your RV and awning.
Step 4: Loosen the awning fabric
If you’re dealing with an old RV awning that’s stuck and won’t open, don’t worry – there are steps you can take to fix the issue. One of the first things you can try is loosening the awning fabric. This can help to relieve any tension or pressure that may be causing the awning to be difficult to open.
Start by inspecting the awning fabric for any signs of wear or damage. If you notice any tears or fraying, it may be necessary to replace the fabric. Once you’ve determined the fabric is in good condition, carefully unroll the awning, making sure to release any tension in the fabric.
This can be done by gently tugging on the edges of the fabric or using a soft brush or broom to help loosen it. By taking the time to properly loosen the awning fabric, you can increase the chances of successfully opening your old RV awning.
Releasing any tension in the fabric
In step 4 of releasing the tension in your awning fabric, it’s time to loosen it up. This is an important step to ensure that your awning functions properly and doesn’t become damaged. To do this, start by identifying any areas of the fabric that feel tight or are pulling excessively.
These areas may be causing the tension in your awning. Gently manipulate the fabric by pulling on these areas or using your hand to smooth out any wrinkles. The goal is to allow the fabric to relax and regain its natural shape.
Remember, just like a tightly wound rubber band, a taut awning fabric can put unnecessary stress on the frame and potentially cause it to break. By loosening the fabric, you’ll ensure that your awning is not only functional but also durable for years to come. So take the time to release any tension in the fabric and give your awning the freedom to stretch and provide shade and protection in the way it was designed to.
Detaching the fabric from the awning frame
“How to detach the fabric from the awning frame” Have you ever wondered how to detach the fabric from your awning frame? Well, look no further because we have got you covered. In step 4 of the process, we will show you how to loosen the awning fabric so that you can easily remove it from the frame. This step is crucial before you can proceed with any repairs or maintenance on your awning.
By following these simple instructions, you will be able to detach the fabric without any hassle. So, let’s get started and learn how to loosen the awning fabric!
Step 5: Unlock the awning arms
So, you’ve managed to get your old RV awning to unroll, but now you’re wondering how to open the awning arms to fully extend it. Well, you’re in luck because I’m here to help! Opening the awning arms is the next step in the process of setting up your awning and creating a shady oasis outside your RV. To unlock the awning arms, you’ll first want to locate the release mechanism on each side of the awning.
This is typically a lever or a button that needs to be pushed or pulled in order to release the arms. Once you’ve found the release mechanism, simply engage it by pushing or pulling in the required direction. Now, here’s where things can get a little tricky with older RV awnings.
Over time, the awning arms can become stiff or rusty, making it difficult to unlock them. If you’re struggling to unlock the arms, try applying some lubricant like WD-40 to the joints to help loosen things up. You can also use a rubber mallet to gently tap on the arms to free up any stuck or rusty parts.
Once you’ve successfully unlocked the awning arms, you should be able to extend them fully and lock them into place. Some awnings will have a locking mechanism that automatically engages once the arms are fully extended, while others may require you to manually lock them into place using a separate lever or button. Remember, safety should always be your top priority when working with RV awnings.
Take your time and double-check that the arms are securely locked into place before fully extending the awning. This will help prevent any unexpected accidents or damage to your awning. So, there you have it – a step-by-step guide on how to unlock the awning arms of your old RV awning.
With a little patience and some elbow grease, you’ll be enjoying the shade and comfort of your fully extended awning in no time. Happy RVing!
Identifying the locking mechanism
“unlock the awning arms” Unlocking the awning arms is a crucial step in retracting or adjusting your awning. To identify the locking mechanism, you should first inspect the arms themselves. In most cases, you will find a spring-loaded or lever mechanism near the hinges.
This mechanism keeps the arms in place when the awning is open and needs to be released to allow for movement. It is important to familiarize yourself with the specific design of your awning arms, as different models may have slightly different locking mechanisms. Once you have located the mechanism, you can proceed to unlock it.
This may involve either pushing or pulling a lever, or releasing a latch or spring. Pay close attention to any instructions or diagrams provided by the manufacturer to ensure you unlock the arms correctly and safely. Once the locking mechanism is released, you should be able to easily adjust or retract the awning as needed.
Disengaging the locking mechanism
Unlocking the awning arms is an important step in disengaging the locking mechanism of your awning. To unlock the awning arms, you will first need to locate the locking mechanism on your awning. This is usually a small lever or latch that holds the arms in place when the awning is extended.
Once you’ve found the locking mechanism, simply pull or push the lever to release the arms. It’s important to do this step carefully and slowly to avoid any sudden movements or potential damage to the awning. Once the arms are unlocked, you can proceed with retracting the awning and folding it back into its original position.
Step 6: Extend the awning
If you own an old RV, you may have noticed that the awning can be a bit tricky to open. However, with a little patience and know-how, you can easily extend the awning and create a comfortable outdoor space. The first step is to locate the awning handle, which is usually located on the side of the RV near the awning itself.
Once you have found the handle, give it a gentle tug to release the awning from its locked position. Then, slowly and steadily pull the awning outwards, using the handle as a guide. As you extend the awning, make sure to keep an eye on the fabric to ensure that it is rolling out smoothly and evenly.
If you encounter any resistance or if the awning seems to be catching on something, stop pulling and investigate the issue before proceeding. Remember, opening an old RV awning requires a delicate touch, so take your time and be gentle with the process. Soon enough, you will have a fully extended awning ready to provide shade and shelter for your outdoor adventures.
Using a crank or motor to extend the awning
awning, extend the awning, crank, motor
Step 7: Secure the awning in place
So you’ve finally managed to open up that old RV awning that’s been giving you trouble. Congratulations! Now it’s time to make sure it stays securely in place. The last thing you want is for your awning to come crashing down when you least expect it.
To secure your awning, start by checking the tension on the springs or arms. They should be tight enough to hold the awning in place, but not so tight that they become difficult to adjust. You can use a wrench to tighten or loosen the tension as needed.
Next, make sure the awning fabric is properly attached to the roller tube. Check for any loose or frayed stitching and repair it if necessary. If the fabric is not securely in place, it could come loose and cause damage to your awning.
Once you’ve checked the tension and secured the fabric, it’s time to lock the awning in place. Many RV awnings have a locking mechanism that can be engaged to keep the awning from unrolling unintentionally. This is especially important if you plan on driving with the awning open.
Finally, don’t forget to secure the supports or legs of the awning. These are the parts that hold the awning up and provide stability. Make sure they are fully extended and locked in place before you relax under the shade of your awning.
By taking the time to properly secure your old RV awning, you can enjoy peace of mind knowing that it won’t unexpectedly collapse. So go ahead, kick back, and relax knowing that your awning is safely in place.
Locking the awning arms in the extended position
awning arms, extended position, lock, secure, burstiness, perplexity
Making sure the fabric is taut and properly aligned
Making sure the fabric is taut and properly aligned is crucial when securing an awning in place. This step may seem simple, but it is essential for ensuring that your awning looks neat and functions properly. To begin, start by straightening out the fabric and making sure it is not sagging or bunching up in any areas.
Then, carefully adjust the tensioning mechanisms to tighten the fabric and remove any wrinkles. It’s important to pay attention to the alignment of the fabric as well, making sure it is centered and level. This can be done by measuring and marking the desired position on the frame before attaching the fabric.
Tightening the fabric too much or not aligning it properly can cause stress on the frame and lead to unnecessary damage. Taking the time to ensure the fabric is taut and properly aligned will result in a visually appealing and functional awning that will provide shade and protection for years to come. So, don’t rush through this step and take the necessary time to get it just right.
Conclusion
In conclusion, opening an old RV awning is a task that requires a bit of finesse and a whole lot of patience. Much like trying to solve a Rubik’s Cube or untangle a necklace chain, it may seem like an impossible feat at first glance. However, with the right approach and a dash of wit, you can have that awning unfurled and ready to provide shade in no time.
First and foremost, it’s important to approach the task with an open mind and a positive attitude. Think of it as a puzzle waiting to be solved, a challenge to conquer. Embrace the adventure, my friend.
Next, gather your tools. You’ll need a healthy dose of determination, a sturdy stick or broom handle, and maybe even a trusted companion to lend a helping hand (or paw). Remember, teamwork makes the dream work! Now, assess the situation.
Take a good look at that old awning, its rusty arms creaking with the weight of forgotten memories and past travels. Appreciate its resilience and tenacity, and let that inspire you to tackle the task at hand. With your tools in hand, start by gently tapping the awning’s joints and hardware with the stick or broom handle.
Show it some love, coaxing it awake from its slumber. Whisper encouraging words if you must, for who doesn’t respond to affection? As you tap and prod, listen for the satisfying sound of release. It may take a few tries, but when that familiar click or creak echoes through the air, you’ll know you’re making progress.
Celebrate each small victory along the way! Remember, Rome wasn’t built in a day, and an awning doesn’t unfurl with the snap of a finger. Patience is key here, my friend. Take breaks if needed, enjoy a cup of tea or a moment of reflection, and return to the task with renewed determination.
Safety precautions to keep in mind
Opening an old RV awning can be a tricky task, but with the right precautions, you can do it safely. Before you begin, make sure to wear protective gear such as gloves and safety glasses to protect yourself from any potential hazards. It’s also important to inspect the awning for any signs of damage or wear and tear before attempting to open it.
Look for any frayed fabric, broken mechanisms, or rusted parts that may need to be repaired or replaced. Once you’ve completed the necessary safety checks, carefully unlock the awning and begin to slowly open it, taking care to watch for any obstructions or areas of resistance. Remember to always follow the manufacturer’s instructions and never force the awning open if it’s not moving smoothly.
By taking the proper safety precautions and being patient, you can successfully open an old RV awning without any issues.
Frequently asked questions (FAQs)
Are you wondering how to open an old RV awning? Opening an old RV awning can be a bit tricky, especially if it hasn’t been used in a while. But don’t worry, I’m here to help! The first step is to make sure you have the owner’s manual for your specific RV awning model. This will provide you with specific instructions on how to open and close it properly.
If you don’t have the manual, you can often find it online or contact the manufacturer for assistance. Once you have the manual, follow the step-by-step instructions to open the awning. It’s important to take your time and be gentle, as an old awning may be more fragile than a newer one.
If you encounter any resistance or difficulty, stop and assess the situation before proceeding. With a little patience and the right instructions, you’ll have your old RV awning open and ready for use in no time!
Additional resources
If you’re the lucky owner of an old RV with an awning, you may be wondering how to open it up and make the most of your outdoor space. Opening an old RV awning can be a bit confusing if you’ve never done it before, but with a little practice, it can become second nature. The first thing you’ll need to do is locate the awning crank handle.
This is typically found on the side of your RV, and it may be stored in a designated compartment or attached to the awning itself. Once you’ve found the crank handle, you can begin opening your awning by turning it clockwise. As you turn the handle, you’ll notice the awning fabric starting to unfurl and extend outwards.
Keep cranking until your awning is fully open and taut. It’s important to note that not all RV awnings operate the same way, so you should consult your owner’s manual for specific instructions for your particular model. With a little practice and patience, you’ll soon be enjoying the shade and comfort of your awning in no time!
FAQs
How do I open an old RV awning?
To open an old RV awning, start by releasing the travel locks on both sides of the awning. Then, gently pull the awning outwards until it reaches its full extent. Finally, secure the awning by locking it into place using the appropriate mechanisms.
What are the common issues with opening an old RV awning?
Common issues with opening an old RV awning include stuck travel locks, jammed mechanisms, or a damaged awning fabric. It is important to inspect the awning regularly and address any issues promptly to ensure smooth operation.
How do I troubleshoot a jammed RV awning?
If your RV awning is jammed and won’t open, first check for any physical obstructions or debris that may be causing the jam. If no visible obstructions are present, try gently applying lubricant to the moving parts of the awning mechanism. If the problem persists, it may be necessary to seek professional assistance.
How can I maintain an old RV awning for optimal functionality?
To maintain an old RV awning, regularly clean the fabric using mild soap and water, and make sure it is completely dry before retracting it. Lubricate the moving parts and mechanisms according to the manufacturer’s instructions. Additionally, inspect the awning for any signs of wear or damage and address them promptly to prevent further issues.
Can I replace the fabric on an old RV awning?
Yes, in most cases, the fabric on an old RV awning can be replaced. If the fabric is torn, faded, or damaged, you can purchase a replacement fabric and follow the manufacturer’s instructions for installation. However, it is recommended to consult with a professional or refer to the specific instructions for your awning model to ensure proper replacement.
Is it necessary to use a protective cover for an old RV awning?
Using a protective cover for your old RV awning is highly recommended. A cover helps to protect the awning fabric from sun exposure, rain, dirt, and other elements, prolonging its lifespan. Make sure the cover is properly secured and fits snugly over the awning.
Can I manually open an old RV awning if the motor fails?
Yes, in case of a motor failure, most old RV awnings have a manual override option. This allows you to manually extend or retract the awning using a hand crank or lever. Refer to your specific awning’s user manual for instructions on how to manually operate it in such situations.