Are you ready to embark on your next RV adventure but unsure how to open your awning? Don’t worry, we’ve got you covered! Opening your RV awning is a simple process that can be done in just a few easy steps. In this step-by-step guide, we’ll walk you through the process of opening your RV awning, so you can enjoy the shade and protection it provides while on the road. Whether you’re a seasoned RV owner or a newbie, you’ll find this guide helpful in getting your awning up and ready for your camping trip.
So, let’s dive in and get started!
Table of Contents
Section 1: Preparing to Open the Awning
Have you ever been itching to open up your RV awning and enjoy the great outdoors? Well, look no further because I’m here to guide you through the process of opening your RV awning. Before we dive into the nitty-gritty, it’s important to take some preparatory steps. First, make sure you find a suitable location with enough space to open the awning fully.
Clear any obstacles, such as tree branches or other RVs, to ensure a smooth opening. Next, check the weather forecast. It’s always best to open your awning on a calm day with no strong winds or rain in the forecast.
Once you’ve done these preliminary checks, you’re ready to move on to the next steps of opening your RV awning.
Step 1: Check the Weather Conditions
Opening the awning can be an enjoyable experience, but before you do, it’s important to check the weather conditions. This step is crucial for ensuring the safety and durability of your awning. You don’t want to be caught off guard by a sudden rainstorm or strong winds that could potentially damage your awning.
By checking the weather forecast beforehand, you can make an informed decision about whether or not it’s the right time to open your awning. This will give you peace of mind and help you avoid any potential issues. So, take a moment to check the weather conditions and plan accordingly before opening your awning.
Trust me, it’s better to be safe than sorry!
Step 2: Gather the Necessary Tools
In order to successfully open your awning, you’ll need a few essential tools. First and foremost, make sure you have a sturdy ladder or step stool that will allow you to safely reach the awning. It’s important to prioritize your safety when working at heights, so choose a ladder that is stable and properly sized for the job.
Additionally, you’ll need a soft brush or broom to remove any dirt or debris from the surface of the awning. This will ensure that your awning opens smoothly and doesn’t get damaged by any sharp or abrasive particles. Lastly, keep a can of lubricating spray or silicone-based lubricant on hand.
Applying a thin layer of lubricant to the moving parts of the awning will make it easier to open and close, and will help prevent sticking or binding. With these tools at the ready, you’ll be well prepared to open your awning and enjoy the benefits of shade and protection.
Step 3: Inspect the Awning Fabric for Damage
awning fabric, fabric inspection, awning damage When preparing to open your awning, it’s crucial to inspect the fabric for any signs of damage. Your awning’s fabric is its protective shield against the elements, so it’s essential to ensure its integrity before using it. Start by carefully examining the fabric for any tears, rips, or holes.
These can compromise the structure and effectiveness of the awning, allowing water, sunlight, or wind to penetrate through. Additionally, check for any discoloration or fading, as this can indicate sun damage. If you notice any damage or wear and tear, it’s best to address it before opening the awning.
You can either repair the fabric yourself or consult a professional for assistance. By inspecting the awning fabric thoroughly, you can identify and address any potential issues, ensuring a long-lasting and well-functioning awning.
Step 4: Locate the Awning Crank or Remote Control
To successfully open an awning, the first step is to locate the awning crank or remote control. Depending on the type of awning you have, the crank could either be a handheld tool or built into the awning mechanism itself. This is an important step because it allows you to easily extend the awning and enjoy the shade it provides.
If you have a remote control, make sure it is fully charged and easily accessible so that you can operate the awning with just the push of a button. By finding the awning crank or remote control, you will be well on your way to enjoying the benefits of your awning.
Section 2: Unfolding and Extending the Awning
So, you’ve arrived at your camping spot and it’s time to set up your RV awning. Opening an RV awning may seem like a daunting task, but with a little guidance, you’ll have it up in no time. First, locate the awning and make sure it’s securely fastened to your RV.
Then, unlock any latches or locks that may be holding it closed. Next, locate the support arms on the sides of the awning and release any securing mechanisms. These may be in the form of pins or levers that need to be pulled or pushed.
Once the support arms are unlocked, you can start extending the awning by pulling it outwards. Be careful not to pull too forcefully, as you don’t want to damage the awning or any of its components. As you extend the awning, you’ll begin to see it taking shape, providing shade and cover for your outdoor space.
Finally, when the awning is fully extended, secure it in place by locking the support arms back into their designated spots. Now you can relax and enjoy your outdoor oasis!
Step 1: Unlock the Awning Latch
“Awning latch unlocking” Now that you’ve got your awning set up and ready to go, it’s time to unlock the latch and get it unfolded and extended. The latch is what holds the folded awning in place, so releasing it is the first step in the process. Locate the latch on your awning, usually found near the center.
It may be a lever or a knob that you’ll need to turn or push to unlock. Don’t worry if it feels a bit stiff at first – that’s normal. Use a bit of force if needed, but be gentle to avoid damaging the latch.
Once the latch is unlocked, the awning is ready to be unfolded and extended, which we’ll cover in the next section. So, let’s move on to step 2 and get that awning fully set up!
Step 2: Slowly Unroll the Awning Fabric
unroll the awning fabric, unfolding and extending the awning When it comes to setting up your awning, one of the essential steps is slowly unrolling the awning fabric. This may seem like a simple task, but it’s crucial to do it carefully to avoid any mishaps. Begin by locating the awning fabric and identifying the end that needs to be unrolled.
Some awnings may have a fabric cover that needs to be removed before unrolling, so make sure to check for any additional layers. Once you’re ready, grip the fabric firmly and start unrolling it slowly and steadily. Take your time to ensure that the fabric is unwinding evenly and doesn’t get tangled.
Remember, rushing through this step can often lead to frustration and even damage to the fabric. So, take a deep breath, stay patient, and before you know it, you’ll have the awning fabric fully unrolled and ready for the next step in setting up your awning.
Step 3: Extend the Awning Arms
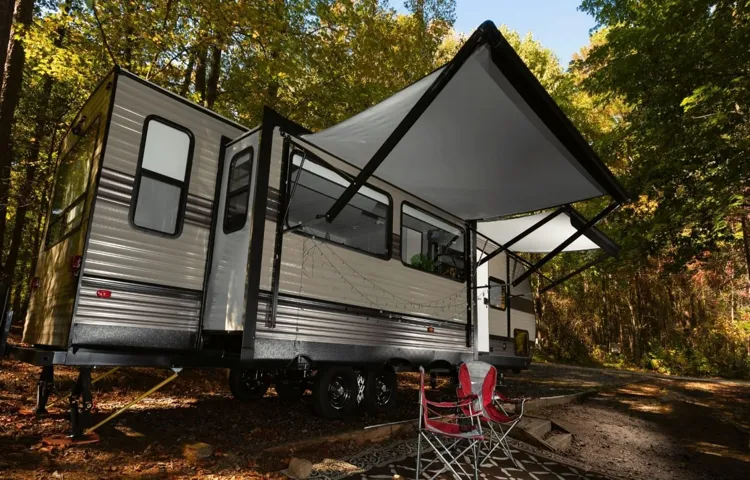
In order to fully enjoy your outdoor space and protect yourself from the sun, it’s important to know how to properly unfold and extend your awning. Once you have safely unlocked and released the travel locks, it’s time to move on to the next step: extending the awning arms. This is where the real magic happens! Gently pull on the roller tube and let it unfurl, allowing the awning fabric to slowly reveal itself.
It’s like watching a beautiful flower bloom before your eyes. As the awning fabric extends, you will notice two sets of arms on either side. These arms are what will support and hold up the awning.
Carefully reach up and grab hold of the arms, one on each side, and pull them down towards the ground. It’s important to make sure both arms are fully extended and locked in place before moving on. This will ensure that your awning is stable and secure, able to withstand the elements and provide you with the shade and comfort you desire.
So go ahead, take a moment to extend those awning arms and witness the transformation of your outdoor space. Mother Nature may bring the heat, but you’ll be prepared to relax and enjoy the great outdoors, all thanks to your trusty awning.
Step 4: Secure the Awning Arms in Place
Securing the awning arms in place is an important step in setting up your awning and ensuring it stays securely in position. Once you have unfolded and extended the awning, you will need to secure the arms to prevent them from collapsing or moving due to wind or other external factors. To do this, you can use the included awning straps or ropes to tie the arms to a nearby stable structure, such as a tree or post.
Make sure to pull the straps or ropes tight to ensure a secure hold. Additionally, some awnings may have built-in locking mechanisms or clamps that can be used to secure the arms in place. If your awning has these features, be sure to use them correctly and double-check that they are tightly fastened.
By properly securing the awning arms, you can enjoy your outdoor space without worrying about the awning collapsing or being blown away.
Section 3: Adjusting the Awning Angle and Tension
So, you’ve arrived at your campsite and you’re ready to set up your RV awning. Opening an RV awning is a straightforward process, but there are a few key steps to keep in mind. One important aspect to consider is adjusting the angle and tension of the awning.
This will ensure that it provides proper shade and protection from the elements. To adjust the angle, you can simply use the awning arms to raise or lower one side of the awning. This will allow you to tilt it slightly, depending on the angle of the sun or the direction of the wind.
It’s important to find the right balance between shade and proper drainage, so water doesn’t accumulate on the fabric. Additionally, adjusting the tension of the awning is crucial to prevent it from flapping in the wind. Most RV awnings come with a tension adjustment knob or lever that allows you to tighten or loosen the fabric.
Tightening the tension will keep the awning more stable, while loosening it will allow for more movement. Finding the right tension may take a bit of trial and error, but once you get it right, your awning will provide the perfect outdoor retreat. So, go ahead and enjoy the great outdoors with your perfectly adjusted RV awning!
Step 1: Choose the Desired Awning Angle
In this blog section, we will be discussing how to adjust the awning angle and tension on your outdoor awning. This is an important step in ensuring that your awning provides optimal shade and protection from the sun. The first step in adjusting the awning angle is to choose the desired angle.
This will depend on your specific needs and preferences. Do you want maximum shade? Do you want to allow some sunlight to come through? By considering these factors, you can determine the angle that will work best for you. Once you have chosen the desired angle, you can then proceed to adjust the tension of the awning.
The tension of the awning refers to how taut or loose it is when extended. It is important to find the right amount of tension to ensure that the awning is not too loose, which can cause it to flap in the wind, or too tight, which can put stress on the frame. To adjust the tension, you will typically find a tension knob or lever on the awning frame.
Turning the knob or lever in one direction will increase the tension, while turning it in the other direction will decrease the tension. It may take some trial and error to find the right amount of tension, so be sure to test the awning at different levels to see what works best for you. By following these steps and taking the time to adjust the awning angle and tension, you can ensure that your outdoor awning provides the shade and protection you desire.
So go ahead and make those adjustments and enjoy your time outdoors with the perfect awning setup!
Step 2: Adjust the Awning Tension
Step 2: Adjust the Awning Tension Now that you’ve taken care of adjusting the awning angle, it’s time to move on to the next step: adjusting the awning tension. This is an important aspect of ensuring that your awning functions properly and stays securely in place. To adjust the tension of your awning, you will first need to locate the tension knobs or screws.
These are typically located on the arms of the awning, near where it attaches to the wall or the roof of your house. Different awnings may have different mechanisms for adjusting tension, so it’s important to refer to your awning’s instructions or contact the manufacturer for specific guidance. Once you have located the tension knobs or screws, you can begin adjusting the tension.
Start by loosening the knobs or screws slightly, allowing the arms of the awning to move more freely. Then, gradually tighten the tension knobs or screws until you achieve the desired amount of tension. Be careful not to overtighten, as this can put unnecessary strain on the awning and potentially damage it.
Adjusting the tension of your awning is important for a couple of reasons. First, it helps to keep the fabric taut, preventing sagging or flapping in the wind. This not only looks better aesthetically, but it also helps to prolong the life of your awning by reducing wear and tear.
Second, proper tension is important for the overall stability and functionality of your awning. If the tension is too loose, your awning may not stay in place during windy conditions, which can not only be annoying but also potentially dangerous. On the other hand, if the tension is too tight, it can put excessive strain on the awning and its components, leading to premature wear and tear.
By adjusting the tension of your awning, you can ensure that it functions properly and stays securely in place. So take the time to adjust the tension knobs or screws, and enjoy a well-functioning and secure awning for years to come.
Step 3: Use the Awning Support Legs (if applicable)
“So, you’ve got your awning set up and ready to go, but you’re wondering how to adjust the angle and tension to make it just right. Well, you’re in luck! In this section, we’ll cover exactly how to do that. First, let’s talk about adjusting the angle.
Depending on the model of your awning, you may have support legs that can be used to change the angle. These legs are typically adjustable and can be extended or retracted to raise or lower one side of the awning. This is particularly useful if you’re dealing with uneven terrain or want to create more shade on one side.
Simply extend or retract the legs as needed to achieve the desired angle. Easy peasy! Now, let’s move on to tension. Ensuring the correct tension is important for both the functionality and longevity of your awning.
Most awnings will have a tensioning system that allows you to tighten or loosen the fabric. This is typically done using a hand crank or a ratchet mechanism. To adjust the tension, start by fully extending your awning.
Then, slowly tighten the tensioning system until the fabric is taut. Be careful not to overtighten, as this can put unnecessary strain on the fabric and potentially damage it. Similarly, if the fabric feels too loose, simply loosen the tension until it feels just right.
By adjusting both the angle and tension of your awning, you can optimize its performance and make it a comfortable and functional addition to your outdoor space. Happy adjusting!”
Section 4: Enjoying Your RV Awning
So, you’re ready to enjoy the great outdoors in your RV, and that means it’s time to open up your awning. But how do you do it? Don’t worry, it’s easier than you might think. To open your RV awning, start by making sure all the latches and locks are released.
Then, locate the awning crank or switch, depending on your specific awning model. If you have a crank, simply insert it into the roller and turn it clockwise to start opening the awning. If you have a switch, just press the button to extend the awning.
As the awning starts to unroll, make sure it is straight and centered. If it gets a little off track, you can gently guide it back into place. Once the awning is fully extended, secure the arms or legs in place to keep it steady.
And voila! You’re all set to relax and enjoy the shade provided by your RV awning. Just be sure to follow the manufacturer’s instructions and take any necessary precautions to ensure a safe and successful awning opening experience.
Step 1: Add Accessories for Comfort and Protection
Enjoying Your RV Awning
Step 2: Make Sure the Awning is Securely Fastened
RV awnings are a great addition to any camping adventure, providing shade and shelter from the elements. After you have securely fastened your awning, it’s time to sit back, relax, and enjoy all the benefits it has to offer. Whether you’re seeking relief from the hot sun or looking for a cozy spot to enjoy a meal, your awning provides the perfect space for you to unwind and take in the surroundings.
Imagine sitting under the shade of your awning, sipping on a cold drink, and watching the world go by. It’s like having your own little oasis in the great outdoors. Plus, with the added protection from the elements, you can enjoy being outside even when the weather isn’t cooperating.
No need to worry about getting wet from the rain or being too hot under the scorching sun. Your awning has got you covered. So go ahead, set up your chairs, put your feet up, and relax under the comfort and protection of your RV awning.
Step 3: Follow Safety Tips and Guidelines
RV awnings are a great addition to any camping trip, as they provide shade and protection from the elements. However, it’s important to follow safety tips and guidelines to ensure that you and your family can enjoy the awning without any accidents or issues. First and foremost, always make sure that the awning is securely fastened to your RV.
This will prevent it from blowing away or collapsing in high winds. Additionally, be mindful of the weight restrictions for your specific awning. Overloading it with heavy items or too many people can cause it to become unsteady and potentially collapse.
It’s also a good idea to regularly inspect the awning for any signs of wear or damage. Small tears or loose parts can easily turn into big problems if not addressed promptly. Finally, when you’re finished using the awning, make sure to clean it and store it properly to prolong its lifespan.
Following these safety tips will ensure that you can fully enjoy your RV awning without any worries.
Step 4: Maintain and Clean Your Awning Regularly
awning maintenance, cleaning an RV awning, enjoying your RV awning Having a clean and well-maintained awning is essential for maximizing your enjoyment of your RV. Regular maintenance and cleaning can help prolong the lifespan of your awning and ensure that it continues to function properly. One important step in maintaining your awning is to regularly inspect it for any signs of wear or damage.
Look for tears, frayed edges, or loose stitching, as these can indicate that your awning needs repair. If you do notice any damage, it’s best to address it as soon as possible to prevent further deterioration. In addition to inspecting your awning, it’s also important to clean it regularly.
Use a mild soap and water solution, and gently scrub the fabric with a soft brush or sponge. Rinse thoroughly and allow the awning to air dry completely before retracting it. By following these maintenance and cleaning tips, you can ensure that your awning is in top shape and ready to provide you with shade and comfort on your RV adventures.
So go ahead, relax under your clean and well-maintained awning, and enjoy the great outdoors!
Step 5: Close and Store the Awning Properly
RV awnings are a fantastic addition to any camper, providing much-needed shade and protection from the elements. But once you’ve finished using your awning, it’s important to properly close and store it for safekeeping. To close your awning, start by retracting it back into its housing.
Use the manual or electric controls to carefully roll up the fabric, making sure it is evenly distributed. Once the awning is fully retracted, secure it in place with the travel locks or straps provided. This will prevent the awning from unfurling during transit and causing damage.
Finally, store your awning in a clean, dry area when not in use. This will help to prolong its lifespan and keep it in good condition for future trips. Remember, properly closing and storing your RV awning is essential for its longevity and your enjoyment.
So take a few extra minutes to do it right and you’ll be reaping the benefits for years to come.
Conclusion
In conclusion, opening an RV awning is like unlocking a hidden treasure. With a little finesse and a dash of bravery, you can unveil a luxurious oasis right outside your mobile home. Just remember, like a puzzle waiting to be solved, patience and persistence are key.
So grab your sunscreen and your sense of adventure and prepare to master the art of the RV awning opening. And remember, in the words of Shakespeare, “All the world’s a stage, and an RV without its awning is merely a prop.” Happy unveiling, fellow adventurers!”
FAQs
How do I open my RV awning?
To open your RV awning, locate the awning switch or handle, usually located on the outside wall of your RV. If it’s a motorized awning, simply press the switch to extend the awning. If it’s a manual awning, turn the handle clockwise to roll out the awning.
Can I open my RV awning by myself?
Yes, you can open your RV awning by yourself. Most modern RV awnings are designed to be user-friendly and easy to operate. However, if you have physical limitations or are unsure about the process, it’s always wise to ask for assistance.
What precautions should I take while opening my RV awning?
When opening your RV awning, make sure there are no obstructions above or below it. Clear any tree limbs, branches, or other debris that may interfere with the smooth operation of the awning. Also, be mindful of the weather conditions, as strong winds can damage or even rip off the awning.
How long does it take to open an RV awning?
Opening an RV awning shouldn’t take more than a few minutes. If it’s a motorized awning, it will extend automatically with a press of a button. If it’s a manual awning, it may take slightly longer, depending on your familiarity with the process.
Can I open my RV awning partially?
Yes, you can open your RV awning partially. Most awnings have adjustable settings, allowing you to extend them to your desired length. This can be useful when you want partial shade or protection from light rain.
What should I do if my RV awning gets stuck while opening?
If your RV awning gets stuck while opening, stop immediately and assess the situation. Check for any obstructions or tangled straps. If there is no visible issue, try closing the awning and then reopening it. If the problem persists, it’s best to consult a professional RV technician for assistance.
Is it necessary to secure my RV awning once it’s fully opened?
Yes, it is highly recommended to secure your RV awning once it’s fully opened. Most awnings come with adjustable support legs that need to be extended and locked into place. This will provide stability and prevent the awning from collapsing during strong winds or heavy rain.
Can I open my RV awning while the RV is in motion? A8. No, you should never attempt to open your RV awning while the RV is in motion. This can be extremely dangerous and may cause damage to the awning, RV, or surrounding objects. Always make sure the RV is stationary and properly leveled before operating the awning.
How often should I open and close my RV awning?
The frequency of opening and closing your RV awning depends on your personal preference, camping habits, and weather conditions. However, it’s generally recommended to retract the awning when not in use or during inclement weather to protect it from damage.
Can I leave my RV awning open overnight?
Leaving your RV awning open overnight is not recommended, especially if you’re not present at the campsite. Sudden gusts of wind or heavy rain can cause significant damage to the awning, RV, or nearby structures. It’s best to retract the awning when you’re not actively using it or before going to bed.
How do I clean my RV awning after opening it?
To clean your RV awning, first, retract it and remove any loose debris. Then, using a mild soap or RV awning cleaner, scrub the awning gently with a soft brush or sponge. Rinse thoroughly with clean water and allow it to dry completely before retracting.
Why won’t my RV awning open?
Several reasons could prevent your RV awning from opening, including electrical issues, a blown fuse, a defective motor or switch, or physical obstructions. If troubleshooting the basic steps doesn’t resolve the issue, it’s recommended to consult a professional for further inspection and repair.