
If you’re an RV owner, you know that regular maintenance is crucial to keep your vehicle in tip-top shape. One thing that often needs attention is the awning. After all, it’s exposed to the elements and can experience wear and tear.
The good news is that patching an awning on an RV is a relatively simple process that can be done yourself. In this blog post, we’ll go over the steps you need to follow to patch your RV awning and get it looking as good as new. So, grab a cup of coffee, get ready to learn, and let’s get started!
Table of Contents
Assess the Damage
When it comes to patching an awning on an RV, the first step is to assess the damage. Take a close look at the area that needs to be patched and identify any tears, holes, or other damage that needs to be addressed. It’s important to be thorough in your assessment so that you can fully understand the extent of the damage and determine the best course of action for making the repair.
Once you’ve assessed the damage, you can start to gather the materials you’ll need to make the repair, such as patching materials or adhesive. With a little bit of elbow grease and some careful attention to detail, you can patch an awning on your RV and get back to enjoying your next adventure on the road.
Inspect the Awning Fabric and Frame
When assessing the damage to your awning, the first step is to inspect the fabric and frame. Look for any tears, holes, or discoloration on the fabric, and check if the frame is bent or broken. If there is any damage, it’s important to address it right away to avoid further deterioration.
Replacing the awning fabric or repairing the frame may be necessary, depending on the extent of the damage. In order to avoid costly repairs in the future, it’s a good idea to perform regular inspections and take care of any issues as soon as they arise. By being proactive, you can ensure that your awning remains in good condition for years to come.
So, take some time to inspect your awning today and address any damage that you find promptly.
Determine the Size of the Patch Needed
When assessing the damage to your wall, it’s important to determine the size of the patch needed to fix it. How severe is the damage? Is it a small crack or a large hole? Before proceeding to repair, it’s essential to answer these questions to ensure that the repair process is effective and efficient. A simple crack can be easily fixed with some spackle, but a larger hole requires more effort.
To assess the damage, start by identifying the size and location of the damage on the wall. Check if the damaged area is limited to the surface layer or if it extends deeper into the drywall. If it’s only on the surface layer, it can be fixed quickly, but if it’s deeper, it requires more time and attention.
Once you have identified the damage’s extent, you can determine the size of the patch needed. To patch a hole or larger damage, you need to cut out a section of the wall and replace it with a new drywall piece. Measure the size of the hole and cut out a section in a square or rectangular shape.
Use a drywall saw to cut out the old patch cleanly and ensure that the surrounding surface is not damaged. Then, cut the drywall piece to fit the space, attach it with drywall screws, and smooth out the surface with spackle. In conclusion, assessing the damage is crucial in determining the size of the patch needed to repair your wall.
Taking the time to evaluate the damage and the repair process’s extent ensures that the repair will be done correctly and efficiently. Remember to measure the damage’s size, cut out and replace the damaged patch with new drywall, and smooth out the surface to ensure a seamless finish.
Gather Materials
When it comes to patching an awning on an RV, the first step is to gather the necessary materials. The last thing you want is to start the repair and realize midway through that you’re missing a tool or material. So, check your awning’s manual to see what kind of fabric it’s made of, and then purchase a patch kit that’s suitable for repairing that type of fabric.
You may also need a sewing kit, scissors, and a ladder. Additionally, make sure you have a clean work surface and enough space to spread out the awning. It’s important to have everything you need within arm’s reach, so plan accordingly.
Having all of your materials ready to go will save you time and frustration in the long run. Remember to take your time and don’t rush the process, as a well-done patch will ensure your awning lasts for many more adventures to come.
Acquire a Matching Fabric Patch
So, you’ve noticed a small tear on your favorite garment and you’re thinking of repairing it with a fabric patch? The first step before getting started is to gather all the necessary materials, and the most important of all is a matching fabric patch. This might sound simple, but finding a patch that blends perfectly with your garment can be quite challenging. The best way to do so is to take a swatch of fabric from the garment and visit your local fabric store.
Ask the sales assistant for a similar or matching fabric patch. If you’re unsure about the color tone, you might want to carry your garment along to pick the most suitable match. Keep in mind that the patch should be a complementary match and not a direct color match.
Once you find the right patch, you’re ready to start the repair process. With patience and attention to detail, your garment will be as good as new in no time!
Purchase a High-Quality Awning Repair Tape
Awning Repair Tape If you are planning to repair your damaged awning, the first thing you must do is gather all the necessary materials. One of the most important materials you should have is a high-quality awning repair tape. This tape is designed specifically to repair tears, rips, and holes in your awning, making it an essential tool for any repairs you need to make.
You can save time and money by purchasing the right tape, which is strong and durable enough to hold up against harsh weather conditions. Awning repair tape is easy to use, and you can apply it to your damaged surface without the need for any professional assistance. With awning repair tape, you can fix your awning quickly and easily, ensuring that your outdoor spaces stay comfortable during the hot summer months.
Get a Strong Adhesive, Such as E6000
If you want to make sure your DIY project stays together, you need a strong adhesive. One of the best options out there is E6000. In order to gather materials for your project, you’ll need to make sure you have all the necessary components.
That means you’ll want to start by collecting E6000 and any other products you’ll use in your project, such as fabric, ribbon, or wood. You’ll also want to have some scissors handy in case you need to cut any materials down to size. Depending on the complexity of your project, you may also need a ruler, pencil, or other tools to make sure everything is measured out just right.
But above all, the key component you’ll need for strong, long-lasting adhesion is E6000. So make sure you have plenty on hand before you begin your next DIY venture!
Prepare the Awning for Patching
If your RV awning has a tear or hole that needs patching, the first step is to prepare the area. Start by cleaning the surrounding area with soap and water to remove any dirt or debris that could interfere with the patch. Rinse the area and let it dry completely.
Next, measure the size of the tear or hole to determine the size of the patch you will need. Cut your patch material with a pair of scissors, making sure it is slightly larger than the damaged area to ensure complete coverage. Lay the patch over the tear, making sure it is straight and centered over the damaged area.
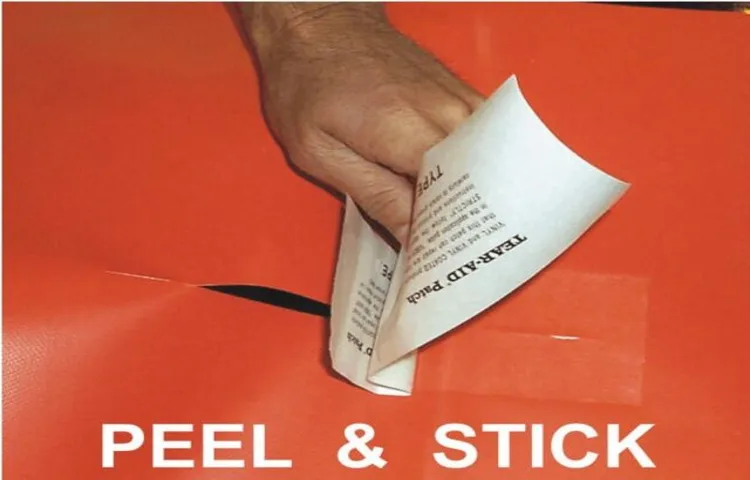
If your patch material has adhesive, peel the backing off and stick it to the awning. If your patch material does not have adhesive, use a sewing machine to sew around the edges or use an awning repair tape to seal the patch in place. With these simple steps, your RV awning will be ready to use again in no time.
Remember to always check your awning for damage before you hit the road to avoid unexpected repairs on your trip.
Clean the Area Around the Damage
Before patching an awning, it’s important to properly clean the area around the damage to ensure the patch adheres well. Start by removing any debris or dirt around the tear with a soft-bristled brush or dry cloth. For more stubborn grime, you can use a gentle cleaner and a sponge or rag to wipe it away.
Make sure the area is completely dry before moving on to the next step. This will help the patch adhere better and prevent any further damage from occurring. By taking a few extra minutes to clean the area, you’ll be setting yourself up for a successful awning repair.
Remember, a little bit of preparation can go a long way in maintaining the longevity of your awning.
Apply Primer to Stabilize the Surface
If you want to patch an awning, the first step is to prepare the surface. Before you start applying the patches, the awning surface should be stabilized to prevent further damage. Using a primer is the best way to do this.
The primer ensures proper adhesion of the patch by stabilizing the fabric. It also improves the strength and durability of the repaired area. When applying the primer, you should make sure that the surface is clean and dry.
The primer should be applied evenly, and you should follow the manufacturer’s instructions for the best results. Applying primer is crucial, and it can make the difference between a successful or a failed repair. So, take your time and be patient when applying it to ensure that the surface is stable and ready for patching.
Apply the Patch
If you find yourself with a tear in your RV awning, the good news is that patching it up is not too difficult! First, make sure the area is clean and dry before applying any patches. Then, you’ll want to choose a patching material that is suitable for your specific type of awning. This could be a self-adhesive patch, a liquid patch, or a piece of fabric with adhesive backing.
Apply the patch over the tear, making sure it is positioned evenly and pressed down firmly to ensure a strong seal. If you’re using a liquid patch, be sure to follow the manufacturer’s instructions carefully for the best results. After applying the patch, give it ample time to dry before retracting or using the awning again.
With proper application, your patched awning can last for years to come. And remember, if you’re not comfortable tackling the patch job on your own, don’t hesitate to bring in a professional for help!
Cut the Fabric Patch to Fit the Damage
When it comes to repairing a damaged fabric, it’s important to cut the fabric patch to fit the damage precisely. This helps to ensure that the patch covers only the affected area and doesn’t look out of place. To apply the patch, first, carefully cut it to the size and shape needed using a pair of sharp scissors.
Next, place the patch over the damaged area with the adhesive side facing downwards. Gently press the patch onto the fabric, making sure there are no wrinkles or air bubbles trapped between the patch and the fabric. Finally, iron the patch using a hot iron, following the instructions carefully, and taking care not to scorch the fabric or the patch.
By following these simple steps, you can easily repair damaged fabric and make it look as good as new. So go ahead, grab those scissors and get ready to tackle that damaged fabric!
Place the Patch Over the Damage
When it comes to repairing damages on a surface, applying a patch can be an effective solution. The first step is to clean the damaged area thoroughly, ensuring there is no dirt or debris. Then, place the patch over the damage and press it down firmly.
The adhesive on the patch will prevent any further damage and hold the patch in place. It is important to choose a patch that is appropriate for the type of damage and surface it is being applied to – for example, a fabric patch may work well on a tear in clothing, but not on a wooden surface. Overall, applying a patch can be a quick and easy solution for repairing damages and preventing them from getting worse.
Apply Repair Tape Around the Patch’s Edges
Now that you have successfully cleaned and prepped the damaged area, it’s time to apply the actual patch. Begin by carefully placing the patch over the hole, ensuring that it completely covers the damaged area. Next, firmly press down on the patch to ensure that it adheres properly to the surface of the material.
Once the patch is in place, it’s essential to apply repair tape around the edges to create an even more secure bonding. Repair tape helps to protect the patch from water or other damaging elements and increases the overall longevity of the repair. Don’t skimp on the tape; make sure to apply a healthy amount to firmly seal the edges of the patch and protect against any further damage.
By following these simple steps and taking the time to carefully apply the patch and tape, you’ll have a seamless repair that will last for years to come.
Allow Time to Cure
When it comes to patching an awning on your RV, one important step is to allow time for the patch to cure. It can be tempting to rush the process and get back on the road as soon as possible, but allowing the patch to fully cure is crucial to ensuring it stays in place and does its job effectively. Depending on the type of patch material you use, this can take anywhere from a few hours to a few days.
During this time, it’s important to avoid using the awning and to keep it dry and protected from the elements as much as possible. By taking the time to properly cure your patch, you’ll be able to enjoy a safe and reliable awning for many trips to come.
Leave the Awning to Dry Completely
After a camping trip, it’s important to properly care for your awning to ensure it lasts for years to come. One crucial step in this process is to leave the awning to dry completely. This means giving it ample time to cure after any rain or washing.
If you pack up your awning while it’s still damp, you risk trapping moisture inside, which can lead to mildew or even rot. Depending on the weather conditions, it may take several hours or even a full day for your awning to dry properly. Be patient and resist the temptation to pack up and hit the road too soon.
By taking the time to properly care for your awning, you’ll ensure it remains in tip-top shape for your next outdoor adventure.
Ensure the Adhesive Has Bonded
When it comes to adhesive bonding, allowing time for the adhesive to cure is crucial for a successful bond. While the amount of time needed for curing depends on the adhesive type, it’s recommended to wait at least 24 hours before putting any significant stress on the bond. Rushing the curing process can only lead to a weak bond that may break off over time.
It is essential to keep the bonding surfaces undisturbed during the curing time to avoid weakening the bond. A strong bond is the result of good surface preparation, proper application of the adhesive, and allowing enough time for the adhesive to cure. So, always make sure that you have ample curing time in the schedule before starting any adhesive bonding project.
Conclusion
In conclusion, patching an awning on an RV is a quick and easy fix that can prevent further damage to your vehicle’s exterior. Just like applying a band-aid to a small cut, patching your awning can save you time, money, and the headache of a more extensive repair. With just a few simple steps, you can restore your RV’s awning to its former glory and hit the road with confidence.
So don’t let a tear or rip in your awning hold you back from your next adventure – grab your patch kit, strap on your tool belt, and get to work like the savvy DIYer you are. Your trusty RV will thank you!”
FAQs
What tools do I need to patch an awning on an RV?
You will need a patch kit, scissors, rubbing alcohol, and a ladder to access the awning.
Can I patch a large tear in my RV awning, or will I need to replace it?
In most cases, you can patch a large tear in an RV awning. However, if the tear is too big or the awning is too old, it may be more cost-effective to replace it.
How do I find the tear in my RV awning to patch it?
Start by cleaning the awning with soap and water to remove any dirt or debris. Then, use a hose to spray water on the awning and look for where the water is coming through. This is likely where the tear is located.
Do I need to remove the awning from my RV to patch it?
No, you do not need to remove the awning from your RV to patch it. However, you may find it easier to work on the awning if you extend it fully.
How long will a patched RV awning last?
The lifespan of a patched RV awning will depend on the size and location of the patch, as well as the overall age and condition of the awning. However, with proper care and maintenance, a patch can extend the life of an awning by several years.
Can I use duct tape to patch my RV awning?
While duct tape may provide a temporary fix in an emergency, it is not a recommended long-term solution for patching an RV awning. Use a patch kit designed for the specific type of awning material for best results.
Will patching my RV awning affect its appearance?
A well-done patch should not significantly affect the appearance of your RV awning. However, if the patch is large or in a highly visible area, it may be noticeable upon close inspection.