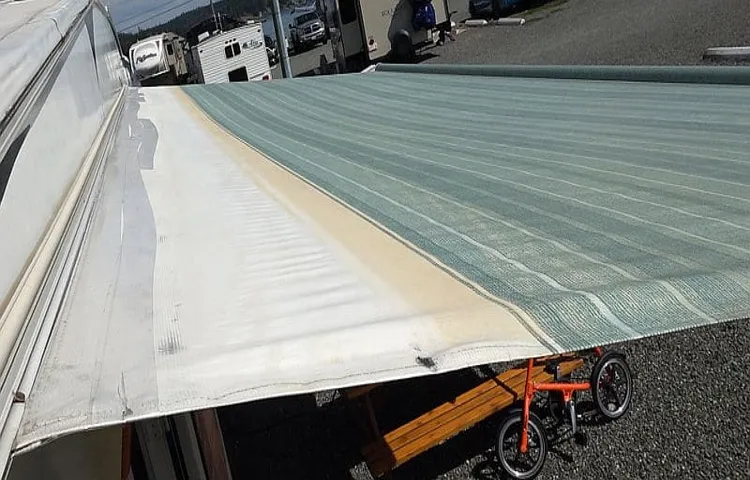
When you’re out camping, an RV awning can be a lifesaver. It provides shade and protection from the elements, allowing you to enjoy the outdoors even in hot, sunny weather or light rain. But over time, your awning can become damaged due to wear and tear, harsh weather conditions, or accidents.
If you notice holes or tears in your awning, don’t worry! It’s easier than you might think to patch it up. In this post, we’ll show you how to patch an RV awning so that you can get back to enjoying your time in the great outdoors.
Table of Contents
Gather Materials
When it comes to patching an RV awning, the first thing you need to do is gather the necessary materials. You’ll need an awning patch kit, which typically includes patches, adhesive, and instructions on how to apply the patch. Make sure to choose a patch that is the right size and material for your awning.
Additionally, you’ll want to have a cleaning solution on hand to clean the area around the tear before applying the patch. This will ensure that the adhesive sticks properly and your patch stays in place. Once you have everything you need, you’re ready to move on to the next step in patching your RV awning.
Remember to take your time and follow the instructions carefully to ensure the best results. With a little effort and the right materials, you can fix a tear in your RV awning and get back to enjoying your camping trips in no time.
Awning Patch Kit, Scissors, Cleaning Solution, Rag
If you’re planning to repair your awning, the first step is to gather all the necessary materials. You’ll need an awning patch kit, which can be found at most hardware stores or online. Make sure to get a kit that matches the color and material of your awning.
You’ll also need a pair of scissors to cut the patch to the right size and shape. Additionally, you’ll need a cleaning solution and a rag to prepare the surface for the patch. The cleaning solution will remove any dirt or debris from the area around the tear, allowing the patch to adhere properly.
Once you’ve gathered all of your materials, you’re ready to start the repair process and get your awning looking as good as new! By utilizing these materials, you can easily patch up your awning in no time without the need for professional help and without breaking the bank.
Clean the Area to Be Patched
One of the first steps when it comes to patching your RV awning is to clean the area that needs to be patched. This is important for ensuring that the patch adheres properly and lasts. To clean the area, you should begin by brushing away any loose dirt or debris.
Next, you can use a solution of water and mild soap to gently clean the area. Be sure to thoroughly rinse the soap off with water and allow the area to dry completely before proceeding with the patch. Taking the time to properly clean the area will increase the chances of a successful patch and prevent further damage to your RV awning.
So, before you begin the actual patching process, be sure to give the area a good cleaning.
Use Cleaning Solution and Rag to Remove Dirt and Debris
When it comes to patching holes and cracks in your walls, it’s essential to clean the area thoroughly to ensure the patch adheres properly and lasts for a long time. The first step in the cleaning process is to use a cleaning solution and a rag to remove any dirt and debris, including dust, grease, and grime. The cleaning solution you use will depend on the type of surface you’re cleaning.
For painted walls, a mild soap and water solution will suffice. For bare drywall, it’s best to use a drywall-specific cleaning solution that won’t damage the paper facing. After you’ve applied the cleaning solution, use a clean rag to wipe the area clean and remove any leftover debris.
Make sure the area is completely dry before proceeding with the patching process. By taking the time to clean the area properly, you’ll be setting yourself up for success when it comes time to apply the patch. So, don’t skimp on this crucial step – your patch will thank you!
Cut Out Patch
If your RV awning has a tear or hole, you may be wondering how to fix it. One effective method is using a cut out patch. With this method, you’ll need a patch that is slightly larger than the hole or tear, as well as some adhesive.
First, cut a piece of the patch material so it will cover the entire hole, with a bit of extra around the edges. Then, use the adhesive to secure the patch to the top of the awning, making sure to press down firmly around the edges. Finally, apply another layer of adhesive over the top of the patch to help seal it in place.
This method can be a quick and easy fix for small tears or holes in your RV awning. However, if the damage is more extensive or the patch doesn’t hold up over time, you may need to consider more extensive repairs or replacement of the awning. Remember, regular maintenance and inspection can help catch small tears before they become larger issues, saving you time and money in the long run.
Using Scissors, Cut Patch to Size and Shape of Damage
When it comes to repairing damaged clothing, patches are a great solution. But before you can apply a patch, you need to make sure it’s the right size and shape. That’s where your scissors come in! Take a look at the damage and use your scissors to carefully cut out a patch that will cover it completely.
Make sure you give yourself a little bit of extra fabric on all sides of the patch so that you have enough to work with when you’re attaching it. You can use a ruler or a template to make sure your patch is the right size and shape, but a steady hand and some trial and error can also work just fine! Once you have your patch cut out, you’re one step closer to repairing your favorite clothing item. Keep in mind that using high-quality scissors will make the process easier and give you a cleaner cut, which will make your patch look more professional in the end.
So go ahead and get ready to breathe new life into your clothing – it’s time to cut out your patch!
Place Patch on Area to Be Repaired
When repairing your RV awning, the first step is to place the patch onto the damaged area. Make sure the area is clean and dry before applying the patch. You can use an alcohol-based cleaner or soap and water to remove any dirt or debris.
Once the area is clean, you can apply the patch according to the instructions provided by the manufacturer. Some patches have adhesive on one side, while others require the use of an adhesive to attach them securely. Regardless of the type of patch you are using, make sure it is centered over the damaged area and pressed down firmly to ensure proper adhesion.
By taking the time to properly place the patch, you can ensure a seamless repair that will keep your RV awning protected for years to come. Don’t wait until the damage becomes worse – act quickly to repair your RV awning and enjoy a worry-free camping experience.
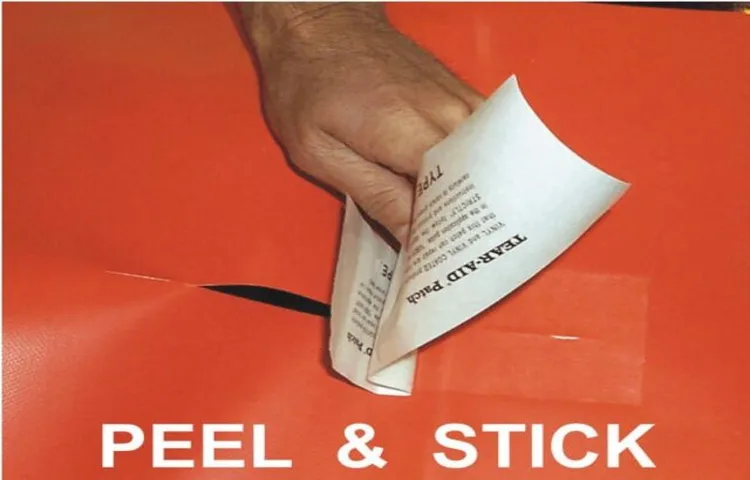
Remove Backing and Place Patch Over Damage
When it comes to repairing a damaged area on a piece of clothing or fabric, placing a patch over the affected area can be an effective solution. First, remove the backing from the patch to reveal the adhesive side. Next, carefully place the patch over the damaged area, making sure to line up the edges as closely as possible.
Use your fingers to press down on the patch, ensuring that it is firmly attached to the fabric. If you are using an iron-on patch, follow the manufacturer’s instructions for heat and time to activate the adhesive. It’s important to choose a patch that matches the fabric color and texture as closely as possible to ensure a seamless repair.
Whether it’s a rip in your favorite pair of jeans or a hole in a beloved sweater, placing a patch over the damage can extend the life of the garment and keep it looking its best.
Smooth Out Air Bubbles
If you’re wondering how to patch your RV awning, one important step you shouldn’t skip is smoothing out air bubbles. Before applying the patch, make sure the area is clean and dry. Then, carefully place the patch over the damaged area, being sure to avoid creating any new wrinkles or bubbles.
If you notice any bubbles or wrinkles after applying the patch, don’t panic. Simply lift the patch and smooth out any air pockets before reapplying it. This will ensure the patch adheres properly and provides a strong seal.
Remember, taking the time to properly patch your awning will save you a lot of hassle and potential damage down the line.
Use a Credit Card or Other Flat Object to Smooth Out Air Bubbles
No one likes a bubbly surface! Whether it’s a newly painted wall or a protective film on your phone screen, air bubbles can be a frustrating sight. But don’t worry, there’s a simple solution to this pesky problem. Grab a credit card or any flat object with a hard edge and use it to smooth out the surface.
This method works great for removing those stubborn air bubbles. Start by placing the card on the bubbled area and gently pushing it towards the edge. Push out any excess air and repeat the process until all the bubbles have flattened out.
Not only will this leave your surface looking smooth and bubble-free, but it also saves you from having to replace or reapply the protective film or paint. So next time you encounter air bubbles, just reach for your trusty credit card!
Allow Patch to Set
If you need to patch your RV awning, it’s important to take the right steps to ensure the repair stays put. One option to consider is allowing the patch to set before using the awning, which can help ensure the patch adheres properly and doesn’t come loose over time. To start, you’ll want to clean the area around the hole or tear thoroughly so the patch has a clean surface to adhere to.
From there, you can apply the patch according to the manufacturer’s instructions and allow it to set for the recommended amount of time. This may take several hours or even overnight, but it’s important to be patient and let the patch do its job. Once the patch is set, you can test the awning to ensure it’s working properly and doesn’t show any signs of damage.
Overall, patching an RV awning isn’t too difficult, but taking the time to allow the patch to set can help ensure a more permanent, reliable repair.
Depending on Patch Kit, Allow Time for Adhesive to Dry
When it comes to repairing a puncture in your inflatable, it’s essential to allow the patch to set properly so that it can do its job. Depending on the patch kit you’re using, the adhesive may need some time to dry before you can inflate your product again. It’s crucial to read the instructions carefully and follow them precisely to ensure the best possible results.
Rushing the process can result in a patch that won’t hold up over time or, worse yet, a patch that fails entirely and leaves you with a flat inflatable. Nobody wants to waste their time patching up their inflatable only to have to do it all over again a few days later, so make sure you allow ample time for the adhesive to dry completely. Your inflatable will thank you for it!
Inspect Patch
If you need to patch your RV awning, the first step is to inspect the damage carefully. Look for any tears or holes in the fabric and note their size and location. If the damage is small and confined to one area, you may be able to patch it easily.
There are special awning repair kits available that come with adhesive patches and instructions on how to use them. Make sure to clean the area thoroughly before applying the patch to ensure a good bond. If the damage is more extensive or the awning is old and worn, it may be time to replace the entire awning.
When in doubt, it’s always best to consult a professional to get their advice on the best course of action. Remember, a properly functioning awning is essential for enjoying your outdoor adventures, so it’s worth taking the time to get it fixed or replaced if needed.
Make Sure Patch Is Secure and Free of Air Bubbles or Loose Edges
When it comes to sewing on patches, one of the most crucial steps is inspecting the patch itself. As you look at the iron-on or sew-on patch, make sure to check for any loose threads, edges, or air bubbles. If there are any of these present, it can indicate a weak seal or a poorly-made patch which could come off easily.
Gently press on the patch to make sure it is securely attached and that there are no air bubbles. Air bubbles can cause the patch to come off over time, so it is essential to ensure that it is entirely smooth before use. It’s also important to find a clean, flat surface to attach the patch.
By inspecting the patch and ensuring it is secure and free of imperfections, you can create a long-lasting and visually-appealing addition to your clothing or accessories. Remember to take your time during the process, and use proper materials and techniques to ensure a successful outcome.
Conclusion
In conclusion, patching an RV awning is like performing an intricate dance between your DIY skills and the unpredictable nature of the great outdoors. It requires a delicate touch, a keen eye for detail, and a healthy dose of patience. But fear not, for with the right tools and techniques at your disposal, you too can make your RV awning look like new again.
So go forth, intrepid traveler, and tackle that tear with confidence. Happy patching!”
FAQs
What materials do I need to patch my RV awning?
Depending on the type of awning and the size of the hole/tear, you may need a patch kit, fabric glue/adhesive, a needle and thread, and a piece of matching or coordinating awning fabric.
How do I determine if my RV awning needs to be patched?
Look for visible holes, tears, or fraying in the fabric of your awning. You may also notice water leaking through the fabric when it rains or a draft coming through the awning when it’s extended, indicating a large hole or tear.
Can I patch large holes in my RV awning or do I need to replace the entire thing?
In most cases, you can patch large holes or tears in your RV awning with a patch kit and proper adhesives or sewing techniques. However, if the damage is extensive or the fabric is severely worn, it may be more cost-effective to replace the awning entirely.
What is the best way to patch a vinyl RV awning?
To patch a vinyl RV awning, you will need a vinyl patch kit or fabric adhesive designed for use with vinyl. Clean the affected area with soap and water and allow it to dry completely before applying the patch or adhesive according to the manufacturer’s instructions.
How long will a patched RV awning last?
The lifespan of a patched RV awning will vary depending on the material, extent of damage, and quality of the patch. In general, a well-done patch on a quality RV awning could last for several years or longer, allowing you to postpone or avoid the cost of a complete replacement.
Can I patch my RV awning myself or do I need to hire a professional?
If you have basic DIY skills and the necessary tools/materials, you can likely patch your RV awning yourself. However, if you are unsure of your abilities or if the damage is extensive, it may be best to consult with a professional RV repair technician or awning specialist.
What steps can I take to prevent damage to my RV awning in the future?
To minimize damage to your RV awning, avoid leaving it extended during high winds or heavy rain, ensure it is properly tensioned, and inspect the fabric regularly for signs of wear or damage. It’s also a good idea to clean the awning periodically with gentle soap and water to remove dirt or debris that could cause abrasion.