
Do you ever find yourself struggling to put a tire back on the bead? It’s a frustrating and time-consuming task, but it’s important to know how to do it properly. When a tire moves off the rim, it can be difficult to get it back into place. In this blog post, we will cover everything you need to know about putting a tire back on the bead.
We’ll discuss the common causes of a tire moving off the bead, the tools you’ll need, and the steps you can take to do it yourself. By the end of this post, you’ll be an expert at this sought-after skill. So, if you want to avoid the hassle of taking your tire to a professional and want to get back on the road faster, keep reading!
Table of Contents
Gather Supplies
Putting a tire back on the bead can seem like a daunting task, but with the right supplies, it can be done quickly and easily. First and foremost, you’ll need a tire iron to help you pry off the tire from the wheel. Additionally, you’ll want to have a tire bead sealer and some sort of lubricant, such as soap or water, to help ease the tire onto the bead.
A compressor or air tank is also necessary to inflate the tire once it’s back on. It’s important to make sure you have all these supplies on hand before attempting to put a tire back on the bead, as it can be difficult to pause and run to the store mid-process. With these tools at your disposal, you can confidently tackle putting any tire back on the bead.
Valve stem tool
When you’re ready to tackle that tire change on your bike, one essential tool you need is a valve stem tool. This tool helps you remove the valve stem from the tire so you can add air or replace it altogether. To get started, gather your supplies: you’ll need a valve stem tool (sometimes called a valve core remover), your replacement valve stems, and a valve stem lubricant.
It’s best to have a few replacement valve stems on hand because they can be easy to lose or damage during the tire change process. Once you have everything you need, you’re ready to get started. And don’t worry – even if you’re a beginner, this process is simple and straightforward.
So grab your tools and let’s get started!

Tire lubricant
When it comes to tire lubricant, getting the right supplies is key. First off, you’ll need to choose the type of lubricant that works for your particular tires. Silicone-based lubricants are great for tires that encounter high temperatures, while PTFE-based lubricants work best for tires that encounter wet or cold conditions.
Once you’ve chosen your lubricant, you’ll also need a tire brush to apply it evenly across the surface of the tire. You can also use a tire dressing applicator if you prefer a more uniform application. Finally, don’t forget to have a sturdy set of gloves on hand to protect your hands as you work.
With the right supplies, lubricating your tires can be a quick and simple task that helps keep your vehicle running smoothly. So, whether you’re driving in extreme heat or navigating slippery roads, be sure to invest in some quality tire lubricant and application supplies today!
Air compressor
Air compressor If you’ve recently invested in an air compressor, it’s time to gather all the necessary supplies to make the most out of your new tool. The first thing you’ll want to do is purchase an air hose that’s long enough to reach every corner of your workshop or garage. A good quality air hose should be flexible and durable, yet easy to manipulate.
Next, you’ll need a set of quick-connect fittings to attach to your compressor and hose. These fittings allow you to switch between tools and accessories with ease. Another important accessory is an air pressure regulator, which enables you to adjust the air pressure with precision, depending on the task at hand.
You may also want to consider purchasing a set of air tools, such as an impact wrench, ratchet, and air hammer. These tools are specifically designed to work with your air compressor and can make quick work of any job. By gathering these essential supplies, you’ll be able to optimize your compressor’s performance and enjoy all the benefits of this powerful tool.
Loosen the Bead
Putting a tire back on the bead can be a bit tricky, but it’s not impossible, and with a little patience and some elbow grease, you can save yourself a lot of money and hassle. One of the first steps in this process is to loosen the bead, which refers to the part of the tire that sits against the rim. To do this, you need to remove the valve core and deflate the tire.
Then, you can pry the bead away from the rim using a tire lever or a pry bar. Once you’ve loosened the bead, you can work on getting the rest of the tire back in place. Just be sure to avoid using too much force, as this can damage the tire or cause it to rupture.
With a bit of effort and some know-how, you can get your tire back on the road in no time.
Remove the valve stem core
When it comes to changing a tire, one important step is removing the valve stem core. This ensures that all the air is released from the tire and allows for easy removal. To do this, first, you need to loosen the bead of the tire by placing it on a small block or other support so that the wheel can spin freely.
Then, use a valve core remover tool to unscrew the valve stem core from the valve stem. Be careful not to lose the small valve stem core, as it can easily roll away when loosened. Once the core is removed, all of the air in the tire should escape completely.
This step ensures that the old tire can be easily removed and the new one can be installed properly. So, the next time you need to change a tire, be sure not to forget the important step of removing the valve stem core.
Push the tire bead down
When it comes to changing a tire, one of the most important steps is loosening the bead. This means separating the tire from the rim. To do this, you’ll need to push the tire bead down.
But what exactly is the tire bead? It’s the thick edge of the tire that sits on the rim. To loosen it, you can use a tire iron or a pry bar. Start at the valve stem and work your way around the tire, pushing the bead downward.
It may take some elbow grease, but eventually, you’ll hear a satisfying “pop” as the bead separates from the rim. Be careful not to damage the tire or the rim as you work. Once you’ve loosened the bead, you can move on to removing the tire from the rim and replacing it with a new one.
Remember, safety always comes first, so be sure to use proper equipment and techniques when changing a tire.
Apply Lubricant
When it comes to putting a tire back on the bead, one helpful tip is to apply lubricant to ease the process. Lubricant can help the tire slide onto the rim more easily and reduce the risk of damaging the tire or rim. You can use a variety of lubricants, such as dish soap or silicone spray.
Simply apply the lubricant to the bead of the tire and the rim before attempting to put the tire back on. It’s important to note that you should only use a small amount of lubricant to avoid having it interfere with the tire’s ability to grip the road. By adding lubricant to the process, you can make putting a tire back on the bead a smoother and less frustrating experience.
Spray or smear lubricant on the tire bead
When it comes time to mount a tire onto a wheel, lubrication is key. One of the best ways to ensure a smooth installation experience is to spray or smear lubricant on the tire bead. This not only makes the process easier, but it also helps prevent damage to the tire and the wheel.
One tip to keep in mind is to choose a lubricant that won’t damage the rubber on the tire. Water-based lubricants are a great option, as they won’t degrade the rubber over time, unlike oil-based lubricants. The goal of applying lubricant to the tire bead is to reduce the friction between the tire and the wheel, making it easier to get the tire onto the wheel.
Without lubricant, the tire can become stuck on the wheel, and you may find yourself struggling to make progress. So, next time you’re installing a tire, don’t forget to apply a bit of lubricant. It may seem like a small detail, but it can save you time and hassle in the long run.
Reinforce with Air
Putting a tire back on the bead can be a tricky task, but reinforcing it with air can make it much easier. After removing the tire from the wheel, make sure to clean both surfaces thoroughly before trying to put it back on. Once clean, lubricate the edges of the tire with a soap solution to help ease it onto the rim.
Next, get an air compressor and attach it to the valve stem of the wheel. Take care not to overinflate the tire, but add enough air to push the tire back onto the bead. Depending on the tire size and pressure, this can take anywhere from a few seconds to a few minutes.
Keep an eye on the progress and adjust the air pressure as needed. Once the tire is firmly on the bead, release any excess air, and double-check that the tire is seated evenly on the rim. With these steps, you can safely and efficiently put your tire back on the bead.
Attach the valve stem core
Attaching the valve stem core is a crucial step in reinforcing your tires with air. The valve stem core acts as a seal between the tire and the valve, preventing air leaks and ensuring proper tire pressure. This small but essential component is often overlooked but taking the time to properly attach it can save you from significant trouble down the road.
To attach the valve stem core, start by removing the valve cap and using a valve core remover to unscrew the old core. Next, insert the new core into the valve stem and tighten it using a valve core tool. Make sure to tighten it firmly, but not too much as it can damage the valve stem.
Once you have successfully attached the valve stem core, it’s time to reinforce your tire with air. Attach the pump hose to the valve stem and pump the tire to the recommended pressure level. It’s crucial to make sure that the valve stem is seated properly to prevent air leaks and overinflation.
In conclusion, attaching the valve stem core is a simple yet essential step in maintaining tire pressure and preventing air leaks. Take your time, follow these steps, and make sure to properly reinforce your tires with air for a smoother and safer ride. Remember, a small amount of prevention can go a long way towards avoiding a potentially hazardous situation on the road.
Reinforce with an air compressor
If you’re looking to reinforce your tools, parts, or even tires, an air compressor can be a game-changer. It works by using compressed air to create a strong bond between different surfaces, similar to how a vacuum cleaner picks up dust and debris. By forcing air into small spaces and between surfaces, an air compressor can help create a secure seal that will hold up against a variety of pressures and vibrations.
Whether you’re working on a DIY project at home or need to reinforce machinery in a professional setting, an air compressor can be a valuable asset. With the right tools and techniques, you can use an air compressor to reinforce your projects and ensure they stay strong and reliable for years to come. So if you want to step up your reinforcement game, consider getting an air compressor and harnessing the power of compressed air to get the job done right.
Double Check the Bead
When putting a tire back on the bead, it’s important to double check that the bead is properly seated all the way around the rim. This is especially true if you had to remove the tire to repair a puncture or replace a tube. One common mistake is to assume that the tire is seated correctly just because it looks like it is.
But appearance alone is not a reliable indicator of proper seating. To double check, start at the valve stem and use your thumbs to push the tire into the rim channel on both sides, moving in opposite directions. If the tire is properly seated, you should be able to feel the rim edge on both sides as you work your way around.
If you notice any dips or bulges in the tire, it’s a sign that it hasn’t fully seated and may come off the rim while you’re riding. In that case, deflate the tire and try seating it again. With a little practice, you’ll be able to confidently put your tire back on the bead and get back on the road in no time.
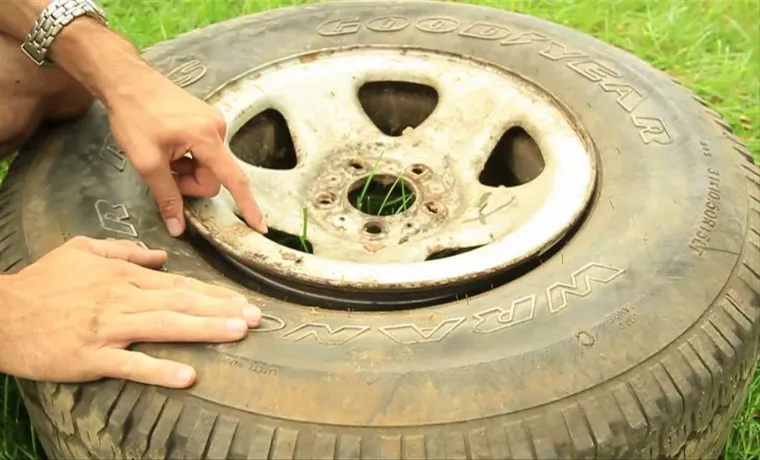
Inspect the bead
Inspecting the bead is an essential step in ensuring your tire is properly installed and seated on the rim. It’s important to double check the bead to avoid any potential mishaps while on the road. First, visually inspect the bead and make sure it’s properly aligned with the rim.
Next, use your fingers to check for any gaps between the bead and rim, and make sure the tire is seated evenly all around the bead. Don’t be afraid to apply pressure to the sidewall to ensure a snug fit. Using a tire gauge, check the air pressure and ensure it’s within the manufacturer’s recommended range.
If you notice any issues with the bead, it’s best to fix them before hitting the road. A loose bead can cause the tire to deflate or even cause a blowout, which can be dangerous. So, always take the time to double check the bead before getting back on the road.
Drive the vehicle slowly to check stability
When it comes to ensuring your vehicle is safe to drive, double-checking the bead can make all the difference. The bead refers to the part of the tire that sits snugly against the wheel rim, creating a seal to keep the tire inflated properly. If this seal is compromised, it can result in a blowout while driving, which can be extremely dangerous.
That’s why it’s crucial to double-check the bead before hitting the road. One way to do this is to drive the vehicle slowly to check stability. If you notice any wobbling or shaking, it could indicate a problem with the bead.
It’s also a good idea to inspect the bead visually, looking for signs of wear or damage. Make sure it’s seated correctly against the rim, and ensure there are no foreign objects lodged in the gap between the wheel and tire. By taking a few minutes to double-check the bead, you can enjoy peace of mind and a safer driving experience.
Conclusion
Putting a tire back on the bead can seem daunting, but with a little elbow grease and some know-how, you’ll be rolling in no time. It’s all about using the right tools, applying the right amount of force, and having the patience to see it through. So don’t let a flat tire deflate your spirits – put it back on the bead and get back on the road to adventure!”
FAQs
Can I put a tire back on the bead without any special tools?
It is possible to do so, but it is not recommended unless you have experience in doing so. Using the proper tools will ensure the tire is seated correctly and not to place any undue stress on the sidewall.
What is the best way to get a tire back on the bead?
The best way to get a tire back on the bead is by using a tire changing machine, but an alternative is the use of a ratchet strap around the circumference of the tire to apply pressure around its circumference.
Why does a tire come off the bead in the first place?
A tire can come off the bead for several reasons, including low tire pressure or damage to the bead caused by driving on rough terrain or hitting a curb.
Can you prevent a tire from coming off the bead?
Yes, you can prevent a tire from coming off the bead by ensuring that it is properly inflated according to the recommended PSI in the car manual and being careful when driving on rough terrain or hitting curbs.
What are the symptoms of a tire that is not seated properly on the bead?
A tire that is not seated correctly on the bead can cause vibrations, uneven wear on the tire, and even loss of control while driving. If you notice any of these symptoms, it is important to have your tires checked by a professional.
Can you fix a tire that keeps coming off the bead?
If a tire keeps coming off the bead, it may be due to damage to the bead or rim. In this case, it is advisable to have it checked by a professional to avoid any risk of losing control while driving.
How do you know when a tire is seated correctly on the bead?
A tire is correctly seated on the bead when you hear a loud “pop” sound as the tire settles into place. Also, you should be able to see that the tire is evenly seated around the rim.