
As a car owner, it’s important to know and understand how to maintain your vehicle properly. One essential aspect of maintaining your car is ensuring that the coolant levels are adequate. When the weather gets hotter or colder, your car’s engine relies on the coolant system to keep it at the right temperature.
Without enough coolant, your engine could overheat, and you could be left stranded on the side of the road. In this blog post, we will go over step-by-step instructions on how to add coolant to your car, ensuring that you are ready for whatever temperature changes may come your way. So, let’s dive in and learn how to keep your car’s engine running smoothly!
Table of Contents
Step 1: Locate the Coolant reservoir
If you’re wondering how to put coolant in your car, the first step is to locate the coolant reservoir. This is typically a translucent plastic tank located near the engine compartment. The tank will have markings indicating the appropriate level of coolant, so it’s important to check these before adding any more fluids.
Be sure to only add coolant when the engine is cool, as it can be dangerous to handle hot engine components. Once you’ve located the reservoir, pop off the cap and pour in the coolant until the level reaches the appropriate marker. If you’re unsure about the type of coolant to use, consult your vehicle’s owner’s manual or a trusted mechanic.
Remember to always use the recommended coolant to avoid causing any damage to your engine. With a little care and attention, adding coolant is an easy task that can help keep your vehicle running smoothly.
Check your car’s manual for the location of the coolant reservoir.
When it comes to properly maintaining your car, checking the coolant reservoir is essential for preventing engine damage. Step one in this process is locating the reservoir, which can vary depending on the make and model of your car. To find it, the best place to start is your car’s manual.
This important document will provide clear instructions on how to locate all of the different parts of your car, including the coolant reservoir. It’s important to note that the coolant reservoir is not the same as the radiator. The reservoir is a separate container that holds coolant, so make sure to identify it correctly.
Once you know exactly where to look, you can easily check the coolant levels to ensure they are within the recommended range. It’s always better to catch any potential issues early on, so if you’re unsure about anything, it’s best to consult with a professional mechanic. By taking care of your car’s coolant system, you’ll be able to keep your engine running smoothly for years to come.
It is usually located near the radiator and is a translucent plastic container.
When it comes to keeping your car running smoothly, checking the coolant level is an important maintenance task that shouldn’t be overlooked. Step one in this process is locating the coolant reservoir, typically found near the radiator and marked with a translucent plastic container. This container allows you to easily check the level of coolant and ensures that you are able to keep your engine running at an optimal temperature.
It’s important to note that the coolant reservoir may not always be in the same location depending on your make and model, so it’s a good idea to consult your owner’s manual to confirm the location. Don’t ignore the importance of this small, but crucial step in ensuring the longevity of your vehicle. By taking the time to locate your coolant reservoir, you can stay ahead of any potential issues and keep your car running smoothly for years to come.
Step 2: Check the coolant level
After opening the hood of your vehicle, the next step in adding coolant is to check the coolant level. This can usually be done by looking at the coolant overflow tank or the radiator itself. The coolant level should be at or near the “Full” mark.
If it is low, add a mixture of coolant and water until it reaches the appropriate level. Be sure to use the correct type of coolant specified by your vehicle’s manufacturer, and never add coolant to a hot engine as it can cause damage. Checking and maintaining the coolant level of your vehicle is an important part of keeping the engine cool and preventing overheating.
By making sure the coolant level is correct, you can help ensure your vehicle runs smoothly and avoid costly repairs down the road. Now, let’s move on to the next step in the process of adding coolant to your vehicle.
Make sure your car has cooled down before checking the coolant level.
Checking the coolant level of your car is an essential part of regular vehicle maintenance. Once you’ve allowed your engine to cool down, you can take a look at the coolant tank. Make sure the car is on a flat and level surface before you open the hood.
The coolant level should be easily visible, and it should fall between the minimum and maximum lines on the side of the tank. If it’s below the minimum level, it’s time to add more coolant. This is a crucial step to ensure that your engine runs smoothly and avoids overheating.
Remember, it’s important to only check the coolant level when the car has cooled down, as hot engine coolant can cause serious burns or injury. Don’t put yourself in danger – wait until the car has fully cooled off to check the coolant level.
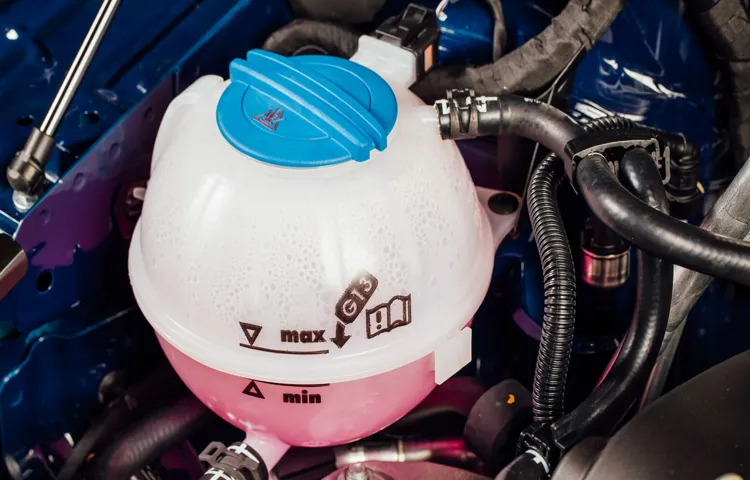
Look at the side of the reservoir to check the level. It should be between the minimum and maximum markings.
When it comes to maintaining your vehicle, checking the coolant level is an essential step. Not only does it ensure that your car is operating smoothly, but it also helps prevent overheating or damage to your engine in the long run. To do this, take a look at the side of the reservoir where the coolant is stored.
You should see two markings indicating the minimum and maximum levels of coolant. Make sure the fluid level is between these two markers. If it’s below the minimum line, add more coolant until it reaches the correct height.
However, if you notice that the coolant level is consistently low, there may be a leak or issue with your vehicle’s cooling system that needs addressing. Regularly checking and topping up your coolant level is a simple but crucial task for keeping your car running smoothly and preventing any major problems down the line.
Step 3: Add coolant
So, you’ve checked your coolant level and found it’s low. Don’t worry, topping up your coolant is a quick and easy task that you can do at home without the help of a mechanic. First, make sure your engine is cool before opening the hood.
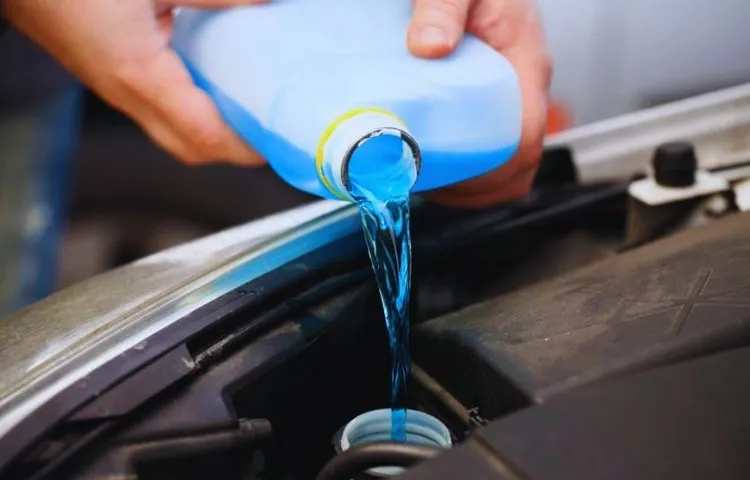
Once you’re ready to add coolant, locate the coolant reservoir which is usually a translucent plastic container with a cap labeled “coolant” or “engine coolant”. Remove the cap and pour in the coolant mixture slowly until it reaches the “full” line or the maximum fill line indicated on the side of the reservoir. It’s important to only use the coolant recommended by the manufacturer, as different types of coolant can cause damage to your engine.
Once you’ve added the correct amount, screw the cap back on tightly, start the engine and let it run for a few minutes so the coolant can circulate throughout the system. Check the coolant level again to make sure it’s at the right level. And that’s it! Adding coolant to your car is a simple task, but it’s an important one to ensure your car runs smoothly and efficiently.
If the coolant level is low, add the recommended coolant type according to your car’s manual.
Adding coolant is a crucial step in maintaining your car’s health. When checking the coolant level, if you notice that it is low, don’t hesitate to add the recommended coolant type specified in your car’s manual. By doing so, you can prevent serious engine damage and overheating issues.
Coolant is a mixture of water, antifreeze, and other additives that help regulate the temperature inside your engine. Without a proper mixture, your engine may suffer from rust, corrosion, and poor heat transfer. Always ensure that you use the right coolant type and mix it correctly before pouring it into your coolant reservoir.
It’s important to keep your car’s cooling system in good condition, especially during hot summer months or if you frequently drive long distances. Remember, adding coolant is an easy and inexpensive task that can save you from costly repairs down the line. So, be sure to check your coolant level regularly, and top it off as needed to avoid any damages.
Remove the cap of the reservoir and pour the coolant slowly until it reaches the maximum line.
One of the essential steps in maintaining your vehicle’s engine performance is checking and adding coolant to the reservoir. The coolant is responsible for regulating the temperature of your engine and preventing overheating. To add coolant, you need to remove the cap of the reservoir and pour it slowly until the coolant reaches the maximum line.
It’s essential to use the coolant recommended by your vehicle’s manufacturer to ensure its effectiveness and avoid any damage to your engine. When adding coolant, don’t forget to check the level frequently and refill it whenever necessary. Just like how a water bottle needs refilling, your engine needs coolant to operate at its best.
By taking care of your engine’s cooling system, you’re ensuring it runs smoothly on the road and avoiding costly repairs in the long run. So, don’t ignore adding coolant to your vehicle and make it a habit to check it regularly.
Step 4: Replace the cap
Now that you have poured coolant into the reservoir, it’s time to put the cap back on. Make sure the cap is securely in place to prevent any leaks or spills. Don’t forget to wipe off any spills or excess coolant around the cap with a clean cloth to keep your engine clean and running smoothly.
It’s essential to check the coolant level regularly and top it off as needed to prevent your engine from overheating. Remember, maintaining your vehicle’s fluids is crucial to its longevity and performance. By following these simple steps, you can easily put coolant in your car and ensure it’s ready for the road.
So, the next time you need to add coolant, use this guide for a hassle-free experience and keep your car running smoothly for years to come.
Make sure the cap is screwed on tightly before closing the hood.
When it comes to closing the hood of your car, there is a crucial step that many people overlook – replacing the cap. You may have just finished filling up your windshield wiper fluid, oil, or coolant, but forgetting to replace the cap before closing the hood can lead to a disaster. The cap ensures that the fluid doesn’t leak out and become a hazard on the road, not to mention the potential damage it could cause to the engine.
That’s why it’s important to double-check that the cap is screwed on tightly before closing the hood. Take the extra few seconds to ensure that you don’t encounter any issues down the line. It’s a simple step to take that can save you from a world of problems.
Dispose of the used coolant properly.
Now that you’ve successfully drained the old coolant and disposed of it properly, it’s time to replace the cap. This may seem like a small task, but it’s the final step in ensuring your coolant change is complete. Firstly, double-check that the drain valve is fully closed before replacing the cap.
Next, give the cap a good twist until it’s secure. It’s important to make sure the cap is properly tightened as any looseness can cause leaks and pressure build-up in the system. Remember, the coolant is under pressure when the engine is running, so a properly tightened cap is crucial for a safe and efficient engine operation.
Once the cap is secured, take it for a test drive to make sure everything runs smoothly. Congratulations, you have successfully changed your coolant and ensured your engine’s longevity!
Conclusion
And there we have it folks, the art of adding coolant to your vehicle has been conquered! Remember to stay cool and collected while performing this task, and never underestimate the importance of keeping your engine at the right temperature. With these simple steps, you can be confident in keeping your vehicle running smoothly and strutting your stuff in style. So go ahead and fill ‘er up, and let your engine hum with satisfaction!”
FAQs
1. How often should I add coolant to my car? A: It is recommended to check and add coolant to your car at least every 6 months or as recommended by your car’s manufacturer. 2. Can I use any type of coolant in my car? A: No, it is important to use the coolant that is recommended by your car’s manufacturer as using the wrong type can cause damage to your car’s engine. 3. How much coolant should I add to my car? A: The amount of coolant required for your car varies depending on the make and model. Refer to your car’s owner manual or consult with a mechanic to determine the right amount. 4. Why is my car’s engine overheating even with enough coolant? A: There can be multiple reasons for engine overheating such as a malfunctioning thermostat, damaged radiator or a water pump failure. It’s recommended to seek professional help to diagnose the issue. 5. What are the signs of low coolant? A: The signs of low coolant include the engine overheating, the temperature gauge reading high, a low coolant warning light on the dashboard, and a sweet, distinctive odor coming from the engine. 6. Can I mix different types of coolant? A: No, different types of coolant should not be mixed as they have different chemical compositions that can cause damage to the car’s engine. 7. What should I do if I accidentally put too much coolant in my car? A: If you put too much coolant in your car, you should remove the excess coolant by using a siphon or asking a mechanic to drain it out to prevent any damage to the engine.