Are you starting to notice that your car’s engine is running hotter than usual? Is there a sweet smell coming from under the hood? These are both signs that your car might be low on coolant, and it’s time to top it up. But don’t worry, adding coolant to your car is a simple task that anyone can do. In this blog post, we’ll guide you through the process step-by-step, so you can keep your engine cool and running smoothly.
Let’s dive in and learn how to put coolant in your car.
Table of Contents
- 1 Introduction
- 2 Step-by-Step Guide
- 2.1 Step 1: Park Your Car on a Level Surface and Turn Off the Engine
- 2.2 Step 2: Let the Engine Cool Down
- 2.3 Step 3: Find the Coolant Reservoir
- 2.4 Step 4: Remove the Coolant Reservoir Cap
- 2.5 Step 5: Check the Coolant Level
- 2.6 Step 6: Pour Coolant into the Reservoir
- 2.7 Step 7: Replace the Cap
- 2.8 Step 8: Monitor the Coolant Level
- 3 Conclusion
- 4 FAQs
Introduction
So, you’re having trouble with your car’s coolant and need to know how to put coolant in your car? Well, you’ve come to the right place! Coolant, or antifreeze, is a crucial component for keeping your engine running smoothly and preventing it from overheating. If your coolant levels are low, it’s important to top them up before any serious damage occurs. But don’t worry, adding coolant to your car is actually a quite simple process that can be done by anyone.
First, make sure your engine is cool before opening the hood. Then, locate the coolant reservoir, which is usually a translucent plastic tank near the radiator. Check the markings on the tank to see where the coolant should be filled to.
If it’s below the minimum line, it’s time to add more coolant. Open the cap and carefully pour the coolant into the reservoir until it reaches the desired level. Be sure to use the correct coolant specified by your vehicle’s manufacturer, as different types may not be compatible.
Once you’ve topped up the coolant, securely replace the cap and you’re all done! Your car will thank you for keeping its engine cool and running smoothly.
Understanding the Importance of Coolant
coolant, importance of coolant, engine coolant, car maintenance
Preparing for the Coolant Refill
coolant refill, preparing for coolant refill, coolant system, car maintenance. Introduction: When it comes to car maintenance, one crucial aspect is ensuring that the coolant system is in good working condition. Coolant, also known as antifreeze, plays a vital role in keeping the engine cool and preventing it from overheating.
Over time, coolant can become degraded or depleted, requiring a coolant refill. Before attempting a coolant refill, it is important to properly prepare to ensure a successful and efficient process. In this blog post, we will discuss the steps you need to take in order to prepare for a coolant refill, providing you with the knowledge to successfully maintain your vehicle’s coolant system.
So let’s get started!
Locating the Coolant Reservoir
“coolant reservoir” Introduction: If you’ve ever wondered where your car’s coolant goes or how to check its levels, the answer lies in the coolant reservoir. This essential component of your vehicle’s cooling system stores and regulates the coolant, ensuring that your engine stays at the optimal temperature. Without a functioning coolant reservoir, your engine could overheat, leading to serious damage.
But where exactly can you find this vital part of your car? In this blog section, we will guide you through the process of locating the coolant reservoir, so you can keep your engine running smoothly and avoid any unnecessary breakdowns on the road. So let’s get started and find out where the coolant reservoir is hiding in your vehicle!
Step-by-Step Guide
Putting coolant in your car is a simple but essential task to keep your engine running smoothly. The coolant, also known as antifreeze, helps regulate the temperature of your engine and prevent it from overheating. Here’s a step-by-step guide on how to put coolant in your car.
First, make sure your engine is cool before attempting to add coolant. Opening the coolant reservoir while the engine is hot can cause the coolant to spray out and burn you. Once the engine is cool, locate the coolant reservoir.
It is often a translucent plastic tank with a cap labeled “coolant” or “antifreeze.” Next, remove the cap from the coolant reservoir. Some caps may have a pressure release mechanism, so be careful not to turn it quickly.
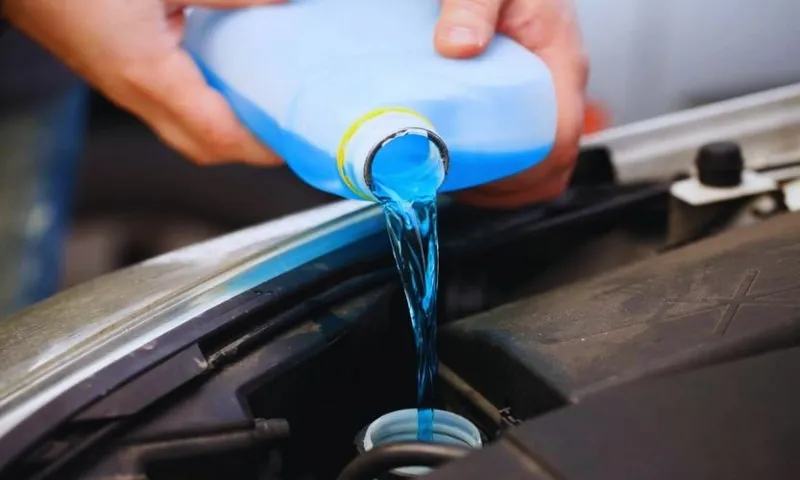
You can use a towel or rag to protect your hands from any coolant that may be pressurized. Now it’s time to add the coolant. Slowly pour the coolant into the reservoir until it reaches the “full” or “max” line.
Be sure to use the correct type of coolant recommended by your car’s manufacturer. This information can usually be found in your owner’s manual or on the coolant reservoir cap. After adding the coolant, replace the reservoir cap securely.
Make sure it is tightened properly to prevent any leaks. Finally, start your car and allow it to run for a few minutes to circulate the coolant throughout the system. Check the coolant level again and top up if necessary.
Step 1: Park Your Car on a Level Surface and Turn Off the Engine
After a long day at work, you finally arrive home and park your car on the driveway. It’s time to relax and unwind, but before you can do that, there’s one important step you need to take: parking your car on a level surface and turning off the engine. Why is this step necessary? Well, parking on a level surface ensures that your car remains stable and secure while it’s parked.
If you were to park on a slanted or uneven surface, there’s a chance that your car could roll or tip over, which could result in damage not only to your car but also to any objects or people nearby. Additionally, turning off the engine is important for safety reasons. Leaving your engine running while your car is parked can be dangerous and can lead to a variety of problems, such as overheating, carbon monoxide poisoning, and even theft.
So, before you step out of your car and head inside, take a moment to make sure that you’ve parked on a level surface and turned off the engine. It may seem like a small step, but it’s an important one that helps to ensure the safety of both you and your car.
Step 2: Let the Engine Cool Down
cooling down the engine Once you’ve safely pulled over to the side of the road and turned off your vehicle, it’s important to give the engine time to cool down. This step is crucial in preventing any further damage to your vehicle. Think of it like this: when you finish a strenuous workout, it’s important to allow your body time to cool down before you jump into your next activity.
The same principle applies to your engine. After running at high temperatures, it needs time to cool down before you can start troubleshooting. So, take a few deep breaths, step out of your car, and give your engine a chance to catch its breath.
Step 3: Find the Coolant Reservoir
“coolant reservoir” The coolant reservoir is an essential component of your vehicle’s cooling system. It stores the coolant, allowing you to easily monitor and maintain the coolant levels. To find the coolant reservoir, start by locating the engine bay.
Depending on the make and model of your car, the coolant reservoir may be located at different positions inside the engine bay. It is usually a white or translucent plastic container with markings indicating the minimum and maximum coolant levels. It may also have a cap that you can unscrew to add coolant if necessary.
Take a moment to familiarize yourself with the location and appearance of the coolant reservoir, as it will come in handy when checking and topping up the coolant levels.
Step 4: Remove the Coolant Reservoir Cap
In the fourth step of our car coolant reservoir replacement guide, we’ll tackle the task of removing the coolant reservoir cap. This may seem like a simple step, but it’s an important one to get right. The coolant reservoir cap is located on the top of the reservoir and is responsible for maintaining the right pressure and level of coolant in the system.
Before removing the cap, it’s essential to ensure that the engine is cool to prevent any injuries or damage. Carefully remove the cap by turning it counterclockwise until it comes off. Keep in mind that there may be pressure built up in the system, so it’s a good idea to place a cloth or rag over the cap to catch any coolant that may spray out.
Once the cap is off, inspect it for any signs of damage, such as cracks or worn seals. If you notice any issues, it’s best to replace the cap along with the reservoir to ensure proper functioning of the coolant system.
Step 5: Check the Coolant Level
coolant level
Step 6: Pour Coolant into the Reservoir
In the step-by-step guide to pouring coolant into the reservoir, it is important to ensure the engine is cool before starting. Once you have confirmed this, locate the coolant reservoir, which is usually a translucent plastic tank with a cap labeled “Coolant.” Open the cap carefully and check the coolant level by looking at the markings on the side of the reservoir.
If the level is below the recommended amount, it is time to add coolant. Slowly pour the coolant into the reservoir, making sure not to overfill it. It is important to use the correct type of coolant for your vehicle, so refer to the owner’s manual or consult a professional if you are unsure.
As you pour the coolant, you may notice bubbles rising to the top. This is perfectly normal and indicates that air pockets are being displaced. Once you have poured the proper amount of coolant and there are no more bubbles, securely close the reservoir cap.
It is also a good idea to check the coolant level regularly to ensure your vehicle stays properly cooled. So, remember to follow these steps when it’s time to pour coolant into the reservoir, and keep your engine running smoothly.
Step 7: Replace the Cap
“replace the cap” So, you’ve made it to the final step of replacing the cap on your hard-to-open bottle. Congratulations! Now it’s time to finish up and seal the deal. Grab the cap and take a moment to align it with the bottle’s opening.
Make sure it’s sitting straight and centered. Then, using a firm but gentle grip, apply downward pressure as you twist the cap clockwise. You’ll feel some resistance at first, but don’t worry, that’s just the seal breaking.
Keep twisting until the cap is fully tightened. And there you have it – your bottle is now properly sealed and ready for storage. Remember, a tightly closed cap ensures your bottle’s contents stay fresh and secure.
Well done on completing all the steps, and enjoy your bottle of goodness!”
Step 8: Monitor the Coolant Level
coolant level, monitor coolant level, car maintenance, car engine, coolant system, engine temperature One important aspect of car maintenance is monitoring the coolant level in your vehicle. The coolant system plays a crucial role in maintaining the engine temperature and preventing it from overheating. By regularly checking the coolant level, you can ensure that your engine is running at an optimal temperature and avoid any potential issues.
Monitoring the coolant level is a simple and quick task that can be done at home. All you need to do is locate the coolant reservoir, which is usually a translucent plastic tank near the radiator. Make sure the engine is cold before opening the reservoir cap.
Then, check the coolant level by looking at the markings on the side of the reservoir. The level should be within the recommended range indicated by the markings. If the level is low, you can add coolant to bring it up to the appropriate level.
It’s important to use the correct type of coolant as recommended by your car’s manufacturer. By regularly monitoring the coolant level, you can ensure that your car’s engine is properly cooled and avoid any potential overheating issues.
Conclusion
In conclusion, the process of putting coolant in your car is like giving it a refreshing spa treatment. Just like how we indulge in a cool, revitalizing drink on a hot summer day, our cars also deserve some hydration to keep their engines cool and functioning efficiently. So, grab that gallon of coolant, don your mechanic hat, and let the coolant flow like a refreshing waterfall into your car’s radiator.
Your car will thank you with its purring engine, and you’ll feel like a hero in a world where coolness reigns supreme.”
Regular Maintenance Ensures Optimal Engine Performance
engine performance, regular maintenance, step-by-step guide
Properly Maintaining Coolant Levels Extends Engine Life
coolant levels, engine life, maintaining coolant levels
Consult a Professional if You’re Unsure
consult a professional, unsure, step-by-step guide
FAQs
How do I put coolant in my car?
To put coolant in your car, first locate the coolant reservoir, usually found near the radiator. Open the reservoir cap and pour the coolant mixture into it until it reaches the “max” or “full” line. Be sure to use the correct type of coolant recommended for your car. Close the reservoir cap tightly and check for any leaks.
What happens if my car runs out of coolant?
If your car runs out of coolant, the engine can overheat, leading to potential damage. It is important to regularly check the coolant level to ensure it doesn’t run low. If your car does run out of coolant, pull over to a safe place and allow the engine to cool down before adding more coolant.
How often should I check my car’s coolant level?
It is recommended to check your car’s coolant level at least once a month. This will help you identify any leaks or low coolant levels before they become a bigger issue. Additionally, it is a good idea to check the coolant level before long trips or during extreme weather conditions.
Can I use water instead of coolant in my car?
While water can temporarily be used in an emergency, it is not recommended as a long-term coolant replacement. Coolant contains additives that help prevent corrosion and lubricate the water pump. Water alone can cause rust and other issues in the cooling system, so it is best to use a proper coolant mixture.
What should I do if I see a coolant leak in my car?
If you notice a coolant leak in your car, it is important to address it promptly. Start by identifying the source of the leak. It could be a loose hose or a damaged radiator. Depending on the severity of the leak, you may need to have it repaired by a professional or replace the faulty component yourself.
Can I mix different types of coolant in my car?
It is generally not recommended to mix different types of coolant in your car unless specified by the manufacturer. Different types of coolants may have different chemical properties and mixing them can cause issues such as reduced cooling effectiveness or accelerated corrosion. Always refer to your car’s manual for specific coolant recommendations.
Why is my car’s coolant level always low?
If your car’s coolant level is consistently low, there may be an underlying issue that needs to be addressed. Common causes of coolant loss can include a coolant leak, a faulty radiator cap, or a blown head gasket. It is best to have your car inspected by a qualified mechanic to identify and fix the problem.