Electric scooters are all the rage these days, and it’s no wonder why! They’re an easy and eco-friendly mode of transportation that has revolutionized the way we move around cities. However, like any mode of transportation, you might find yourself in need of a bit of maintenance from time to time. One common issue with electric scooters is changing the tires, and it can be a daunting task for those who haven’t done it before.
But fear not! With a little bit of know-how, you’ll be able to put an electric scooter tire on a rim in no time. In this article, we’ll take a close look at how to get the job done right, step-by-step.
Table of Contents
Gather Necessary Tools
When it comes to putting an electric scooter tire on a rim, gathering the necessary tools is key to ensuring a smooth process. You’ll need a set of tire levers, which are specially designed to help you pry the tire off the rim without causing any damage. You’ll also need a tire pump, so you can inflate the tire to the appropriate pressure level once it’s in place.
It’s also a good idea to have some soap and water on hand, so you can lubricate the tire and make it easier to maneuver onto the rim. And don’t forget a pair of gloves, which can protect your hands and make it easier to grip the tire levers. By having these tools ready to go, you’ll be prepared to tackle any electric scooter tire replacement with confidence and ease.
Wrench
When you’re ready to work on your car, it’s important to have all the necessary tools on hand. One of the most commonly used tools is a wrench. Before you begin any repair work, it’s essential to gather all the wrenches you’ll need.
This may include open-end wrenches, box-end wrenches, adjustable wrenches, and torque wrenches. Having a variety of sizes and shapes will ensure you have the right tool for the job. It’s also essential to make sure your wrenches are the correct size for the bolts and nuts you’ll be working on.
Using the wrong size wrench can be frustrating and can damage your car. Take the time to inspect your wrenches before starting any work. Look for signs of rust or wear and make sure they are clean and free of debris.
With the right tools and a bit of preparation, even the most challenging repair job will be much easier to handle.
Tire lever
When it comes to bike maintenance, having the right tools can make all the difference. One essential tool for changing a bike tire is a tire lever. Before you start, make sure you have all the necessary tools, including at least two tire levers, a new tire, and a pump.
Position your bike upside down to make it easier to work on, and remove the wheel from the bike. Loosen the nut or quick release skewer and slide the wheel out of the dropouts. Once the wheel is removed, lever the old tire off the rim with your tire levers, being careful not to damage the inner tube.
With the tire off, check the rim tape to make sure there are no holes or damage. If the rim tape is damaged, it should be replaced. Now you’re ready to install the new tire.
Start by inserting one side of the tire onto the rim, then use the tire lever to lever the other side of the tire onto the rim. Once the tire is in place, pump it up to the recommended pressure and reinstall the wheel onto the bike. With a little practice, changing a tire can be quick and easy.
And having a tire lever on hand ensures that you’ll be able to take care of any tire issues that come up on your ride.
New tire
When it comes to changing a tire, having the right tools on hand is crucial. To start, make sure you have a spare tire in good condition that fits your vehicle. You’ll also need a jack to lift the car, a lug wrench to remove the old tire and tighten the new one, and a wheel lock key if your vehicle has wheel locks.
It’s a good idea to keep these tools in your car at all times, so you’re prepared in case of a flat tire. Don’t forget to check the air pressure in your spare tire regularly and replace it when needed. With the right tools and preparation, changing a tire can be a breeze.
New inner tube
“Inner tube” If you need to replace the inner tube of your bike tire, you’ll need a few tools before you get started. First, make sure you have the correct size inner tube for your tire. You’ll also need a tire lever to remove the tire from the rim and a pump to inflate the new tube.
A wrench may be necessary to remove the wheel from the bike frame, depending on your particular bike. It’s also a good idea to have some lubricant on hand to make the process easier. Once you have all the necessary tools, you can get started on removing the tire, replacing the inner tube, and reinstalling the tire and wheel.
With a little practice, you’ll be able to change an inner tube in no time!
Soap and water
When it comes to cleaning your hands, nothing beats good old soap and water. But what tools do you need to get the job done right? First and foremost, you’ll need a sink with running water. If you’re on the go, look for a public restroom or portable handwashing station.
Next, you’ll need soap. Any type of soap will do, although liquid soap is easier to use and less messy than bar soap. You’ll also want a clean towel or paper towel to dry your hands after washing.
If you don’t have access to towels, air dryers are a good alternative. Lastly, don’t forget about hand sanitizer as an option when you can’t get to a sink. By having these tools on hand, you can ensure that your hands stay clean and free from harmful germs and bacteria.
Remove Old Tire and Tube
If you want to know how to put an electric scooter tire on a rim, you first need to remove the old tire and tube. This step can be a bit tricky, but with the right tools and technique, it’s definitely achievable. Start by deflating the tire completely and then using tire levers to pry the edges of the tire away from the rim.
Work your way around the tire, loosening it from the rim until you can easily slide it off. Once the tire is off, you’ll need to remove the old tube as well. To do this, simply locate the valve stem and gently push it through the hole in the rim until the tube is free.
Take a moment to inspect the rim and tire for any damage or wear that might cause problems down the line. Now that the prep work is done, you’re ready to install the new tire and tube.
Deflate tire
If you need to deflate your tire before removing it, the first step is to locate the valve stem and remove the valve cap. Then, using a tire pressure gauge or your fingers, press down on the valve stem to release the air. Be sure to do this slowly and evenly, as releasing too much air too quickly can cause the tire to burst.
Once the tire is fully deflated, use tire levers to remove the old tire and tube. Insert the levers between the tire and rim, and pry the tire away from the rim. Once the tire is partially off, use your hands to carefully pull the rest of the tire and tube out of the rim.
Be sure to inspect the rim and tire for any damage or debris before installing the new tube and tire. Taking the time to properly remove old tires and tubes can greatly improve the overall performance and safety of your bicycle.
Remove nuts and bolts
To change a tire or tube, you’ll first need to remove the old one. This might sound simple, but there are a few steps you’ll need to follow to ensure the process goes smoothly. The first step is to remove the nuts and bolts that are holding the wheel in place.
You’ll need a wrench or socket set to do this, so make sure you have the right tools on hand before you start. Once the nuts and bolts are removed, you can gently lift the wheel off the bike. Be careful not to damage the brake pads or any other parts of the bike as you do this.
Once the wheel is off, you’ll need to remove the tire and tube. To do this, you’ll need a tire lever. Insert the lever under the bead of the tire and lever it off the rim.
Once one side of the tire is off, you can remove the old tube and replace it with a new one. Then, reinstall the tire by working it back onto the rim and inflate the new tube. Pat yourself on the back – you’ve just successfully changed your bike tire or tube!
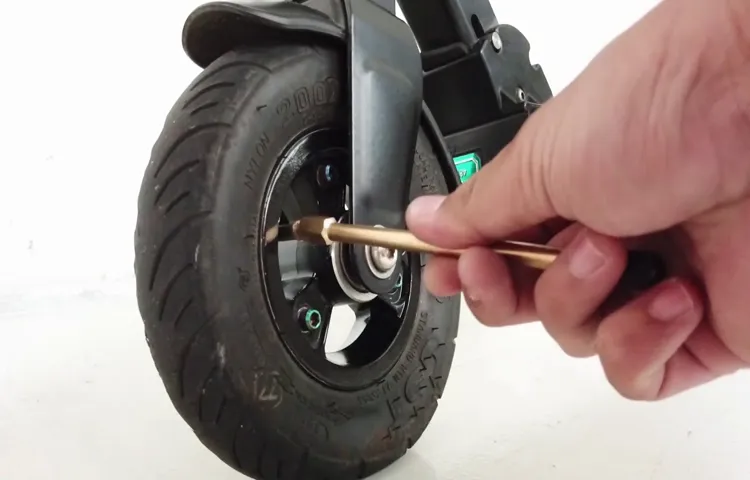
Insert tire lever between tire and rim
If you need to replace your inner tube, the first step is to remove the old tire and tube. To do this, you’ll need to insert a tire lever between the tire and rim. The tire lever will help you pry the tire off the rim, allowing you to access the inner tube.
It’s important to be gentle when using the tire lever, as applying too much pressure could damage the inner tube or the tire itself. Once you’ve inserted the tire lever, work your way around the tire, lifting it off the rim gradually. Once the tire is loose, you should be able to separate it from the rim entirely and remove the old inner tube.
Remember to inspect the tire for any signs of wear and tear as well, as this will give you an idea of whether the tire should be replaced as well. By taking these steps carefully, you’ll ensure that you’re successful in replacing your inner tube without causing any damage to your bike.
Work lever around rim to loosen tire
When it comes to removing an old tire and tube, one essential step is to work the lever around the rim to loosen the tire. This can be a bit tricky, but with the right tools and technique, it can be done easily. First, you’ll need to locate the area where the tire bead meets the rim, and insert the lever between the two.
Then, gently pry the lever up and down, working the tire bead away from the rim. Keep working the lever around the entire tire rim until the tire is completely loose and can be removed easily from the rim. Be sure to take your time and apply a bit of patience, as forcing the tire off too quickly can cause damage to the wheel or tire.
With the tire and tube removed, you can now move on to the next step of repairing or replacing them. Remember to always use caution and proper tools when working on bike maintenance, and enjoy the ride!
Pull out old tube
When it comes to changing a bike tire, the first thing you need to do is remove the old tire and tube. This may seem like a daunting task, but it’s actually easier than you might think. Start by flipping your bike over so that it’s resting on the handlebars and seat.
Next, use a tire lever to pry the tire away from the rim. Once the tire is off, you can then pull out the old tube. Be sure to inspect both the tire and tube for any punctures or damage.
If either the tire or tube needs to be replaced, now is the time to do so. Once you’ve removed the old tube, you’re ready to move on to the next step in changing your bike tire. With a little patience and some practice, removing the old tire and tube will become second nature.
Install New Tire and Tube
If you need to replace a tire or tube on your electric scooter, don’t worry – it’s a simple process that you can easily do at home! To start, you’ll need to remove the old tire and tube from the rim. First, release the air from the tire completely and use tire levers to pry the bead of the tire away from the rim. Once one side is removed, use the levers to remove the second side and the tube.
Next, inspect the rim and tire for any damage or debris, and clean it all off if necessary. Then, install the new tube by inserting the valve stem through the hole in the rim and working the tube into the tire. Once the tube is in place, start fitting the tire back onto the rim by pressing the bead inwards and using your thumbs to push the tire over the wheel.
Finally, inflate the tire to the recommended pressure and double-check that everything is securely in place. With these simple steps, you’ll be back on the road in no time! And remember, if you’re ever unsure or uncomfortable doing it yourself, it’s always best to take your scooter to a professional for maintenance.
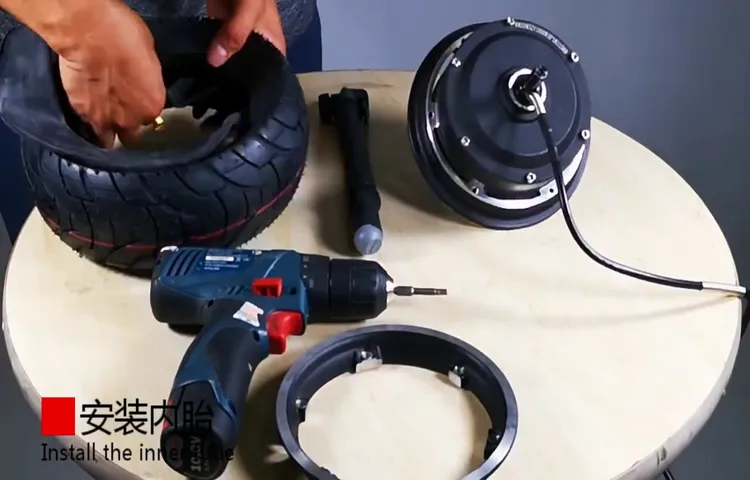
Place new inner tube inside new tire
When replacing a tire, you need to install a new inner tube along with it. Start by inflating the new inner tube just enough to give it shape and place it inside the new tire. Carefully align the valve stem with the hole in the rim and tuck the tube into the tire, making sure it doesn’t get pinched between the tire and the rim.
Once the tube is fully inside the tire, gently push the tire back onto the rim, starting from the opposite side of the valve stem. Be sure to use tire levers if necessary, but be careful not to damage the tire or the new tube. Once the tire is on, double-check the alignment of the valve stem and give the tire a quick spin to make sure it’s centered.
Now you’re ready to inflate the tire to the recommended pressure and hit the road! Remember, proper installation is crucial for a safe and successful ride. The main keyword used organically: install new tire and tube.
Push tire onto rim
Installing a new tire and tube can be daunting, but with the right tools and guidance, it can be done by anyone. Once you have removed the old tire and tube, the next step is to install the new tire. Begin by placing one side of the tire onto the rim, making sure it is seated properly.
Then, take the tube and insert it into the tire, making sure there are no twists or kinks in the tube. Once the tube is in place, it’s time to push the other side of the tire onto the rim. This can be a bit tricky, but with some persistence, it will eventually slide into place.
As you push the tire onto the rim, be sure to double-check that the tube is not getting pinched between the tire and the rim. Once the tire is fully on the rim, you can inflate the tube to the correct pressure, and you’re ready to hit the road! Remember, taking the time to properly install a new tire and tube will ensure a safe and enjoyable ride.
Work tire lever around rim to fully install tire
Installing a new tire and tube might seem like a daunting task, but it is actually a simple process that can be done at home with a few basic tools. Once you have removed the old tire and tube, it’s time to put on the new ones. Begin by inserting the tube into the tire, making sure that it is centered and not twisted.
Then, starting at the valve, work the tire bead onto the rim, using your hands to push it down. Once this is done, it’s time to use a tire lever to work the rest of the bead around the rim. This can be a bit tricky, as the tire may be tight, but with a little patience and perseverance, you will be able to get it fully installed.
Make sure to check that the tire is seated evenly on the rim before inflating it to the recommended pressure. With this simple process, you can have your bike up and running again in no time!
Inflate tire to recommended pressure
When installing new tires and tubes on your vehicle, it’s crucial to inflate them to the recommended pressure. This ensures that the tire performs optimally and provides maximum grip on the road. But, how do you know the recommended pressure for your tires? Well, the answer lies in your vehicle’s owner’s manual or on the label inside the driver’s door jamb.
Here, you’ll find the recommended tire pressure for your specific vehicle based on its weight and other factors. Once you have the recommended pressure, use a tire pressure gauge to measure the current pressure and inflate the tire if necessary. Remember, underinflated tires can lead to reduced fuel efficiency, reduced handling, and even tire failure, while overinflated tires can lead to a harsh ride and reduced traction.
So, always make sure to inflate your tires to the recommended pressure to ensure a safe and comfortable ride.
Reattach nuts and bolts
When it comes to installing a new tire and tube on your bike, it’s important to know how to properly reattach the nuts and bolts. This step might seem simple, but it’s crucial for ensuring your safety while riding. First, you’ll want to make sure that the tire is properly aligned and the tube is in place before tightening any nuts or bolts.
Then, using a wrench or pliers, carefully tighten each nut and bolt, making sure not to over-tighten. Over-tightening can lead to damage to your bike and potentially cause the nuts or bolts to strip. Once everything is securely fastened, give the tire a spin to ensure that it rotates freely.
If there are any difficulties, it’s best to go back and double-check the placement of the tire and tube. With these tips in mind, you can confidently install a new tire and tube, giving you a smooth and safe ride in no time.
Test and Adjust
Putting an electric scooter tire on a rim may seem like a daunting task, but with the right tools and technique, you can do it yourself. The first step is to test the tire by placing it on the rim to ensure it fits properly. If the tire is too loose or too tight, you may need to adjust it before proceeding.
Once you have the tire in place, make sure it is fully seated on the rim and not twisted or bulging. If everything looks good, you can then use tire levers to carefully pry the tire onto the rim, taking care not to pinch the inner tube. It may take some effort to get the tire fully seated, but once it is on, make sure to inflate the tube to the correct pressure and check for any leaks.
Test riding the scooter on a smooth, flat surface can also help ensure the tire is properly installed and balanced. With a little patience and practice, you can easily put an electric scooter tire on a rim and be back on the road in no time.
Spin wheel to make sure tire is centered
When you replace a tire, it’s important to test and adjust it to ensure it’s centered. One simple way to do this is to spin the wheel and visually check if it wobbles or runs unevenly. If it does, it may need adjustment.
To adjust the tire, you’ll need to locate the wheel nuts or bolts and loosen them slightly. Then, gently push or pull the tire until it’s centered. You can use a tire gauge or ruler to measure the distance between the tire and the wheel well to make sure it’s even on both sides.
Once you’re satisfied with the placement, tighten the nuts or bolts to the manufacturer’s recommended torque. This process may take a few tries, but it’s important to make sure your tire is properly centered for optimal performance and safety. So, don’t skip this step when replacing a tire!
Check tire pressure
Keeping your tire pressure at the recommended level is crucial for a smooth and safe driving experience. It not only enhances the performance of your vehicle but also increases its fuel efficiency. To test your tire pressure, use a tire pressure gauge.
After removing the valve cap, attach the gauge to the valve stem and press down firmly. The gauge will display the current pressure reading. Compare this reading to the recommended pressure listed on the driver’s side doorjamb or in the owner’s manual.
If the tire pressure is too low, add air until it reaches the appropriate level. On the other hand, if the pressure is too high, release some air until it matches the recommended level. Remember, tire pressure should be checked regularly, including the spare.
So, don’t delay, if you want to keep your ride a smooth one, check your tire pressure regularly!
Make any necessary adjustments
Once you’ve created your website, it’s important to test and make any necessary adjustments. This step will ensure that your website runs smoothly and provides the best experience for your visitors. One crucial aspect of testing is checking the loading speed of your website.
Slow loading times can lead to visitors becoming frustrated and leaving your site. You can use tools like Google’s PageSpeed Insights to test your website’s speed and make adjustments if needed. Another thing to consider is the navigation of your website.
Is it easy for visitors to find what they’re looking for? Make adjustments to your menu and links to ensure that your visitors can easily navigate your site. It’s also important to test your website on different devices to ensure that it’s responsive and mobile-friendly. By testing and making adjustments, you’ll be able to provide a seamless experience for your visitors and improve the overall success of your website.
Conclusion
Now that you’ve completed the arduous task of putting your electric scooter tire on its rim, you can sit back and revel in the satisfaction of a job well done – just be sure to do it in a safe, responsible manner. Whether you’re tackling this project on your own or with the help of a friend, it’s important to take the necessary precautions to ensure that the job is done correctly and without injury. So grab your tools and get ready to impress yourself (and your friends) with your newfound mechanical skills – it’s time to hit the road and enjoy the smooth ride of your freshly-wheeled electric scooter!”
FAQs
What tools do I need to change an electric scooter tire on a rim?
You will need a tire lever, a wrench, and a new tire.
Can I change an electric scooter tire on a rim myself?
Yes, you can change an electric scooter tire on a rim yourself with the right tools and knowledge.
How do I remove the old tire from the rim of an electric scooter?
To remove the old tire, use a tire lever to pry it off the rim.
Do I need to use a special type of tire for an electric scooter?
It is recommended to use a tire specifically designed for electric scooters for optimal performance and safety.
How do I know what size tire to purchase for my electric scooter rim?
Look at the size stamped on the previous tire or measure the rim’s diameter and width to determine the appropriate tire size.
Can I reuse an old tire on my electric scooter rim?
It is not recommended to reuse an old tire as it may be worn or damaged and can compromise safety and performance.
Are there any safety tips I should follow when changing an electric scooter tire on a rim?
Yes, wear gloves and eye protection, and ensure the scooter is turned off and the battery is disconnected before removing the tire.