
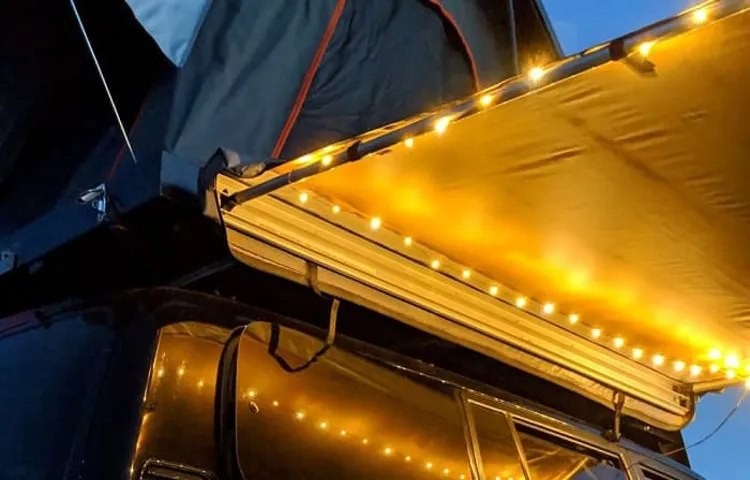
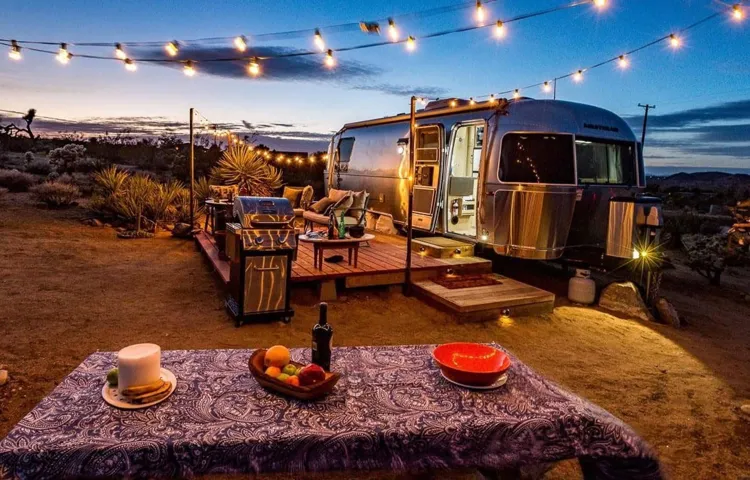
Looking to add some extra ambiance to your RV camping experience? One great way to enhance the atmosphere is by putting lights on your high RV awning. This simple DIY project can transform your outdoor space into a cozy retreat, perfect for relaxing or entertaining. Imagine sitting under a canopy of twinkling lights, sipping a cold beverage, and enjoying the beauty of nature all around you.
But how do you go about installing lights on your high RV awning? Don’t worry, we’ve got you covered! In this blog post, we’ll guide you through the process step by step, so you can easily illuminate your RV awning and create a magical outdoor oasis. So let’s get started and brighten up your camping experience!
Introduction
Have you ever wanted to add some extra flair to your RV camping experience? Well, one way to do that is by putting lights on your high RV awning. Not only will it make your campsite look welcoming and festive, but it can also provide additional lighting for those evening gatherings or late-night hangouts. So, how exactly can you go about putting lights on your high RV awning? Well, it’s actually quite simple.
First, you’ll need to gather the necessary materials, which include string lights, outdoor clips, and a ladder. Once you have everything you need, start by securing the string lights to the underside of your RV awning using the outdoor clips. Make sure to evenly distribute the lights and securely fasten them to avoid any mishaps.
Next, you’ll want to plug in the lights and test them to ensure they’re working properly. Finally, sit back and enjoy the cozy and inviting ambiance that your new high RV awning lights provide.
Why Add Lights to your RV Awning?
rv awning lights, adding lights to rv awning
Choosing the Right Lights
Choosing the Right Lights
Safety Considerations
safety considerations, safety precautions, safety measures, ensuring safety, safety regulations, safety guidelines, safety protocols, safety standards. Introduction: When it comes to any activity or task, whether it be at home or in the workplace, safety should always be a top priority. Safety considerations are essential to ensure the well-being of individuals and to prevent accidents or injuries.
By taking necessary precautions and implementing safety measures, we can create a safe and secure environment for everyone involved. In this blog section, we will explore different safety considerations that should be taken into account in various situations. From discussing safety regulations to understanding safety guidelines and protocols, we will provide valuable insights and tips to ensure safety in different contexts.
Whether you are a homeowner, an employer, or an employee, this blog section will help you understand the importance of safety and how to make it a priority in your daily life. So sit back, relax, and let’s dive into the world of safety considerations!
Step-by-Step Guide
Are you ready to add some extra sparkle to your RV camping experience? Putting lights on your high RV awning is a fun and easy way to create a festive atmosphere at your campsite. Whether you’re hosting a party, enjoying a cozy evening, or simply want to add some ambiance, installing lights on your awning is a great idea. But how do you do it? Don’t worry, I’ve got you covered! In this step-by-step guide, I’ll walk you through the process of putting lights on your high RV awning, so you can enjoy a magical camping experience.
Let’s get started!
Step 1: Measure your Awning
awning, measurement, step-by-step guide. When it comes to installing an awning, one of the most important steps is measuring your space correctly. After all, you want to make sure your awning fits perfectly and provides the right amount of shade and protection.
So, how do you measure your awning? Fear not! We’ve got you covered with this simple step-by-step guide. First, start by gathering your tools. You’ll need a tape measure, a ladder, and a pen and paper to jot down your measurements.
Next, determine where you want to install your awning. Measure the width of the area, making sure to include any obstructions such as downspouts or windows. Write down the measurement.
Next, measure the height of the area. Again, take note of any obstructions that may affect the height measurement. Remember, you want to make sure your awning doesn’t interfere with any windows or doors.
Jot down this measurement as well. Now, it’s time to measure the projection of your awning. This is how far the awning will extend out from the wall.
Use your tape measure to measure from the wall to where you want the awning to end. Remember to account for any obstacles or pathways that may be underneath the awning. Write down this measurement too.
Step 2: Mounting the Lights
In this step-by-step guide, we will take a closer look at how to mount the lights for your project. Mounting the lights is an essential part of the installation process, as it ensures that the lights are securely attached and in the optimal position for maximum effect. To begin, gather all the necessary tools and equipment, such as a ladder, screws, and a drill.
Before mounting the lights, it is important to plan out their placement. Consider factors such as the desired lighting effect, the location of power sources, and any potential obstacles or obstructions. Once you have determined the ideal position for the lights, use the ladder to reach the mounting location.
Begin by marking the positions where the lights will be mounted using a pencil or marker. Then, using the drill, create holes in the marked positions. Carefully align the light fixtures with the holes and attach them using screws.
Finally, double-check that the lights are secure and properly aligned. By following these steps, you can ensure that the lights are safely and securely mounted, ready to illuminate your space.
Step 3: Securing the Lights
In this step-by-step guide, we will now dive into the process of securing the lights in your home. Once you have chosen the perfect lights and have installed them according to the previous steps, it’s time to make sure they are properly secured. This is important because loose or wobbly lights can be a safety hazard and can also affect the aesthetics of your home.
To secure the lights, start by checking all the screws and bolts that hold them in place. Tighten any loose ones to ensure a snug fit. If you notice any areas that seem unstable or shaky, consider using additional brackets or anchors to provide extra support.
It’s also a good idea to check the electrical connections and make sure they are secure. Remember, the goal is to make your lights feel sturdy and secure so they can brighten up your home with confidence.
Step 4: Connecting the Lights to Power
In the final step of installing your lights, it’s time to connect them to a power source. This is a crucial step, as without power, your lights won’t work. First, locate the power source, which is usually an electrical outlet.
Make sure the outlet is in good condition and can support the power needs of your lights. If you’re using outdoor lights, it’s important to use a weatherproof outlet cover to protect against the elements. Next, check the voltage requirements of your lights and ensure they match the power source.
If not, you may need to use a transformer to convert the voltage. Once you have everything ready, simply plug in your lights and flip the switch. It’s as simple as that! Now you can enjoy the beautiful glow of your newly installed lights.
Tips and Tricks
Are you looking to add some extra pizzazz to your RV adventures? One way to do that is by putting lights on your high RV awning. Not only will this create a beautiful ambiance, but it can also help illuminate your outdoor space at night. But how do you go about doing this? Well, it’s actually quite simple.
First, you’ll need to gather the necessary materials, including adhesive hooks or clips, outdoor or waterproof string lights, and an extension cord if needed. Next, determine the desired location for your lights and clean the area to ensure proper adhesion. Then, attach the adhesive hooks or clips to the awning, spacing them out evenly.
Now comes the fun part – stringing the lights! Start at the end of your awning and carefully drape the lights along the hooks or clips, making sure they are secure and evenly distributed. Finally, plug in the lights and enjoy the magical glow they bring to your outdoor space. So, go ahead and give your RV awning a dazzling makeover with some beautiful string lights!
Using Command Hooks
Command hooks are a versatile and convenient tool that can be used in a variety of ways throughout your home. From organizing and decluttering to adding a decorative touch, these hooks can help you make the most of your space. One of the best tricks for using command hooks is to think beyond their traditional use for hanging lightweight items like keys or towels.
You can use them to hang curtains, string lights, or even create a wall-mounted charging station for your devices. The possibilities are endless! So why not harness the power of command hooks to transform your space and make your life easier? Whether you need to organize your entryway, create a gallery wall, or hang your holiday decorations, command hooks are the perfect solution. They are easy to install, remove without leaving any damage or residue, and can be repositioned as needed.
Plus, they come in a variety of sizes and styles to suit your needs. So go ahead, get creative, and start using command hooks to simplify your life and enhance your home.
Installing a Dimmer Switch
dimmer switch, installing a dimmer switch, tips and tricks for installing a dimmer switch
Using Waterproof Lights
waterproof lights
Conclusion
In conclusion, illuminating your high RV awning is not just a practical solution, but a creative way to make your campsite shine brighter than the stars themselves. By following these simple steps and using the right tools, you can effortlessly transform your RV into a mobile disco party or a cozy relaxing spot under the moonlight. Remember to prioritize safety and functionality when selecting your lights and installation method.
Whether you choose classic string lights, funky LED strips, or even neon glow tubes, don’t be afraid to let your personality shine through. After all, your RV is not just a vehicle, but a reflection of your adventurous spirit and vibrant character. So go ahead, embrace your inner lighting maestro and let the magic begin.
Just imagine the envious looks from your camping neighbors as they gaze upon your awning extravaganza. From now on, your campsite will be known as the beacon of good times, where laughter, memories, and perhaps a spontaneous dance party, begin under the glow of your RV’s high awning lights. Happy camping, and let there be light!”
FAQs
How do I install lights on a high RV awning?
To install lights on a high RV awning, you will need a ladder, outdoor-rated string lights, zip ties, and a power source. Begin by securely placing the ladder against the RV, making sure it is stable. Then, carefully attach the string lights to the awning using zip ties, ensuring they are evenly spaced and securely fastened. Finally, plug the lights into a power source, making sure to use outdoor-rated extension cords and outlets. Always follow manufacturer instructions and exercise caution when working at heights.
What are the benefits of putting lights on a high RV awning?
Adding lights to a high RV awning can enhance the ambiance of your outdoor living space while camping. It provides functional lighting for activities after dark and creates a cozy atmosphere for socializing. Additionally, well-placed lights can increase safety by illuminating the area around your RV and helping to prevent trips and falls.
Can I use any type of lights for my high RV awning?
While there are various types of lights available, it is important to choose lights that are specifically rated for outdoor use. Look for lights that are waterproof or weather-resistant, as they will be exposed to the elements. LED string lights are an excellent choice for high RV awnings, as they are energy-efficient, durable, and produce minimal heat. Always check the specifications and recommendations from the light manufacturer before making a purchase.
Are there any safety precautions I should take when putting lights on a high RV awning?
Safety should always be a top priority when working at heights. Ensure that the ladder you use is sturdy and securely positioned against the RV. It is also important to use caution when attaching the lights, making sure to follow proper installation instructions. Before plugging in the lights, inspect all cords and connections for any signs of damage. Use outdoor-rated extension cords and outlets, and never overload electrical circuits. If you are uncertain about the installation process, it is advisable to seek professional assistance.
Can I leave the lights on my high RV awning overnight?
Leaving lights on your high RV awning overnight is generally safe, but it is important to exercise caution. Make sure the lights are securely attached and that no loose wiring poses a fire hazard. It is recommended to turn off or unplug the lights before going to bed or leaving the campsite unattended. This will not only conserve energy but also minimize the risk of electrical issues or accidents during your absence.
How can I maintain the lights on my high RV awning?
Regular maintenance is crucial to ensure the longevity and proper functioning of the lights on your high RV awning. Periodically check the wiring and connections for any signs of wear or damage, replacing any faulty components. Clean the lights and remove any dirt or debris that may accumulate over time. Additionally, during winter storage or prolonged periods of non-use, it is advisable to remove the lights and store them in a dry and protected area.
Can I customize the lighting design on my high RV awning?
Absolutely! Customizing the lighting design on your high RV awning allows you to create a unique and personal atmosphere. Consider using different colors, patterns, or even smart lights that can be controlled remotely or programmed to change automatically. You can also experiment with various placements and arrangements to achieve the desired effect. Ultimately, the lighting design should reflect your personal style and enhance your camping experience.