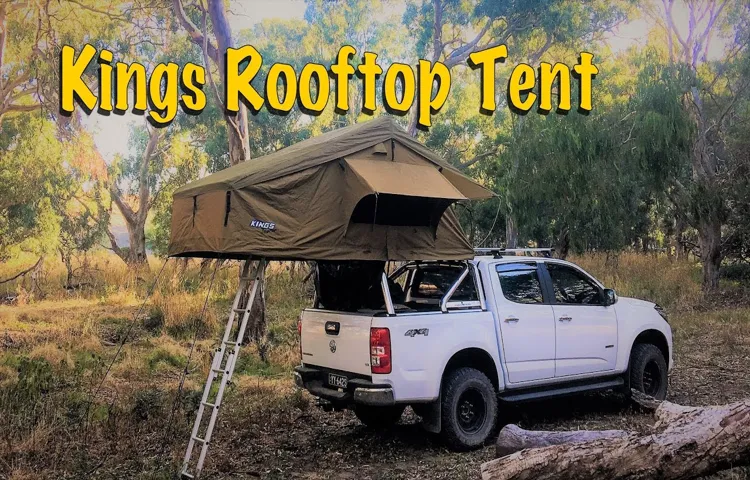
Hey there adventure seekers! Are you ready to elevate your outdoor experiences to the next level? Imagine sleeping under the stars in the comfort of your own personal sanctuary. Introducing King’s Roof Top Tents, the ultimate camping accessory that allows you to take your sleep game to new heights – literally! A King’s Roof Top Tent is a portable and easy-to-install shelter that sits on top of your vehicle, providing a luxurious and cozy space to rest and recharge during your outdoor escapades. With its sturdy construction and durable materials, it offers a safe and secure haven from the elements, ensuring a good night’s sleep no matter where your adventures take you.
But what sets King’s Roof Top Tents apart from traditional ground tents? Well, picture this: You arrive at your campsite, tired after a long day of hiking and exploring. Instead of fussing with poles and pegs, struggling to set up your tent, you simply unstrap your King’s Roof Top Tent and unfold it effortlessly. In a matter of minutes, you’re ready to relax and unwind, enjoying panoramic views of your surroundings from the rooftop vantage point.
Not only does a King’s Roof Top Tent save you precious time and energy, but it also provides unmatched comfort. Equipped with a plush mattress and ample space for sleeping and storage, it’s like having a cozy hotel room on wheels. And the best part? You don’t have to sacrifice the feeling of being in the great outdoors.
With mesh windows and a large, zippered opening, you can enjoy a refreshing breeze and soak in the sights and sounds of nature while cocooned in the comfort of your own private sanctuary. So, whether you’re embarking on a cross-country road trip, going off-the-grid camping, or simply seeking a unique and convenient way to experience the great outdoors, a King’s Roof Top Tent is the perfect solution. It allows you to sleep comfortably, sets up in a snap, and provides the freedom to explore without the hassle of traditional camping setups.
Ready to embrace the freedom and comfort of sleeping under the stars? Stay tuned as we dive deeper into the world of King’s Roof Top Tents, exploring their features, benefits, and the adventures they can take you on. Get ready to embrace a whole new way of camping that will leave you wanting more!
Table of Contents
- 1 What is a King’s Roof Top Tent
- 2 Benefits of a King’s Roof Top Tent
- 3 Choosing the Right Location
- 4 Gathering the Necessary Tools and Materials
- 5 Checking the Compatibility with Your Vehicle
- 6 Inspecting the Tent for Any Damages
- 7 Assembling the Tent Frame
- 8 Unfolding and Extending the Tent
- 9 Testing the Stability and Security of the Tent
- 10 Proper Maintenance and Care
- 11 Additional Accessories and Modifications
- 12 Considerations for Camping Safety
- 13 Conclusion
- 14 FAQs
What is a King’s Roof Top Tent
Are you ready to hit the road and explore the great outdoors? If so, you might want to consider investing in a King’s Roof Top Tent for your next camping adventure. These innovative tents are designed to be mounted on the roof of your car, allowing you to set up camp wherever you go. But how exactly do you put up a King’s Roof Top Tent? Don’t worry, it’s easier than you might think.
First, find a suitable location to park your vehicle and set up your tent. Once you’ve found the perfect spot, start by unpacking the tent and unfolding it. Next, attach the tent to the roof of your car using the provided mounting hardware.
Once the tent is securely attached, you can start setting up the sleeping area inside. Simply unzip the tent and lift the roof, allowing the tent to expand and create a spacious sleeping area. Finally, secure the tent in place using the included guy ropes and pegs.
And voila! You now have a comfortable and convenient home away from home. So why wait? Get your King’s Roof Top Tent today and start planning your next camping adventure.
Benefits of a King’s Roof Top Tent
Putting up a King’s roof top tent may seem like a daunting task, but with a little practice, it can be a breeze. The first step is to find a suitable location for your tent. Look for a flat surface with enough space to accommodate the tent and easy access to your vehicle.
Once you have found the perfect spot, it’s time to start setting up. Begin by unfolding the tent and laying it flat on the ground. Next, attach the ladder to the side of the tent and secure it in place.
Then, lift the tent onto the roof of your vehicle and fasten it securely using the provided straps or brackets. Finally, extend the ladder and make sure it is securely attached to the vehicle. Voila! Your King’s roof top tent is ready to go.
Now you can enjoy all the benefits that come with it, such as a comfortable and elevated sleeping space, protection from the elements, and the freedom to camp anywhere you please. So why not give it a try and see for yourself the convenience and comfort that a King’s roof top tent can offer?
So, you’ve finally decided to take the plunge and install that new piece of equipment or software. Congratulations! But now comes the not-so-fun part: actually preparing for the installation process. It can be overwhelming and intimidating, especially if you’re not familiar with the ins and outs of installation procedures.
But fear not! In this blog, we’ll walk you through some essential steps to ensure a smooth and successful installation. Whether you’re setting up a new home entertainment system or installing the latest software update, these tips will help you get organized, stay on track, and minimize any potential headaches along the way. So, let’s dive in and get you prepped for a hassle-free installation experience!
Choosing the Right Location
So you’ve decided to embark on the adventure of setting up a king’s rooftop tent. Congratulations! But now comes the big question: where should you actually put it? The location you choose can greatly impact your camping experience, so it’s important to choose wisely. First and foremost, you’ll want to find a flat surface to set up your tent.
Avoid sloping or uneven terrain as this can make for an uncomfortable night’s sleep. Additionally, try to find a location that provides a nice view, whether it’s a breathtaking mountain range or a peaceful lakeside. Just imagine waking up to the serenity of nature right outside your tent! Another factor to consider is proximity to amenities.
Are there bathrooms or showers nearby? Is there a water source for cooking and drinking? These are all important things to keep in mind when selecting a location. Lastly, don’t forget about safety. Look for a spot that is away from potential hazards such as dead trees or unstable terrain.
With a little bit of planning and consideration, you’ll be able to find the perfect spot to set up your king’s rooftop tent and create memories that will last a lifetime.
Gathering the Necessary Tools and Materials
Before putting up a King’s rooftop tent, it’s important to gather all the necessary tools and materials. Firstly, make sure you have a ladder or step stool that is tall enough to reach the top of your vehicle. You will also need a wrench or socket set, as well as a rubber mallet or hammer.
Additionally, gather all the components of the tent itself, including the tent fabric, poles, stakes, and guy lines. Double-check that you have all the necessary hardware, such as brackets and bolts, that will be used to secure the tent to your vehicle. Lastly, have a friend or family member on hand to assist you with lifting the tent onto your vehicle and securing it in place.
With all the tools and materials ready, you’ll be well-prepared to tackle the task of setting up your King’s rooftop tent.
Checking the Compatibility with Your Vehicle
So, you’ve decided to take your camping game to the next level and invest in a Kings Roof Top Tent. Great choice! These rooftop tents are not only convenient and comfortable but also easy to set up. However, before you start planning your next camping adventure, it’s important to make sure that your vehicle is compatible with the Kings Roof Top Tent.
Firstly, you need to check the weight and load rating of your vehicle’s roof rack. The Kings Roof Top Tents can be quite heavy, ranging from 100 to 200 pounds depending on the model. Your roof rack should be able to support this weight without any issues.
Additionally, you need to ensure that the roof rack’s load rating is sufficient to handle the weight of both the tent and any occupants. Next, you should measure the dimensions of your vehicle’s roof rack to ensure that it is wide enough to accommodate the Kings Roof Top Tent. These tents come in various sizes, so it’s essential to pick one that fits your specific vehicle.
You can usually find the dimensions of the tent on the manufacturer’s website. It’s also important to consider the height of your vehicle. Kings Roof Top Tents typically add a few inches to the overall height, so you need to make sure that your vehicle will still be able to fit in parking garages or under low-hanging branches.
Lastly, you should check the installation requirements for the Kings Roof Top Tent and compare them to your vehicle’s specifications. Some vehicles may require additional accessories or modifications to safely install the tent. It’s always a good idea to consult with a professional or contact the manufacturer for guidance if you’re unsure.
By taking the time to check the compatibility of your vehicle with the Kings Roof Top Tent, you can ensure a safe and enjoyable camping experience. So, measure those dimensions, check that weight rating, and get ready to take your camping adventures to new heights!
Inspecting the Tent for Any Damages
So, you’ve just purchased a King’s roof top tent and you’re excited to take it out on your next camping adventure. But now comes the part where you have to actually set it up. Don’t worry, it’s not as difficult as it may seem.
The first step is to find a suitable location for your tent. Look for a flat and level surface that is free from any rocks or debris. Once you’ve found the perfect spot, it’s time to unroll the tent and attach it to your vehicle’s roof rack.
Make sure to secure it tightly to prevent any movement while you’re inside. Next, you’ll want to inspect the tent for any damages. Look for any tears or rips in the fabric, as well as any broken or missing parts.
It’s important to fix any damages before you use the tent to ensure your safety and comfort. Once you’ve deemed the tent to be in good condition, it’s time to start setting it up. Begin by unzipping the tent cover and slowly unfolding it until it’s fully open.
Then, attach the ladder to the tent and extend it so that it reaches the ground. This will make it easier for you to access the tent later on. Now that the tent is fully open, it’s time to raise the roof.
This is where the magic happens. Start by pushing up on the center of the roof, using the ladder for support. As you do this, the tent will begin to take shape and rise up.
Are you ready to tackle that DIY project you’ve been putting off? Whether you’re a seasoned handyman or a newbie to home improvement, there’s no denying the satisfaction that comes from completing a project on your own. And what better way to take control of your home than by installing something yourself? In this step-by-step installation guide, we’ll walk you through the process of installing [insert product here]. From gathering the necessary tools to actually putting it all together, we’ve got you covered.
So grab your toolbox and let’s get started!
Assembling the Tent Frame
Putting up a Kings Rooftop Tent may seem like a daunting task, but with a little know-how, it can be done in no time. The first step in assembling the tent frame is to spread out the roof base on top of your vehicle. Make sure it is centered and aligned properly before proceeding.
Next, attach the ladder to the base using the provided hardware. This will provide stability and support when entering and exiting the tent. Once the ladder is securely attached, you can start assembling the frame.
Begin by inserting the aluminum poles into the designated slots on the base. Make sure they are fully inserted and secure before moving on. Then, connect the cross beams to the aluminum poles, creating a sturdy frame.
Finally, attach the frame to the roof base using the provided clamps. Ensure that the clamps are tightened securely so that the tent frame is stable and secure. By following these simple steps, you will have your Kings Rooftop Tent frame set up and ready for adventure in no time.
Attaching the Base Plate to the Vehicle’s Roof Rack
roof rack, tent frame, assembling, base plate, vehicle, attach. So you’ve decided to embark on a camping adventure and want to make the most of your vehicle’s roof rack by attaching a tent frame. Well, you’re in the right place! Let’s dive into the process of assembling the tent frame and attaching it to the base plate on your vehicle’s roof rack.
First things first, make sure you have all the necessary components for assembling the tent frame. These typically include poles, connectors, and fabric panels. Lay them out in an organized manner so you can easily access them during the assembly process.
Next, locate the base plate that is designed specifically for your vehicle’s roof rack. This plate will serve as the foundation for attaching the tent frame securely. It’s important to ensure that the base plate is compatible with your roof rack before proceeding.
Now, it’s time to attach the base plate to your vehicle’s roof rack. This can vary depending on the design of your roof rack, so refer to the manufacturer’s instructions for specific guidance. In most cases, you will need to use screws or bolts to secure the base plate in place.
Make sure to tighten them securely to ensure a stable foundation for your tent frame. Once the base plate is firmly attached, you can begin assembling the tent frame. Start by connecting the poles using the provided connectors.
This may involve sliding them into each other or using a click-lock mechanism, depending on the specific design. Be sure to follow the instructions carefully to ensure a proper fit. As you assemble the tent frame, pay attention to any tensioning mechanisms or adjustments that may be required.
Setting up the Telescopic Ladder
“telescopic ladder” So, you’ve just purchased a telescopic ladder, and now you’re wondering how to set it up. Well, you’re in the right place! Setting up a telescopic ladder is actually quite simple and straightforward. All you need to do is follow a few easy steps, and you’ll have your ladder ready to use in no time.
Firstly, start by finding a flat and stable surface to set up your ladder. This could be the ground, a concrete floor, or even a sturdy table. Make sure the surface is clean and free from any obstacles that could hinder the stability of the ladder.
Next, locate the locking mechanism on the side of the ladder. This is usually a small lever or button that you can easily access. Unlock the mechanism by either pulling the lever or pressing the button, depending on the design of your ladder.
Once the locking mechanism is released, you can start extending the ladder. Begin with the bottom rung and pull it gently towards you. As you do this, the ladder will start to extend, and the different sections will slide out.
Keep pulling until the desired height is reached. It’s important to note that telescopic ladders usually have multiple locking positions, so choose the one that suits your needs. Now that your ladder is extended, it’s time to lock it in place.
Locate the locking mechanism again and secure it by either pushing the lever or pressing the button back into place. This will ensure that the ladder remains stable and safe to use. Finally, give the ladder a gentle shake to ensure that it is sturdy and properly set up.
Securing the Tent Base to the Mounting Bracket
Assembling the Tent Frame is an essential step in setting up your tent and ensuring a sturdy and secure shelter for your outdoor adventure. One crucial aspect of this process is securing the tent base to the mounting bracket. This step ensures that your tent is firmly attached to the frame, preventing any wobbling or instability.
Imagine the mounting bracket as the foundation of your tent frame, and the tent base as the connection point between the bracket and the tent itself. It’s like the glue that holds everything together. By securely fastening the tent base to the mounting bracket, you’re creating a solid and reliable framework for your tent.
This not only enhances the stability of your shelter but also provides peace of mind knowing that your tent is securely anchored, even during windy conditions. So, take the time to correctly assemble your tent frame by securely attaching the tent base to the mounting bracket, and you’ll be well on your way to enjoying a comfortable and worry-free camping experience.
Unfolding and Extending the Tent
So, you’ve just purchased a King’s rooftop tent and you’re ready to set it up for your next camping adventure. Putting up a rooftop tent can seem intimidating at first, but with a little practice, it’s actually quite simple. First, find a suitable location to park your vehicle and unfold the tent.
Start by releasing the tension straps and opening the latches that hold the tent closed. Slowly unfold the tent, making sure to keep it balanced and stable. Once fully unfolded, extend the ladder to the ground and secure it in place.
Next, it’s time to extend the tent poles and canopy. Start by extending the main support poles and attaching them to the designated points on the tent. Then, extend the outer tent poles and secure them in place.
Finally, fix the rainfly over the tent and fasten it securely to protect you from the elements. With a little practice, setting up your King’s rooftop tent will become second nature, allowing you to focus on enjoying your outdoor adventures. So go ahead, unfold and extend the tent, and embark on your next camping excursion with ease.
Unlocking the Latch Mechanism
unfolding and extending the tent, latch mechanism So, you’ve arrived at your campsite and it’s time to set up your tent. You start by unpacking it and laying it out on the ground. The next step is unlocking the latch mechanism that holds the tent together in its folded state.
This latch mechanism is like the key to unlocking your tent and allowing it to spring open like a beautiful flower. You locate the latch and give it a gentle tug, feeling the satisfying click as it releases. This is the moment when your tent starts its transformation from a compact bundle to a spacious shelter.
As you unfold the tent, you can’t help but feel a sense of anticipation. It’s like opening a present on your birthday – you never quite know what you’re going to get until it’s fully unfurled. As the tent unfolds, you start to see the shape of your temporary home take form.
It’s like watching a slow-motion video of a flower blooming. Piece by piece, the tent extends, revealing each section and making it ready for you to inhabit. Just like a flower needs time and patience to reach its full potential, so too does your tent.
Once the tent is fully unfolded, it’s time to extend it to its full height. This is done by extending the tent poles and attaching them to the appropriate loops and hooks. It’s like stretching your arms up to the sky and taking a deep breath – stretching out your tent allows it to reach its maximum potential.
As you extend the tent, you can’t help but marvel at the engineering behind the latch mechanism. It’s a simple yet genius design that allows you to pack up your tent with ease and then unlock it effortlessly. It’s one of those small details that make camping a little bit more enjoyable.
Pulling and Extending the Tent Fabric
unfolding and extending the tent, tent fabric Have you ever set up a tent before? There’s something magical about the process of unfolding and extending the fabric, transforming it from a compact bundle to a spacious shelter. It’s like opening up a world of possibilities, as the tent expands and reveals its full potential. In many ways, life is similar to setting up a tent.
We start with a small, contained existence, but as we unfold and extend ourselves, we discover new horizons and experiences. The fabric of our lives can be stretched to accommodate our dreams and ambitions, allowing us to create a meaningful and fulfilling existence. Just like a tent fabric, our lives are flexible and can be adjusted to fit the circumstances.
Sometimes, we may find ourselves in situations where we need to pull and stretch ourselves beyond our comfort zones. It’s during these times that we can truly grow and learn about our strengths and capabilities. Just as a tent fabric can withstand the elements and provide us with shelter, we too can weather the storms and challenges that come our way.
Extending the tent fabric also reminds us of the importance of being adaptable. Life is unpredictable, and we often have to adjust our plans and expectations. By being open to change and willing to adapt, we can make the most of any situation.
This flexibility allows us to seize opportunities that may arise unexpectedly, just like adding extra sections to a tent to accommodate more people or belongings. In the same way that we can extend a tent fabric, we can also extend ourselves emotionally and mentally. Our minds and hearts have an incredible capacity for growth and expansion.
By embracing new experiences, learning from others, and challenging ourselves, we can continually extend the fabric of our being. Just like a tent, we can create more room for joy, love, and fulfillment in our lives. So, the next time you set up a tent, take a moment to appreciate the process of unfolding and extending the fabric.
Securing the Tent’s Stakes and Guylines
Securing the Tent’s Stakes and Guylines Now that you’ve unfolded and extended your tent, it’s time to secure it properly. One of the most important steps in setting up your tent is making sure the stakes and guylines are securely in place. Stakes are used to anchor the tent to the ground, while guylines provide additional support and stability.
It’s essential to properly secure both to ensure your tent stays put, even in windy conditions. To start, find the attachment points on your tent where the guylines will connect. These are usually located at the corners and along the sides of the tent.
Attach the guylines to these points using the included clasps or loops. Next, drive the stakes into the ground at a 45-degree angle, pointing away from the tent. You’ll want to make sure the stakes are fully inserted into the soil to provide maximum stability.
If you encounter hard or rocky ground, you can use a rock or mallet to help drive the stakes in. Once the stakes are secure, attach the guylines to them. Pull the guylines taut and use tensioners, if provided, to tighten them even further.
This will help prevent any slack, keeping your tent in place and stable. Remember to check your stakes and guylines periodically, especially during inclement weather conditions. If necessary, adjust the tension and re-secure any loose or shifting stakes.
This will help ensure your tent remains securely anchored throughout your camping adventure. By taking the time to properly secure your tent’s stakes and guylines, you can have peace of mind knowing your shelter will withstand the elements. So, before you set off on your next camping trip, make sure to master the art of securing your tent, and you’ll be ready for any weather Mother Nature throws your way.
Testing the Stability and Security of the Tent
Are you wondering how to put up a Kings rooftop tent? Well, you’re in luck because we’re here to guide you through the process. First things first, it’s important to ensure the stability and security of the tent. After all, you want to sleep soundly and comfortably, knowing that your tent is reliable.
To test the stability, make sure you have a sturdy and level surface to place the tent on. This will prevent any wobbling or tilting. Once you have the right spot, securely attach the tent to your vehicle using the provided straps or mounting system.
Give it a gentle shake to see if it feels secure. Next, check the tension of the tent fabric and make any necessary adjustments. This will ensure a tight and secure fit.
Now, onto security. Kings rooftop tents are designed with safety in mind, but it’s always a good idea to take extra precautions. Make sure all zippers and closures are properly fastened and locked.
This will keep out any unwanted critters and ensure your belongings stay safe. Additionally, consider adding a lock to the ladder or securing it in some way to prevent unauthorized access. By following these steps, you’ll have a stable and secure Kings rooftop tent that you can rely on for your outdoor adventures.
Checking the Tent for Any Swings or Movements
tent security, stability, checking for swings, testing the tent When you’re out camping, it’s essential to ensure the stability and security of your tent. One way to do this is by checking for any swings or movements in the tent. This can be done by giving the tent a gentle shake or applying pressure to different parts of the structure.
If the tent feels wobbly or shaky, it may be a sign that it’s not properly secured or stable. In such cases, you can try adjusting the stakes and guy lines to provide more support and tension. Additionally, make sure that all the zippers and fasteners are properly closed to prevent any unwanted movements.
By regularly testing the stability and security of your tent, you can rest assured that you’ll have a comfortable and safe camping experience.
Ensuring the Tent Zippers are Functioning Properly
When it comes to camping, one of the most important aspects of a tent is its stability and security. After all, you want to make sure that you and your gear are protected from the elements and any unwanted visitors. One way to ensure that your tent is secure is by testing the stability of the structure, especially the tent zippers.
Zippers are the main access point to a tent, so it is crucial that they are functioning properly. The last thing you want is to be stuck inside your tent because the zipper is jammed or broken. To test the stability and security of the tent, try pulling on the zippers to see if they glide smoothly.
Make sure they can be easily opened and closed without any resistance. Additionally, check for any signs of wear and tear, such as missing teeth or frayed fabric. If you notice any issues, it may be worth investing in a repair kit or replacing the zippers altogether.
Camping is all about enjoying the great outdoors, so don’t let a faulty zipper ruin your experience. Take the time to ensure that your tent zippers are functioning properly and you’ll have peace of mind knowing that you and your belongings are safe and secure.
Verifying the Secure Fastening of Straps and Buckles
Verifying the Secure Fastening of Straps and Buckles When it comes to setting up your tent, it’s crucial to ensure that the straps and buckles are securely fastened. After all, you don’t want any surprises in the middle of the night when a sudden gust of wind hits your campsite. Testing the stability and security of the tent should be part of your camping routine to provide you with peace of mind during your outdoor adventures.
To start, take a close look at the straps and buckles. Check for any signs of wear and tear or fraying. It’s important to replace any damaged straps or buckles to maintain the tent’s integrity and prevent any accidents.
Once you’ve examined the condition of the straps and buckles, it’s time to put them to the test. First, secure the straps around the tent poles tightly. Pull on them firmly to see if they hold their position.
They should feel strong and not give way under moderate pressure. Similarly, the buckles should be able to withstand a bit of force without coming undone. Give them a gentle tug to ensure they are properly locked in place.
Next, consider the overall stability of the tent. Stand inside and give it a gentle shake to see if it wobbles or feels flimsy. Ideally, your tent should feel sturdy and able to withstand the elements.
If it feels unstable, it might be worth revisiting the fastening of the straps and buckles or considering a different tent altogether. When testing the security of your tent, it’s essential to think about the weather conditions you may encounter. While a gentle breeze might not pose much of a threat, strong winds can put your tent to the test.
Looking for tips on how to make the most out of your King’s Roof Top Tent? Look no further! In this blog, we’ll provide you with some handy tips and tricks to ensure that your camping experience with a King’s Roof Top Tent is comfortable, convenient, and unforgettable. Camping with a roof top tent offers a unique and exciting way to connect with nature. With its easy setup and spacious design, a King’s Roof Top Tent is a popular choice among outdoor enthusiasts.
However, to truly make the most of your adventure, there are a few things you should keep in mind. First and foremost, it’s essential to familiarize yourself with the setup and take-down process of the tent. While King’s Roof Top Tents are known for their simplicity, practicing the setup a few times before your trip can save you time and frustration once you’re at the campsite.
Additionally, pay attention to the weight restrictions of your vehicle’s roof rack system to ensure a safe and secure installation. Another important tip is to consider the weather conditions before heading out. While the sturdy construction of a King’s Roof Top Tent can withstand various weather conditions, it’s always wise to check the forecast and pack accordingly.
Bringing a tarp or rainfly can offer extra protection from unexpected rain showers or increased privacy at the campsite. When it comes to bedding, investing in a quality sleeping pad and sleeping bag is essential for a comfortable night’s rest. While a King’s Roof Top Tent provides a cozy elevated platform, a proper sleep system will ensure you wake up feeling refreshed and ready for a day of adventure.
Lastly, don’t forget to take advantage of the additional accessories that King’s Roof Top Tents have to offer. From annex rooms and gear hammocks to awnings and awning rooms, these add-ons can significantly expand your living space and enhance your camping experience. By following these tips, you’ll be well-prepared to enjoy all the benefits that come with using a King’s Roof Top Tent.
So, grab your gear, pack your sense of adventure, and get ready for a camping experience like no other!
Proper Maintenance and Care
Putting up a King’s rooftop tent is not difficult, but it does require some proper maintenance and care to ensure its longevity and functionality. To start, it’s important to regularly clean and inspect the tent for any signs of wear or damage. Check the zippers, seams, and fabric for any tears or fraying, and repair them promptly if needed.
It’s also a good idea to regularly apply a waterproofing treatment to keep the tent dry and protected from the elements. When setting up the tent, it’s important to choose a level and stable surface to avoid any tipping or sliding. Make sure to follow the manufacturer’s instructions carefully and securely anchor the tent to your vehicle.
Once the tent is set up, be mindful of how much weight you place inside, as overloading the tent can lead to damage or instability. Finally, when it’s time to take down the tent, make sure it is completely dry before storing it away to prevent mold or mildew growth. Taking these steps will ensure that your King’s rooftop tent stays in great shape for all your outdoor adventures.
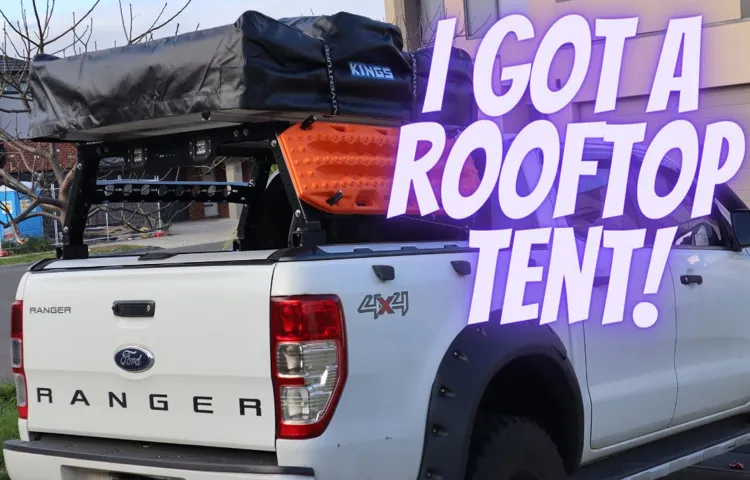
Additional Accessories and Modifications
So, you’ve just purchased a Kings rooftop tent and can’t wait to experience the joy of camping on top of your car. But now comes the question of how to actually put up the tent. Don’t worry, the process is easier than you might think.
Here’s a step-by-step guide to help you get your Kings rooftop tent set up and ready for a cozy night under the stars. First, you’ll want to find a suitable location to park your car and set up your tent. Look for a flat area with enough space for the expanded size of the tent.
Make sure there are no overhanging branches or other obstructions that could interfere with the tent’s setup. Next, remove the tent from its storage bag and unfold it. Lay it out on the ground next to your car, making sure the ladder is facing the right direction.
The ladder should be positioned on the side of the car where you plan to access the tent. Now it’s time to attach the tent to your car. Most Kings rooftop tents come with mounting brackets that need to be bolted onto the crossbars of your roof rack.
Use the provided hardware to securely attach the brackets. Make sure they are evenly spaced and securely tightened. Once the brackets are in place, carefully lift the tent onto your car.
Position it so that the mounting brackets line up with the holes on the underside of the tent. Insert the provided bolts into the holes and tighten them down to secure the tent to your car. With the tent securely attached, it’s time to set up the ladder.
Considerations for Camping Safety
If you’re planning a camping trip and want to make the most out of your outdoor adventure, consider setting up a Kings roof top tent. These tents are a convenient and comfortable way to camp, allowing you to sleep above the ground and enjoy a great view of your surroundings. But how do you put up a Kings roof top tent? Don’t worry, it’s easier than you might think.
First, choose a suitable location for your tent, making sure the ground is level and stable. Then, unfold the tent and attach it to your vehicle’s roof racks using the provided straps. Once secured, extend the ladder and climb up into your tent.
Finally, make sure all the tent poles are locked into place and the rainfly is properly attached. Now you’re ready to relax and enjoy your camping trip in style.
Hey adventure enthusiasts! Are you ready to take your camping experience to the next level? Look no further than King’s Roof Top Tent. This innovative and convenient camping solution allows you to elevate your outdoor adventures like never before. With its easy setup, comfortable sleeping quarters, and durable construction, King’s Roof Top Tent is the perfect companion for your weekend getaways or extended expeditions.
So pack your bags, grab your friends, and get ready to embark on an unforgettable journey with King’s Roof Top Tent! Your next adventure awaits.
Conclusion
And there you have it: the fool-proof guide to putting up a king’s rooftop tent. Just remember, while it may make you feel like the ruler of the camping world, taking your time and following the instructions will ensure that you don’t end up with a royal headache. So grab your crown, your camping gear, and get ready to sleep like a king under the stars.
And hey, if all else fails, throw out the instructions and claim that you were just practicing your sword fighting skills. After all, a true king always knows how to improvise and conquer any challenge that comes their way. Happy camping, your majesty!”
FAQs
How do I properly set up a King’s Roof Top Tent?
To set up a King’s Roof Top Tent, first, find a level and sturdy surface on your vehicle’s roof. Then, unfold the tent and secure it to the roof rack using the provided straps and mounts. Finally, extend the ladder and make sure it is stable before entering the tent.
What is the weight limit for a King’s Roof Top Tent?
The weight limit for a King’s Roof Top Tent varies depending on the specific model. However, most tents can comfortably accommodate two to three adults, with a weight limit ranging from 400 to 600 pounds.
Can I leave my King’s Roof Top Tent installed on my vehicle all year round?
Yes, you can leave your King’s Roof Top Tent installed on your vehicle all year round. However, it’s important to regularly check the tent’s mounting system, straps, and roof rack for any signs of wear or damage to ensure safe and secure usage.
How long does it take to set up a King’s Roof Top Tent?
The time it takes to set up a King’s Roof Top Tent can vary depending on your experience and familiarity with the tent. On average, it takes about 10-15 minutes to set up the tent and have it ready for use.
Can I install a King’s Roof Top Tent on any vehicle?
King’s Roof Top Tents are designed to be compatible with various types of vehicles, including SUVs, trucks, and vans. However, it’s essential to check the weight limits and roof rack compatibility of your specific vehicle to ensure a proper and secure installation.
How do I pack up a King’s Roof Top Tent after use?
To pack up a King’s Roof Top Tent, first, remove any bedding or belongings from inside the tent. Then, collapse the tent by folding it back to its original position. Secure any loose straps or buckles, and make sure all zippers are closed. Finally, carefully fold the ladder and store it inside the tent before closing and securing the cover.
Are King’s Roof Top Tents waterproof?
Yes, King’s Roof Top Tents are designed to be waterproof. They feature high-quality materials and waterproof coatings to protect you from rain and moisture during your camping adventures. However, it’s always a good idea to double-check the manufacturer’s specifications and instructions for proper care and maintenance.