

Do you own a tubeless tire bike and dread the thought of having to remove the tire? Fear not, as we’ve got you covered! Removing a tubeless tire may seem intimidating at first, but with the right tools and techniques, it can be a breeze. In this article, we’ll guide you through the step-by-step process and give you some tips to make the task much easier. Whether you’re a seasoned pro or a newbie to bike maintenance, this guide will help you remove your tubeless tire quickly and efficiently.
So, put on your gloves, grab some tools, and let’s get started!
Table of Contents
Tools Needed
Removing a tubeless tire can be a bit challenging, but with the right tools, it can be done quickly and smoothly. Firstly, you will need a tire lever or two for removing the tire from the rim. You will also require a valve core remover tool to extract the valve core from the valve stem.
This tool is essential to ensure that the tire comes off quickly. A quality floor pump is another requirement to push air into the tire, making the task less time-consuming. A pair of latex gloves is handy to prevent greasy fingers and to have an excellent grip on the tire and the rim.
Additionally, a tire sealant and a sealant injector are critical tools for repairing punctures in tubeless tires. Having these tools ready and knowing how to use them will make removing tubeless tires a breeze.
Tire Levers
When it comes to fixing a flat tire, tire levers are an essential tool. These simple yet effective tools are designed to help pry the tire away from the rim, allowing you to remove the tube and make the necessary repairs. While some people might think that any tool would do the job, it’s important to use the right tool for the job to avoid damaging the tire or the rim.
When selecting tire levers, you want to look for a set that is made of durable materials and is easy to use. Some popular options include the Park Tool TL-2, the Pedro’s Tire Levers, and the Kool Stop Tire Bead Jack.
These tools will make the task of fixing a flat tire much easier and faster, ensuring that you’re back on the road in no time. So, don’t let a flat tire ruin your ride – make sure you have a set of tire levers on hand before heading out.
Pump
When it comes to using a pump, there are a few tools you’ll need to make the process go smoothly. First of all, you’ll need the pump itself, whether that’s a manual pump or an electric one. Depending on what you plan to pump, you may also need hoses or pipes to connect the pump to the source and the destination.
Additionally, you’ll want to have a way to measure the flow and pressure of the liquid being pumped, such as a pressure gauge or flow meter. If the liquid is particularly thick or viscous, you may need a strainer or filter to prevent clogs. And of course, safety should always be a top priority, so make sure you have any necessary protective equipment like gloves or goggles.
With the right tools in place, you can use a pump to move liquids efficiently and effectively.
Valve Core Tool
If you’re an avid cyclist, one of the most important things you should always have on hand is a valve core tool. This small, compact tool is essential for maintaining your bike’s tires and keeping them in optimal condition. The valve core tool is used to remove the valve core from the valve stem, allowing you to add or release air from your tires as needed.
It’s a simple tool that can make a big difference in your cycling experience. To use the valve core tool, you’ll need a few other basic tools as well. You’ll want to have a pump for adding air to your tires, as well as a pressure gauge to ensure that your tires are inflated to the correct pressure.
A tire lever can also be helpful for removing and installing tires if you need to replace a tube or tire. Overall, having a valve core tool is an essential part of maintaining your bike and ensuring that your tires are in good shape for your rides. Don’t forget to keep it in your toolkit and bring it with you on every ride.
With a little bit of routine maintenance and the right tools on hand, you’ll be able to enjoy your cycling adventures to the fullest.
Preparation
Removing a tubeless tire can be intimidating but with some preparation, it can be a breeze. Start by deflating the tire completely and ensure you have all the necessary tools like tire levers and a valve core remover. Next, remove the valve core to release any remaining air, making it easier to remove the tire.
Once done, break the bead on the tire by pushing down on the tire sidewalls. Work your way around the tire, using tire levers to lift the edges, releasing the bead from the rim. Now the tire should come off easily.
To make the process easier, consider using a tire sealant, which can lubricate the tire bead and make it slip off the rim effortlessly. With this simple method, you can now remove tubeless tires like a pro.
Deflate the Tire
Deflating the tire before starting any work on your vehicle is essential and should be a part of your routine. It helps in preventing accidents and ensures a safe environment. So, before starting any work, the first step is to park the vehicle at a safe spot and apply the parking brake.
You can then use a tire pressure gauge to check the tire pressure. If the pressure is above the recommended level, use a tire deflator to let out enough air to reach the recommended level. It is important to ensure that the tire is not completely deflated as it could damage the tire’s sidewalls.
Once the required pressure is reached, remove the valve cap and use a valve stem tool to depress the valve core, allowing the air to escape. Always remember to keep the valve core in a safe place to avoid losing it. This simple step will ensure that you are well prepared to start working on your vehicle safely.
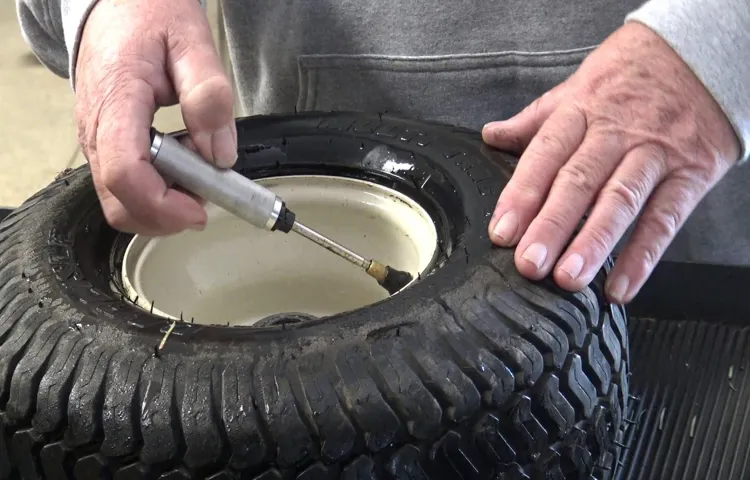
Remove the Valve Core
Removing the valve core can be a daunting task if you’re not careful. Before you start, make sure you have all the necessary tools on hand. These include a valve core remover, pliers, and a fresh core to replace the old one if necessary.
Start by deflating the tire completely and unscrewing the valve cap. Next, insert the valve core remover onto the valve stem and turn it counterclockwise to loosen the valve core. Use pliers to carefully remove the valve core from the valve stem.
Be sure to keep the core in a safe place where you won’t lose it. Once you have removed the valve core, you can inspect it for any damage or wear. If it’s damaged, replace it with a new one before re-inflating your tire.
With these steps in mind, removing the valve core becomes a simple and stress-free task to accomplish.
Removing the Tire
If you need to change a tire, knowing how to remove a tubeless tire can be a lifesaver. The first step is to make sure your bike is stable and secure. Then, remove the valve core using a valve core remover tool.
This will release any air pressure remaining in the tire. Next, use tire levers to pry the tire off the rim, starting at the valve stem and working your way around the circumference of the tire. Be careful not to damage the rim during this process.
Once the tire is completely off the rim, you can inspect both the tire and rim for any damage or wear and tear. Remember to check the condition of the sealant inside the tire as well. With a bit of practice, removing a tubeless tire can become an easy and routine task for any cyclist.
Insert Tire Levers
Tire levers are an essential tool for any cyclist, as they help remove the tire without damaging it. To use tire levers, start by deflating the tire completely. Then, insert the lever in between the tire and the rim, and gently pry the tyre away from the rim.
If you encounter resistance, work your way around the tire lever, making sure not to force the lever too hard, as this can cause damage to the tire or rim. Once you have removed one side of the tire, you can use your hands to take the inner tube out. Be sure to inspect the tire for any damage or wear before reassembling it.
When it comes to using tire levers, practice makes perfect. With enough experience, you’ll be able to remove tires quickly and without any hassle.
Lift and Pull the Tire Off
Removing a tire can be tricky, but with the right steps, it can be done with ease. The first step is to park the vehicle on a flat surface and engage the emergency brake. Next, use a lug wrench to loosen the lug nuts just enough to break their resistance.
Then, position the jack under the vehicle’s frame near the tire that needs to be removed. Slowly turn the jack handle until the tire is just above the ground. At this point, remove the lug nuts and lift the tire off the wheel studs.
It’s important to remember to lift the tire straight up and avoid tilting it as this can cause damage to the wheel studs or brake components. With the tire off, inspect it for any damage or signs of wear. Then, install the spare tire by lining up the wheel studs with the holes in the spare.
Finally, tighten the lug nuts by hand until they are snug, then lower the vehicle and tighten in a star pattern with the lug wrench. And there you have it, tire successfully removed and replaced!
Tips and Tricks
Removing a tubeless tire can be a bit tricky, but with the right tools and technique, it can be done easily. First, ensure that the tire is completely deflated before starting the removal process. Then, insert a tire lever between the tire bead and rim to loosen the tire.
Once a small portion of the tire is detached from the rim, carefully slide the lever along the tire’s edge, working around the rim while simultaneously pushing the tire down and away from the rim. It may require some extra force to break the seal between the tire and the rim, especially in stubborn spots. Once the tire is completely detached, you can pull it off the rim, taking care not to damage the sidewalls.
Repeat the process on the other side of the tire until it is fully removed. Remember to always use caution and be patient when removing a tubeless tire. By following these simple steps, you can remove tubeless tires like a pro and keep your bike in top condition.
Be Patient
When it comes to achieving success, one of the most important things to remember is to be patient. It’s easy to get caught up in the excitement of success and the desire for instant gratification, but the reality is that anything worth having takes time and effort. That being said, there are a few tips and tricks that can help make the waiting process a bit easier.
Firstly, it’s important to set realistic expectations and goals. If you expect instant results, you’re setting yourself up for disappointment. Instead, set smaller milestones along the way that will keep you motivated and allow you to measure your progress.
Secondly, it can be helpful to find ways to enjoy the journey rather than just fixating on the end goal. Whether it’s finding joy in the process of learning and growing or enjoying the small victories along the way, finding ways to appreciate the journey can help you stay focused and motivated. Finally, surround yourself with supportive people who will encourage you and remind you that success is possible, but it takes time.
Rome wasn’t built in a day, and neither is success. Stay persistent, stay focused, and remember that success is a journey, not a destination. With patience and perseverance, you can achieve whatever you set your mind to.
Use Lubricant
Using lubricant during sexual activity can enhance pleasure and reduce discomfort. It’s commonly used during penetration to reduce friction, but it can also be used in other areas of the body, such as nipples or clitoris. There are many types of lubricants available, and choosing the right one can depend on personal preference and sensitivity.
Water-based lubricants are versatile and easily accessible, while silicone-based lubricants are longer-lasting and great for shower or bathtub play. Oil-based lubricants, such as coconut or almond oil, can also be used but should not be used with condoms as they can cause them to break down. It’s important to choose a lubricant that is compatible with any sex toys or contraceptives being used.
Overall, adding lubricant to sexual play can increase comfort and intimacy while reducing the risk of injury or discomfort.
Watch Out for the Beadlock
When it comes to off-roading, one crucial element that can often go unnoticed is the beadlock. The beadlock is the part of your tire that holds the tire bead tightly against the wheel rim. Without it, your tire could easily slip off the rim and cause a disaster.
Therefore, it is crucial to check your beadlocks often to ensure they are tight and secure. A loose beadlock can not only cause a blowout but also lead to a damaged tire and wheel rim. It is also important to note that beadlocks require a more complex installation process than regular rims, often requiring special tools and knowledge.
Therefore, if you are unfamiliar with installing beadlocks, it is best to seek help from a professional to avoid any mishaps on the trails. Remember, always keep an eye on your beadlocks to ensure your off-roading adventure is a safe one.
Conclusion
In the world of cycling, removing a tubeless tire can seem like a daunting task, especially for beginners. But fear not, with a little know-how and some elbow grease, you can pop that tire off like a pro. Just remember to release the air, loosen the beads, and take your time.
And if all else fails, there’s no shame in asking for help or tossing in the towel and heading to your local bike shop. After all, sometimes the wit and cleverness is knowing when to call in the reinforcements. Happy riding!”
FAQs
What tools do I need to remove a tubeless tire?
You’ll need a tire lever, a valve core tool, and an air compressor.
Can I remove a tubeless tire without any tools?
It’s not recommended, as you could damage the tire or rim. Always use the proper tools.
How do I remove the valve core from a tubeless tire?
Use a valve core tool to unscrew the valve core. Be sure to keep it in a safe place so you don’t lose it.
Can I reuse the valve core after removing it from a tubeless tire?
Yes, as long as it’s not damaged. If it’s bent or shows signs of wear, replace it with a new one.
What’s the best way to break the bead on a tubeless tire?
Use a tire lever to pry the tire away from the rim. Work your way around the tire until the bead is loose enough to remove.
How do I remove a tubeless tire from the rim completely?
Once the bead is loose, use your hands to pull the tire away from the rim. Be careful not to damage the tire or rim in the process.
How do I install a new tubeless tire onto the rim?
First, make sure the rim is clean and free of debris. Then, use a tire lever to install one side of the tire onto the rim. Once one side is in place, work the other side onto the rim using your hands or a tire lever.