
Are you tired of seeing that ugly dealership decal on your car every time you hit the road? You’re not alone! These decals can be irritating and make your car look less attractive. Luckily, removing them is easier than you might think. In this step-by-step guide, we’ll show you how to remove a dealership decal safely and efficiently, without causing damage to your car’s paint or leaving any residue behind.
So, if you want to learn how to get rid of that pesky decal once and for all, keep reading!
Table of Contents
Materials You’ll Need
Removing dealership decals from your car can be a challenging and frustrating task. However, with the right tools and materials, you can do it yourself without damaging your car’s paint. You will need a few items to get started, including a hairdryer, plastic scraper or credit card, rubbing alcohol, and a microfiber towel.
First, use the hairdryer to heat up the decal for a few minutes, making it easier to remove. Then, use the plastic scraper or credit card to gently peel off the decal, starting from one corner. If the decal is stubborn, apply more heat and continue scraping until it’s all removed.
Once the decal is fully removed, apply rubbing alcohol to a microfiber towel and remove any remaining adhesive residue. Be sure to use a clean area of the towel or a new towel to prevent any scratches on your car’s paint. With these materials and a little bit of patience, you’ll have a decal-free car in no time.
Heat gun or hairdryer
When it comes to DIY projects, a heat gun or hairdryer can be incredibly useful tools for making some of the more complicated tasks much easier to tackle. But which one is better? Well, it really depends on the project you’re working on. If you need high heat and more precision, then a heat gun is likely the better choice.
This tool is perfect for things like removing paint, welding plastics, and even shrink-wrapping materials. On the other hand, if you’re looking for a more versatile tool for softer materials, then a hairdryer might be the better option for you. This tool is excellent for things like drying paint, heating up glue, and even drying out wet paper or cardboard.
Ultimately, which one you choose will depend on the project you’re working on and the specific needs you have.
Plastic scraper or credit card
When it comes to removing stickers or labels from surfaces, you’ll need a plastic scraper or a credit card. These materials are perfect for getting rid of stubborn stickers without causing any damage to the surface underneath. Plastic scrapers come in different shapes and sizes, but a credit card is just as effective as a scraper.
In fact, many people prefer to use credit cards because they’re readily available and they won’t scratch surfaces. These materials will make the sticker removal process much easier and faster. Plus, they’re affordable and can be reused multiple times, making them a great investment for any homeowner.
So, next time you need to remove a sticker or adhesive label, make sure you have a plastic scraper or credit card on hand to get the job done efficiently and effectively.
Rubbing alcohol or Goo Gone
If you’re planning on using rubbing alcohol or Goo Gone for a project, there are a few materials you’ll need. First, make sure you have a clean cloth or sponge, as this will be used to apply the rubbing alcohol or Goo Gone. Additionally, you may want to use gloves to protect your hands from the chemicals and a mask to avoid inhaling any fumes.
It’s also a good idea to have a bowl or container to hold the rubbing alcohol or Goo Gone and a small brush or scraper to assist with removing any stubborn spots. Remember to follow the instructions on the label and test a small area before applying to a larger surface to avoid any damage or unwanted reactions. By having these materials on hand, you can ensure that your project with rubbing alcohol or Goo Gone goes smoothly and effectively.
Microfiber cloth
When it comes to cleaning, having the right materials is essential for getting the job done properly. One of the materials you’ll need is a microfiber cloth. Microfiber cloths are made up of tiny fibers that are much smaller than a human hair, allowing them to reach and clean areas that traditional cloths cannot.
The fibers attract dirt and dust easily, making them ideal for dusting and cleaning surfaces. To use a microfiber cloth, simply dampen it with water and use it to wipe down surfaces. They are perfect for use on a variety of surfaces, including windows, mirrors, and even stainless steel appliances.
You can also use them dry to dust furniture or clean up spills. Once you’re finished, be sure to wash the cloth with a mild detergent and let it air dry. With a microfiber cloth in hand, cleaning has never been easier.
Preparing the Car
If you’ve recently purchased a new car and it came with a dealership decal, it’s completely understandable if you want to remove it. Fortunately, removing a dealership decal is a pretty simple process. However, before you start peeling away, it’s important to ensure that you prepare the car properly.
Begin by washing the area around the decal with soap and water, or with a specialized automotive detailing product. This will remove any dirt or debris that could scratch your car’s finish during the decal removal process. Once you’ve cleaned the area, use a heat gun or hairdryer to warm up the decal.
This makes the adhesive easier to remove and could prevent any damage to your car’s paint. When the decal has been warmed up, gently peel back one corner using a plastic scraper, then slowly work your way around the decal. Be patient and avoid the temptation to pull too hard as it could cause scratches to your car’s finish.
And there you have it, with these simple steps, you’ll have removed the dealership decal from your car in no time.
Wash and dry the area around the decal
One of the crucial steps in preparing your car for a decal application is washing and drying the area around it. This will ensure that there is no dirt, debris, or other contaminants that may interfere with the decal’s adhesion. To clean the area, use a gentle soap and water solution, as harsh cleaners may damage the paint job.
You can also use a clay bar to remove any stuck-on contaminants. It’s important to dry the area thoroughly to prevent water spots from forming, as these may cause bubbles or wrinkles in the decal. A clean and dry surface will not only help the decal stick better, but it will also make it last longer.
So take your time and be thorough in washing and drying the area – your decal will thank you for it!
Heating the Decal
If you’re looking for a quick and easy way to remove dealership decals from your car, heating the decal is your best bet. Start by using a hairdryer or heat gun to warm up the decal. This will help to loosen the adhesive and make it easier to peel off.
Be sure to keep the heat source at a safe distance from the paint to prevent any damage. Once the decal is warm, use a plastic scraper or credit card to gently lift the edge of the decal. Then, pull the decal off slowly and evenly.
If any adhesive residue remains, you can use a mixture of hot water and dish soap to clean it up. Heating the decal is a safe and effective method for removing dealership decals without causing damage to your car’s paint job. Try it out for yourself and enjoy a clean, sleek-looking ride!
Use heat gun or hairdryer to heat the decal for 2-3 minutes
When it comes to applying a decal, heating it up beforehand can be a game-changer. This is where a heat gun or hairdryer come in handy. By using heat, the adhesive on the decal becomes more pliable, allowing it to conform better to the surface you’re applying it to.
Simply aim the heat gun or hairdryer at the decal for 2-3 minutes, taking care not to get too close or overheat the decal. This will help ensure that the decal stays in place and looks great for years to come. Plus, it’ll make the application process easier and less frustrating.
So, next time you’re putting a decal on your car, laptop, or anywhere else, don’t forget to break out the heat gun or hairdryer for a professional-looking result.
Scraping the Decal
If you’ve recently purchased a new car from a dealership, you’ve likely noticed the obnoxious dealership decal on the back of your vehicle. While some people don’t mind advertising for the dealership that sold them the car, others prefer a cleaner look. Removing the decal isn’t difficult, but it does require patience and a steady hand.
First, try to peel the decal off with your fingers. If that doesn’t work, use a plastic scraper or credit card to get underneath the decal and gently lift it up. Be careful not to scratch the paint on your car.
Once you’ve removed the decal, use a mild solvent like rubbing alcohol or adhesive remover to get rid of any sticky residue that’s left behind. Remember to test the solvent on a small, hidden area of your car first to make sure it doesn’t damage the paint. With a little effort, you can enjoy a decal-free car that’s all yours.
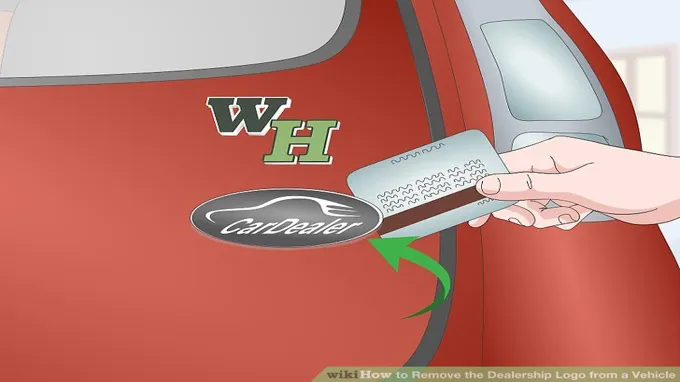
Use plastic scraper or credit card to start peeling the decal
When it comes to removing decals, starting the process can sometimes be tricky. That’s where a plastic scraper or a credit card comes in handy. By using a plastic scraper or credit card, you can begin peeling the decal away from the surface it’s adhered to without damaging the area underneath.
The key is to start in a corner, lifting the edge of the decal slightly with the tool before slowly working your way across. Make sure to apply pressure evenly and continue to lift the edges as you go. This technique works well on smooth surfaces like glass or metal, but may not be as effective on textured surfaces.
By taking the time to scrape the decal away, you’ll be able to remove it without all the headache and hassle. So the next time you’re faced with a stubborn decal, grab your plastic scraper or credit card and get to work!
Add heat to stubborn areas for easier removal
When it comes to removing stubborn decals, one helpful tip is to apply heat to the area. By using a heat gun or even a hair dryer, the adhesive on the decal will become softer and easier to scrape off. This method is especially useful for decals that have been stuck on for a long time, or in places where it’s difficult to get a good grip for scraping.
Just be sure not to apply too much heat, as it can damage the surface underneath the decal. So next time you’re struggling to remove a decal, try adding some heat for an easier removal process!
Removing Residue
Do you have a dealership decal on your car that you want to remove? Don’t worry! It’s a quick and easy process that you can do at home. First, get a plastic scraper, rubbing alcohol, and a microfiber towel. Use the plastic scraper to gently lift up one corner of the decal and slowly peel it off.
If there’s any residue left behind, dab a small amount of rubbing alcohol onto the microfiber towel and gently rub it onto the residue until it comes off. Be sure to use a light pressure so you don’t damage the surface of your car. Once you’ve removed all the residue, give the area a final wipe with a clean microfiber towel to give it a nice shine.
Voilà! Now you have a clean car free of dealership decals.
Use rubbing alcohol or Goo Gone to remove leftover adhesive residue
When it comes to removing adhesive residue, there are a few things you can do to make the process as easy and effective as possible. One option is to use rubbing alcohol or Goo Gone. Both of these products are great at breaking down the leftover adhesive, making it easy to wipe away.
Rubbing alcohol is a great choice because it is readily available and dries quickly. Simply apply the alcohol to the affected area and let it sit for a few minutes. Then, use a clean cloth or paper towel to wipe away the adhesive residue.
Goo Gone is another effective option that is specifically designed for removing adhesive residue. It works by breaking down the adhesive, making it easy to wipe away with a cloth or paper towel. No matter which product you choose, be sure to test it on a small, inconspicuous area first to ensure it won’t damage the surface you’re working on.
With a little bit of effort and the right tools, removing adhesive residue can be a quick and easy task.
Apply to microfiber cloth, not the car directly
When it comes to removing residue from your car, it’s important to use the correct method to avoid damaging the paintwork. Applying too much force or abrasive materials can lead to scratches or even permanent damage. That’s why it’s recommended to always apply any cleaning products, including microfiber cloths, to the cloth itself instead of directly onto the car.
This method ensures that you have better control over the cleaning process and can prevent any scratches or damage. Microfiber cloths are a great choice for removing residue because they are gentle on the paintwork and can effectively lift and trap dirt and debris. So, the next time you’re cleaning your car, remember to always apply any cleaning products to your microfiber cloth first to prevent unnecessary damage to your car’s surface.
Cleaning Up
Are you tired of seeing that old dealership decal on your car? Removing it can seem like a daunting task, but with a little patience and some basic tools, it can be a breeze. First, gather some rubbing alcohol, a plastic scraper, and a clean cloth. Start by pouring a small amount of rubbing alcohol onto the cloth and rubbing it onto the decal.
Let the alcohol soak in for a few minutes to loosen the adhesive. Then, use the plastic scraper to gently lift the edge of the decal, working your way under it until it starts to peel off. If any residue remains, rub some more alcohol onto it and continue to scrape until it is gone.
Once you have removed the decal and any residue, use a clean cloth to wipe down the area and give your car a fresh look. With these simple steps, removing that annoying dealership decal is easy and can give your car a cleaner appearance.
Wash and dry the area again
After cleaning the affected area, it’s crucial to wash and dry it thoroughly. This step is essential to ensure that no bacteria or germs remain on the surface, which can further lead to infection. When washing the area, use warm water and mild soap to avoid any harsh chemicals that may irritate the skin.
Gently wash and pat dry the area using a clean, soft towel. Remember not to rub it vigorously, as it may cause further irritation. Once you’ve cleaned and dried the area, check for any signs of redness, swelling, or irritation.
If any of these symptoms persist, it’s best to consult a medical professional. Following these steps can help prevent infection and promote faster healing. Always make sure to keep the area clean and dry and avoid any potential irritants that may cause further damage.
Polish and wax the area to remove any remaining marks or blemishes
Cleaning up your car after a significant amount of damage can be frustrating, but it’s important to take the time and properly fix any issues. Once you’ve removed any dents or scratches, the next step is to polish and wax the area to remove any remaining marks or blemishes. This will give your car a smooth and shiny finish, making it look like new again.
When polishing, it’s crucial to use the right type of polish for your car’s paint, as using the wrong kind could result in further damage. Additionally, it’s important to use a clean cloth and apply the polish in circular motions to ensure even distribution. After polishing, waxing is the next step.
Using a high-quality wax will not only protect your car’s paint but also make it shine like a new penny. Remember, taking care of your car’s exterior is crucial to maintaining its value and appearance, so don’t skimp on the details. Try to keep it clean and polished regularly to avoid any significant damage in the future.
Tips and Warnings
If you recently bought a car from a dealership, you might have noticed a tacky decal on the back or side of your vehicle that features the dealership’s logo and name. Not only do these decals cheapen the look of your car, but they also serve as free advertising for the dealership. Fortunately, removing dealership decals from your car is a quick and easy process.
The safest and most effective method is to use a heat gun or hair dryer to warm up the decal, making it easier to peel off. However, be careful not to overheat the decal or the paint of your car. Once the decal is removed, you may notice some adhesive residue remaining.
Use a gentle adhesive remover to clean up the area and avoid scratching your car’s finish. With these tips, you can easily remove dealership decals from your car and enjoy a cleaner, more personalized ride.
Don’t rush the process, take your time
When it comes to achieving your goals, whether personal or professional, it’s important to remember that the process is just as important as the end result. While it can be tempting to rush through things to get to the finish line, taking your time can actually lead to a better outcome in the long run. One of the best ways to ensure success is by setting small, achievable goals along the way and celebrating each milestone.
It’s also important to be patient and not get discouraged if things don’t happen quickly. Remember, Rome wasn’t built in a day! Additionally, be wary of cutting corners or taking shortcuts, as these can often lead to mistakes or unforeseen consequences down the line. In conclusion, don’t be in a rush to achieve your goals, take your time, and enjoy the journey!
Don’t use abrasive tools or cleaners that could damage the paint
When it comes to maintaining the paint on your car or any other vehicle, one of the most important things you can do is to avoid using abrasive tools or cleaners that could damage the paint. This may seem like common sense, but it’s surprising how many people don’t realize the harm that can be caused by using harsh chemicals or rough materials. Not only can these products scratch the surface of your paint, but they can also dull the shine and leave unsightly marks that are difficult to remove.
Instead, opt for gentle cleaners and soft cloths to keep your vehicle looking its best. And if you’re not sure what products are safe to use on your particular type of paint, be sure to consult with a professional or do your research to avoid any potential damage. Remember, taking care of your paint will not only keep your vehicle looking great, but it will also help protect its resale value in the long run.
So, take the time to treat your paint with care and you’ll enjoy a beautiful car for years to come.
If you’re unsure or uncomfortable, seek professional assistance
One of the most important tips to keep in mind when pursuing any unfamiliar task or activity is to seek professional assistance if you’re unsure or uncomfortable. This is particularly important when it comes to situations where your actions could have serious consequences, such as financial investments or medical procedures. While it may be tempting to try to figure things out on your own, doing so could put you at risk of making costly mistakes or causing harm to yourself or others.
By working with a professional who has the necessary knowledge and experience, you can ensure that you’re taking the right steps and making the best decisions for your situation. So if you find yourself feeling uncertain or anxious about a particular task or situation, don’t hesitate to reach out for help from someone with expertise in the matter.
Conclusion
In conclusion, removing a dealership decal from your car should be approached with the same level of care and attention as any other maintenance task. Sure you could just rip it off, but that’s like using a hammer to fix a watch. Instead, take your time, gather the right tools, and approach the task with patience and precision.
Who knows, you might even find the process unexpectedly satisfying…
kind of like popping bubble wrap or peeling off a satisfyingly long strip of painters tape. Happy decal removing!”
FAQs
What tools do I need to remove a dealership decal from my car?
You will need a hairdryer or heat gun, a plastic scraper or credit card, rubbing alcohol, and a clean cloth.
Can I remove a dealership decal without damaging the paint on my car?
Yes, by using a hairdryer or heat gun to soften the adhesive, and then slowly peeling off the decal using a plastic scraper or credit card, you can avoid damaging the paint.
Is it safe to use rubbing alcohol to remove the residue left by the decal?
Yes, rubbing alcohol is a safe and effective way to remove sticky residue left by the dealership decal.
Do I need to wax my car after removing the decal?
It is recommended to wax your car after removing the decal to protect the paint and give it a shiny finish.
How long does it take to remove a dealership decal?
It can take up to 30 minutes to remove a dealership decal, depending on the size and amount of adhesive left behind.
Can I use a razor blade to remove the dealership decal?
It is not recommended to use a razor blade as it may scratch the paint. Instead, use a plastic scraper or credit card.
What if the dealership decal is placed on a curved surface of my car?
You can still remove the decal using a hairdryer or heat gun to soften the adhesive and then slowly peeling it off from one corner to the other. Use a plastic scraper or credit card to remove any residue.