Imagine driving your truck with a hard tonneau cover, feeling secure and protected. It keeps your cargo safe from the elements and prying eyes. But then, a question arises: why would anyone want to remove their hard tonneau cover? After all, it serves an essential purpose.
Well, there are several valid reasons why owners may choose to take it off temporarily or even permanently. In this blog post, we will explore the various situations where removing a hard tonneau cover may be necessary and why it might make sense for your truck. So, let’s dive in and uncover the reasons behind this seemingly counterintuitive act.
Table of Contents
Tools and Materials Needed
When it comes to removing a hard tonneau cover, it’s important to have the right tools and materials on hand. One of the essential tools you’ll need is a socket wrench or screwdriver, depending on the type of fasteners securing the cover in place. Additionally, having a set of pliers can be helpful for any stubborn bolts or clips.
It’s also a good idea to have a friend or family member to assist you with the removal process, as some covers can be quite heavy and awkward to handle alone. In terms of materials, having a soft cloth or tarp nearby to lay the cover on once it’s been removed can help protect it from scratches or damage. And finally, it’s always a good idea to read the manufacturer’s instructions or consult a professional for guidance specific to your particular tonneau cover model.
With the right tools and materials, removing a hard tonneau cover can be a simple and straightforward process.
Heading Three
“tools and materials needed” When it comes to starting a new project or tackling a DIY task, having the right tools and materials on hand is crucial. Whether you’re a seasoned pro or just starting out, having the necessary tools can make all the difference in the success of your project. So, what exactly do you need for your next handy endeavor? Let’s take a look.
First and foremost, having a good set of basic hand tools is essential. This includes items like a hammer, screwdrivers (both flathead and Phillips), pliers, and a tape measure. These tools will come in handy for a wide range of tasks and are a must-have for any aspiring DIYer.
Next, consider the specific needs of your project. Are you planning on doing some plumbing work? If so, having a pipe wrench and a set of adjustable wrenches will be necessary. Building a bookshelf? A saw and a set of clamps will be needed.
By thinking ahead and considering the specific tools required for your project, you can ensure that you have everything you need to get the job done right. In addition to tools, it’s important to have the necessary materials on hand. This can include items like nails, screws, bolts, and various types of adhesives.
It’s always a good idea to stock up on these items so you have them readily available when needed. Depending on the project, you may also need specific materials like wood, paint, or electrical wiring. Taking the time to gather all the necessary materials before starting your project will save you time and frustration down the line.
Lastly, don’t forget about safety equipment. No matter how small or simple the task may seem, it’s important to prioritize safety. This means wearing things like safety goggles, gloves, and hearing protection when necessary.

Heading Three
“tools and materials needed.” When it comes to starting a new project or tackling a DIY task, having the right tools and materials can make all the difference. Whether you’re a seasoned pro or a beginner, having the necessary tools and materials on hand is essential for a successful outcome.
So, what exactly do you need? Well, it all depends on the task at hand. For example, if you’re planning to build a bookshelf, you’ll probably need a hammer, screws, a power drill, a measuring tape, and some wood. But if you’re planning to paint a room, you’ll need paintbrushes, rollers, painter’s tape, drop cloths, and of course, paint.
The key is to identify what tools and materials are necessary for your specific project and make sure you have them readily available. It’s also important to consider the quality of the tools and materials you choose. Investing in high-quality tools will not only make the job easier but also ensure that your project stands the test of time.
So, before you dive into your next DIY endeavor, take some time to gather the tools and materials you’ll need. Trust me, it will save you a lot of frustration down the line.
Step-by-Step Instructions
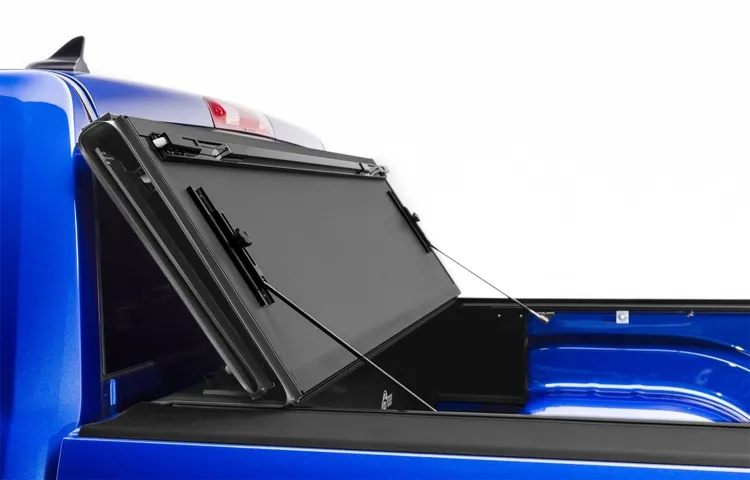
So, you’ve decided it’s time to remove your hard tonneau cover. Whether you’re getting ready for a bed liner, need access to the full bed, or simply want to switch to a different type of truck bed cover, knowing how to remove your hard tonneau cover is essential. Luckily, the process is fairly straightforward and can be done with just a few simple steps.
Start by locating the latches or locking mechanism that secure the tonneau cover to your truck bed. Depending on the brand and model of your cover, these may be located on the sides, front, or back of the bed. Once you’ve found them, unlock or release them to disengage the cover from the bed.
Next, carefully lift the cover upwards, making sure to support its weight as you do so. Depending on the design, you may need a helper to assist you in safely removing the cover. Once the cover is lifted, set it aside in a safe location where it will be protected from damage.
With the tonneau cover removed, you now have full access to your truck bed. Whether you’re planning to install a new cover or leave the bed bare, taking the time to properly remove the hard tonneau cover will ensure a smooth transition and protect your investment.
Heading Three
“Step-by-Step Instructions for Making Homemade Pizza from Scratch” Making homemade pizza from scratch can be a fun and delicious way to spend time in the kitchen. Not only do you get to customize your toppings and flavors, but the process of creating the dough and watching it rise can be incredibly satisfying. To start, gather all your ingredients: flour, yeast, warm water, salt, olive oil, and any toppings you desire.
Begin by activating the yeast in warm water, allowing it to foam and come to life. In a separate bowl, combine the flour and salt, then slowly add in the activated yeast mixture and olive oil. Knead the dough until it becomes smooth and elastic, then let it rise for about an hour, or until it doubles in size.
Once the dough has risen, preheat your oven to a high temperature and roll out the dough to your desired thickness. Now comes the fun part – adding your toppings! Spread your favorite sauce, cheese, and toppings onto the dough and bake in the oven until the crust is golden and the cheese is bubbling. In just a few simple steps, you can enjoy a homemade pizza that is far superior to any store-bought option.
So why not give it a try and impress your friends and family with your culinary skills?
Heading Three
“Step-by-Step Instructions for a Perfect Picnic” Who doesn’t love a picnic? It’s the perfect way to enjoy the great outdoors, soak up some sunshine, and indulge in delicious food. But planning a picnic can sometimes feel overwhelming. Where should you go? What should you bring? Don’t worry, we’ve got you covered with these step-by-step instructions for a perfect picnic.
Step 1: Choose the perfect location. Look for a scenic spot with plenty of shade and maybe even a picturesque view. Whether it’s a local park, a beach, or a nearby hiking trail, make sure the location suits your mood and preferences.
Step 2: Pack the essentials. Don’t forget to bring a comfortable blanket or picnic mat to sit on. You’ll also need a cooler or an insulated bag to keep your food and drinks chilled.
Pack some reusable plates, cups, and utensils for a more eco-friendly picnic experience. And of course, don’t forget the sunscreen and bug repellent! Step 3: Plan your menu. Think about the type of food you want to enjoy during your picnic.
Do you prefer sandwiches, salads, or finger foods? Make a list of the ingredients you’ll need and prepare some simple recipes ahead of time. Don’t forget to pack some refreshing drinks and tasty snacks too! Step 4: Pack your picnic basket. Once you have all your ingredients and recipes ready, it’s time to pack your picnic basket.
Make sure to layer your items properly to avoid any spills or leaks. Keep the drinks separate from the food and use ice packs to keep everything cool. Step 5: Arrive at your picnic spot and set up.
Heading Three
Are you feeling overwhelmed by all the information out there on how to make a delicious homemade pizza? Don’t worry, I’ve got you covered with this step-by-step guide. First, gather all your ingredients: pizza dough, tomato sauce, cheese, and any toppings you desire. Make sure your dough is at room temperature and ready to be rolled out.
Next, lightly flour a surface and roll out your dough into your desired shape and thickness. Place the rolled-out dough onto a greased baking sheet or pizza stone. Now it’s time to add the sauce! Spread a generous amount of tomato sauce evenly over the dough, leaving about an inch border around the edges for the crust.
Sprinkle your desired amount of cheese over the sauce, and now it’s time for the fun part – toppings! Get creative and add your favorite ingredients such as pepperoni, mushrooms, onions, or even pineapple. Finally, preheat your oven to the recommended temperature (usually around 425°F) and bake your pizza for about 12-15 minutes or until the crust is golden brown and the cheese is bubbling. Remove from the oven and let it cool for a few minutes before slicing and serving.
Enjoy your homemade pizza masterpiece!
Tips and Precautions
Removing a hard tonneau cover from your truck can be a slightly challenging task, but with the right tips and precautions, it can be done smoothly. Firstly, make sure to park your truck on a flat and stable surface to avoid any accidents or injuries. Next, locate the mounting brackets or bolts that secure the tonneau cover in place.
Often, these will be found near the front and rear of the cover. Use a suitable tool, such as a ratchet or a wrench, to loosen and remove these bolts carefully. It is important to support the cover while removing the bolts to prevent it from falling and getting damaged.
Once the bolts are removed, gently lift the tonneau cover off the truck bed, making sure to check for any additional clips or fasteners that might still be holding it in place. Lastly, it is advisable to have someone assist you during the removal process, as the cover can be heavy and cumbersome. Following these tips and taking the necessary precautions will ensure a safe and successful removal of your hard tonneau cover.
Heading Three
Heading Three: Tips and Precautions When it comes to taking care of our health, it’s important to be proactive and take the necessary precautions to prevent illness and injury. Here are some tips and precautions to keep in mind: Stay Active: Regular exercise not only keeps us physically fit but also boosts our immune system.
Engaging in activities such as walking, jogging, or swimming can help strengthen our bodies and reduce the risk of health issues. Eat a Balanced Diet: A well-balanced diet rich in fruits, vegetables, whole grains, and lean proteins is key to maintaining good health.
Make sure to include a variety of nutrients in your meals to support your body’s overall wellness. Get Plenty of Sleep: Adequate sleep is vital for our physical and mental well-being.
Aim for 7-8 hours of sleep each night to give your body the rest it needs to function at its best. Practice Good Hygiene: Simple habits like washing your hands regularly, covering your mouth and nose when coughing or sneezing, and avoiding close contact with sick individuals can help prevent the spread of germs and reduce the risk of infections.
Stay Hydrated: Drinking enough water throughout the day is essential for maintaining proper bodily functions. Hydration helps regulate body temperature, aids digestion, and keeps our skin healthy.
Protect Yourself from the Sun: Limit your sun exposure, especially during peak hours, and always apply sunscreen with a high SPF to protect your skin from harmful UV rays. Wearing protective clothing, such as hats and sunglasses, can also provide added shield.
Heading Three
Tips and Precautions for a Successful Home Renovation When it comes to home renovations, it can be an exciting but also overwhelming process. Whether you’re planning to update a single room or give your entire home a makeover, there are a few tips and precautions you should keep in mind to ensure a successful renovation experience. First and foremost, it’s important to plan ahead.
Take the time to thoroughly research and decide on the design and layout of the space you want to renovate. Consider your budget, timeline, and any necessary permits or regulations. By creating a detailed plan, you can avoid costly mistakes and ensure that the renovation stays on track.
Next, it’s crucial to hire the right professionals for the job. While some small projects can be done on your own, larger renovations often require the expertise of contractors, architects, or designers. Take the time to vet potential candidates, checking their credentials, references, and previous work.
Remember, your home is a significant investment, and you want to ensure that the renovation is done to the highest quality. Communication is key during the renovation process. Make sure you maintain open and clear lines of communication with your contractors and other professionals involved.
Regular check-ins and updates will allow you to address any concerns or changes that may arise. Additionally, don’t be afraid to voice your opinions and preferences. It’s your home, and you should feel comfortable and involved in the process.
During the renovation, it’s essential to take precautions to protect your home and belongings. Dust and debris can easily travel throughout your house, so consider sealing off the construction area and covering furniture and valuables with protective sheets. It’s also a good idea to establish a clear plan for access to your home and any necessary accommodations, such as temporary living arrangements or alternative bathroom facilities.
Conclusion
Now that you’re armed with all the necessary tips and tricks, you’ll be able to remove your hard tonneau cover with ease. Remember, it’s like solving a puzzle – just follow the steps, use your brain power, and voila! Your tonneau cover will be off in no time. But before you embark on this adventure, let me leave you with a witty analogy.
Removing a hard tonneau cover is like breaking up with an ex – it may seem intimidating at first, but once you gather the courage to take the first step, the process becomes surprisingly straightforward. First, you’ll need to assess the situation – is the relationship (or in this case, the tonneau cover) worth salvaging or is it time to move on? If the cover is damaged or no longer serving its purpose, it’s time to say goodbye. And just like clearing out your ex’s things, removing a hard tonneau cover requires dedication, patience, and a bit of finesse.
As you gather your tools and prepare for the task ahead, remember that sometimes the hardest part is simply getting started. But fear not, my friend! With these helpful instructions, you’ll be able to navigate the removal process smoothly, just like you navigated your way out of that doomed relationship. So take a deep breath, summon your inner strength, and start removing that hard tonneau cover.
Because just like getting rid of your ex, once you’re done, you’ll feel a sense of liberation and freedom. And hey, who knows, maybe you’ll even find a new, sleek tonneau cover that’ll make you wonder why you ever held onto the old one. Good luck, my intrepid tonneau cover remover! May your journey be filled with triumph, satisfaction, and maybe even a touch of humor.
Happy removing!”
FAQs
How do I remove a hard tonneau cover from my truck bed?
To remove a hard tonneau cover from your truck bed, start by locating the mounting brackets or clamps that secure the cover to the bed. Use a socket wrench or a suitable tool to loosen and remove these fasteners. Once the brackets or clamps are removed, carefully lift the tonneau cover off the bed and set it aside. Be sure to follow any additional instructions provided by the manufacturer for your specific model.
Are there any tools I need to remove a hard tonneau cover?
The tools needed to remove a hard tonneau cover may vary depending on the specific model and manufacturer. However, most tonneau covers can be removed using basic hand tools such as a socket wrench or a screwdriver. It is always recommended to consult the owner’s manual or instructions provided by the manufacturer for the correct tools and procedures for removing your particular tonneau cover.
Can I remove a hard tonneau cover by myself or do I need assistance?
Most hard tonneau covers can be removed by a single person, but it is always helpful to have someone assist you, especially if the cover is heavy or awkward to handle. The assistance can provide extra stability and prevent any potential damage during the removal process. If you feel uncomfortable or unsure about removing the tonneau cover by yourself, it is always a good idea to seek assistance from another person.
How long does it take to remove a hard tonneau cover?
The time it takes to remove a hard tonneau cover can vary depending on factors such as the specific model, the number of mounting brackets or clamps, and the level of experience of the person removing it. In general, it can take anywhere from 15 minutes to an hour to remove a tonneau cover, including the time to locate and remove the mounting brackets or clamps.
Is the process of removing a hard tonneau cover reversible?
Yes, the process of removing a hard tonneau cover is typically reversible. Once the cover is removed, the mounting brackets or clamps can be reinstalled to secure it back onto the truck bed. It is important to follow the manufacturer’s instructions or guidelines for reinstallation to ensure a proper fit and proper alignment of the tonneau cover.
Can removing a hard tonneau cover cause any damage to my truck bed?
When removing a hard tonneau cover, it is important to do so carefully to avoid causing any damage to the truck bed or the cover itself. It is recommended to follow the manufacturer’s instructions or guidelines for removal to ensure a safe and damage-free process. If you are unsure about the removal process or if you encounter any difficulties, it may be best to consult a professional or the manufacturer for assistance.
Are there any precautions I should take when removing a hard tonneau cover?
When removing a hard tonneau cover, it is important to take certain precautions to ensure a safe and smooth process. Some precautions to consider include wearing gloves to protect your hands, having an assistant nearby for help if needed, and carefully storing the removed tonneau cover in a safe location to prevent any damage. Additionally, following the manufacturer’s instructions or guidelines for removal is crucial to avoid any potential issues or mishaps.