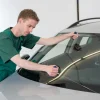
Have you recently attempted to repair a chip or crack in your windshield using Permatex windshield repair resin, only to discover that it didn’t turn out as expected? While Permatex windshield repair resin is a popular and effective solution for fixing minor windshield damage, removing it from your windshield can be a bit tricky. But don’t worry, because in this blog post, we will guide you through the process of removing Permatex windshield repair resin from your windshield and restoring its clarity and functionality. So, if you’re ready to say goodbye to that unsightly and stubborn resin, keep reading to discover the steps you need to take.
Table of Contents
Introduction
If you’ve recently attempted to repair a chip or crack on your windshield using Permatex windshield repair resin, but now you’re wondering how to remove the excess resin, don’t fret! Removing Permatex windshield repair resin from your windshield can be done with a few simple steps. First, you’ll want to gather a few supplies. Grab a clean microfiber cloth, a mild glass cleaner, and some water.
Begin by moistening the cloth with the glass cleaner and gently rubbing it over the resin. This should help to break up the resin and make it easier to remove. Use a circular motion and apply gentle pressure.
Once you’ve loosened the resin, rinse the area with water and wipe away any residue with a clean cloth. It’s important to avoid using any abrasive materials or harsh chemicals, as these can damage the glass. With a little bit of patience and some gentle cleaning, you’ll have your windshield looking as good as new in no time!
Explanation of Permatex Windshield Repair Resin
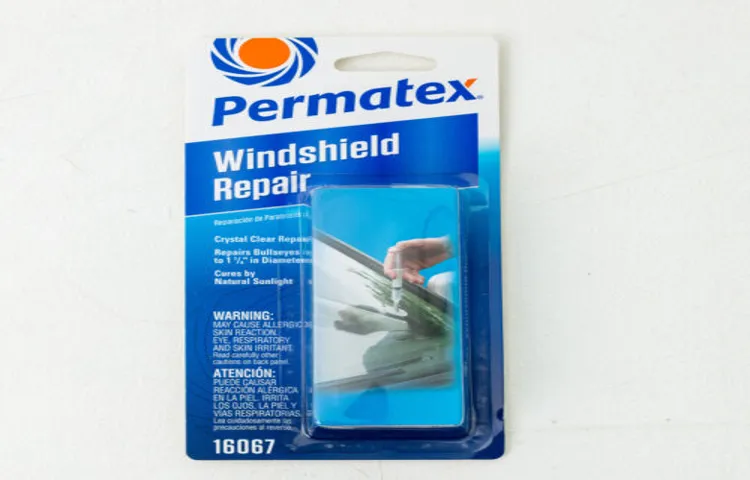
Permatex windshield repair resin is a revolutionary product that helps fix cracked and chipped windshields, providing a quick and cost-effective solution. It is a specially formulated liquid resin that is designed to fill in the damaged areas of a windshield and restore its structural integrity. This resin is specifically designed to bond with the glass surface and create a strong, durable repair that can withstand the elements.
Whether you have a small chip or a larger crack, Permatex windshield repair resin can help prevent further spreading of the damage and improve the overall appearance of your windshield. So, if you are looking for a reliable and effective solution to fix your windshield, Permatex windshield repair resin is definitely worth considering.
Importance of Properly Removing the Resin
resin removal, proper resin removal, importance of resin removal, resin removal process. Introduction: Properly removing resin is an essential step in various industries, such as manufacturing, construction, and automotive. Resin, a sticky substance derived from plants or synthesized chemically, is widely used in these industries for its adhesive properties.
However, once its purpose is fulfilled, it needs to be removed efficiently. The importance of proper resin removal cannot be understated, as failure to do so can result in several issues. In this blog post, we will explore why proper resin removal is crucial and the steps involved in the resin removal process.
So, grab a cup of coffee, and let’s dive in!
Methods for Removing Permatex Windshield Repair Resin
If you’ve used Permatex windshield repair resin to fix a crack or chip on your windshield but are now wondering how to remove it, don’t worry – there are methods you can try. One method is using a razor blade or a plastic scraper to gently scrape the resin off the surface of the windshield. Be very careful when using this method to avoid scratching or damaging the glass.
Another method is using a solvent such as acetone or rubbing alcohol. Dampen a cloth with the solvent and gently rub the resin in a circular motion until it starts to dissolve. You may need to repeat this process multiple times for stubborn residue.
It’s important to note that using solvents may cause damage to the windshield, so it’s best to test it on a small, inconspicuous area first. If these methods don’t work, you can also try using a specialized windshield cleaner specifically designed to remove resin or contacting a professional for assistance.
Method 1: Using Acetone
Permatex Windshield Repair Resin is a popular product used to repair chips and cracks in windshields. However, when it comes time to remove the resin, it can be a challenging task. One method for removing Permatex Windshield Repair Resin is using acetone.
Acetone is a strong solvent that can effectively dissolve the resin and make it easier to remove. To use this method, you will need a bottle of acetone and a clean cloth. Start by applying a small amount of acetone to the cloth and gently rubbing it on the resin.
Allow the acetone to sit on the resin for a few minutes to allow it to break down the bond. Then, using a firm and circular motion, continue to rub the resin until it starts to lift away from the surface. Repeat this process as necessary until all of the resin has been removed.
Remember to wear gloves and work in a well-ventilated area when using acetone.
Method 2: Using Isopropyl Alcohol
Permatex Windshield Repair Resin is a popular product used to fix small cracks and chips in windshields. While it does a great job of repairing the damage, it can be a bit stubborn to remove if it gets on any other surfaces. Luckily, there are a few methods you can try to effectively remove the resin.
One method is using isopropyl alcohol. Isopropyl alcohol, commonly known as rubbing alcohol, is a versatile solvent that can help break down and dissolve the resin. To use this method, simply apply a small amount of isopropyl alcohol to a clean cloth and gently rub the resin.
The alcohol will help to soften and break down the resin, making it easier to remove. Be sure to work in small sections and use a clean portion of the cloth as needed. Once the resin has been removed, clean the area with soap and water to remove any residue.
Method 3: Using Vinegar
“Permatex windshield repair resin can be a sticky and stubborn mess to remove, but fear not! There are several methods you can try to tackle this pesky substance. One effective method is to use vinegar. Vinegar is a versatile cleaning agent that can break down and dissolve many types of adhesives.
To remove Permatex windshield repair resin with vinegar, start by mixing equal parts vinegar and water in a spray bottle. Spray the mixture onto the resin and let it sit for a few minutes to allow the vinegar to penetrate and loosen the resin. Then, use a soft cloth or sponge to gently scrub the area in a circular motion.
The acidic properties of the vinegar will help to break down the resin, making it easier to remove. Rinse the area with clean water and continue scrubbing until the resin is completely gone. Finally, dry the area thoroughly with a clean cloth.
Voila! Your windshield is now resin-free and ready to shine.”
Steps for Removing Permatex Windshield Repair Resin
If you have used Permatex windshield repair resin to fix a crack or chip on your windshield but now need to remove it, don’t worry. It is possible to remove Permatex resin from your windshield with a few simple steps. First, you will need to gather some supplies, including a razor blade or scraper, rubbing alcohol, and a microfiber cloth.
Start by gently scraping off any excess resin with the razor blade or scraper. Be careful not to scratch the windshield. Next, dampen the microfiber cloth with rubbing alcohol and gently scrub the area to break down the resin.
Continue to wipe the area until all of the resin is gone. Finally, use a clean, dry microfiber cloth to dry the windshield and remove any remaining residue. Taking these steps will help remove the Permatex windshield repair resin and leave your windshield looking clean and clear once again.
Step 1: Gather the Necessary Materials
Permatex Windshield Repair Resin is a popular product that can help you fix small cracks and chips on your car’s windshield. Whether you’re a DIY enthusiast or a professional, removing the resin after the repair is essential to ensure a clean and smooth surface. In this blog post, we will guide you through the steps for removing Permatex Windshield Repair Resin.
The first step is to gather all the necessary materials. You will need a razor blade or scraper, a microfiber cloth, a bucket of soapy water, and a clean towel. The razor blade or scraper will help you remove the excess resin from the windshield, while the microfiber cloth will be used to clean the surface.
The soapy water will act as a lubricant and help remove any remaining resin, and the clean towel will be used to dry the windshield after the process. By having all these materials ready and at hand, you can ensure a smooth and efficient resin removal process. So, let’s move on to the next step and start removing the Permatex Windshield Repair Resin from your car’s windshield.
Step 2: Ventilate the Area
Removing Permatex Windshield Repair Resin If you’ve recently attempted to repair a crack or chip in your windshield using Permatex windshield repair resin, you may find yourself needing to remove it for one reason or another. When it comes to removing this resin, it’s important to follow the proper steps to ensure you don’t cause any further damage to your windshield. One of the first steps you’ll want to take is to properly ventilate the area in which you’ll be working.
This is essential because some of the substances used in the removal process can produce strong fumes that can be harmful if inhaled. To ventilate the area, make sure you’re in a well-ventilated space, such as an open garage or outdoors, and ensure there’s plenty of fresh air flowing through the area. This will help to minimize your exposure to the fumes and make the removal process safer for you.
Remember, safety should always be a top priority when working with any chemicals or substances. So, be sure to take the necessary precautions to protect yourself.
Step 3: Apply the Chosen Removal Method
Permatex Windshield Repair Resin is a reliable solution for fixing small cracks and chips in your windshield. However, there may come a time when you need to remove the resin for various reasons. To do this, you will need to follow a few simple steps.
First, you will need to gather the necessary materials. This includes a razor blade, rubbing alcohol, a clean cloth, and a microfiber towel. Once you have these items ready, you can begin the removal process.
The next step is to position the razor blade at a slight angle and carefully scrape away the resin. Be sure to apply steady pressure, but not too much force that it damages the windshield. Take your time and work in small sections, moving the razor blade back and forth until all the resin is removed.
After scraping off the majority of the resin, you can use rubbing alcohol to further dissolve any remaining residue. Moisten a cloth with the rubbing alcohol and gently rub the affected area. This will help to break down the resin and make it easier to remove.
Once you have removed all traces of the resin, use a clean cloth or a microfiber towel to wipe away any residue or streaks. Inspect the windshield to ensure that all the resin has been completely removed. In conclusion, removing Permatex Windshield Repair Resin is a simple process that can be accomplished with just a few tools and some patience.
By following these steps, you can ensure that your windshield is clean and free from any unwanted residue.
Step 4: Scrub the Resin Gently
Permatex Windshield Repair Resin, remove resin, scrub resin, gentle scrubbing, clean windshield, clear view So you’ve successfully applied Permatex Windshield Repair Resin to your windshield, and now it’s time to remove it. The final step is to gently scrub away the excess resin, so you can enjoy a clear view through your windshield once again. But how do you go about this process without damaging the glass? First, gather a clean microfiber cloth or a lint-free cloth, as these materials are perfect for gentle scrubbing.
Using a firm but gentle pressure, start scrubbing the resin in small circular motions. Be careful not to press too hard, as this could scratch or damage the glass. Instead, let the cloth do the work for you, using the friction to remove the resin.
Make sure to cover the entire area where the resin was applied, and continue scrubbing until you no longer see any residue. It may take a bit of time and effort, but it’s important to be patient and thorough in order to achieve the best results. If the resin is particularly stubborn and doesn’t seem to come off, you can dampen the cloth with a bit of water or glass cleaner.
This can help loosen the resin and make it easier to remove. Just be sure to avoid using any harsh chemicals or abrasive materials, as this can damage the glass surface. Once you’re satisfied with the results, take a step back and admire your clean windshield.
Not only will you be able to see clearly through it, but you’ll also have the peace of mind knowing that your windshield is free of any unsightly resin. So go ahead and take that drive with confidence, knowing that you’ve successfully removed the Permatex Windshield Repair Resin and restored your clear view of the road ahead.
Step 5: Wipe Off the Residue
When it comes to repairing a windshield, using Permatex Windshield Repair Resin is a popular choice for many DIYers. After applying the resin and allowing it to cure, the next step is to wipe off the residue. This is an important step as it helps to ensure a clear and smooth finish.
To remove the residue, you will need a clean cloth or paper towel and some glass cleaner. Simply dampen the cloth or paper towel with the glass cleaner and gently wipe away the excess resin. Be sure to use gentle, circular motions to avoid scratching the glass.
Continue wiping until all of the residue has been removed, and then take a step back and admire your handiwork. Your windshield should now be looking as good as new! Overall, removing the residue from Permatex Windshield Repair Resin is a straightforward process that can be done with minimal effort. By following these steps, you can effectively wipe away any excess resin and leave your windshield looking shiny and clear.
So, the next time you find yourself with a windshield chip or crack, don’t hesitate to give Permatex Windshield Repair Resin a try. You’ll be amazed at the results you can achieve with just a little bit of time and effort.
Precautions and Tips
If you find yourself with permatex windshield repair resin on your windshield, there are a few precautions and tips to keep in mind when removing it. First, it’s important to remember that the resin is designed to bond to the glass and provide a strong repair, so removing it can be a bit tricky. Before attempting to remove the resin, make sure you have the necessary tools on hand, such as a razor blade or scraper, glass cleaner, and a microfiber cloth.
Start by gently scraping away any excess resin using the razor blade or scraper. Be sure to use a light touch to avoid scratching the glass. Once the excess resin has been removed, apply a small amount of glass cleaner to a microfiber cloth and gently scrub the area in a circular motion.
Repeat this process until the resin is completely removed. It’s important to note that removing the permatex resin may require some effort and patience, so take your time and be careful not to damage the glass in the process.
Use Gloves and Protective Eyewear
precautions and tips, gloves and protective eyewear, safety measures, protect your hands and eyes, avoid injuries, reduce the risk of accidents, importance of using gloves and protective eyewear, recommended safety gear, protect against chemicals and debris, prevent infections and allergic reactions, maintain good hygiene, proper fit and quality, choose the right type of gloves and eyewear, follow safety guidelines, store and clean them properly. You’ve probably heard the saying “safety first,” and when it comes to certain tasks or activities, this couldn’t be truer. Whether you’re working with chemicals, handling sharp objects, or even engaging in certain sports, it’s crucial to take precautions to protect yourself from potential injuries.
One essential safety measure that often gets overlooked is wearing gloves and protective eyewear. These simple yet effective safety gear can significantly reduce the risk of accidents and protect your hands and eyes in various situations. So, why is it so important to use gloves and protective eyewear? Well, for starters, they provide a physical barrier that shields your hands and eyes from potential hazards, such as chemicals, debris, and sharp objects.
By using them, you can prevent cuts, burns, infections, allergic reactions, and even more severe injuries. When it comes to gloves, it’s essential to choose the right type for the task at hand. Different gloves are designed for specific purposes, such as latex gloves for medical settings or chemical-resistant gloves for handling hazardous substances.
Ensuring a proper fit is also crucial to maximize protection and maintain dexterity. It’s recommended to follow safety guidelines and consult professionals if unsure about the appropriate type of gloves to use. As for protective eyewear, it’s equally important to select high-quality goggles or safety glasses that are specifically designed to protect against impact, chemical splashes, and UV radiation.
Regular glasses or sunglasses are not sufficient in providing adequate protection for your eyes. In addition to using gloves and protective eyewear, it’s crucial to practice good hygiene when handling these safety gear. Make sure to clean gloves and eyewear after use to avoid cross-contamination or the spread of germs.
Additionally, storing them properly can help prolong their lifespan and effectiveness. In conclusion, using gloves and protective eyewear should not be underestimated when it comes to ensuring personal safety. They play a vital role in protecting your hands and eyes from potential injuries, infections, and harmful substances.
Avoid Excessive Scrubbing
Avoid Excessive Scrubbing to Take Care of Your Skin When it comes to taking care of our skin, it’s important to remember that less is often more. Excessive scrubbing can actually do more harm than good, as it can strip away the natural oils and protective barriers that keep our skin healthy. Instead of vigorously scrubbing your face or body, it’s best to adopt a gentle approach.
One of the biggest mistakes people make is thinking that scrubbing harder will yield better results. However, this can cause irritation, redness, and even breakouts. Our skin is delicate and sensitive, and aggressive scrubbing can damage its surface and leave it vulnerable to infection and inflammation.
Instead of rough scrubbing, opt for gentle cleansers and exfoliants. Look for products that contain mild ingredients and avoid harsh chemicals or abrasive particles. These gentle products can effectively remove dirt, oil, and dead skin cells without causing irritation or damage.
If you’re unsure about what products to use or how often to exfoliate, it’s always a good idea to consult with a dermatologist. They can assess your skin type and condition and provide personalized recommendations. Remember, everyone’s skin is unique, and what works for one person may not work for another.
In addition to avoiding excessive scrubbing, it’s also important to follow other skincare best practices. This includes moisturizing daily, using sunscreen to protect your skin from harmful UV rays, and maintaining a healthy lifestyle with a balanced diet and regular exercise. By taking care of your skin gently and following these precautions and tips, you can help maintain a healthy and radiant complexion.
Remember, your skin deserves love and care, so treat it kindly and avoid unnecessary scrubbing.
Test the Removal Method on a Small Area First
One important precaution to keep in mind when removing stains or cleaning solutions from a surface is to test the removal method on a small area first. This is a helpful tip that can save you from potential damage or unexpected reactions. By testing the method on a small, inconspicuous area, you can observe how the surface reacts and determine if the method is safe to use on the rest of the stained or dirty area.
This is especially important when dealing with delicate or sensitive surfaces such as fabrics, carpets, or wood. Applying the method to a small area allows you to assess its effectiveness and prevent any unintended consequences. So before you start scrubbing away at that stubborn stain, take a moment to test the removal method on a small area and proceed with confidence.
Seek Professional Help If Needed
“precautions and tips for seeking professional help when needed” Seeking professional help is an important step in taking care of our mental health. However, it’s crucial to approach it with caution and ensure that we are making the right choices. Here are some precautions and tips to keep in mind when seeking professional help.
Firstly, it’s essential to do your research and find a reputable professional. Look for licensed therapists or counselors with the necessary qualifications and experience. Check their credentials and read reviews or testimonials from previous clients.
This will help you make an informed decision and ensure that you are choosing someone who can provide the support you need. Secondly, consider what type of therapy or approach you feel comfortable with. There are various modalities and techniques used in therapy, and it’s important to find a professional who aligns with your preferences and needs.
For example, if you prefer a more holistic approach, you may want to look for therapists who specialize in alternative therapies such as mindfulness or art therapy. Additionally, trust your instincts and focus on building a therapeutic relationship that feels safe and supportive. It’s crucial to have open and honest communication with your therapist, so don’t be afraid to ask questions or voice concerns.
Remember that therapy is a collaborative process, and finding a therapist who respects and listens to your needs is essential for a successful outcome. Furthermore, it’s important to understand the financial aspect of therapy and consider your budget. Therapy can be costly, so it’s essential to have a clear understanding of the fees involved and whether your insurance covers it.
If finances are a concern, consider exploring options such as online therapy or community mental health centers, which may offer lower-cost or sliding scale options. Lastly, be patient with yourself and the therapeutic process. It’s normal to feel vulnerable or uncertain when seeking professional help, but remember that seeking support is a courageous and positive step towards your well-being.
Conclusion
In conclusion, removing Permatex windshield repair resin from your windshield is a task that requires a delicate touch and a touch of humor. Just like trying to remove a stubborn stain from your favorite shirt, it can be frustrating and time-consuming. But fear not, dear reader, for I am here to offer you a witty and clever explanation on how to tackle this sticky situation.
First and foremost, remember that patience is key. Look at your windshield, marred by this resinous intruder, and think of it as a canvas waiting for restoration. Take a deep breath, make yourself a cup of tea, and let’s begin this artistic endeavor.
Now, onto the tools you’ll need. Grab yourself a razor blade, a microfiber cloth, rubbing alcohol, and a can-do attitude. But wait, before you start scraping away like Picasso, remember to put on some gloves to protect your precious hands from the perils of resin removal.
Next, let’s tackle the resin like a polite debate – with gentle persuasion. Dip your microfiber cloth into the rubbing alcohol and gently dab at the affected area. The resin will begin to soften and loosen its grip on your windshield, almost as if it’s whispering, “Okay, okay, I’ll leave now, no need to get all abrasive.
” Now, here comes the moment of truth – the razor blade. Take it in your hand and glide it across the surface of the resin, using light and controlled movements. Think of yourself as a skilled surgeon, delicately removing the resin without leaving any scars.
Remember, the goal here is not to etch your life story into the windshield, but rather to restore its former pristine glory. As you scrape away, you may encounter some stubborn remnants of resin that refuse to budge. Do not be discouraged, my determined friend.
FAQs
Can I remove Permatex windshield repair resin from my windshield?
Yes, you can remove Permatex windshield repair resin from your windshield by following these steps:
– Apply a small amount of acetone or nail polish remover to a clean cloth.
– Gently rub the resin on your windshield in circular motions.
– Continue to rub until the resin starts to lift off.
– Wipe away any remaining residue with a clean cloth.
– Rinse the area with water and dry it thoroughly.
What are the potential risks of using acetone or nail polish remover to remove Permatex windshield repair resin?
Using acetone or nail polish remover to remove Permatex windshield repair resin can potentially damage the surface of your windshield if not used correctly. It is important to use a small amount and gently rub the resin, avoiding excessive pressure or scrubbing. It is also recommended to test a small, inconspicuous area before applying the acetone or nail polish remover to the entire resin spot.
Are there any alternative methods to remove Permatex windshield repair resin?
Yes, there are alternative methods to remove Permatex windshield repair resin. Some options include:
– Using a specialized resin remover product designed for automotive use.
– Applying heat to the resin spot using a hairdryer or heat gun and then gently scraping it off with a plastic scraper.
– Using a commercial glass cleaner combined with a non-abrasive sponge or cloth to gently dissolve and remove the resin.
Will removing Permatex windshield repair resin affect the integrity of my windshield?
The removal of Permatex windshield repair resin should not affect the integrity of your windshield, as long as you follow the instructions and use appropriate methods. It is important to avoid using excessive force or harsh abrasives that could scratch or weaken the glass.
Can I remove Permatex windshield repair resin without leaving any residue?
While it is possible to remove Permatex windshield repair resin without leaving any residue, there may still be a faint mark or slight discoloration on the glass. To minimize any residue or marks, thoroughly clean the area with glass cleaner and a clean cloth after removing the resin.
How long should I wait before attempting to remove Permatex windshield repair resin?
It is recommended to wait at least 24 hours before attempting to remove Permatex windshield repair resin. This allows the resin to fully cure and ensures a better chance of successful removal.
Can I use a razor blade to remove Permatex windshield repair resin?
It is not advisable to use a razor blade to remove Permatex windshield repair resin, as it can easily scratch the glass. Using a plastic scraper, a soft cloth, or specialized resin remover product is a safer option to prevent damage to the windshield.