
Have you ever found yourself with a flat tire on your GMC Sierra while on the road? It’s frustrating and stressful, but fortunately, most pickup trucks come equipped with a spare tire in the back. If you’re not familiar with how to remove the spare tire, don’t worry. In this blog post, we’ll walk you through the steps on how to remove the spare tire from your GMC Sierra.
First things first, locate the spare tire under your truck. It’s typically located at the back of the truck, underneath the bed. Once you’ve found it, look for the tire changing tools in your GMC Sierra.
These tools include a jack and lug wrench, which you’ll need to remove the spare tire. Next, use the lug wrench to loosen the lug nuts on the flat tire. Don’t remove them completely yet, just loosen them enough to make it easier to remove the tire later.
Once the lug nuts are loose, position the jack under the truck on the designated lift point, typically located near the flat tire. Now it’s time to raise the GMC Sierra using the jack. Keep raising it until the flat tire is lifted off the ground.
Then, go ahead and remove the lug nuts completely and take off the flat tire. Finally, take out the spare tire and place it onto the wheel base of the truck. Tighten the lug nuts by hand as much as possible, and then use the lug wrench to fully tighten them.
Lower the truck back down to the ground using the jack and remove the jack from underneath the truck. Voila, you’re done! You’ve successfully removed the spare tire from your GMC Sierra and installed the replacement tire. Remember to get the flat tire repaired or replaced as soon as possible, and always drive with caution on the road.
Table of Contents
Step 1: Locate the Spare Tire
If you’re wondering how to remove the spare tire from your GMC Sierra, the first step is locating it. Typically, the spare tire is stored underneath the truck bed or attached to the underside of the vehicle. To access the spare tire, locate the tire-changing tools inside the vehicle – these tools will include a lug wrench and a jack.
Once you have the tools, use the lug wrench to loosen the lug nuts on the tire before using the jack to lift the Sierra off the ground. Once it’s safely raised, remove the lug nuts completely and slide the flat tire off of the wheel studs. Finally, grab the spare tire and place it onto the wheel studs before tightening the lug nuts and lowering the jack.
Congratulations, you’ve successfully changed a tire on your GMC Sierra!
Drive to a safe, level surface.
If you need to change a flat tire on your vehicle, the first step is to find a safe, level surface to park on. This ensures your car won’t roll while you’re working on it, which can be dangerous. Once you’ve parked your car in a safe place, it’s time to locate the spare tire.
Most vehicles come with a spare tire, which is usually located in the trunk or underneath the car. If you’re not sure where your spare tire is located, consult your owner’s manual. It’s important to know where your spare tire is located so you can access it quickly if you have a flat tire on the road.
Remember, always put your safety first when changing a flat tire!
Open truck tailgate
If you want to open your truck tailgate, a good starting point is to locate the spare tire. Most trucks have the spare tire hidden underneath the bed of the truck, so you’ll need to find it before you can access the tailgate. To do this, you may need to remove any cargo or equipment that is currently stored in the bed of your truck.
Once you have a clear view of the bed, look for a small flap or hatch that covers the area where the spare tire is located. This flap or hatch should be located near the middle or rear of the bed, usually on the driver’s side. Once you find it, you can open it up and access the spare tire.
From there, you should have a clear view of the tailgate and be able to open it up without any issues. Just be sure to put the spare tire back in its proper location once you’re done!
Step 2: Loosen the Spare Tire
Removing a spare tire from a GMC Sierra can be challenging, but once you know the steps involved, it can be a breeze. The second step is to loosen the spare tire from the vehicle. Locate the spare tire hoist located near the rear bumper of the GMC Sierra.
Insert the tire wrench onto the hoist’s lug nut and turn counterclockwise to lower the tire. Continue turning until you feel the hoist cable become slack. Then, pivot the hoist cover and slowly pull it away from the spare tire to release it from the mount.
Place the tire wrench and hoist cover to one side and remove the spare tire from its mount. Handle the tire with care as it can be quite heavy. With a little effort, you can remove the spare tire in no time!
Use the Lug Wrench to turn the lug nuts counterclockwise
To successfully loosen your spare tire, you’ll need to use a lug wrench to turn the lug nuts counterclockwise. This step is crucial to ensure that you can remove the tire from your vehicle. Grab your lug wrench and ensure it’s the right size to fit comfortably onto the lug nuts.
Apply some pressure to the wrench to loosen the nuts and turn it counterclockwise. It’s important to note that if the nuts are extremely tight, it may require you to use more force or even standing on the wrench to help loosen them. However, be cautious to avoid injury or accidents.
Once you start to feel the lug nuts loosen, it’s time to proceed to the next step to completely remove the tire. Remember, it’s better to be safe than sorry, so if you’re uncertain or uncomfortable with the process, call a professional to help.
Loosen the lug nuts, but do not remove them yet
When you encounter a flat tire, it’s crucial to know how to change it. Loosening the lug nuts is the second step. It’s important to first locate the spare tire and make sure you have the necessary tools to complete the task.
Once you have all the necessary tools, use the lug wrench to loosen each lug nut, but do not remove them yet. This will make it easier to remove them once the car is lifted. If the lug nuts are too tight, you may need to stand on the wrench to break them loose.
Remember to turn the wrench counterclockwise to loosen the lug nuts. By loosening the lug nuts before lifting the car, you’ll avoid having the tire spin when you try to remove the nuts, making the process much easier. Always remember to check your owner’s manual for the recommended torque specifications when tightening the lug nuts.
All in all, take your time, use caution and keep safety as your top priority when dealing with a flat tire.
Step 3: Lower the Spare Tire
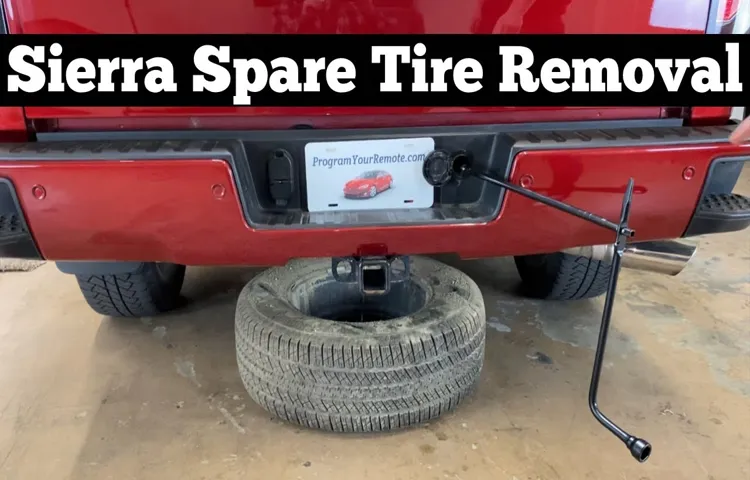
Removing the spare tire from your GMC Sierra can be a daunting task, but if you follow these simple steps, it can be a breeze. The third step is to lower the spare tire. To do this, locate the extension rod that fits into the hole located near the license plate.
Insert the rod and turn it counterclockwise until the tire touches the ground. Remove the rod and the tire should be fully disengaged from the truck. Be sure to handle the tire with care and store it in a safe place until it can be replaced or repaired.
By learning how to remove the spare tire from your GMC Sierra, you can be well-prepared in the event of a flat tire or other emergency situation.
Go under the truck and locate the spare tire winch
When you’re in a bind and your spare tire is needed, it’s important to know how to access and lower it. Step 3 is all about locating and using the spare tire winch to bring down the tire positioned beneath your truck. To begin, take a look underneath your truck and find the winch.
It should be located near the rear bumper fully extended. Pull the mechanism towards you to start lowering the tire. As you continue to pull, the cable will start to retract, eventually causing the tire to gradually lower to the ground where it can be removed.
This process requires some physical effort, so you may need to use your free hand to steady yourself while the tire is being lowered. Once your spare tire is on the ground, it’s important to double-check that you don’t see any visible damage, especially to the sidewalls. If it looks good to go, then you can move on to the next step- removing the lug nuts.
Insert the lug wrench into the winch and turn it counterclockwise until the tire reaches the ground.
“lug wrench” So, you’ve successfully removed the flat tire and are ready to put on the spare. Now comes the next step – lowering the spare tire. Grab the lug wrench and locate the winch under your vehicle.
Insert the lug wrench into the winch, making sure it fits properly. Then turn the wrench counterclockwise until the spare tire reaches the ground. Now, don’t forget to keep one hand on the tire as it lowers and ensure that it comes down safely.
Once the tire is securely on the ground, remove it from the winch and put it aside. You’re one step closer to getting back on the road! Remember to keep track of the lug nuts you removed earlier and slowly lift your car off the jack stands before tightening them up. It’s important to take care and stay safe while handling tires, so be sure to follow all of the steps carefully.
With a little bit of effort and concentration, you’ll be back on the road in no time.
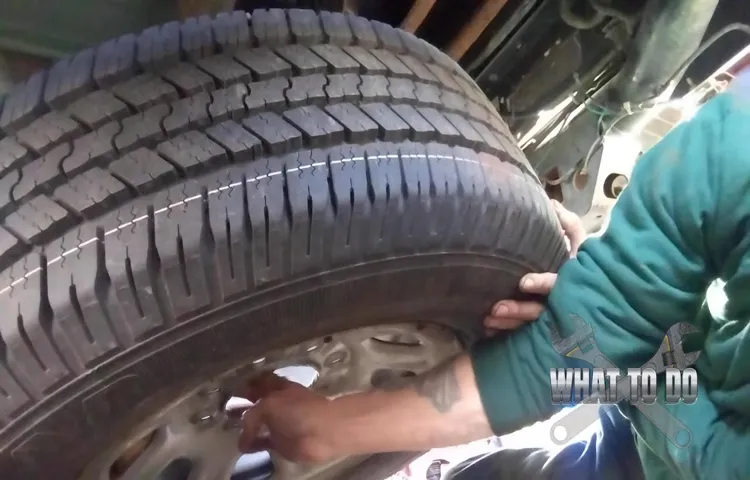
Remove the lug nuts entirely and release the spare tire by lifting it off the studs.
When you have removed the lug nuts, the next step in changing a tire is to lower it down from the car. The spare tire is designed to fit onto the same studs as the regular tire, but it may take a bit of maneuvering to get it in place. Before you attempt to lift the spare into position, make sure it is fully deflated.
You don’t want to struggle with an overinflated tire! Using both hands, gently lift the spare and align the rim with the studs. Once it is in position, push the tire onto the studs and tighten the lug nuts by hand. Take note that it is not necessary to have the lug nuts tightened yet, as you will tighten them completely once the car is back on the ground.
Remember the importance of safety and use caution when dealing with heavy equipment. It may be helpful to call roadside assistance if you have any doubts about changing a tire. Always remember to store your tools and flat tire in the trunk of your vehicle as they will once again come in handy in the future.
Step 4: Store the Spare Tire
Now that we’ve successfully removed the spare tire from our GMC Sierra, it’s time to properly store it until it’s needed again. The first step is to inspect the spare tire to ensure it’s in good condition and has the proper air pressure. If there are any issues, it’s best to get it fixed before storing it.
Next, find the storage location in your vehicle. In most GMC Sierra models, this will be under the truck bed or in the rear cargo area. Make sure the area is clean and dry before placing the tire inside.
Some models may have a cover or strap to keep the tire secure, so be sure to use these if available. Once the tire is securely in place, close the storage area and double-check that it’s properly locked. It’s important to regularly check the air pressure on the spare tire and inspect it for any damage to ensure it’s ready to use in case of an emergency.
By following these simple steps, you’ll be prepared for any unexpected flat tires on the road.
Reinstall the lug nut hand tight
After successfully replacing the flat tire, it’s time to store the spare tire. The first step is to reinstall the lug nut hand tight. Make sure it’s secured and hand tightened enough so that the spare tire won’t come loose while driving.
Once that’s done, it’s time to store the spare tire. If you have a tire cover, make sure to put it on before storing the tire. The tire should be stored in a clean, dry place, away from any moisture or direct sunlight.
It’s important to check the tire pressure periodically and rotate it with the other tires periodically to maintain its longevity. Properly storing the spare tire ensures that it’s ready to use when you need it, giving you peace of mind while on the road. Remember, safety always comes first.
Let the jack down completely and tighten the lug nuts.
Now that the lug nuts have been tightened, it’s time to store the spare tire. First, remove any tools or items that were used in the process and place them securely in the trunk or back of the vehicle. Next, carefully lift the spare tire onto the mounting bracket or back into its designated storage area.
Make sure it is secure and in its proper place. It’s essential to remember to replace the original tire on the vehicle as soon as possible. The spare tire is a temporary solution, and prolonged use can cause damage to the vehicle’s suspension and alignment.
So, be sure to get the original tire repaired or replaced as soon as possible. Storing the spare tire may seem like a simple task, but it’s crucial to ensure it’s secured correctly. A loose tire can lead to a hazardous situation while driving, so taking the proper precautions is essential.
Remember, the spare tire is not a long-term solution, and driving on it for an extended period can cause more damage to your vehicle. Think of it as a temporary fix until you can get your original tire repaired or replaced. So, don’t forget to make that appointment with your mechanic and get your vehicle back to its optimal condition.
Conclusion
Removing a spare tire from a GMC Sierra may seem like a daunting task, but with a little bit of know-how and some elbow grease, you’ll have that tire off faster than a cheetah chasing down its prey. So, grab your tools, take a deep breath, and get ready to impress your friends with your tire-removing skills. And hey, who knows, maybe you’ll even get offered a spot on the pit crew for the next NASCAR race!”
FAQs
What tools do I need to remove the spare tire on my GMC Sierra?
To remove the spare tire on your GMC Sierra, you’ll need a lug wrench, a jack, and possibly a wheel chock.
Is it safe to drive with a spare tire on a GMC Sierra?
While it’s okay to drive on a spare tire for a short distance, it’s not recommended for long-term use as it’s not designed for regular driving.
How do I lower the spare tire from underneath my GMC Sierra?
To lower the spare tire, locate the tire winch mechanism behind the bumper and use the lug wrench to turn the crank clockwise until the tire is lowered to the ground.
Can I use a donut spare tire on my GMC Sierra?
Yes, you can use a donut spare tire on your GMC Sierra, but it’s only intended for temporary use and at a limited speed.
How do I properly secure the spare tire back onto my GMC Sierra?
To secure the spare tire, align the holes on the tire and the hub and insert the lug nuts. Tighten them with the lug wrench.
Can I replace my spare tire with a full-size tire on my GMC Sierra?
Yes, you can replace the spare tire with a full-size tire on your GMC Sierra. However, you may need to reset the tire pressure monitoring system.
How often should I check the air pressure on my spare tire on my GMC Sierra?
It’s recommended to check the air pressure on your spare tire at least once a month to ensure it’s properly inflated and ready to use in case of an emergency.