Has your windshield recently been cracked? Don’t panic! While it may seem like a major issue, repairing a crack in your windshield is not as difficult as you might think. In fact, with a little bit of time and effort, you can fix it yourself and save yourself the cost of replacing the entire windshield. So, grab your tools and let’s get started on learning how to repair a crack in your windshield! Firstly, it’s important to assess the size and depth of the crack.
Is it a small, superficial crack or a larger one that has spread across the glass? This will determine the type of repair method you will need to use. If it’s a small crack, you might be able to repair it with a windshield repair kit that can be purchased at your local auto parts store. These kits typically include a resin that is injected into the crack, and once it dries, it bonds the glass back together, making the crack virtually invisible.
However, if the crack is larger or the windshield is severely damaged, you may need to consider seeking professional help or replacing the windshield altogether. In some cases, cracks that are longer than a dollar bill or located in the driver’s line of sight may compromise the structural integrity of the windshield, putting you at risk of further damage or injury. Remember, repairing a crack in your windshield is not something you should put off.
Even a small crack can quickly spread due to changes in temperature or the pressure of driving, which can result in a more extensive and expensive repair. Additionally, a cracked windshield is not only unsightly but can also obstruct your view of the road and compromise your safety while driving. By addressing the crack as soon as possible, you can ensure that it doesn’t worsen and potentially cause further damage.
So, don’t wait any longer—grab that repair kit or give a professional a call and get your windshield looking as good as new in no time. Your safety and peace of mind are worth it!
Table of Contents
Introduction
Are you frustrated by that annoying crack in your windshield? Don’t worry, I’ve got you covered. Today, I’m going to show you how to repair a crack in your windshield like a pro. It’s actually a lot simpler than you might think, and with a little bit of patience, you can save yourself a ton of money by fixing the problem yourself.
So grab your tools and let’s get started!
Understanding the Importance of Repairing Windshield Cracks
windshield cracks, repairing windshield cracks, importance of repairing windshield cracks
Causes of Windshield Cracks
windshield cracks, causes of windshield cracks
Assessing the Crack
So you’ve noticed a crack in your windshield. Don’t panic! It’s a common issue that many drivers face. Assessing the crack is the first step in determining how to repair it.
Take a good look at the crack and note its size, location, and direction. Is it a small crack or a long one? Is it located in the middle of the windshield or near the edges? Is the crack running horizontally or vertically? These are all important factors to consider when deciding how to tackle the repair. Small cracks can often be fixed with a DIY windshield repair kit, while larger cracks may require professional help.
Remember, it’s crucial to address the crack as soon as possible to prevent it from spreading further and compromising the integrity of your windshield. So take a deep breath, assess the crack, and take the necessary steps to get it fixed and keep you on the road safely.
Determining the Size and Shape of the Crack
Determining the size and shape of a crack in a structure is an important step in assessing its severity and potential impact on safety. When it comes to assessing a crack, there are a few key factors to consider. First, you’ll want to determine the length and width of the crack.
This can be done by carefully measuring the crack from end to end and noting its widest point. It’s also important to consider the depth of the crack, as this can give you insight into the stability of the structure. In addition to measuring the crack, you’ll also want to examine its shape.
Cracks can take on various shapes, such as straight, jagged, or branching patterns. The shape of the crack can provide clues about the forces that contributed to its formation. For example, a straight crack may indicate tension, while a branching crack may suggest bending or shear forces.
By carefully assessing the size and shape of a crack, you can gather valuable information that will help determine the best course of action for repairs and ensure the safety of the structure.
Checking for Additional Damage
cracked windshield, additional damage, assessing the crack When you notice a crack in your windshield, your first instinct may be to panic. But before you jump to conclusions, it’s essential to assess the crack and determine if there is any additional damage. Cracks in windshields can vary in size and severity, so it’s crucial to take a closer look to understand the extent of the problem.
To assess the crack, start by examining its length and width. A small crack that is less than a few inches in length and width may not require immediate attention, as it can often be repaired. On the other hand, a large crack that is spreading rapidly or is accompanied by a significant impact may indicate additional damage to your windshield.
Next, check for any signs of discoloration or cloudy areas around the crack. These can be indicators of moisture or debris getting trapped in the crack, which can lead to further damage if left untreated. Additionally, look for any spiderweb-like patterns branching out from the crack, as this could suggest that the crack is expanding.
It’s also important to inspect the surrounding area of the windshield for any chips or dents. Sometimes, an impact on the windshield can cause damage that extends beyond a single crack. Small chips or dents can weaken the structural integrity of the windshield, making it more susceptible to further cracks or breakage.
If you notice any signs of additional damage or if you’re unsure about the severity of the crack, it’s always best to consult a professional. A windshield repair specialist can assess the crack and recommend the appropriate course of action based on the extent of the damage. Whether it’s a simple repair or a complete windshield replacement, addressing the issue promptly can help prevent further damage and ensure your safety on the road.
Remember, a cracked windshield should never be ignored. Assessing the crack and checking for any additional damage is the first step in determining the necessary repairs. By taking the time to evaluate the situation, you can make an informed decision and protect your windshield from further harm.
Preparing for Repair
Repairing a crack in your windshield might seem like a daunting task, but with a little preparation, it can actually be quite simple. Before you begin the repair process, gather all the necessary tools and materials you’ll need. This might include a windshield repair kit, which typically includes resin, an applicator, and adhesive strips.
You’ll also need a microfiber cloth, rubbing alcohol, and a razor blade or sharp knife to clean and prepare the crack for repair. Once you have everything ready, start by cleaning the crack thoroughly with rubbing alcohol and a microfiber cloth. This will remove any dirt or debris that could interfere with the repair process.
Next, use a razor blade or sharp knife to gently scrape away any loose glass around the crack. This will create a smooth surface for the resin to adhere to. Once the crack is clean and prepared, carefully follow the instructions included with your windshield repair kit to apply the resin.
Typically, this involves placing a few drops of resin into the crack and then using the applicator to evenly distribute it. Make sure to cover the entire crack and any surrounding areas that may be prone to spreading. After the resin has been applied, cover it with the adhesive strips included in the kit.
These strips will help hold the resin in place and prevent it from spreading or drying unevenly. Leave the adhesive strips on for the recommended amount of time, usually around 24 hours, to allow the resin to fully cure. Once the curing process is complete, carefully remove the adhesive strips and use a razor blade or sharp knife to scrape away any excess resin.
Finish by cleaning the repaired area with rubbing alcohol and a microfiber cloth. With proper preparation and a little bit of patience, you can successfully repair a crack in your windshield and avoid the need for a costly replacement.
Gathering the Necessary Materials
Preparing for repair involves gathering all the necessary materials beforehand. It’s important to ensure that you have everything you need to successfully complete the repair without any interruptions or delays. First and foremost, you’ll need the proper tools for the job.
Depending on the type of repair, this could range from basic hand tools like screwdrivers and wrenches to more specialized tools like pliers or wire cutters. Next, you’ll need to gather any replacement parts or materials that may be required. This could include things like screws, nails, or adhesive if you’re fixing something that is broken or needs to be secured.
For more complex repairs, you may need to order specific parts or components, so it’s important to plan ahead and make sure you have everything you need before starting the repair. In addition to tools and materials, it’s also important to gather any documentation or instructions that may be necessary for the repair. This could include things like instruction manuals, diagrams, or troubleshooting guides.
Having these resources readily available can be incredibly helpful, especially if you encounter any unexpected issues during the repair process. Lastly, it’s a good idea to gather any personal protective equipment (PPE) that may be necessary. This could include things like gloves, safety glasses, or a dust mask, depending on the nature of the repair.
It’s important to prioritize your safety while working on any repair project, so make sure you have any necessary PPE on hand. By taking the time to gather all the necessary materials before beginning a repair, you’ll be setting yourself up for success. This preparation will help ensure that you have everything you need to complete the repair efficiently and effectively, without any unnecessary delays or setbacks.
So, before you start working, take a moment to gather your tools, replacement parts, documentation, and personal protective equipment. Trust me, you’ll be glad you did!
Ensuring Proper Safety Measures
Ensuring Proper Safety Measures: Preparing for Repair When it comes to repairing something, it’s important to not only focus on the task at hand but also on ensuring proper safety measures. Starting off with the right mindset and preparation can make a world of difference in keeping yourself and those around you safe. First and foremost, assess the situation and determine the potential risks involved.
Are there any hazardous materials or electrical components that could pose a danger? By identifying the risks, you can take the necessary precautions to eliminate or minimize them. This might involve wearing safety goggles, gloves, or even a mask to protect yourself from potential exposure. It’s also crucial to have the right tools and equipment for the job.
Using the wrong tools or faulty equipment can not only hinder your repair efforts but also increase the likelihood of accidents or injuries. So before you begin, make sure all your tools are in good working condition and that you have the appropriate safety gear on hand. Remember, safety should always be your top priority when it comes to any repair task.
Repair Options
If you find yourself facing a crack in your windshield, don’t panic! There are a few different repair options available to you, depending on the size and location of the crack. For smaller cracks, such as those less than six inches long, a DIY repair kit may be sufficient. These kits usually include a resin that you can apply to the crack, which will help prevent it from spreading further.
However, it’s important to note that these kits are not a permanent fix and may only be a temporary solution. For larger cracks, or cracks that are in the line of sight while driving, it’s best to seek professional help. A professional glass repair technician will have the tools and expertise to properly repair the crack, ensuring that it won’t interfere with your visibility or compromise the structural integrity of your windshield.
So, the next time you find a crack in your windshield, remember that there are repair options available to help get you back on the road safely.
Small Cracks: DIY Repair
small cracks, DIY repair, repair options
Large Cracks: Professional Repair
When it comes to large cracks in your home’s foundation, it’s important to seek professional repair options. Attempting to fix these types of cracks on your own can be risky and may not provide a lasting solution. Professional repair services have the expertise, tools, and materials needed to effectively repair large cracks and prevent further damage.
They will assess the severity of the crack and determine the best course of action to ensure a long-lasting and structurally sound fix. Whether it’s injecting epoxy into the crack, installing carbon fiber strips, or even underpinning the foundation, professionals have a range of solutions to address different types of cracks. It’s worth investing in these services to protect the integrity of your home and avoid costly repairs down the line.
DIY Repair Steps
If you’ve ever had a crack in your windshield, you know how frustrating it can be. But don’t worry, repairing a crack in your windshield is actually something you can do yourself with a little bit of time and effort. The first step is to purchase a windshield repair kit, which can be found at most auto parts stores.
These kits usually come with a resin that is used to fill in the crack and a tool that helps to apply the resin. Once you have your kit, begin by cleaning the crack and the surrounding area with glass cleaner and a soft cloth. This will help to remove any dirt or debris that could interfere with the repair process.
Next, follow the instructions on the kit to apply the resin to the crack. This typically involves applying a small amount of resin to the crack and then using the tool to spread it evenly. After the resin is applied, cover it with a curing strip or piece of clear plastic and allow it to dry in the sunlight for about an hour.
Finally, remove the curing strip and use a razor blade to carefully scrape away any excess resin. And there you have it – a repaired crack in your windshield!
Cleaning the Crack
repairing cracks in concrete, DIY steps, cleaning the crack, sealing the crack, fill the crack with epoxy, smooth the surface, ensure the crack is clean and dry, apply epoxy, let it dry completely, sand the surface, paint or seal the repaired area.
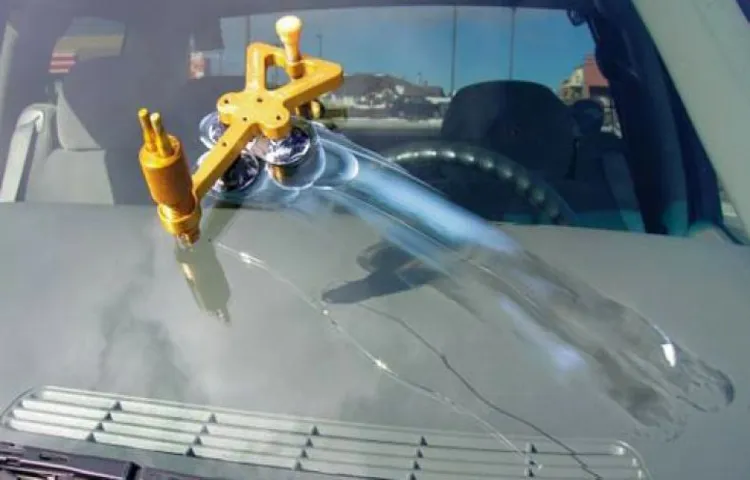
Applying Windshield Repair Resin
Applying Windshield Repair Resin Are you tired of looking at that annoying chip or crack in your windshield? Well, you’re in luck because you can fix it yourself! With a little patience and the right tools, you can repair your windshield and save yourself a trip to the auto shop. One of the key steps in the DIY windshield repair process is applying windshield repair resin. This special resin is designed to fill in the damaged area and restore the strength and integrity of your windshield.
But how do you go about applying it? Let’s break it down into some easy steps. First, you’ll want to clean the damaged area thoroughly. Use a mild detergent and water solution to remove any dirt, debris, or oils that may be on the surface of the glass.
This will ensure that the resin adheres properly to the windshield and provides a strong bond. Next, prepare the repair resin according to the manufacturer’s instructions. This may involve mixing two different components together or simply opening a package.
Be sure to follow the instructions carefully to ensure that the resin cures properly and provides the best results. Once the resin is prepared, it’s time to apply it to the damaged area. Start by placing a small amount of resin on the end of a plastic applicator.
Gently press the applicator against the chip or crack, allowing the resin to flow into the damaged area. Be careful not to apply too much pressure, as this could cause the chip or crack to spread further. After applying the resin, use a curing light or UV lamp to help the resin harden and bond to the glass.
This usually takes a few minutes, but be sure to follow the manufacturer’s instructions for the specific curing time. Once the resin has cured, it’s time to remove any excess material. Use a razor blade or sharp edge to gently scrape away any resin that is above the surface of the glass.
Curing and Polishing the Repair
DIY Repair Steps for Curing and Polishing So you’ve successfully repaired that pesky dent or scratch on your car, but now comes the important step of giving it the finishing touch. Curing and polishing the repair is crucial to ensure a seamless finish and restore your car’s showroom shine. Here are some DIY repair steps you can follow to achieve professional-looking results.
First, you’ll need to let the repaired area cure properly. This usually involves allowing the touch-up paint, filler, or other repair materials to dry completely. Make sure to follow the manufacturer’s instructions on the curing time as this can vary depending on the products used and the temperature and humidity of your surroundings.
Once the repair has cured, you can begin the polishing process. Start by cleaning the area with a mild car wash soap and water to remove any dirt or residue. Rinse it thoroughly and dry it with a clean microfiber cloth.
Next, you’ll need a good quality automotive polish. Apply a small amount of polish onto a foam applicator pad or a soft cloth, and then work it into the repaired area using circular motions. Be sure to apply even pressure and cover the entire area of the repair.
Continue polishing until you start to see the desired shine and smoothness. If necessary, you can repeat the process with more polish until you’re satisfied with the results. Remember to work in small sections to ensure even coverage and avoid any streaks or swirl marks.
After you’ve finished polishing, give the area a final wipe-down with a clean microfiber cloth to remove any excess polish residue. This will give your repair a clean and glossy finish. In conclusion, the curing and polishing steps are essential to achieving a professional-looking repair on your car.
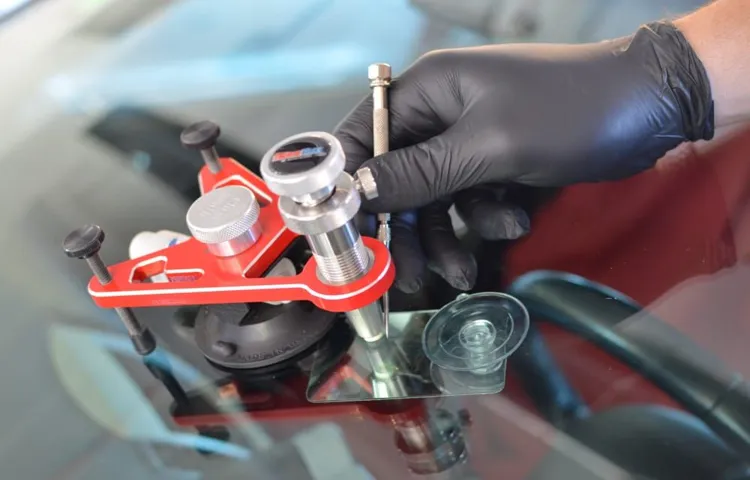
Professional Repair Process
Have you ever noticed a small chip or crack in your windshield and wondered what you should do about it? Well, the good news is that repairing a crack in a windshield is actually quite simple! The first step is to assess the size and location of the crack. If it is smaller than a dollar bill and is not in the driver’s line of sight, it can typically be repaired. Next, you will need to gather some supplies: a windshield repair kit, which usually includes resin, a syringe-like applicator, and a curing film.
Once you have your supplies, clean the area around the crack with a glass cleaner and remove any dirt or debris. Then, follow the instructions on the repair kit to fill the crack with resin and apply the curing film. After allowing the resin to cure, usually under sunlight or a UV lamp, the crack should be significantly reduced or even completely gone! Keep in mind that repair kits are best suited for small cracks and chips, so if your crack is larger than a dollar bill or in a critical area, it may be necessary to replace the entire windshield.
By taking prompt action and utilizing a windshield repair kit, you can easily and effectively repair a crack in your windshield, ensuring clear visibility and safety on the road.
Choosing a Reputable Windshield Repair Service
windshield repair service
The Repair Process
professional repair process When it comes to getting your device fixed, it’s essential to understand the professional repair process. Professional repair technicians follow a systematic approach to ensure that your device is repaired correctly and efficiently. First, they will assess the damage and diagnose the problem.
This will help them determine the best course of action to fix the issue. Once the problem has been identified, the technician will gather the necessary tools and replacement parts, if needed. They will then begin the repair process, carefully disassembling the device and replacing any damaged components.
Throughout the repair, the technician will take great care to ensure that everything is put back together correctly, paying close attention to detail. After the repair is complete, the device will undergo thorough testing to ensure that everything is in working order. The technician will also provide you with instructions on how to properly care for your device to prevent future issues.
Professional repair technicians have the expertise and knowledge to handle a wide range of repairs, giving you peace of mind knowing that your device is in good hands. So, next time your device needs fixing, trust the professionals to provide you with a top-notch repair experience.
Post-Repair Inspection
post-repair inspection
Preventing Future Cracks
If you’ve ever had a crack in your windshield, you know how frustrating and inconvenient it can be. But what if there was a way to prevent cracks from happening in the first place? Well, there are actually a few things you can do to decrease the likelihood of a crack forming. First, avoid extreme temperature changes.
When your car is exposed to hot sun or cold weather, the glass expands and contracts, which can lead to stress on the windshield and eventually result in a crack. Park your car in a shaded area or use a windshield sunshade to protect it from direct sunlight. Another tip is to avoid slamming your car doors.
This may seem like a small thing, but the force of a slamming door can actually cause vibrations that can weaken the glass over time. Instead, try closing your doors gently to reduce the risk of cracks. Finally, be cautious when driving on rough roads or over speed bumps.
These types of conditions can cause your car to shake and jolt, which can put stress on the windshield and make it more prone to cracking. By following these tips, you can help prevent future cracks in your windshield and save yourself the hassle of dealing with repairs.
Driving Habits to Avoid Windshield Damage
Driving habits play a crucial role in preventing windshield damage. By avoiding certain habits, we can significantly reduce the risk of cracks and chips in our windshields. One important habit to avoid is tailgating.
Following the car in front of us too closely increases the chances of debris hitting our windshield and causing damage. Another habit to steer clear of is slamming our car doors. The impact from slamming can create vibrations that weaken the glass over time, making it more susceptible to cracks.
Additionally, we should be mindful of our speed when driving over speed bumps or potholes. Driving at high speeds over these obstacles can put excessive pressure on the windshield, leading to cracks. It’s also important to avoid using our windshield wipers on a dry windshield as this can cause scratches.
By adopting these preventive measures, we can protect our windshields and avoid the need for costly repairs or replacements.
Protective Measures for Your Windshield
One of the most frustrating things that can happen while driving is a cracked windshield. It not only obstructs your view but also poses a safety risk. To prevent future cracks in your windshield, there are some protective measures you can take.
First and foremost, always maintain a safe distance from the vehicle ahead of you to avoid any rock or debris kicked up by their tires. Additionally, be cautious when washing your windshield, as using harsh chemicals or scrubbing too aggressively can weaken the glass. Another important step is to avoid sudden temperature changes, such as pouring hot water on a frozen windshield.
These rapid shifts in temperature can cause the glass to expand and contract, leading to cracks. Finally, if you do notice a small chip or crack in your windshield, have it repaired promptly before it spreads and requires a costly replacement. By implementing these preventive measures, you can keep your windshield safe and free from cracks.
Conclusion
In conclusion, fixing a crack in a windshield is no different than healing a broken heart – it requires patience, a steady hand, and a dash of ingenuity. Just like a skilled surgeon, you must delicately apply the right tools and techniques to mend the damaged glass. And just like a master puzzle solver, you must carefully piece together the shattered fragments to restore the windshield’s strength and integrity.
But fear not, for even if you’re not a professional glass wizard, you can still conquer this challenge with a few simple steps. First, gather your supplies and mentally prepare for this repair mission, channeling your inner MacGyver. Remember, duct tape and chewing gum may have been his go-to tools, but for a windshield crack, you’ll need more specialized gear.
Next, clean the cracked area meticulously, removing any debris and dirt with the precision of a crime scene investigator. This step will ensure that the repair solution has a pristine canvas to adhere to, just like a fresh sheet of paper awaiting a masterpiece. Now it’s time to apply the magic elixir that will work its wonders on the crack – the windshield repair resin.
Carefully inject the resin into the crack, as if you were administering a life-saving antidote. Once it fills the crevices, apply the finishing touch – a curing strip or tape that will seal the deal. This will allow the resin to harden and create a strong bond, like a superhero suit that provides ultimate protection.
Lastly, embrace your patience and let time work its magic. Allow the resin to cure and set for the recommended duration, resisting the temptation to poke or prod at it like a curious child poking a sleeping dragon. Soon enough, your cracked windshield will be restored to its former glory, stronger and more resilient than ever before.
So, my fellow windshield warriors, fear not the cracks that threaten to shatter your driving confidence. Armed with the knowledge and a touch of artistry, you can repair that pesky crack with finesse and grace. And who knows, along the way, you might just discover a new talent for bringing shattered things back to life – a true hero of the glass world!”
FAQs
How can I repair a crack in my windshield?
You can repair a crack in your windshield by using a windshield repair kit. These kits usually include a resin that you can apply to the crack to fill it in and prevent further damage.
Is it possible to repair a large crack in a windshield?
It is possible to repair a large crack in a windshield, but it is recommended to consult a professional. They have the expertise and equipment to properly repair larger cracks and ensure the structural integrity of the windshield is not compromised.
Can I use DIY methods to repair a crack in my windshield?
Yes, you can use DIY methods to repair a crack in your windshield. As mentioned earlier, windshield repair kits are available in the market that are designed for DIY use. However, it is important to carefully follow the instructions provided with the kit to ensure a successful repair.
What should I do if the crack in my windshield is spreading?
If the crack in your windshield is spreading, it is important to take immediate action. You should schedule a professional repair or replacement of the windshield as soon as possible to prevent further damage and ensure your safety on the road.
Can a repaired crack in a windshield become invisible?
While a repaired crack in a windshield may not become completely invisible, a successful repair can significantly improve the appearance of the crack. The goal of a repair is to prevent the crack from spreading and restore the structural integrity of the windshield.
How long does it take to repair a crack in a windshield?
The time it takes to repair a crack in a windshield can vary depending on the size and complexity of the crack. Generally, a simple repair can be completed in about 30 minutes to an hour, while more extensive repairs may take longer.
Will my car insurance cover the cost of repairing a crack in my windshield?
Many car insurance policies cover the cost of repairing a crack in a windshield. However, the coverage may vary depending on your specific policy. It is recommended to contact your insurance provider to determine if the repair is covered and what the process is for filing a claim.