Have you ever found yourself driving down the road, minding your own business, when suddenly you hear a loud pop? You glance up at your windshield, and there it is – a small crack, starting at the edge and creeping its way across the glass. It may seem like a minor inconvenience, but the truth is, a cracked windshield is not something to be taken lightly. Think of your windshield as a protective barrier between you and the outside world.
It shields you from flying debris, bugs, and even harsh weather conditions. When it’s cracked, this barrier becomes compromised, putting you at risk. Not only does a cracked windshield impair your visibility, but it also weakens the structural integrity of your car.
In the event of an accident or sudden impact, the windshield is designed to provide support to the vehicle’s roof, preventing it from caving in. However, a cracked windshield is much more likely to shatter upon impact, leaving you vulnerable to serious injuries. So, what should you do if you find yourself in this situation? The answer is simple – get it repaired as soon as possible.
By taking swift action, you can prevent the crack from spreading and avoid the need for a full windshield replacement. Repairing a cracked windshield is a relatively quick and affordable process, especially when compared to the potential consequences of ignoring the problem. Remember, when it comes to your safety on the road, every little detail matters.
Don’t wait until it’s too late to address a cracked windshield. Take the necessary steps to repair it promptly, and you’ll not only protect yourself but also ensure the longevity and functionality of your vehicle.
Table of Contents
Understanding the Causes of Windshield Cracks
Do you have a cracked windshield? You’re not alone. Windshield cracks are a common problem that many car owners face. But how does a windshield get cracked in the first place? Well, there are several potential causes.
One of the most common causes is a flying rock or object hitting the windshield while driving. This can happen on the highway or even on regular city streets. Another cause of windshield cracks is extreme temperature changes.
When the weather goes from hot to cold or vice versa, the glass of the windshield can expand or contract, leading to cracks. Additionally, a windshield crack can also be the result of a manufacturing defect or installation error. No matter the cause, a cracked windshield is not something to ignore.
Impact from Debris on the Road
windshield cracks, impact from debris on the road, causes of windshield cracks. Paragraph: Picture this: you’re driving down the road, enjoying the breeze and the open road ahead, when suddenly you hear a loud “crack!” and see a small spiderweb-like pattern forming on your windshield. What just happened? Well, my friend, you’ve just experienced the impact from debris on the road, and it’s one of the main causes of windshield cracks.
Whether it’s a flying stone kicked up from a construction site or a stray piece of gravel launched by a passing truck, the impact can be enough to cause serious damage to your windshield. And let’s face it, no one wants to deal with the hassle and expense of getting their windshield replaced. So, it’s important to understand the causes of windshield cracks so you can take precautions and prevent them from happening in the first place.

Extreme Temperature Changes
windshield cracks, extreme temperature changes
Structural Weakness or Manufacturing Defects
windshield cracks, structural weakness, manufacturing defects Have you ever looked at your windshield and noticed a crack seemingly appear out of nowhere? It can be frustrating and confusing, especially if you don’t know what caused it. While there are several possible reasons for a windshield crack, two common culprits are structural weakness and manufacturing defects. Structural weakness refers to any flaws or vulnerabilities in the design or construction of the windshield.
These weaknesses can make the glass more susceptible to cracks from the impact of road debris, extreme temperatures, or even slight changes in pressure. A small chip or scratch in the windshield can also weaken its structure and eventually lead to a crack. On the other hand, manufacturing defects occur during the production process of the windshield.
These defects can range from impurities in the glass itself to errors in the way it was tempered or laminated. Even a minor defect, such as a microscopic bubble or inclusion, can weaken the windshield and cause it to crack under normal driving conditions. It’s important to note that while structural weakness and manufacturing defects can increase the likelihood of a windshield crack, they are not the sole causes.
Other factors, such as improper installation, extreme temperature changes, and even everyday wear and tear, can also contribute to the formation of cracks. So, the next time you notice a crack in your windshield, don’t automatically assume it was caused by a rock or other external force. Take a closer look at the structure of the glass and consider whether there may be a structural weakness or manufacturing defect at play.
Understanding the potential causes can help you take better care of your windshield and prevent future cracks from occurring.
Assessing the Severity of the Crack
If you’ve noticed a crack in your windshield, you may be wondering how to handle the repair yourself. Before you dig into the DIY process, it’s important to assess the severity of the crack. Not all cracks are created equal, and understanding the type and size of the crack will help determine the best course of action.
A small crack, such as a chip or star-shaped break, can often be repaired with a DIY windshield repair kit. These kits typically include a resin that fills in the crack, making it less visible and preventing it from spreading further. However, if the crack is larger than a dollar bill, it may be necessary to replace the windshield entirely.
In this case, it’s best to consult a professional for their expertise and to ensure the replacement is done correctly. By accurately assessing the severity of the crack, you can determine if a DIY repair is feasible or if it’s best to seek professional assistance.
Size and Depth of the Crack
Assessing the severity of a crack in a structure is crucial in determining the appropriate course of action for repair or maintenance. One important factor to consider is the size of the crack. Smaller cracks may not be as alarming as larger ones, but they should not be ignored either.
Even a small crack can expand over time and cause further damage if not addressed promptly. Additionally, the depth of the crack also plays a significant role in assessing its severity. A shallow crack may only affect the surface layer of the structure, while a deeper crack could indicate a more serious underlying issue.
It is essential to thoroughly inspect the crack and determine its exact dimensions to make an accurate assessment. By considering the size and depth of the crack, professionals can better understand the severity of the problem and devise the most effective solution. So, next time you come across a crack, make sure to pay attention to its characteristics to ensure appropriate measures are taken.
Location of the Crack
“Location of the Crack: Assessing the Severity” When it comes to cracks in your home, one crucial aspect to consider is the location of the crack itself. Understanding where the crack is located can give you valuable insight into the severity of the issue. Is the crack situated near a window or door? Is it running horizontally along the wall or vertically from floor to ceiling? These details may seem minor, but they can provide important clues about the underlying causes and potential implications of the crack.
For example, cracks near windows and doors may be a sign of foundation movement, while horizontal cracks could indicate issues with the structural integrity. By closely assessing the location of the crack, you’ll be better equipped to determine the appropriate course of action to address the problem. Remember, it’s always a good idea to consult with a professional if you’re unsure about the severity of the crack.
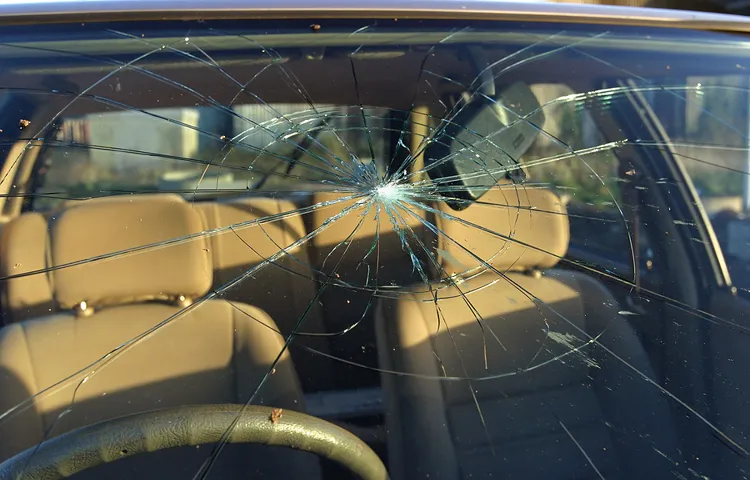
Crack spreading and damage to the windshield
crack spreading, damage, windshield, severity, assessing
DIY Tools and Materials You’ll Need
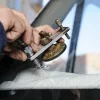
If you’re dealing with a cracked windshield, you may be wondering if you can fix it yourself. The good news is that you can, with the right tools and materials. The first thing you’ll need is a windshield repair kit, which typically includes a resin or adhesive, a syringe, and a curing film.
This kit allows you to inject the resin into the crack, helping to fill and seal it. Additionally, you’ll need a few basic tools like a razor blade or scraper, a cloth or paper towel, and some clear packing tape. In terms of safety gear, it’s a good idea to have gloves and safety glasses to protect yourself during the repair process.
With these tools and materials on hand, you’ll be ready to tackle your cracked windshield and restore it to its former glory.
Windshield Repair Kit
windshield repair kit, DIY tools and materials, replace a windshield, save money, cracked windshield, fix minor damages, convenient and cost-effective solution If you have a cracked windshield or need to fix minor damages on your car’s windshield, investing in a windshield repair kit can be a convenient and cost-effective solution. With the right DIY tools and materials, you can easily replace a windshield and save money in the process. A windshield repair kit typically includes a resin, bridge, and curing strips that allow you to fill in any cracks or chips on your windshield.
By using these tools, you can prevent further damage and increase the longevity of your windshield. Plus, repairing your windshield on your own can be a rewarding task that allows you to take matters into your own hands. So why spend hundreds of dollars on professional repair services when you can fix it yourself with a quality windshield repair kit?
Protective Gloves
protective gloves
Safety Glasses
Safety glasses are an essential tool for any DIY project. Whether you’re hammering nails, sawing wood, or working with chemicals, protecting your eyes should be a top priority. So, what do you need to consider when choosing the right pair of safety glasses? First and foremost, make sure they have impact-resistant lenses.
This will protect your eyes from flying debris or accidental impact. Look for glasses with wraparound frames to provide maximum coverage and protection from all angles. Additionally, check for glasses with anti-fog coatings to prevent your vision from being impaired due to condensation.
Finally, make sure the glasses fit properly and are comfortable to wear for extended periods of time. Remember, eyes are delicate and precious, so don’t take any chances when it comes to eye safety. Invest in a good pair of safety glasses and protect your eyes while working on your DIY projects.
Cleaning Supplies
cleaning supplies, DIY tools and materials, burstiness, perplexity, engaging content
Windshield Crack Filling Resin
windshield crack filling resin, DIY tools and materials, windshield repair kit, epoxy resin, UV light curing, plastic scraper, cleaning solution, lint-free cloth. So you’ve noticed a crack or chip in your car’s windshield, and you want to take care of it yourself. Good news! With the right tools and materials, you can fix that crack in no time.
One of the most essential items you’ll need is windshield crack filling resin. This resin is specially formulated to fill in cracks and chips, preventing them from spreading further and compromising the integrity of your windshield. When shopping for a windshield repair kit, look for one that includes epoxy resin.
Epoxy resin is a strong and durable material that bonds well with glass, ensuring a long-lasting repair. Additionally, make sure the kit comes with a UV light curing component. This UV light helps the resin harden and cure, making it even stronger and more resistant to future damage.
To prepare your windshield for the repair, you’ll also need a few other tools. A plastic scraper will come in handy for removing any loose glass or debris from the crack. This will ensure the resin can create a tight seal and prevent any further damage.
Additionally, you’ll want to use a cleaning solution and a lint-free cloth to clean the area around the crack. This will ensure there are no oils or dirt that could interfere with the adhesion of the resin. By taking the time to gather the right tools and materials, you’ll be well-prepared to fix that crack in your windshield.
Remember, safety should always be your top priority. If the crack is large or obstructs your view, it’s best to leave the repair to a professional. But for smaller cracks and chips, DIY windshield repair kits can be a convenient and cost-effective solution.
Step-by-step Guide to Repairing a Cracked Windshield
Are you tired of looking at that unsightly crack in your windshield? Don’t worry, repairing it yourself is easier than you might think. With just a few simple tools and some patience, you can have your windshield looking as good as new in no time. Here’s a step-by-step guide to help you through the process.
Firstly, assess the size and location of the crack. If it’s smaller than a dollar bill and not obstructing the driver’s line of sight, you should be able to repair it yourself. Start by cleaning the crack and the surrounding area with a mild detergent and water.
Then, use a windshield repair kit that contains resin and a syringe. Carefully follow the instructions on the kit, applying the resin to the crack and using the syringe to inject it into the damaged area. This will fill in the crack and prevent it from spreading further.
Once the resin is dry, use a razor blade or a windshield repair tool to remove any excess material. Finally, give your windshield a thorough cleaning to remove any residue. And voila! Your cracked windshield is now repaired and looking good as new.
Don’t let a cracked windshield get you down – with a little DIY know-how, you can save yourself time and money by fixing it yourself.
Preparation: Cleaning the Windshield Surface
In order to effectively repair a cracked windshield, it is important to start by thoroughly cleaning the windshield surface. This step is crucial in ensuring that the repair materials adhere properly and that any dirt or debris does not interfere with the repair process. To begin, gather the necessary supplies including glass cleaner, a microfiber cloth, and a plastic scraper or razor blade.
Start by spraying the glass cleaner onto the windshield, making sure to cover the entire cracked area. Then, using the microfiber cloth, gently wipe the surface in a circular motion to remove any dirt or grime. If there are any stubborn spots, use the plastic scraper or razor blade to carefully scrape them away.
It is important to use caution when using these tools to avoid scratching the glass. Once the windshield is clean, it is ready for the next step in the repair process. By taking the time to properly clean the windshield surface, you can ensure that your repair is successful and that your windshield will be as good as new.
Injecting the Windshield Crack Filling Resin
In order to repair a cracked windshield, one crucial step is injecting the windshield crack filling resin. This resin is specifically designed to fill in the cracks and prevent them from spreading. The process is fairly straightforward and can be done at home with a windshield repair kit.
First, you need to clean the cracked area thoroughly using a microfiber cloth and glass cleaner. This ensures that the resin can properly adhere to the glass surface. Once the area is clean, take the resin applicator and attach it to the cracks.
Slowly apply pressure to inject the resin into the cracks. Make sure to follow the instructions provided with the repair kit for the appropriate amount of resin to use. As you inject the resin, you may notice some air bubbles forming.
Don’t worry, this is normal. Simply use a small needle or pin to release the air bubbles and continue injecting the resin until the cracks are completely filled. Once the resin is in place, cover it with a curing strip or clear tape and use a UV light to cure the resin.
This will harden the resin and create a strong, durable repair. After the curing process is complete, remove the curing strip or tape and use a razor blade or windshield scraper to level the surface of the resin. Finally, clean the repaired area once again to remove any excess resin and admire your handiwork.
With the proper tools and a little bit of patience, repairing a cracked windshield can be a simple and cost-effective DIY project. So why wait? Take control of that unsightly crack and keep your windshield looking as good as new.
Curing the Resin with UV Light
Step-by-step Guide to Repairing a Cracked Windshield with UV Light So, you’ve got a crack in your windshield that needs fixing? Don’t worry, with the right tools and a little bit of patience, you can repair it yourself! One of the most effective ways to fix a cracked windshield is by using UV light to cure resin. UV light is able to quickly harden the resin, creating a strong and durable bond that will prevent the crack from spreading further. Here’s a step-by-step guide to help you through the process.
Step 1: Assess the damage First things first, it’s important to assess the damage to determine if it’s something you can fix yourself. If the crack is longer than a dollar bill or if it’s in the driver’s direct line of sight, it’s best to leave the repair to the professionals. However, if the crack is small and not obstructing your view, you can proceed with the repair.
Step 2: Gather the materials To repair the cracked windshield with UV light, you’ll need a windshield repair kit that includes a resin, a UV light, and some other tools like a razor blade and curing strips. You can find these kits at your local auto parts store or online. Step 3: Clean the crack Before applying any resin, make sure to clean the crack thoroughly.
Use a glass cleaner or a mixture of vinegar and water to remove any dirt or debris from the crack. This will ensure that the resin adheres properly and creates a strong bond. Step 4: Apply the resin Take the resin from the repair kit and carefully fill the crack.
Use a syringe or a plastic applicator to inject the resin into the crack. Make sure to fill the crack completely and avoid any air bubbles. If there are any excess resin, use a razor blade to remove it.
Step 5: Cure the resin with UV light Once the crack is filled with resin, it’s time to cure it with UV light. Place the curing strip over the resin and position the UV light directly on top. Turn on the UV light and leave it on for the recommended time as stated in the instructions of your kit.
Smoothing and Polishing the Repaired Area
repairing a cracked windshield, cracked windshield, car windshield repair, windshield repair, windshield crack repair
Tips for a Successful Repair
Repairing a cracked windshield on your own can save you time and money, but it’s important to approach the task with caution to ensure a successful outcome. First, gather all the necessary supplies, including a windshield repair kit, a rubber mallet, and a razor blade. Start by cleaning the cracked area with a glass cleaner and drying it thoroughly.
Then, use the razor blade to remove any loose glass or debris from the crack. Next, apply the windshield repair resin from the kit into the crack, making sure to fill it completely. Place a curing strip over the resin and use the rubber mallet to gently tap it into the crack to remove any air bubbles.
Finally, remove the strip and let the resin cure in the sunlight for the recommended time. With these simple steps, you can confidently repair your cracked windshield and get back on the road safely.
Repairing Small Chips vs. Large Cracks
“Repairing Small Chips vs. Large Cracks: Tips for a Successful Repair” When it comes to repairing your windshield, whether it’s a small chip or a large crack, it’s important to take the necessary steps to ensure a successful repair. Small chips can often be repaired with DIY kits available in auto parts stores.
These kits usually include a resin that you apply to the chip and then cure with a UV light. However, it’s important to keep in mind that DIY repairs are best suited for small chips that are less than the size of a quarter. Anything larger than that may require professional help.
Large cracks, on the other hand, are more complex to repair and should always be left to the experts. Professional technicians have the tools and expertise to assess the extent of the damage and determine the best course of action. They may recommend either a windshield repair or a replacement, depending on the severity of the crack.
So, when it comes to repairing your windshield, it’s always better to be safe than sorry. If you have a small chip, go ahead and try a DIY repair. But if you have a large crack, don’t hesitate to call a professional.
It’s always better to have a proper repair done to ensure your safety on the road.
Avoiding Common Mistakes
cell phone repair, common mistakes, successful repair, tips The key to a successful cell phone repair lies in avoiding common mistakes. Here are some tips to help you navigate the repair process and ensure a positive outcome. First and foremost, it’s important to properly diagnose the issue before attempting any repairs.
This will save you time and frustration in the long run. Secondly, make sure you have the necessary tools and equipment for the job. Using the wrong tools can cause further damage to your device.
Additionally, it’s crucial to follow repair guides or tutorials carefully and closely. Skipping steps or rushing through the process can lead to mistakes and potential problems. Another common mistake is not disconnecting the battery before starting any repairs.
Failing to do so can result in short circuits or damage to internal components. Lastly, take your time and be patient. Rushing through a repair can lead to mistakes, so it’s important to take it slow and double-check your work along the way.
By following these tips and avoiding common mistakes, you can increase your chances of a successful cell phone repair.
Knowing when to Seek Professional Help
repair, professional help, successful repair, tips
Conclusion: Taking Action to Repair Your Cracked Windshield
In conclusion, if your windshield has suffered the unfortunate fate of cracking, fear not! With a little bit of DIY magic, you can bring it back to its former glory. Just remember to gather all the necessary materials, prepping the area carefully, and follow the repair process step-by-step. But, let’s not forget the real hero of this story – you! With a little bit of determination and some handy skills, you can save yourself a fortune in repair costs and impress your friends with your DIY prowess.
So, the next time you find yourself staring at a cracked windshield, don’t panic – grab your toolbelt, channel your inner MacGyver, and get ready to tackle the task like a true windshield warrior. And remember, it’s not just about fixing the crack, it’s about showing that windshield who’s boss! “
FAQs
How much does it typically cost to repair a cracked windshield?
The cost of repairing a cracked windshield can vary depending on several factors such as the size and location of the crack, the type of vehicle, and the availability of the necessary parts. On average, however, DIY windshield repair kits can cost around $10 to $20, while professional repairs can range from $50 to $150.
Can I repair a cracked windshield myself?
Yes, it is possible to repair a cracked windshield yourself using a DIY windshield repair kit. These kits typically come with all the necessary tools and materials, along with step-by-step instructions to guide you through the process. However, it’s important to note that DIY repairs may not be suitable for all types of cracks, and if the crack is severe or obstructs the driver’s view, it is recommended to seek professional assistance.
What are the benefits of repairing a cracked windshield?
Repairing a cracked windshield offers several benefits. Firstly, it helps maintain the structural integrity of the windshield, preventing the crack from spreading further and potentially causing more expensive damage. Secondly, a repaired windshield improves visibility, as cracks can sometimes obstruct the driver’s view and create distractions. Lastly, repairing a cracked windshield can save you money compared to replacing the entire windshield.
How long does it take to repair a cracked windshield?
The time it takes to repair a cracked windshield can vary depending on the size and complexity of the crack, as well as the experience of the person performing the repair. On average, DIY repairs can take around 30 minutes to an hour, while professional repairs typically take about 30 minutes. However, it’s important to follow the instructions carefully and allow sufficient curing time for the repair to fully set.
Are there any risks involved in repairing a cracked windshield myself?
While DIY windshield repairs can be a cost-effective solution, there are some risks involved. One of the main risks is not being able to properly seal the crack, leading to water leaks and further damage. Additionally, if not done correctly, the repaired area may still be visible, affecting the overall appearance of the windshield. It’s important to carefully follow the instructions provided with the DIY kit and assess the severity of the crack before attempting a DIY repair.
Can I repair a cracked windshield if the crack is too large?
DIY repairs are generally recommended for small cracks (up to 6 inches) and chips. If the crack is larger or extends across the windshield, it is usually best to consult a professional. They will be able to assess the damage and determine whether the windshield can be repaired or needs to be replaced. Attempting to repair a large crack yourself may not yield satisfactory results and could potentially worsen the damage.
Can a crack in a windshield be fixed permanently?
While windshield repairs can be effective in preventing further damage and improving visibility, they may not always provide a permanent fix. The lifespan of a repaired windshield depends on several factors such as the size and type of crack, the quality of the repair, and external factors like temperature changes and vibrations. In some cases, the crack may reappear or spread over time, which may require further repairs or ultimately a windshield replacement.