
Hey there! Welcome to our blog, where we’re diving into the fascinating world of “Introduction”. As humans, introductions play a significant role in our lives. Whether it’s meeting someone for the first time, starting a new job, or even opening a book, introductions set the stage for what’s to come.
They serve as gateways into new experiences, providing us with a glimpse of what lies ahead. Just like in the physical world, introductions are equally important in the digital space. From website landing pages to blog posts, a well-crafted introduction can capture a reader’s attention and entice them to continue reading.
It’s like that small spark of curiosity that ignites a fire of interest within us. So, why are introductions so crucial? Well, think of them as the secret ingredient to any successful piece of content. They establish the tone, create a connection with the reader, and provide a brief preview of what to expect.
In a way, introductions serve as the “handshake” between the writer and the reader. Imagine yourself walking into a room full of strangers. You’re eager to make connections and engage in meaningful conversations.
That initial greeting and introduction can make all the difference in forming a positive impression. The same goes for writing. Through a compelling and well-crafted introduction, writers have the power to capture their readers’ attention and keep them engaged throughout.
In this blog series, we’ll explore the art of writing effective and engaging introductions. We’ll dive into different techniques, share tips and tricks, and provide you with a roadmap to help you master the art of introductions. Whether you’re a content creator looking to improve your writing skills or simply someone who enjoys consuming information, this series is for you.
Table of Contents
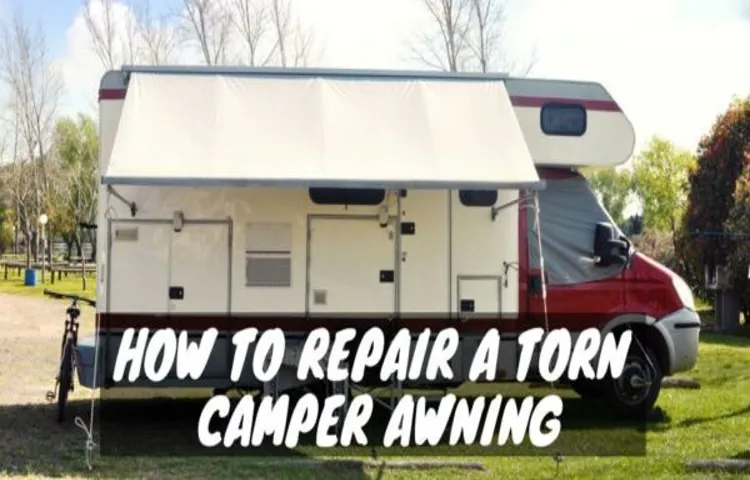
What is an A&E RV awning?
If you’re an avid RV enthusiast, you probably know how important it is to have a functioning awning on your vehicle. A broken A&E RV awning can put a real damper on your camping experience, but fortunately, repairing it isn’t as difficult as it may seem. First, you’ll need to identify the specific issue with your awning.
This could be anything from a torn fabric to a malfunctioning mechanism. Once you’ve pinpointed the problem, you can then begin the repair process. Depending on the issue, you may need to replace the fabric, fix the frame, or replace any broken parts.
It’s important to follow the manufacturer’s instructions and use the correct tools and materials for the job. By taking the time to properly repair your broken A&E RV awning, you can ensure that it continues to provide you with shade and protection on all your camping adventures.
Common causes of a broken A&E RV awning
If you’re a proud owner of an RV, you may have experienced the frustration of a broken A&E RV awning. There are several common causes of a broken awning that can leave you searching for a solution. One common cause is the accumulation of debris, such as sticks or leaves, on top of the awning.
This extra weight can put strain on the awning’s mechanisms and cause it to malfunction. Another cause could be strong winds or heavy rain, which can cause the awning to become misaligned or even tear. Additionally, general wear and tear over time can also lead to a broken awning.
It’s important to regularly inspect and maintain your RV awning to prevent any potential issues. If you do find yourself with a broken A&E RV awning, don’t worry – there are ways to repair it. From simple fixes like replacing a broken part to more complex repairs like reattaching a detached awning, there are solutions for every type of damage.
By following some simple steps and using the right tools, you can have your A&E RV awning back in working order in no time.
Assessing the damage
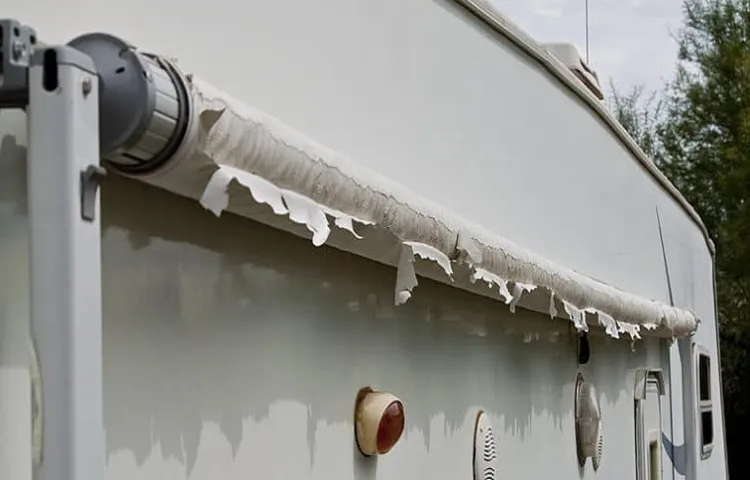
So, you’re enjoying a nice RV trip and suddenly, your awning gets damaged. It happens to the best of us! But don’t worry, repairing a broken RV awning is not as complicated as it might seem. First, you need to assess the damage.
Is it a tear in the fabric? Or maybe a bent or broken frame? Once you’ve determined the extent of the damage, you can proceed with the necessary repairs. If it’s a tear in the fabric, the first step is to clean the area around the tear to ensure a good adhesive bond. Then, you can use a repair kit specifically designed for RV awnings.
These kits typically include a patch and adhesive that will bond to the awning fabric. Simply follow the instructions on the kit to apply the patch and allow it to dry before using the awning again. If the frame is bent or broken, you may need to replace the damaged parts.
Start by removing the awning fabric from the frame to access the damaged area. Take note of the manufacturer and model of your RV awning, as this information will be helpful in finding replacement parts. You can contact the manufacturer or a reputable RV parts supplier to purchase the necessary replacement pieces.
Once you have the new parts, simply follow the manufacturer’s instructions to install them and reattach the awning fabric. Remember, if you’re not comfortable with DIY repairs or if the damage is more extensive, it’s always a good idea to seek professional help. They have the expertise and tools to fix your RV awning properly, ensuring it stays in good condition for future adventures.
In conclusion, repairing a broken RV awning can be done with a little bit of patience and the right tools. Whether it’s a tear in the fabric or a bent frame, you can tackle the repairs yourself or find a professional to assist you. Just remember to assess the damage first, gather the necessary materials, and follow the instructions carefully.
Inspect the fabric
When it comes to assessing the damage on a fabric, one of the first things you should do is inspect it closely. Take a good look at the fabric and try to determine the extent of the damage. Is it a small tear or a big rip? Are there any stains or discoloration? By carefully examining the fabric, you can get a better idea of what needs to be done to fix it.
This is also a good time to identify any potential problems that may have caused the damage in the first place. Perhaps the fabric was exposed to harsh chemicals or was not properly cared for. By assessing the damage, you can make a plan for how to fix it and prevent it from happening again in the future.
So take the time to inspect the fabric and give it the attention it deserves.
Check the arms and hardware
assessing damage to arms and hardware
Tools and materials needed for the repair
If you’re looking to repair a broken A&E RV awning, there are a few tools and materials you’ll need to get the job done. First and foremost, you’ll need a ladder or step stool to access the awning. You’ll also need a tape measure to accurately measure the size of the awning fabric that needs to be replaced.
In terms of materials, you’ll need a replacement awning fabric, which you can purchase from an RV supply store or online. You’ll also need a utility knife or scissors to cut the fabric to the correct size. Finally, you’ll need a drill and screws to secure the new fabric to the awning frame.
Make sure you have all of these tools and materials on hand before you begin the repair process to ensure a smooth and successful repair.
Repairing a broken A&E RV awning
Are you dealing with a broken A&E RV awning? Don’t worry, you’re not alone. Awning malfunctions can be a common issue for RV owners, but fortunately, they can be repaired with a bit of know-how. To begin with, you’ll want to assess the damage and determine whether it can be fixed or if a replacement is needed.
If it’s a minor issue like a broken bracket or a tear in the fabric, you may be able to fix it yourself. However, if the damage is extensive or beyond your skill level, it’s best to consult a professional. When repairing the awning yourself, start by ordering the necessary replacement parts, which can usually be found online or at RV supply stores.
Then, carefully remove the damaged components and install the new ones according to the manufacturer’s instructions. Make sure to tighten all bolts and screws securely to ensure a safe and sturdy repair. Additionally, always exercise caution when working with tools and climbing on ladders.
By following these steps, you’ll have your A&E RV awning fixed up and ready for your next adventure in no time.
Step 1: Remove the awning fabric
A&E RV awnings are a popular choice for campers and RV enthusiasts, providing much-needed shade and protection from the elements. However, like any outdoor equipment, they can sometimes become damaged and require repair. If you find yourself with a broken A&E RV awning, don’t fret – with a bit of time and effort, you can get your awning back in working order.
The first step in repairing a broken A&E RV awning is to remove the awning fabric. This may seem like a daunting task, but with the right tools and a little patience, it can be done. Start by loosening the tension on the awning springs and folding the awning fabric up into a neat bundle.
Next, carefully remove the end cap from the roller tube and slide the fabric off. Be sure to take note of how the fabric is attached, as this will make reassembly much easier. Once the fabric is off, inspect it for any tears or damage that may need to be repaired.
Now that the fabric is removed, you’re ready to move on to the next step in repairing your broken A&E RV awning.
Step 2: Replace damaged arms or hardware
When it comes to repairing a broken A&E RV awning, one of the first steps you’ll need to take is to replace any damaged arms or hardware. Over time, wear and tear can cause these components to break or become ineffective. To fix the issue, you’ll need to carefully remove the old arms or hardware and replace them with new ones.
This process may involve finding the right replacement parts and tools, but it’s a crucial step in getting your awning back in working order. Once the new arms or hardware are in place, you can move on to the next step of repairing your awning and enjoying the shade and comfort it provides.
Step 3: Reattach the awning fabric
Repairing a broken A&E RV awning can be challenging but with the right steps, it is possible to fix it yourself. Once you have identified the broken part, the next step is to reattach the awning fabric. This is an important step as it ensures that the awning is secure and will provide the necessary shade and protection from the elements.
To reattach the awning fabric, start by removing any remaining debris or old adhesive from both the awning rail and the fabric. Then, apply a bead of adhesive along the length of the awning rail and press the fabric firmly onto it. Make sure to smooth out any wrinkles or air bubbles as you go.
Allow the adhesive to dry completely before retracting the awning. By following these steps, you can effectively repair your broken A&E RV awning and get back to enjoying your outdoor adventures.
Preventive measures to avoid future damage
If you own an A&E RV awning, you know how important it is to keep it in good condition. However, accidents happen, and sometimes your awning may get damaged. Fortunately, there are preventive measures you can take to avoid future damage and extend the life of your awning.
First and foremost, it’s essential to regularly inspect your awning for any signs of wear or tear. Look for loose or frayed threads, holes, or any other damage. Catching these issues early on can prevent them from becoming bigger problems down the line.
Another preventive measure is to properly secure your awning when it’s not in use. Strong winds can easily cause your awning to flap around or even get completely torn off. Ensure that you properly stow and secure your awning before leaving your RV or during inclement weather.
Regular cleaning is also crucial for maintaining your RV awning. Over time, dirt, dust, and debris can accumulate on the fabric, causing it to deteriorate. Cleaning your awning with mild soap and water, and ensuring it is fully dry before retracting it, will help prevent the growth of mildew and extend its lifespan.
Lastly, consider investing in awning accessories such as wind deflectors or de-flappers. These items can help protect your awning from wind damage and keep it secure during storms or strong gusts. By implementing these preventive measures, you can avoid future damage to your A&E RV awning and ensure it continues to provide shade and shelter for years to come.
Remember to regularly inspect, properly secure, clean, and consider additional accessories to keep your awning in top condition.
Regular inspection and maintenance
One of the most important preventive measures you can take to avoid future damage to your property is regular inspection and maintenance. By regularly inspecting your property, you can identify any potential issues before they turn into major problems. This can save you a lot of time, money, and stress down the line.
Regular maintenance tasks, such as cleaning gutters, checking for leaks, and testing electrical systems, can also help prevent small issues from becoming larger ones. Think of it like going to the doctor for a check-up – catching a small problem early on is much easier to treat than waiting until it has become a serious health issue. So, make it a point to schedule regular inspections and maintenance for your property to ensure its longevity and avoid future damage.
Avoid putting excessive weight on the awning
awning, damage, preventive measures, excessive weight Excessive weight on awnings can lead to severe damage, and it’s important to take preventive measures to avoid this issue. Awnings are designed to offer shade and protection from the elements, but if they are overloaded with weight, they can easily become damaged. One way to prevent this is by being mindful of what you hang on your awning.
Avoid hanging heavy objects like plants or decorations that can add unnecessary weight. Additionally, be careful when leaning on or placing heavy objects against the awning, as this can also cause damage. It’s also crucial to regularly inspect the awning for any signs of damage or wear and tear, such as tears, loosening of the fabric, or weakened support structures.
By taking these preventive measures, you can prolong the lifespan of your awning and avoid costly repairs in the future.
Conclusion
In conclusion, repairing a broken A&E RV awning is not for the faint of heart. It requires a combination of patience, ingenuity, and a dash of DIY magic. But fear not, for I am here to guide you through this perilous journey with my witty and clever explanations.
First, you must assess the damage with a keen eye and a discerning mind. Is it a tear, a bend, or something more mysterious? No matter the case, you must approach the repair with the curiosity of Sherlock Holmes and the determination of MacGyver. Once you have identified the problem, it’s time to gather your tools.
A trusty ladder, a roll of duct tape, and a can-do attitude are essential for this task. Remember, duct tape is to a DIY enthusiast what a wand is to a wizard – a powerful tool capable of fixing almost anything. Now comes the fun part – brainstorming ingenious solutions.
If your awning has a tear, fear not, for there are many creative ways to mend it. You can opt for the classic “sew and patch” technique, but why be conventional when you can be extraordinary? Consider stitching a flamboyant rainbow pattern or maybe even a zany dinosaur shape. Let your imagination run wild! If your awning has a bend, don’t fret! Channel your inner superhero and unleash your strength upon it.
You can attempt the infamous “Hulk maneuver” where you use brute force to straighten the bend, or you can take a more calculated approach and enlist the aid of a trusty friend or a team of circus acrobats. Just make sure to document this daring feat for posterity! Finally, remember that a little humor goes a long way in the face of adversity. Namedropping famous repairmen like Bob Vila or Tim “The Toolman” Taylor is sure to lighten the mood and inspire confidence in your DIY skills.
Don’t forget to add a dash of puns and dad jokes along the way – after all, laughter is the best adhesive! In conclusion, repairing a broken A&E RV awning may seem daunting, but with the right mindset and a touch of creativity, you can turn this challenge into a triumph. So grab your toolbox, don your cape of DIY magic, and let the repair journey begin! May your awning be stronger than ever and your RV adventures be filled with laughter and clever repairs.”
FAQs
How can I repair a broken A&E RV awning on my own?
To repair a broken A&E RV awning, you can start by identifying the cause of the problem. If it’s a tear or hole, you can patch it with a specialized awning repair tape. If it’s an issue with the arms or mechanisms, you may need to disassemble and replace the damaged parts. It’s recommended to consult the awning manufacturer’s manual or seek professional help if you’re uncertain about the repair process.
Is it possible to repair a completely torn A&E RV awning?
If your A&E RV awning is completely torn, it may not be possible to repair it effectively. It’s best to evaluate the extent of the damage and consider replacing the entire awning. Replacement awnings are readily available from RV supply stores or online retailers.
Can I temporarily fix a broken A&E RV awning for immediate use?
If you need to temporarily fix a broken A&E RV awning for immediate use, you can consider using a quick-fix solution such as a tarp or a temporary shelter. These can be secured to the RV to provide temporary shade and protection until a proper repair or replacement can be made.
Are there any preventive measures to avoid A&E RV awning damage?
To prevent damage to your A&E RV awning, it’s essential to follow the manufacturer’s guidelines for operation and maintenance. Avoid leaving the awning extended during heavy rain or wind storms, as this can lead to damage. Regularly inspect the awning for any signs of wear or tear and promptly address any minor issues before they escalate.
What should I do if my A&E RV awning won’t retract?
If your A&E RV awning won’t retract, start by checking if the awning arms are properly aligned. Sometimes, misalignment can prevent the awning from retracting. You can also inspect the awning fabric for any obstructions or debris that may be causing interference. If the issue persists, it’s advisable to consult the manufacturer’s manual or seek professional assistance.
Can I repair a broken A&E RV awning spring on my own?
Repairing a broken A&E RV awning spring can be challenging and requires a certain level of expertise. It’s recommended to consult the manufacturer’s manual or seek professional help to replace a broken spring. Attempting to repair it on your own without the necessary skills and tools may result in further damage or injury.
How often should I inspect and maintain my A&E RV awning?
It’s advisable to inspect and maintain your A&E RV awning regularly, especially before and after each camping season. This will help you identify any wear and tear, as well as address any potential issues before they worsen. Regular maintenance can increase the lifespan of your awning and prevent costly repairs or replacements in the long run.
Are there any specific cleaning instructions for A&E RV awnings? A8. A&E RV awnings can be cleaned by following a few simple steps. Start by sweeping the awning fabric with a soft brush to remove any loose debris. Then, mix a mild soap with water and scrub the fabric gently using a soft cloth or sponge. Rinse thoroughly with water and allow it to dry completely before retracting. It’s essential to avoid using harsh chemicals or abrasive cleaners, as these can damage the awning fabric.
Is it necessary to lubricate the moving parts of my A&E RV awning?
It’s recommended to lubricate the moving parts of your A&E RV awning regularly to ensure smooth operation. You can use a silicone-based lubricant or a specialized awning lubricant to apply a thin layer on the hinges, springs, and other moving components. This will help prevent friction and extend the lifespan of your awning.
Can I use my A&E RV awning during windy conditions?
It’s important to exercise caution when using your A&E RV awning during windy conditions. High winds can put excessive stress on the awning and potentially cause damage. If possible, retract the awning during strong winds to prevent any mishaps. Additionally, consider using awning tie-downs or anchor straps for added stability in moderate wind conditions.
How long does the average A&E RV awning last?
The lifespan of an average A&E RV awning can vary depending on several factors, such as usage, maintenance, and exposure to harsh weather conditions. However, with proper care, an A&E RV awning can last anywhere from 5 to 10 years or more. Regular inspections, timely repairs, and following the manufacturer’s guidelines can help extend its longevity.
Can I install a new A&E RV awning by myself?
Installing a new A&E RV awning can be a complex task and may require the assistance of another person. It’s crucial to carefully read and follow the manufacturer’s instructions to ensure proper installation. If you’re uncertain about the process or don’t feel comfortable doing it yourself, it’s advisable to hire a professional to ensure a safe and accurate installation.