
Have you ever found yourself pondering over a problem, struggling to find a solution? It happens to all of us at some point. Understanding the problem is often the first step towards finding a solution. In this blog, we will delve into the concept of problem-solving by examining the importance of understanding the problem before attempting to solve it.
Imagine you come across a challenging puzzle. Your instinct might be to immediately jump into finding a solution. However, without fully comprehending the problem, your efforts may prove to be in vain.
Just like trying to put together a jigsaw puzzle without looking at the picture on the box, attempting to solve a problem without understanding its intricacies can lead to frustration and wasted time. Understanding the problem involves analyzing its various dimensions, gathering information, and identifying any underlying causes. It requires a systematic approach that involves asking the right questions and digging deeper to uncover the root of the problem.
By gaining a comprehensive understanding, you can pave the way for effective problem-solving. To illustrate, think of understanding a problem as peeling back the layers of an onion. The more layers you peel, the clearer the core becomes.
Similarly, by peeling back the layers of a problem, you can unravel its complexities and gain insight into its true nature. This deeper understanding enables you to approach the problem from different angles and explore potential solutions that may have otherwise remained hidden. In our upcoming blog posts, we will explore various techniques and strategies that can help you enhance your problem-solving skills by focusing on understanding the problem at its core.
From breaking down complex issues to defining clear goals, each step will contribute to your ability to tackle problems with confidence. So, join us on this journey as we unlock the secrets of effective problem-solving through understanding the problem. Get ready to develop a new perspective and equip yourself with the skills needed to overcome any challenge that comes your way.
Table of Contents
- 1 What is a gouge in a windshield?
- 2 Why is it important to repair gouges in windshields?
- 3 Assessing the damage: How bad is the gouge?
- 4 Safety precautions: Protecting yourself and your windshield
- 5 Tools needed for repairing gouges
- 6 Materials needed for repairing gouges
- 7 Cleaning the damaged area
- 8 Taping off the surrounding area
- 9 Removing loose glass and debris
- 10 Choosing the right repair kit
- 11 Applying the resin or epoxy
- 12 Using a UV light to cure the repair
- 13 Removing excess resin or epoxy
- 14 Smoothing the repaired area
- 15 Polishing the windshield for a seamless finish
- 16 Removing the tape and cleaning the windshield
- 17 Inspecting the repair for any imperfections
- 18 Additional tips and tricks for successful repair
- 19 Why repairing gouges in windshields is worth it
- 20 Enjoying a clear and safe driving experience
- 21 Conclusion
- 22 FAQs
What is a gouge in a windshield?
If you’ve ever noticed a gouge in your windshield, you may be wondering what exactly it is and if it can be repaired. A gouge in a windshield refers to a deep scratch or indentation that is typically caused by a sharp object, such as a rock or piece of debris, hitting the glass. These gouges can vary in size and severity, but they can often be quite noticeable and can even affect the structural integrity of the windshield.
To repair a gouge in a windshield, it is best to consult with a professional auto glass repair specialist. They have the necessary tools and expertise to assess the damage and determine the best course of action. Depending on the severity of the gouge, they may be able to fill it in with a special resin and polish it to restore the integrity of the glass.
However, in some cases, the gouge may be too severe and it may be necessary to replace the entire windshield. Overall, it is important to address any gouges in your windshield promptly to ensure your safety and to prevent further damage.
Why is it important to repair gouges in windshields?
We’ve all been there – driving along, minding our own business, when suddenly, a rock or piece of debris gets kicked up by another vehicle and smacks into our windshield. Ouch! The result is often a nasty gouge or chip that can be not only unsightly but also potentially dangerous. So why is it important to repair gouges in windshields? Well, for starters, a gouge in your windshield can obstruct your view of the road.
This can be particularly dangerous during nighttime driving or in inclement weather when visibility is already compromised. Additionally, an unrepaired gouge can weaken the integrity of your windshield, making it more susceptible to further damage. Imagine hitting a pothole or going over a speed bump and having your already damaged windshield shatter completely – not a pretty picture, right? Finally, repairing a gouge in your windshield can actually save you money in the long run.
Most insurance companies will cover the cost of a windshield repair, so by addressing the issue promptly, you can avoid having to shell out for a full windshield replacement down the line. So, how do you go about repairing a gouge in your windshield? Well, it’s best to leave this task to the professionals. There are specialized techniques and tools that windshield repair experts use to effectively and safely repair gouges, chips, and cracks.
They can fill in the gouge with a resin that restores the strength and clarity of your windshield. So, if you notice a gouge or chip in your windshield, don’t procrastinate – get it repaired as soon as possible to ensure your safety and prevent further damage.
Assessing the damage: How bad is the gouge?
Have you ever noticed a gouge in your windshield and wondered how bad it actually is? It’s important to assess the damage to determine whether it can be repaired or if you’ll need to replace the entire windshield. The severity of the gouge depends on factors such as its size, depth, and location. If the gouge is small and shallow, it may be possible to repair it using a windshield repair kit.
These kits typically include a resin that can be applied to the gouge to fill in the damaged area. However, if the gouge is larger or deeper, it may require professional repair or replacement. It’s always best to consult with a professional to assess the damage and determine the best course of action.
Remember, even a small gouge can compromise the integrity of your windshield, so it’s important to address the issue promptly to ensure your safety on the road.
Safety precautions: Protecting yourself and your windshield
If you discover a gouge in your windshield, it’s important to take action right away to ensure your safety and protect your vehicle. First and foremost, it’s crucial to remember that attempting to repair a gouge on your own can be dangerous and is not recommended. It’s best to leave it to the professionals who have the knowledge and experience to properly fix the issue.
In the meantime, there are a few safety precautions you can take to protect yourself and prevent further damage to your windshield. Start by covering the gouge with clear packing tape. This will help prevent any debris or water from entering the crack and causing it to expand.
Additionally, avoid slamming your car doors or driving over bumps too quickly, as this can put additional stress on the damaged area. Lastly, be sure to schedule an appointment with a reputable auto glass shop as soon as possible to have the gouge properly repaired. Remember, prioritizing your safety and taking preemptive measures can save you time, money, and potential injury down the road.
Hey there! Are you ready to dive into the world of DIY projects and get your hands dirty? Well, you’ve come to the right place! In this blog post, we’re going to explore the exciting realm of tools and materials that you’ll need to tackle any DIY project with confidence. Imagine yourself as a master chef in the kitchen, creating a delicious meal from scratch. You wouldn’t be able to whip up a gourmet dish without the proper utensils and ingredients, right? The same goes for DIY projects.
Having the right tools and materials at your disposal is essential for a successful outcome. So, what exactly do we mean by “tools and materials”? Well, tools refer to the instruments that you’ll use to complete your project, such as hammers, screwdrivers, and power drills. These tools are like the paintbrushes in an artist’s hand, allowing you to shape, assemble, and create your vision.
Materials, on the other hand, are the physical substances that you’ll be working with. Whether it’s wood, metal, fabric, or paint, these materials are the building blocks of your DIY masterpiece. Just like a sculptor would choose their preferred stone, you’ll need to select the perfect materials to bring your project to life.
But what if you’re a beginner and have no idea where to start with tools and materials? Don’t worry, we’ve got your back! In the upcoming sections, we’ll walk you through the essential tools every DIY enthusiast should have in their toolbox. We’ll also cover a wide range of materials for different types of projects, helping you find the perfect fit for your creative endeavors. So, whether you’re planning to renovate your home, build a customized piece of furniture, or simply want to explore the world of DIY, stick around! We’ll equip you with the knowledge and confidence to unleash your inner handyman or handywoman.
Get ready to embark on an exciting journey of creativity and craftsmanship – it’s time to get started with section one: tools and materials!
Tools needed for repairing gouges
If you have a gouge in your windshield, it’s important to repair it as soon as possible to prevent further damage and ensure safe driving. To repair a gouge in your windshield, you’ll need a few tools. First, you’ll need a windshield repair kit, which typically includes a resin or adhesive that can fill in the gouge and make it less noticeable.
You’ll also need a razor blade or utility knife to clean and prepare the area around the gouge for the repair. Additionally, you’ll need a piece of clear plastic and tape, which will be used to create a seal over the repaired area while the adhesive cures. It’s also a good idea to have some rubbing alcohol and a clean cloth on hand to remove any dirt or debris from the windshield before starting the repair.
With these tools in hand, you’ll be ready to repair the gouge in your windshield and get back on the road safely.
Materials needed for repairing gouges
If you find yourself with a gouge in your windshield, don’t panic – it can be repaired! To fix the gouge, you’ll need a few materials. First, start with a windshield repair kit, which typically includes a special resin and an applicator tool. Then, gather a few other supplies like a clean cloth, rubbing alcohol, and a razor blade.
Once you have everything you need, start by cleaning the area around the gouge with the rubbing alcohol and cloth. Next, use the razor blade to carefully scrape away any loose pieces of glass. This will help create a smooth surface for the resin to adhere to.
After that, follow the instructions on the windshield repair kit to apply the resin to the gouge. Allow it to dry and then use the razor blade again to scrape away any excess resin. With these simple steps and the right materials, you’ll have your windshield looking as good as new in no time.
Hey there! Are you ready to give your car’s windshield a little TLC? Section Two of our DIY car maintenance series is all about preparing the windshield for a sparkling clean finish. Just like the windows in our homes, windshields tend to accumulate dirt, grime, and stubborn streaks over time. But fear not, because with a little bit of elbow grease and the right techniques, you’ll have your windshield looking crystal clear in no time.
So grab your cleaning supplies and let’s get started!
Cleaning the damaged area
If you’ve ever found yourself with a gouge in your windshield, you know how frustrating it can be. But don’t worry, repairing a gouge in your windshield is not as difficult as it may seem. The first step is to clean the damaged area.
Begin by thoroughly washing the windshield with a mild soap and water solution. This will help remove any dirt or debris that may be stuck in the gouge. After the windshield is clean, use a glass cleaner to wipe down the area around the gouge.
This will ensure that the surface is free from any contaminants that could interfere with the repair process. Once the area is clean, you can move on to repairing the gouge.
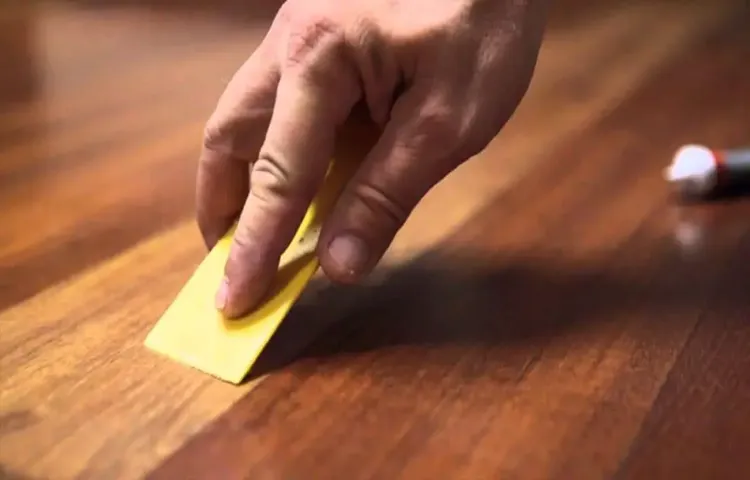
Taping off the surrounding area
When it comes to repairing a gouge in your windshield, one important step is to tape off the surrounding area. This helps to protect the rest of the windshield from any further damage or scratches during the repair process. Start by using a strip of masking tape to outline the area around the gouge.
Make sure the tape is securely adhered to the glass, creating a barrier between the gouge and the rest of the windshield. This will ensure that when you begin the repair, you can focus solely on the gouge without causing any unintended damage to the surrounding glass. So next time you find a gouge in your windshield, keep in mind the importance of taping off the surrounding area before attempting any repairs.
Removing loose glass and debris
If you’ve noticed a gouge in your windshield, it’s important to take action right away to prevent further damage. The first step in repairing a gouge is to remove any loose glass and debris from the affected area. To do this, you can use a small brush or compressed air to gently sweep away any loose particles.
Be sure to wear protective gloves and goggles to prevent injury. Once the loose glass and debris have been removed, you can proceed with the repair process.
Hey there DIY enthusiasts! Are you ready to tackle another home improvement project? Today, we’re diving into section three of our series on repairing and filling gouges. We know that gouges can be a major eyesore and can detract from the overall beauty of your home. Whether it’s a scratch on your hardwood floors or a dent on your kitchen countertop, we’ve got you covered.
In this section, we’ll be exploring the various methods and techniques you can use to fill and repair those unsightly gouges. So let’s roll up our sleeves and get ready to give our homes a little TLC!
Choosing the right repair kit
So you’ve found a gouge in your windshield and now you’re faced with the task of repairing it. Don’t worry, choosing the right repair kit can make this process a breeze! When selecting a repair kit, it’s important to consider a few key factors. First, make sure the kit is specifically designed for repairing windshields.
Look for one that includes all the necessary tools and materials, such as an adhesive and a resin. Additionally, consider the level of damage to your windshield. If the gouge is deep or extensive, you may need a more advanced repair kit that can handle more severe damage.
On the other hand, if the gouge is small and shallow, a basic repair kit may be sufficient. Finally, read reviews and do some research to find a repair kit with a good reputation. By taking the time to select the right repair kit, you can ensure a successful windshield repair that will have your car looking as good as new!
Applying the resin or epoxy
One common issue that many drivers face is finding a gouge in their windshield. Whether it’s from a rock hitting the glass while driving or a small accident that caused damage, it’s essential to repair the gouge to prevent further damage and maintain visibility while on the road. One effective method to repair a gouge in a windshield is by using resin or epoxy.
Resin or epoxy is a strong adhesive that can fill in the gouge and create a smooth surface. To apply the resin or epoxy, start by cleaning the damaged area with glass cleaner to remove any dirt or debris. Then, use a small brush or syringe to apply the resin or epoxy to the gouged area.
Make sure to follow the manufacturer’s instructions for the specific product you are using. Once applied, let the resin or epoxy dry completely before using your vehicle. This repair method can provide a quick and affordable solution to fixing a gouge in your windshield.
Remember, always consult a professional if you are unsure about repairing the gouge yourself or if the damage is severe.
Using a UV light to cure the repair
If you find yourself with a gouge or chip in your windshield, don’t panic – it’s a common problem that can be fixed. One effective method to repair a gouge in your windshield is by using a UV light. UV light technology has been widely used in various industries, including the automotive industry, for its ability to cure adhesives quickly.
To repair a gouge in your windshield using a UV light, you’ll need a windshield repair kit that includes a special resin and a UV light. First, clean the damaged area thoroughly with a windshield cleaner and let it dry completely. Then, apply the resin to fill the gouge, making sure to cover the entire damaged area.
After applying the resin, place a UV light over the damaged area and turn it on. The UV light will emit a high-intensity ultraviolet light that will cure the resin, making it hard and transparent. Hold the UV light over the area for the recommended time stated in the repair kit instructions.
Using a UV light to cure the repair has several advantages. First, it speeds up the curing process significantly. The high-intensity UV light ensures that the resin hardens quickly and effectively, making the repair process much faster compared to traditional methods.
Additionally, the transparent and durable nature of the resin ensures that the repaired area blends seamlessly with the rest of the windshield, leaving no visible signs of repair. Using a UV light to repair a gouge in your windshield is a simple and effective method that can save you time and money. With the right tools and instructions, you can easily fix small chips and gouges in your windshield, restoring its integrity and preventing further damage.
So next time you find a gouge in your windshield, consider using a UV light for a quick and efficient repair.
Welcome back to our blog series on video editing techniques! In our previous sections, we have covered the basics of video editing, including the importance of storytelling and the essential tools and techniques. Now, it’s time to delve into Section Four: Smoothing and Polishing. Just like a sculptor who meticulously refines their masterpiece, a video editor also needs to take the necessary steps to ensure a polished final product.
In this section, we will explore the various methods and tricks that can help you achieve a professional finish to your videos. Think of this section as your toolbox for refining your video editing skills. We will discuss techniques such as color correction and grading, audio cleanup, and removing unwanted elements from your footage.
These techniques are the final touch that can take your videos from good to great. Have you ever watched a movie or a TV show and wondered how they achieved that smooth and polished look? Well, in Section Four, we will unlock the secrets behind those captivating visuals. From enhancing colors to creating a consistent look across all your footage, you’ll learn how to make your videos visually stunning.
But it’s not just about the visuals; we’ll also dive into the world of audio. Clear and crisp audio is crucial for creating an immersive viewing experience. We’ll show you how to remove background noise, level audio levels, and add effects to enhance the overall sound quality.
So, whether you’re creating videos for personal use or want to take your video editing skills to the next level, Section Four: Smoothing and Polishing is a must-read. Get ready to transform your videos into masterpieces that will captivate your audience. Are you ready to polish your editing skills? Let’s dive in!
Removing excess resin or epoxy
If you have a gouge in your windshield, don’t fret! There is a simple solution to repair it. One method involves removing excess resin or epoxy from the damaged area. To do this, you will need a razor blade or a sharp knife.
Gently scrape away the excess resin or epoxy from the surface of the windshield. Be careful not to scratch the glass. Once you have removed the excess material, use a mild glass cleaner and a clean cloth to clean the area.
This will ensure that the repaired section is clean and ready for further repairs or treatments if necessary. Remember, it’s important to address any damage to your windshield promptly to avoid further complications.
Smoothing the repaired area
Now that you’ve successfully repaired the gouge in your windshield, it’s time to give it a smooth finish. Smoothing the repaired area is an important step to ensure that the repaired spot doesn’t stand out and is less likely to catch the light, which can be distracting and potentially impair your vision. Start by gently sanding the repaired area with a fine-grit sandpaper.
This will help to blend the repaired spot with the surrounding glass. Next, use a windshield polish and a soft cloth to buff the area in circular motions. This will help to remove any remaining imperfections and give the repaired area a glossy finish.
Lastly, clean the entire windshield with a glass cleaner to ensure a clear and streak-free result. By following these steps, you’ll have your windshield looking as good as new in no time.
Polishing the windshield for a seamless finish
Is your windshield sporting a nasty gouge or chip? Don’t worry; you can easily repair it yourself and save some money! First, you’ll need to assess the damage and determine if it’s repairable. If the gouge is less than an inch in diameter and doesn’t extend to the outer edge of the glass, chances are you can fix it without needing a full windshield replacement. To start, clean the area around the gouge with a mixture of mild soap and water.
Next, use a glass repair kit that includes a resin and applicator to fill in the gouge. Following the instructions on the kit, apply the resin and carefully smooth it over the damaged area. After allowing it to dry, use a razor blade to scrape away any excess resin.
Finally, polish the windshield with a glass cleaner to restore its clarity. With a bit of patience and the right tools, you can make that annoying gouge disappear and enjoy a seamless finish.
Are you nearing the end of a project or assignment and feeling overwhelmed with the final steps? Do you need some guidance on how to wrap things up and ensure success? Section Five: Final Steps and Tips is here to help! In this blog post, we will provide you with valuable insights and practical advice on how to navigate the last phase of your project like a pro. Think of this section as your personal roadmap to success, where we will outline key tips and strategies to help you tie up loose ends, avoid common pitfalls, and achieve your desired outcome. So grab your notebook and pen, because we’re about to embark on the final leg of this journey together!
Removing the tape and cleaning the windshield
If you’ve ever had a gouge or scratch on your windshield, you know how distracting and unsightly it can be. Thankfully, repairing a gouge in your windshield is not as difficult as it may seem. The first step is to remove any tape or adhesive that may be covering the area.
This can be done by gently peeling back the tape and using a clean cloth to wipe away any residue. Once the tape is removed, you’ll want to clean the windshield thoroughly to ensure the repair adhesive adheres properly. Using a glass cleaner and a clean cloth, wipe down the entire windshield, paying special attention to the affected area.
Once the windshield is clean, you can move on to the repair process.
Inspecting the repair for any imperfections
So you’ve discovered a pesky gouge in your windshield, and it’s driving you crazy. You may be wondering how to repair it yourself, save some money, and avoid the hassle of taking it to a professional. Well, the good news is that small gouges in windshields can often be repaired at home with a few simple tools.
The first step is to thoroughly clean the area around the gouge to ensure a proper bond with the repair material. Next, you’ll want to apply a clear resin or windshield repair kit to the gouge, making sure to fill it completely. Once the repair material is in place, you’ll need to use a curing light or UV lamp to harden it.
This process may take a few minutes, so be patient. After the repair material has hardened, you’ll want to inspect it for any imperfections. If you notice any small bubbles or unevenness, you can use a razor blade or a fine-grit sandpaper to carefully smooth them out.
Finally, give your windshield a good cleaning and your repair job should be complete. Just remember, while DIY repairs can save you money, they may not always be as reliable or long-lasting as professional repairs. If you’re unsure about tackling the repair yourself, it’s always best to consult with a professional.
Additional tips and tricks for successful repair
So, you’ve got a nasty gouge in your windshield. Don’t panic! There are a few tips and tricks you can try to repair it successfully. First, you’ll want to assess the damage.
If the gouge is relatively small and shallow, you may be able to fix it yourself with a windshield repair kit. These kits usually come with a resin that you can apply to the damaged area to fill in the gouge and restore the integrity of the glass. Just make sure to carefully follow the instructions provided with the kit to ensure the best results.
However, if the gouge is deep or extends to the edges of the windshield, it’s best to leave the repair to the professionals. They have the tools and expertise to properly repair or replace your windshield, ensuring your safety on the road. Remember, a well-maintained windshield is essential for clear visibility and protection while driving.
Welcome to our blog post on restoring the integrity of your windshield! Your windshield is not just a piece of glass that protects you from the elements while driving. It is an essential part of your vehicle’s safety system, providing structural support and preventing the roof from collapsing in the event of a rollover accident. Therefore, it is vital to ensure that your windshield is in optimal condition at all times.
But what happens when your windshield gets chipped or cracked? Should you ignore it and hope for the best, or should you take immediate action? Well, the answer is quite simple – you should never ignore a damaged windshield. Even the smallest chip or crack can compromise your safety on the road and lead to further damage if left untreated. Imagine your windshield as a protective barrier between you and the outside world.
Just like a coat of armor, it shields you from flying debris, harsh weather conditions, and even potential burglars. But what happens when this armor is weakened? It becomes less effective and can fail to provide the protection you need. This is why restoring the integrity of your windshield should be a top priority.
Restoring the integrity of your windshield is not just about cosmetic improvements. It is about restoring the strength and stability of the glass, ensuring that it can withstand the impact and stress it may face on the road. A timely repair or replacement can prevent further damage, save you from costly repairs in the future, and most importantly, keep you and your loved ones safe.
In this blog post, we will explore the different methods of restoring the integrity of your windshield, from small chip repairs to complete windshield replacements. We will discuss the signs of a compromised windshield, the importance of seeking professional help, and the benefits of restoring your windshield’s integrity. So, if you have noticed a chip or crack in your windshield or simply want to learn more about how to maintain the structural integrity of this crucial component of your vehicle, keep reading.
We are here to guide you through the process, answer your questions, and help you make informed decisions to ensure your safety on the road. Your windshield deserves the best care, and we are here to provide it. Let’s get started!
Why repairing gouges in windshields is worth it
Have you ever noticed a gouge or chip in your windshield and wondered if it’s really worth repairing? Well, let me tell you, it definitely is! Repairing gouges in windshields is not only worth it, but it’s also essential for the safety of yourself and your passengers. Gouges can compromise the structural integrity of your windshield, making it more susceptible to cracks and shattering. By repairing these gouges, you can prevent further damage and ensure that your windshield remains strong and stable.
Plus, repairing gouges is often much cheaper than replacing the entire windshield. So, if you spot a gouge in your windshield, don’t ignore it! Instead, take the time to have it repaired by a professional. Your safety is worth it!
Enjoying a clear and safe driving experience
When it comes to driving, having a clear and safe experience is essential. However, accidents happen, and sometimes your windshield can get gouged or damaged. So, what can you do to repair a gouge in your windshield? Well, the good news is that there are a few options available to you.
One option is to use a windshield repair kit, which typically includes a resin that can be applied to the gouge. This resin helps to fill in the gap and minimize the appearance of the damage. Another option is to contact a professional windshield repair service.
These professionals have the tools and expertise to fix the gouge in your windshield effectively. They may use methods such as injecting resin into the gouges or even replacing the entire windshield if necessary. Ultimately, the best solution will depend on the severity of the damage and your budget.
Regardless of the method you choose, it’s important to prioritize repairing the gouge to ensure your safety on the road. So, don’t wait! Address the issue as soon as possible to enjoy a clear and safe driving experience once again.
Conclusion
So, there you have it – the ultimate guide on how to repair a gouge in your windshield. By following these steps and armed with a little bit of patience and determination, you can save yourself time and money by addressing this pesky problem yourself. Remember, though, that if the damage is too extensive or if you’re not confident in your DIY skills, it’s always best to leave it to the professionals.
After all, a well-repaired windshield is not just a clear view of the road ahead, but also a reflection of your resourcefulness and ingenuity. So go forth and conquer those windshield gouges, and may all your roads be smooth and free of blemishes!”
FAQs
How can I repair a gouge in my windshield?
To repair a gouge in your windshield, you can use a windshield repair kit. These kits typically include a resin that you can use to fill in the gouge and a tool to apply it. Follow the instructions provided with the kit to properly repair the gouge in your windshield.
Can I repair a gouge in my windshield myself, or do I need to take it to a professional?
You can repair a gouge in your windshield yourself using a windshield repair kit. However, if the gouge is deep or extends through multiple layers of glass, it may be best to take it to a professional for repair to ensure proper restoration of the windshield’s integrity.
Is it possible to prevent gouges in windshields?
While it is not always possible to prevent gouges in windshields, there are a few measures you can take to minimize the risk. Avoid following closely behind vehicles that may kick up stones or debris, use caution when parking near construction sites or areas with loose gravel, and regularly inspect your windshield for any signs of damage or wear.
What are the risks of driving with a gouged windshield?
Driving with a gouged windshield can pose several risks. The damage may compromise the structural integrity of the windshield, making it more susceptible to further cracks or shattering upon impact. Additionally, a gouge can impair your visibility, especially when sunlight or headlights reflect off the damaged area.
How much does it typically cost to repair a gouge in a windshield?
The cost of repairing a gouge in a windshield can vary depending on the extent of the damage and the type of repair required. On average, it can range from $50 to $200. However, certain advanced repairs or extensive damage may cost more, so it is best to consult with a professional for an accurate estimate.
Will my car insurance cover the cost of repairing a gouge in my windshield?
In many cases, car insurance policies cover windshield repairs, including gouge repairs. However, it is important to check the specifics of your policy to understand whether you have windshield coverage and whether any deductibles or limitations apply.
How long does it take to repair a gouge in a windshield?
The time it takes to repair a gouge in a windshield can vary depending on the size and depth of the gouge, as well as the specific repair method used. Typically, it can take anywhere from 30 minutes to a few hours. However, for extensive damage or if multiple layers of glass are affected, the repair process may take longer.