
Do you have a rock chip on your windshield that’s driving you crazy? You’re not alone. Rock chips are a common annoyance for many drivers and can be a real eyesore. But fear not, because repairing a rock chip on your windshield is easier than you might think.
In this blog post, I’ll walk you through the steps to fix that chip and restore your windshield to its former glory. So, grab your tools and let’s get started on giving your windshield the attention it deserves.
Table of Contents
Introduction
Have you ever been driving down the road, minding your own business, only to hear a loud thud and see a rock chip on your windshield? It’s a frustrating situation, but luckily, repairing a rock chip on your windshield is a fairly simple process that you can do yourself. The first step is to clean the area around the chip with glass cleaner and a soft cloth. This will remove any dirt or debris that could interfere with the repair process.
Next, you’ll want to take a windshield repair kit, which typically includes a special resin and applicator, and carefully follow the instructions on how to use it. Essentially, you’ll be injecting the resin into the chip, allowing it to fill the crack and bond with the glass. After the resin has hardened, you can use a razor blade to scrape off any excess and then polish the area to give it a smooth finish.
And that’s it! With a little time and effort, you can have your windshield looking as good as new. So, the next time you find yourself with a rock chip, don’t panic – repair it yourself and save some money in the process.
What is a rock chip?
rock chip, damage, windshield, crack, repair, impact, vehicle Rock chips are a common occurrence on the road. Whether you’re driving on the highway or cruising through a residential neighborhood, it’s inevitable that at some point, a small stone or pebble will be kicked up and hit your windshield. This can result in what is commonly known as a “rock chip,” which is a small area of damage that occurs on the surface of the glass.
Rock chips can vary in size and severity, ranging from a tiny crack or ding to a larger, more noticeable chip. While some rock chips may seem minor, they can actually pose a serious threat to the overall integrity of your windshield. If not addressed promptly, a rock chip can quickly turn into a larger crack that can compromise the strength and safety of your vehicle.
However, the good news is that rock chips can often be repaired, saving you the cost and inconvenience of having to replace your entire windshield.
Why is it important to repair a rock chip?
rock chip repair, importance of rock chip repair
Assessing the Damage
So you’re driving down the road and suddenly you hear that dreaded *ping*. A rock has just hit your windshield and left behind a nasty chip. While it may be tempting to ignore it, leaving a chip in your windshield unrepaired can lead to bigger problems down the road.
Not only does it affect the aesthetic appeal of your car, but it can also compromise the structural integrity of the windshield. So, what can you do to repair that rock chip? Well, the good news is that there are a few options available to you. One option is to use a DIY windshield repair kit.
These kits typically come with a resin and a specialized tool that allows you to fill in the chip and prevent it from spreading. Another option is to take your car to a professional windshield repair shop. They have the expertise and equipment to repair the chip effectively and ensure a seamless finish.
However, if the chip is too large or has caused significant damage to the windshield, you may need to consider getting the entire windshield replaced. Overall, the key is to address a rock chip as soon as possible to prevent further damage and ensure your safety on the road.
Inspecting the chip
chip inspection Inspecting the chip is a crucial step in assessing any damage. It’s like giving it a thorough check-up to understand what’s going on inside. Just like a doctor examining a patient, we need to examine every nook and cranny of the chip to identify any potential issues.
This process involves using various tools and techniques to ensure a comprehensive evaluation. We need to look for any physical damage, such as cracks or breakages, as well as any signs of wear and tear. Additionally, we need to test its functionality and performance to see if it’s working up to par.
By inspecting the chip, we can gather valuable information that will help us determine the extent of the damage and come up with a suitable plan for repair or replacement. It’s a crucial step in the process that ensures we have all the necessary information to make informed decisions.
Measuring the size of the chip
chip size, assessing damage
Materials Needed
Repairing a rock chip on your windshield is a relatively simple process that can be done at home with the right tools and materials. The first step is to gather the necessary materials, which include a windshield repair kit, a razor blade or utility knife, a drill with a small drill bit, rubbing alcohol or glass cleaner, and a clean, lint-free cloth. These items are essential for properly cleaning and filling the chip to prevent further damage.
It’s important to have everything on hand before starting the repair to ensure a smooth and efficient process. With these materials in hand, you’ll be ready to tackle the task of repairing your rock chip and restoring the integrity of your windshield.
Windshield repair kit
windshield repair kit When it comes to fixing small chips or cracks in your car’s windshield, a windshield repair kit is a handy tool to have. This kit typically includes a resin that is specially formulated to bond with the glass, as well as other materials needed for the repair process. One of the key materials you will need is a bridge or injector device.
This is used to apply the resin into the chip or crack, ensuring a proper seal and preventing further damage. Additionally, you will need a curing strip or film, which is placed over the resin after it is applied. This helps to cure and harden the resin, making it strong and durable.
Finally, make sure to have a polishing pad or cloth on hand to buff and smooth the repaired area, leaving it looking as good as new. With these materials, you’ll have everything you need for a successful windshield repair.
Safety goggles
safety goggles
Clean cloth
clean cloth
Razor blade
When it comes to shaving, having the right tools is essential for achieving a clean and comfortable shave. One essential tool that no shaving routine can do without is a razor blade. But what exactly is a razor blade and what materials are needed to make one? A razor blade is a small, flat piece of metal that is sharp on one side and used for shaving.
The blade is typically made from stainless steel, which is known for its durability and rust resistance. Stainless steel is chosen for razor blades because it is strong enough to maintain its sharpness for multiple uses, but also flexible enough to prevent it from snapping or breaking. This ensures a smooth and safe shaving experience.
To create a razor blade, several materials are needed. First and foremost is the stainless steel sheet, which is carefully selected for its quality and thickness. The steel sheet is then cut into the desired shape and size using a precision machine.
The next step is to grind and sharpen the blade edge to create a sharp and smooth surface. This is done using high-quality grinding wheels that remove any rough edges and hone the blade to a fine point. After the blade has been sharpened, it is coated with a protective layer, such as a thin layer of platinum or diamond-like carbon, to enhance its durability and prevent corrosion.
In addition to the stainless steel, other materials are also required to construct a razor blade. These include a plastic or metal handle to hold the blade, as well as a mechanism for attaching and detaching the blade from the handle. Some razor blades also feature a lubricating strip, which contains ingredients like aloe vera or vitamin E to help moisturize the skin during shaving.
Overall, a razor blade is a simple yet crucial tool for achieving a smooth and comfortable shave. Its construction involves the careful selection and shaping of stainless steel, as well as the addition of other materials to enhance its performance. So the next time you reach for your razor, take a moment to appreciate the materials and craftsmanship that go into creating that perfect shave.
Step-by-Step Guide
If you notice a rock chip on your car’s windshield, it’s important to take action quickly to prevent further damage. Repairing a rock chip is something you can do on your own, and it’s a relatively simple process. Here’s a step-by-step guide on how to repair a rock chip on your windshield.
First, gather the necessary supplies. You’ll need a windshield repair kit, which typically includes a resin, a syringe, adhesive strips, and a curing film. You can find these kits at most automotive supply stores or online.
Next, clean the area around the rock chip. Use a mild detergent and water solution to remove any dirt or debris. Make sure the area is completely dry before proceeding.
Now, take the adhesive strips and apply them around the rock chip. These strips will help hold the resin in place during the repair process. Next, carefully fill the syringe with the resin from the windshield repair kit.
Insert the syringe into the hole of the rock chip and slowly inject the resin. Be careful not to overfill it. Once the resin is injected, place the curing film over the repaired area.
This film will help the resin cure and harden. Now, move your car into direct sunlight or use a UV lamp to accelerate the curing process. Let the resin cure for about 15 to 30 minutes, or as directed by the manufacturer.
Cleaning the chip and surrounding area
cleaning the chip
Applying a resin to the chip
Applying a resin to the chip requires some careful steps, but it’s not as complicated as it sounds. Let’s break it down into a step-by-step guide to make it easier for you. First, you’ll need to gather your materials.
Make sure you have the resin itself, a mixing container, a mixing stick, and a brush. It’s also a good idea to have some gloves and safety glasses to protect yourself. Next, clean the chip thoroughly to remove any dirt or debris.
You want a clean surface for the resin to adhere to. You can use a cleaning solution and a lint-free cloth for this step. Once the chip is clean, mix the resin according to the manufacturer’s instructions.
Be sure to follow the recommended mixing ratios and any specific instructions for the resin you’re using. After the resin is mixed, carefully apply it to the chip using the brush. Start at one end and work your way across, making sure to cover the entire surface evenly.
Take your time and be careful not to apply too much resin, as this can cause problems later on. Once the resin is applied, leave it to cure according to the manufacturer’s instructions. This usually involves allowing it to sit undisturbed for a specific amount of time.
Finally, check the chip to make sure the resin has dried properly. It should be hard and glossy to the touch. If there are any imperfections or areas where the resin didn’t adhere properly, you may need to repeat the process or make any necessary repairs.
Curing the resin with UV light
Curing resin with UV light is a crucial step in the 3D printing process. It involves using ultraviolet light to harden and solidify the resin material, transforming it from a liquid to a solid state. This step ensures that the printed object retains its shape and structure.
In this step-by-step guide, we’ll walk you through the process of curing resin with UV light. Step 1: Prepare the curing area Start by setting up a dedicated area for the curing process. It should be well-ventilated and free from direct sunlight.
You can use a curing chamber or a UV curing box specifically designed for this purpose. Make sure the area is clean and free from any contaminants that can affect the quality of the cured resin. Step 2: Position the printed object Carefully place the printed object in the curing chamber.
Make sure it is positioned in a way that allows the UV light to reach all parts of the object evenly. If necessary, use supports or fixtures to hold the object in place and ensure it doesn’t move during the curing process. Step 3: Set the curing time Refer to the manufacturer’s instructions or the resin’s specifications to determine the optimal curing time.
This can vary depending on the resin type and thickness of the printed object. It is important not to over-cure or under-cure the resin, as this can affect the final strength and durability of the printed object. Step 4: Activate the UV light source Turn on the UV light source and make sure it is properly positioned to cover the entire printed object.
Some curing chambers or UV curing boxes come with built-in UV lights, while others require separate UV light sources. Ensure that the UV light source emits the appropriate wavelength for curing the specific resin you are using. Step 5: Monitor the curing process Keep a close eye on the curing process as it progresses.
Scraping off excess resin
Scraping off excess resin is an essential step in the resin art process. Once you have poured the resin onto your artwork and it has cured, you may notice that there are some uneven or drippy areas. These excess resin parts can take away from the overall appearance of your piece, so it’s important to remove them.
The first thing you’ll need is a scraper tool. This can be a plastic card, a putty knife, or even an old credit card. Gently slide the scraper across the surface of your artwork, applying light pressure.
Be careful not to scratch the resin or the surface underneath. As you scrape, you’ll notice the excess resin peeling off, revealing the smooth, glossy finish of your artwork. It’s like getting rid of the rough edges to unveil the true beauty within.
Repeat this process until all the excess resin has been removed, and voila! Your artwork is now ready to be admired.
Polishing the repaired area
“repairs to damaged car paint” So you’ve successfully repaired the damaged area of your car’s paintwork, and now it’s time to give it that finishing touch to make it shine like new again. In this step-by-step guide, we’ll go through the process of polishing the repaired area to achieve a seamless finish. First, gather all the supplies you’ll need for the job.
You’ll need a high-quality automotive polish, a soft microfiber cloth, and a foam or microfiber applicator pad. Make sure to choose a polish specifically designed for automotive use, as it will be gentle on your car’s paintwork. Next, clean the repaired area with a mild car wash soap and water.
This will remove any dirt, grime, or wax residue that may be on the surface. Dry the area thoroughly with a clean microfiber cloth. Apply a small amount of polish to the applicator pad.
Work the polish into the repaired area using circular motions. Apply light pressure and take your time to ensure that the polish is evenly distributed. Continue polishing the area until the repaired paint blends in seamlessly with the surrounding paintwork.
This may take a few minutes of gentle rubbing. Avoid applying too much pressure, as this can damage the paint. Once you’re satisfied with the results, use a clean microfiber cloth to buff away any excess polish.
This will reveal the smooth, glossy finish of your repaired paintwork. Finally, step back and admire your work. The repaired area should now be virtually indistinguishable from the rest of the car’s paint.
Preventing Further Damage
If you’ve ever had a rock chip on your windshield, you know how frustrating it can be. Not only does it obstruct your view, but it can also lead to further damage if left untreated. The good news is that repairing a rock chip is not as difficult as it may seem.
One way to fix a rock chip on your windshield is to use a DIY windshield repair kit. These kits are readily available and come with all the necessary tools and materials you need to repair the chip yourself. They typically include a resin that you apply to the chip, a suction cup device to create pressure and vacuum, and a curing adhesive to harden the resin.
With the right tools and a little patience, you can repair the rock chip and prevent it from spreading into a larger crack.
Avoiding extreme temperature changes
preventing further damage, extreme temperature changes
Driving cautiously on rough roads
One of the challenges of driving on rough roads is the potential damage it can cause to your vehicle. However, there are steps you can take to prevent further damage and keep your car in good condition. First, it’s important to drive cautiously and avoid rough patches whenever possible.
Slow down and take your time navigating through uneven terrain to reduce the impact on your vehicle. Additionally, maintaining proper tire pressure is crucial, as underinflated tires can make the ride even bumpier and increase the risk of damage. Regularly inspecting your vehicle for signs of wear and tear, such as loose bolts or damaged suspension components, is also essential.
By taking these precautions, you can minimize the risk of rough roads causing further damage to your car.
Avoiding pressure on the windshield
One common mistake people make when it comes to their windshields is putting unnecessary pressure on them. Whether it’s leaning on the glass or using excessive force when cleaning, this can actually lead to further damage. To prevent this, it’s important to be mindful of your actions and handle your windshield with care.
Instead of leaning on the glass, use the door frame or roof for support. When cleaning, avoid using abrasive materials or applying too much pressure. Opt for a soft cloth and gentle, circular motions.
By taking these simple precautions, you can avoid putting unnecessary pressure on your windshield and prevent further damage.
Conclusion
So there you have it, a guide on how to repair a rock chip on your windshield. Just remember, when it comes to fixing a chip, time is of the essence, just like in a 90s rom-com. So don’t procrastinate, tackle that chip head-on and show it who’s boss.
And remember, it’s not just about fixing your windshield, it’s about restoring your relationship with the road. Because let’s face it, driving with a chip is like going on a blind date with a pirate – it’s risky business. So gather your tools, channel your inner MacGyver, and embark on this windshield repair adventure.
Trust me, you’ll be feeling like a rockstar once you’ve successfully sealed the deal. And who knows, maybe that chip will even become a funny story you can share at parties. Happy repairing!”
Importance of timely repair
timely repair, preventing further damage, importance of repair, repair services In any aspect of life, it’s essential to address issues in a timely manner, whether it’s a leaky faucet or a malfunctioning car engine. The same principle applies to the maintenance and repair of our homes and properties. It’s crucial to tackle repairs promptly to prevent further damage from occurring.
Ignoring repairs or procrastinating them can lead to more extensive and costly issues down the line. Just like a small leak in a roof can eventually lead to water damage and mold growth, a minor problem with a electrical wiring can escalate into a dangerous fire hazard. By addressing repairs promptly, we can nip potential problems in the bud and prevent them from spiraling out of control.
Not only does this save us money in the long run, but it also ensures the safety and well-being of ourselves and our loved ones. So next time you notice a problem, don’t put it off—call in the repair services and take care of it before it becomes a bigger headache.
Maintaining the condition of your windshield
windshield, maintaining the condition, preventing further damage
FAQs
What causes rock chips on windshields?
Rock chips on windshields are typically caused by small stones or debris that hit the glass while driving.
Can a rock chip on a windshield be repaired?
Yes, rock chips on windshields can often be repaired using resin and a windshield repair kit.
How long does it take to repair a rock chip on a windshield?
The time it takes to repair a rock chip on a windshield can vary, but most repairs can be completed in under an hour.
Can I repair a rock chip on my windshield myself, or should I hire a professional?
While it is possible to repair a rock chip on your windshield yourself using a repair kit, it is often best to hire a professional for the job to ensure it is done correctly.
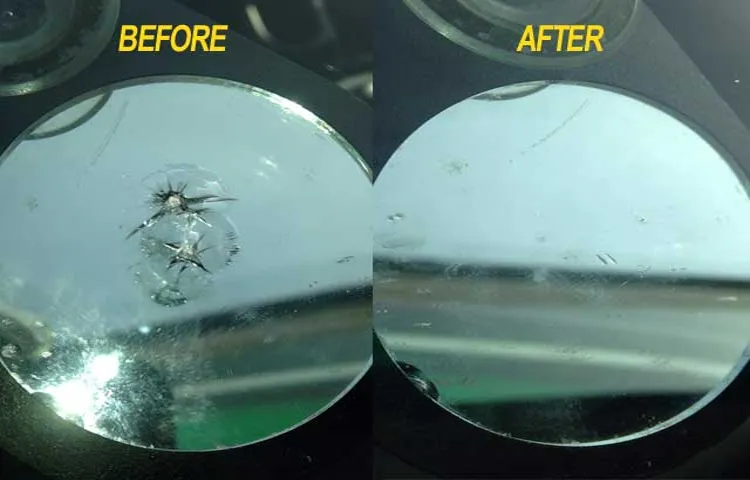
Will repairing a rock chip on my windshield make it disappear completely?
While a properly repaired rock chip should be less visible, it is unlikely to completely disappear. However, it should prevent the chip from spreading and causing further damage.
Will repairing a rock chip on my windshield affect its strength or integrity?
When done properly, repairing a rock chip should not affect the strength or integrity of the windshield. In fact, it can help prevent further damage and extend the lifespan of the glass.
How much does it typically cost to repair a rock chip on a windshield?
The cost of repairing a rock chip on a windshield can vary depending on factors such as the size and location of the chip, but it is generally more affordable than replacing the entire windshield.